
Stuffed Mushroom Eyeballs are not just a dish; they’re an experience waiting to happen, a culinary delight that cleverly blends gourmet taste with a playful, spooky aesthetic. Are you ready to elevate your appetizer game from simply delicious to delightfully daring this season? I am thrilled to guide you through creating these surprisingly elegant, yet wonderfully whimsical, treats that are guaranteed to capture everyone’s attention. While perhaps not found in ancient cookbooks or steeped in centuries of tradition, the joy of crafting visually intriguing edibles has certainly become a cherished part of modern festive celebrations, especially during Halloween. This recipe taps into that playful spirit, offering a sophisticated twist on spooky party food that guests of all ages will adore.
Beyond their undeniably striking appearance, these little morsels are an absolute triumph of flavor and texture. Imagine the earthy tenderness of perfectly roasted mushroom caps, generously filled with a rich, savory mixture bursting with creamy cheeses, aromatic herbs, and just the right amount of seasoning. They are surprisingly simple to prepare, making them an ideal choice for busy hosts who still want to serve something truly memorable. Everyone will adore the irresistible combination of savory flavors and the fun, imaginative presentation. Whether you’re hosting a ghoulish gathering or simply craving a fun, thematic snack, these Stuffed Mushroom Eyeballs promise to be a monstrously good hit at any occasion. I can’t wait for you to try them!

Ingredients:
- 24 large white button mushrooms or Cremini mushrooms (about 2-2.5 inches in diameter), ensuring they have good, sturdy caps for stuffing.
- 8 ounces cream cheese, softened to room temperature – this is crucial for a smooth, easy-to-mix filling for your Stuffed Mushroom Eyeballs.
- ½ cup fresh breadcrumbs (Panko works wonderfully for a light texture, or you can make your own from day-old bread for an even fresher flavor profile).
- ¼ cup grated Parmesan cheese, plus an additional 2 tablespoons for topping.
- 2 tablespoons finely chopped fresh parsley, divided (we’ll use some for the filling and a little for garnish).
- 1 tablespoon olive oil, for sautéing and brushing.
- 1 small shallot, finely minced (or ¼ small yellow onion, finely minced), for a delicate aromatic base.
- 2 cloves garlic, minced – because garlic makes everything better, especially savory fillings!
- 1 teaspoon Worcestershire sauce, for a depth of umami flavor that really elevates the filling.
- ½ teaspoon dried thyme, or 1 ½ teaspoons fresh thyme, finely chopped.
- ¼ teaspoon salt, or to taste – remember, you can always add more, but you can’t take it away!
- ⅛ teaspoon black pepper, freshly ground for the best flavor.
- 1 large egg yolk, lightly beaten – this acts as a fantastic binder, helping our filling hold its “eyeball” shape beautifully.
- For the “Irises”: 12 small pimento-stuffed green olives, halved crosswise, or 12 small black olives (Kalamata or similar), halved. We need 24 halves in total for our creepy Stuffed Mushroom Eyeballs.
- For the “Pupils”: 24 tiny pieces of black olive, capers, or even tiny dots of black food gel, carefully cut or placed to create that piercing gaze.
- For the “Bloodshot Veins” (optional but highly recommended for maximum creepiness):
- 1 tablespoon cream cheese, softened.
- A tiny drop of red food coloring (gel food coloring works best for vibrant results).
- A toothpick or very fine brush for application.
Preparing Your Frightful Fungi
Let’s get started on creating these wonderfully spooky Stuffed Mushroom Eyeballs! The first step is all about preparing our mushroom canvases. You want to pick mushrooms that are relatively uniform in size, making for a more consistent and appealing presentation. Aim for caps that are intact and firm, as they’ll need to hold their shape during stuffing and baking.
- Clean the Mushrooms: Gently wipe each mushroom cap with a damp paper towel to remove any dirt or debris. Avoid rinsing them under water, as mushrooms are like sponges and will absorb too much moisture, which can make them soggy and prevent them from browning nicely. We want perfectly roasted Stuffed Mushroom Eyeballs, not waterlogged ones!
- Remove the Stems: Carefully twist and pull the stems from the mushroom caps. It’s important to be gentle here; we want to keep the caps perfectly intact, as these will form the white of our “eyeballs.” If a stem breaks off and leaves a bit of the cap attached, don’t worry too much, but try for a clean separation. Place the caps cavity-side up on a clean surface.
- Chop the Stems: Finely chop about three-quarters of the mushroom stems. We’re going to incorporate these into our savory filling to boost the mushroom flavor and ensure nothing goes to waste. Discard any woody or particularly tough parts of the stems. If you have extra stems, you can save them for another dish, like a soup or omelet, or simply discard them.
- Lightly Scoop (Optional but Recommended): For larger mushrooms, you might want to very gently use a small spoon or melon baller to scoop out a tiny bit of the inner gills from the caps. Be extremely careful not to break through the cap! This step isn’t strictly necessary but creates a slightly larger cavity for our delicious filling, ensuring a generous and satisfying bite of your Stuffed Mushroom Eyeballs.
- Prepare for Baking: Preheat your oven to 375°F (190°C). Lightly grease a baking sheet or line it with parchment paper for easy cleanup. Arrange the prepared mushroom caps, cavity-side up, on the baking sheet. A little spritz of cooking spray or a light brush of olive oil on the caps can help them achieve a lovely golden hue during baking.
Crafting the Creepy Filling
Now, let’s turn our attention to the heart of our Stuffed Mushroom Eyeballs – the deliciously savory and perfectly seasoned filling. This is where all the wonderful flavors come together, creating a beautiful contrast with the earthy mushroom. The key here is to build layers of flavor that will make these appetizers irresistible, even with their eerie appearance.
- Sauté the Aromatics: Heat the 1 tablespoon of olive oil in a medium skillet over medium heat. Add the finely chopped mushroom stems and minced shallot (or onion). Sauté for 5-7 minutes, stirring occasionally, until they are softened and lightly golden. The moisture from the mushrooms will release and then evaporate, intensifying their flavor.
- Add the Garlic: Stir in the minced garlic and cook for another minute until fragrant. Be careful not to burn the garlic, as burnt garlic can impart a bitter taste to your filling, which we definitely want to avoid in our perfect Stuffed Mushroom Eyeballs.
- Cool the Mixture: Remove the skillet from the heat and allow the mushroom and shallot mixture to cool for a few minutes. It doesn’t need to be completely cold, but it shouldn’t be piping hot when you mix it with the cream cheese, as that can make the cream cheese too runny.
- Combine the Filling Ingredients: In a medium mixing bowl, combine the softened cream cheese, fresh breadcrumbs, ¼ cup Parmesan cheese, 1 tablespoon of the chopped fresh parsley, Worcestershire sauce, dried thyme, salt, and black pepper. Add the cooled mushroom-shallot-garlic mixture to the bowl.
- Add the Egg Yolk: Pour in the lightly beaten egg yolk. This is your secret weapon for a wonderfully cohesive filling that holds its shape beautifully.
- Mix Thoroughly: Using a spoon or your hands (which I find works best for really incorporating everything), mix all the ingredients until well combined. The mixture should be thick, pliable, and easily moldable. Don’t be shy about getting in there with your hands! You want every ingredient evenly distributed, ensuring every bite of your Stuffed Mushroom Eyeballs is bursting with flavor. Taste the mixture and adjust seasoning if necessary. Remember, the flavors will concentrate slightly during baking.
Stuffing and Shaping Your Staring Snacks
This is where the magic (or should I say, the macabre transformation!) happens. We’ll take our delicious filling and turn our mushroom caps into convincing and creepy Stuffed Mushroom Eyeballs. Presentation is key for this dish, so take your time with these steps to achieve the desired spooky effect.
- Stuff the Mushroom Caps: Take a small amount of the filling mixture (about 1 to 1 ½ tablespoons, depending on the size of your mushroom caps) and carefully mound it into the cavity of each mushroom cap. Don’t underfill, as we want substantial eyeballs, but don’t overfill either, or the filling might spill out during baking.
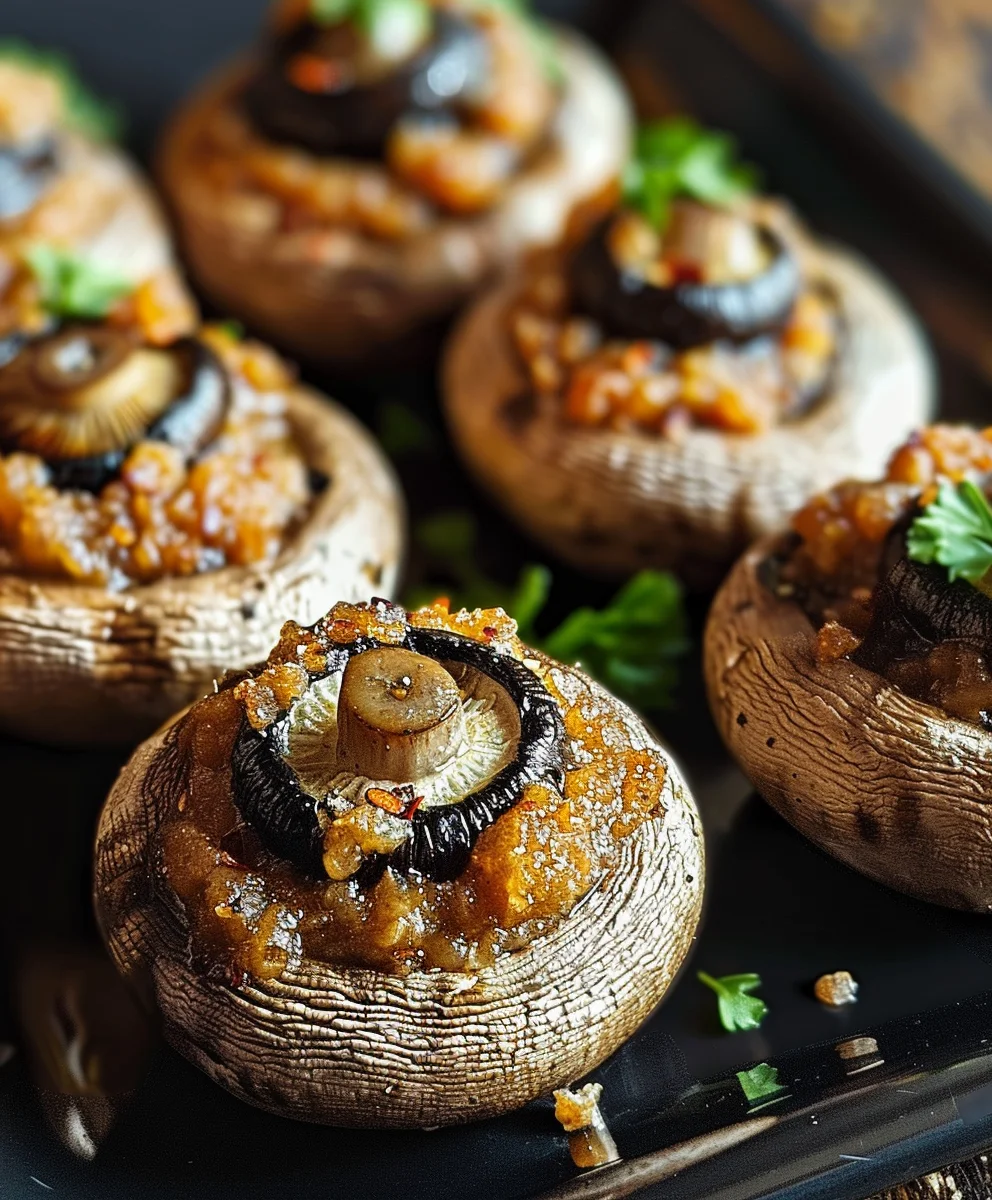
- Shape the “Eyeballs”: Gently pat and shape the filling into a rounded, dome-like mound that mimics the curve of an eyeball. You can use the back of a spoon or your fingers to achieve a smooth, spherical appearance. This domed shape is crucial for the realistic “eyeball” effect of your Stuffed Mushroom Eyeballs.
- Place the “Irises”: Take one of the halved olives (either pimento-stuffed green or black) and gently press it into the center of the rounded filling on each mushroom. This will be the “iris” of your eyeball. Make sure it’s snug but not pushed too deep into the filling.
- Add the “Pupils”: Carefully place a tiny piece of black olive or a caper right in the center of the “iris.” This creates the pupil. If using black food gel, a tiny dot with a toothpick will suffice. This small detail truly brings your Stuffed Mushroom Eyeballs to life (or rather, undeath!).
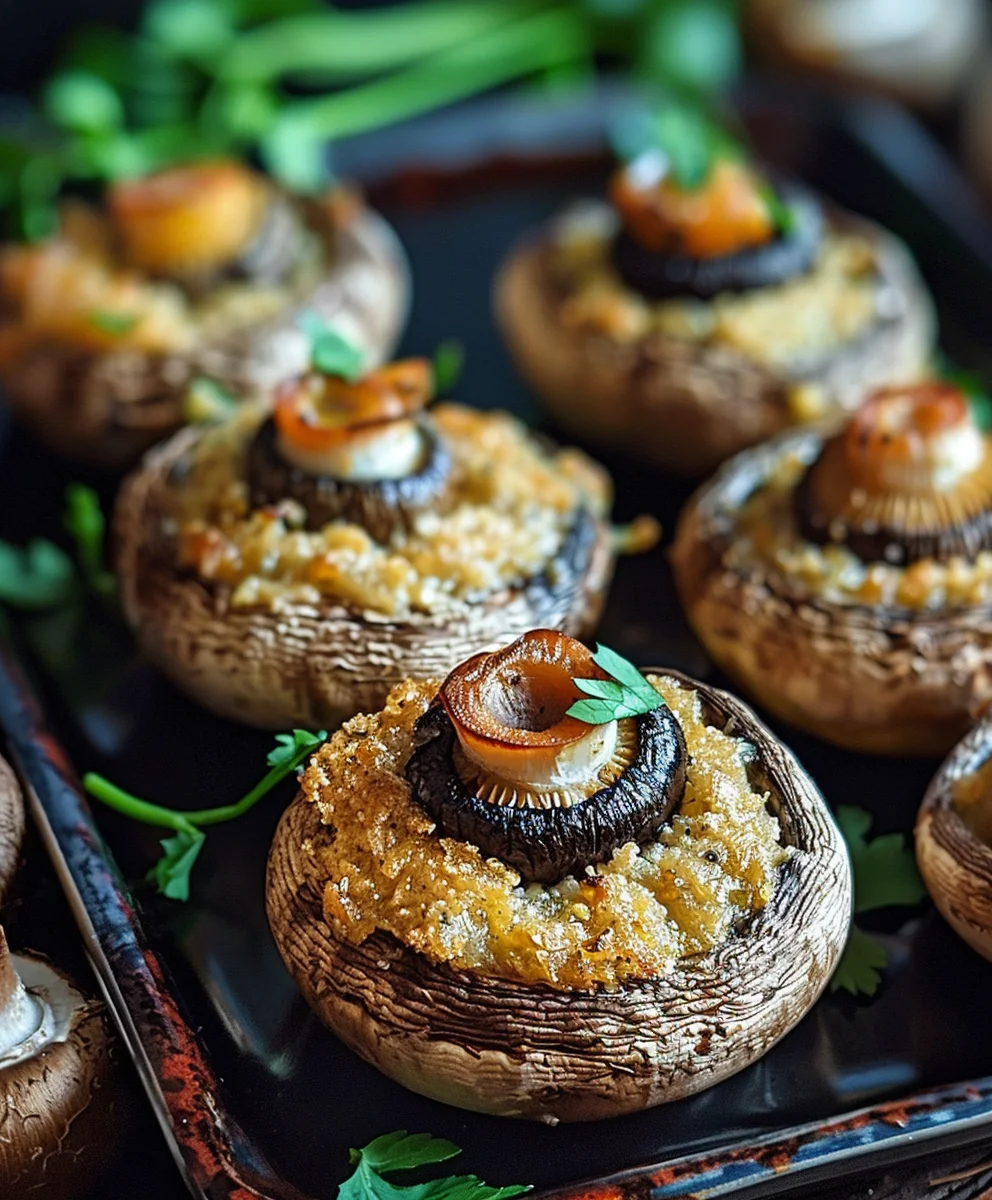
- Top with Parmesan: Lightly sprinkle the remaining 2 tablespoons of Parmesan cheese over the top of the stuffed mushrooms. This will give them a lovely golden crust and extra flavor.
- Arrange on Baking Sheet: Place the stuffed mushrooms back on your prepared baking sheet, ensuring there’s a little space between each one for even baking.
Baking Your Ocular Appetizers
Now that our ghastly gaze is assembled, it’s time to bake these beauties. The goal is to cook the mushrooms until tender, heat the filling through, and achieve a lovely golden-brown crust on top, making your Stuffed Mushroom Eyeballs not just creepy, but also incredibly delicious.
- Bake to Perfection: Bake the Stuffed Mushroom Eyeballs in the preheated oven for 20-25 minutes. The exact time will depend on the size of your mushrooms and your oven. You’re looking for the mushroom caps to be tender, the filling to be heated through and slightly puffed, and the Parmesan topping to be golden brown and bubbly.
- Check for Doneness: You can gently press on a mushroom cap to see if it’s tender, or insert a thin skewer into the filling to check if it’s hot. If the filling feels cold in the center, give them a few more minutes.
Final Touches and Presenting Your Ghastly Gaze
Once baked, your Stuffed Mushroom Eyeballs are almost ready for their grand reveal! This final step adds an extra layer of horrifying detail that will truly impress (and maybe slightly gross out) your guests.
- Cool Slightly: Carefully remove the baking sheet from the oven. Let the Stuffed Mushroom Eyeballs cool on the baking sheet for about 5 minutes before transferring them. They will be very hot and can be a bit delicate right out of the oven.
- Add the “Bloodshot Veins” (Optional but recommended for ultimate spookiness!): While the mushrooms are still warm, you can add the optional “bloodshot” effect. In a very small bowl, mix the 1 tablespoon of softened cream cheese with a tiny drop of red food coloring. You want a vibrant but somewhat muted red. Use a toothpick or a very fine artist’s brush to carefully draw thin, squiggly “veins” radiating out from the olive “iris” over the white of the mushroom cap. This detail truly takes your Stuffed Mushroom Eyeballs from fun to frightfully realistic! Don’t make the lines too thick; subtlety here enhances the creep factor.
- Garnish and Serve: Arrange your finished Stuffed Mushroom Eyeballs on a serving platter. Sprinkle with the remaining fresh parsley for a touch of green that contrasts beautifully with the eerie red veins and white caps. These are best served warm, allowing the creamy filling and tender mushrooms to shine. They make a fantastic centerpiece for any Halloween party or a fun, spooky appetizer for any gathering where you want to add a touch of playful horror. Enjoy watching your guests marvel (and perhaps shiver!) at your culinary creation!
Conclusion:
And there you have it, my friends! We’ve reached the delicious culmination of our culinary journey. I genuinely hope you’ve enjoyed exploring this recipe as much as I’ve enjoyed sharing it with you. This isn’t just another dish; it’s a guaranteed crowd-pleaser, a conversation starter, and an absolute triumph of flavor. What makes this recipe an absolute must-try, you ask? It’s the perfect harmony of textures – the tender, earthy mushroom caps, the rich, creamy filling, and that delightful hint of savory goodness in every single bite. It’s truly a testament to how simple ingredients, when combined with a little love and creativity, can produce something truly extraordinary. Imagine the delight on your guests’ faces as they bite into these flavorful morsels; they’re incredibly satisfying without being overly heavy, making them ideal for just about any gathering.
I find them to be particularly fantastic as an appetizer, a delightful preamble to any meal, whether it’s a casual weeknight dinner or a grand holiday feast. For a more relaxed setting, consider serving them alongside a vibrant green salad, perhaps with a light vinaigrette to cut through the richness. They also pair wonderfully with a crusty loaf of artisanal bread, perfect for mopping up any stray bits of that delectable filling. If you’re hosting a party, arrange them artfully on a platter, perhaps garnished with a sprinkle of fresh parsley or chives, and watch them disappear faster than you can say “delicious!” For a truly memorable spread, you could even offer them as part of a tapas-style meal, alongside other small bites and a selection of your favorite beverages.
Endless Possibilities for Customization
But the beauty of this recipe doesn’t stop at its core deliciousness; it’s also incredibly versatile, inviting you to put your own unique spin on it. Don’t be afraid to experiment with the filling! For a bit of heat, a pinch of red pepper flakes would be a fantastic addition. If you’re a fan of smoky flavors, a tablespoon or two of finely crumbled cooked bacon or even a touch of smoked paprika would elevate the experience beautifully. Vegetarian? No problem! Consider adding some finely chopped spinach or sun-dried tomatoes to the filling for an extra burst of flavor and color. For a different cheese profile, try swapping out the Parmesan for a sharp cheddar, a tangy goat cheese, or even a creamy Boursin for an entirely new dimension of taste. Imagine the delightful variations you could create: perhaps an Italian-inspired version with mozzarella and basil, or a more robust one with a touch of blue cheese for those who love a bold flavor. The possibilities are genuinely endless, and I encourage you to unleash your inner chef and get creative!
Share Your Culinary Adventures!
Now, it’s your turn. I wholeheartedly encourage you to roll up your sleeves, gather your ingredients, and give this recipe a try. I promise you won’t be disappointed. There’s something so incredibly rewarding about bringing a truly delicious dish to life in your own kitchen. And please, please, don’t keep your culinary triumphs to yourself! I would absolutely love to hear about your experience. Did you add a unique twist? Did your family rave about them? How did your Stuffed Mushroom Eyeballs turn out? Share your photos, your feedback, and any creative variations you come up with in the comments section below. Your insights and experiences inspire not only me but also our entire community of food lovers. Let’s celebrate the joy of cooking and sharing delicious food together. Happy cooking, and I can’t wait to see what amazing creations you whip up!
Stuffed Mushroom Eyeballs
These spooky Stuffed Mushroom Eyeballs are a culinary delight, blending gourmet taste with a playful, ghoulish aesthetic. A perfect, crowd-pleasing appetizer for Halloween or any festive gathering, combining tender mushrooms with a savory, cheesy filling.
Ingredients
-
16 large white or cremini mushrooms
-
8 oz cream cheese, softened
-
1/2 cup cooked ground beef (or crumbled beef bacon)
-
1/4 cup grated Parmesan cheese
-
1 clove garlic, minced
-
1 tablespoon fresh parsley, chopped
-
1/4 teaspoon salt
-
1/4 teaspoon black pepper
-
16 small olives, pitted (for “pupils”)
-
Cooking spray or olive oil (for greasing)
-
Optional: Tiny drop of red food coloring (for ‘bloodshot veins’)
Instructions
-
Step 1
Gently wipe mushrooms clean. Carefully remove and finely chop the stems. Preheat oven to 375°F (190°C). Lightly grease a baking sheet and arrange mushroom caps, cavity-side up. -
Step 2
In a skillet, cook the chopped mushroom stems and minced garlic over medium heat until softened (about 3-5 minutes). Remove from heat and let cool slightly. -
Step 3
In a medium bowl, combine the softened cream cheese, cooked ground beef (or crumbled beef bacon), grated Parmesan cheese, chopped fresh parsley, salt, black pepper, and the cooled mushroom-garlic mixture. Mix thoroughly until well combined. -
Step 4
Spoon about 1 to 1 ½ tablespoons of the filling into each mushroom cap, shaping it into a rounded, dome-like mound. Gently press one small pitted olive into the center of each filling dome. Lightly sprinkle the tops with Parmesan cheese. -
Step 5
Place the stuffed mushrooms on the prepared baking sheet. Bake in the preheated oven for 20-25 minutes, or until the mushroom caps are tender, the filling is heated through, and the topping is golden brown and bubbly. -
Step 6
Remove from oven and let cool for 5 minutes. For an optional ‘bloodshot veins’ effect, mix a tiny drop of red food coloring with a small amount of cream cheese (from the 8 oz total) and use a toothpick or fine brush to draw thin lines radiating from the olive. Garnish with remaining fresh parsley and serve warm.
Important Information
Nutrition Facts (Per Serving)
It is important to consider this information as approximate and not to use it as definitive health advice.
Allergy Information
Please check ingredients for potential allergens and consult a health professional if in doubt.
Leave a Comment