
Dive Into Homemade Dragon Rolls A Sushi Sensation that promises to transform your kitchen into a vibrant sushi bar. Have you ever gazed upon those exquisitely crafted, visually stunning Dragon Rolls at your favorite sushi restaurant and thought, “I wish I could make that at home?” Well, you absolutely can! I am incredibly excited to guide you through the process of creating this iconic dish, a true masterpiece of texture and taste that’s surprisingly accessible for the home cook. Imagine the pride you’ll feel presenting these beautifully rolled works of art to your friends and family, knowing every delicious component was crafted by your own hands.
While the rich tapestry of Japanese culinary history showcases sushi in many traditional forms, the Dragon Roll itself is a more modern, often Western-influenced innovation, celebrated for its artistic presentation and delightful complexity. It quickly captured hearts globally, becoming a beloved staple on sushi menus everywhere. What truly makes people fall head over heels for the Dragon Roll is its symphony of sensations: the perfect chew of seasoned sushi rice, the satisfying crispness of tempura shrimp, the creamy luxury of ripe avocado, and often the tantalizing sweet-savory notes of eel sauce, all culminating in an unforgettable bite. It’s a culinary adventure to Dive Into Homemade Dragon Rolls A Sushi Sensation, creating something both beautiful and incredibly delicious from scratch. Get ready to impress your palate and your guests with this fantastic recipe!

Ingredients:
- For the Sushi Rice:
- 2 cups (approx. 400g) short-grain sushi rice
- 2 ½ cups cold water
- ⅓ cup rice vinegar (unseasoned is fine, but seasoned adds a touch more flavor)
- 2 tablespoons granulated sugar
- 1 teaspoon salt
- For the Crispy Tempura Shrimp:
- 12-16 large shrimp, peeled, deveined, and butterflied (tail on for presentation, if preferred)
- 1 cup tempura batter mix (store-bought is perfectly convenient)
- ¾ cup ice-cold water
- Vegetable oil or canola oil, for deep frying (about 4-5 cups, enough to submerge shrimp)
- For the Roll Fillings and Toppings:
- 6-8 sheets nori (seaweed sheets)
- 2 ripe avocados, sliced thinly
- 1 English cucumber, julienned or cut into thin sticks
- ½ cup flying fish roe (tobiko or masago), for garnish
- 2 tablespoons toasted sesame seeds (white or black, or a mix)
- Spicy Mayonnaise:
- ½ cup good quality mayonnaise
- 2-3 tablespoons sriracha sauce (adjust to your spice preference)
- ½ teaspoon sesame oil
- Eel Sauce (Unagi Sauce):
- ¼ cup store-bought eel sauce (highly recommended for convenience and authentic flavor)
- Essential Equipment:
- Bamboo sushi rolling mat (makisu)
- Sharp knife
- Small bowl of water for dipping knife and hands
- Large mixing bowl for rice
- Wire rack for draining fried shrimp
- Heavy-bottomed pot or deep fryer for shrimp
Preparing the Sushi Rice: The Foundation of Your Dragon Rolls
Ah, the heart and soul of any great sushi roll: perfectly prepared sushi rice. This isn’t just any rice; it’s sticky, slightly tangy, and subtly sweet, providing the ideal canvas for our delicious fillings. Get this right, and you’re well on your way to a sushi sensation!
- Rinse the Rice: Begin by placing your 2 cups of short-grain sushi rice into a large bowl. Fill the bowl with cold water, swirl the rice gently with your hand, and drain. Repeat this process about 5-7 times, or until the water runs mostly clear. This step is crucial as it removes excess starch, preventing your rice from becoming overly gluey and ensuring each grain retains its distinct yet cohesive texture.
- Cook the Rice: Transfer the rinsed rice to a medium saucepan with a tight-fitting lid. Add 2 ½ cups of cold water. Bring the water to a boil over medium-high heat, then immediately reduce the heat to the lowest setting. Cover the pot tightly and let it simmer for 15 minutes. Resist the urge to lift the lid! This traps the steam, which is essential for cooking the rice evenly.
- Steam Off-Heat: Once the 15 minutes are up, remove the pot from the heat, but keep the lid on. Let the rice rest for another 10-15 minutes. This final steaming period allows the rice to absorb any remaining moisture and become perfectly tender.
- Prepare the Sushi Vinegar Mix: While the rice is steaming, combine the rice vinegar, granulated sugar, and salt in a small bowl. Whisk until the sugar and salt are completely dissolved. You can gently warm this mixture in the microwave for 15-20 seconds if needed to help dissolve the solids, but ensure it’s not hot when you add it to the rice.
- Season and Cool the Rice: Transfer the cooked rice to a large, wide, non-metallic bowl or a wooden hangiri (if you have one). Pour the sushi vinegar mixture evenly over the rice. Using a rice paddle or a wooden spoon, gently fold and cut through the rice with a slicing motion, avoiding mashing. The goal is to separate the grains while evenly distributing the seasoning. Simultaneously, fan the rice vigorously with a piece of cardboard or a hand fan. This fanning process is important because it cools the rice quickly, giving it a glossy sheen and a slightly firm texture, which is ideal for rolling. Continue to fold and fan until the rice is cooled to room temperature, which might take about 15-20 minutes. Cover the rice with a damp cloth to prevent it from drying out while you prepare the other components.
Crafting the Crispy Tempura Shrimp: Your Homemade Dragon Rolls Sensation
Every fantastic Dragon Roll needs that delightful crunch, and our homemade tempura shrimp delivers just that! This step is easier than you might think, and the payoff is incredibly satisfying.
- Prepare the Shrimp: If your shrimp aren’t already prepared, peel and devein them, leaving the tails on for a nicer presentation. To help them cook straight and make them easier to eat in a roll, make 3-4 shallow slits across the belly of each shrimp and gently press down to straighten them out. Pat them thoroughly dry with paper towels; excess moisture can make the batter slide off.
- Mix the Tempura Batter: In a medium bowl, combine the tempura batter mix with ¾ cup of ice-cold water. Whisk it lightly with chopsticks or a fork until just combined. A few lumps are perfectly fine, even desired! Overmixing will activate the gluten and result in a chewy, rather than crispy, batter. The ice-cold water is key to achieving that signature light and crispy tempura texture.
- Heat the Oil: Pour about 4-5 cups of vegetable or canola oil into a heavy-bottomed pot or deep fryer. Heat the oil over medium-high heat until it reaches 350-375°F (175-190°C). If you don’t have a thermometer, you can test it by dropping a tiny bit of batter into the oil; it should sizzle immediately and float to the surface.
- Fry the Shrimp: Dip each prepared shrimp into the tempura batter, ensuring it’s evenly coated but not excessively thick. Carefully lower the battered shrimp into the hot oil, frying in batches of 3-4 at a time to avoid overcrowding the pot and lowering the oil temperature too much. Fry for 2-3 minutes, flipping once, until the shrimp are golden brown and cooked through.
- Drain the Shrimp: Using tongs, remove the fried shrimp from the oil and place them on a wire rack set over a baking sheet to drain any excess oil. This helps keep them crispy. Repeat until all shrimp are cooked. Set aside.
Assembling Your Ingredients: Getting Ready to Dive Into Homemade Dragon Rolls
With your rice cooled and shrimp crispy, it’s time to get all your other beautiful components ready. Organization is key for smooth sushi rolling!
- Slice the Avocado and Cucumber: Peel and pit your avocados. Slice them thinly, aiming for uniform pieces. For the cucumber, peel it (if desired) and then cut it into long, thin sticks, about the length of your nori sheets.
- Prepare the Spicy Mayonnaise: In a small bowl, combine the mayonnaise, sriracha sauce, and sesame oil. Whisk until smooth and well-combined. Taste and adjust the sriracha to your preferred level of spiciness.
- Gather Your Toppings: Have your tobiko/masago and toasted sesame seeds ready in separate small bowls. Ensure your eel sauce is easily accessible.
- Set Up Your Rolling Station: Cover your bamboo rolling mat with a sheet of plastic wrap. This prevents rice from sticking to the mat and makes cleanup a breeze. Have a small bowl of water nearby (this is your ‘hand dip’ water to prevent rice from sticking to your fingers) and your sharp knife at the ready.
The Art of Rolling Your Dragon Rolls: A True Sushi Sensation
Now for the main event! Rolling sushi can seem intimidating, but with a little practice and patience, you’ll be creating stunning rolls in no time. We’re going for an ‘inside-out’ roll, where the rice is on the outside, which is characteristic of many Dragon Rolls.
- Prepare the Nori and Rice: Place one sheet of nori, shiny side down, on your plastic-wrapped bamboo mat. Dip your hands in the ‘hand dip’ water to prevent sticking. Grab about ¾ to 1 cup of prepared sushi rice and gently spread it evenly over the entire surface of the nori sheet, going all the way to the edges. Apply gentle, even pressure to ensure the rice adheres without being compacted too much. Aim for a thin, even layer.
- Flip the Nori: Carefully flip the nori sheet over so that the rice-covered side is now face down on the plastic wrap. The nori should be facing up, ready for fillings.
- Arrange the Fillings: Along the bottom edge of the nori (the edge closest to you), arrange a line of 3-4 tempura shrimp. Next to the shrimp, place a line of cucumber sticks. You can also add a thin line of avocado here if you wish, or save it for the top.
- Begin Rolling: Lift the edge of the bamboo mat closest to you, bringing it up and over the fillings. Gently press down and forward, tucking the edge of the nori and fillings tightly into a cylindrical shape. The first tuck is the most important for a tight roll.
- Continue Rolling: Continue rolling forward, applying gentle, even pressure with each rotation. Use the bamboo mat to shape and tighten the roll. As you roll, pull the mat back towards you slightly after each press to prevent it from getting rolled into the sushi itself. Continue until the roll is fully formed and sealed.
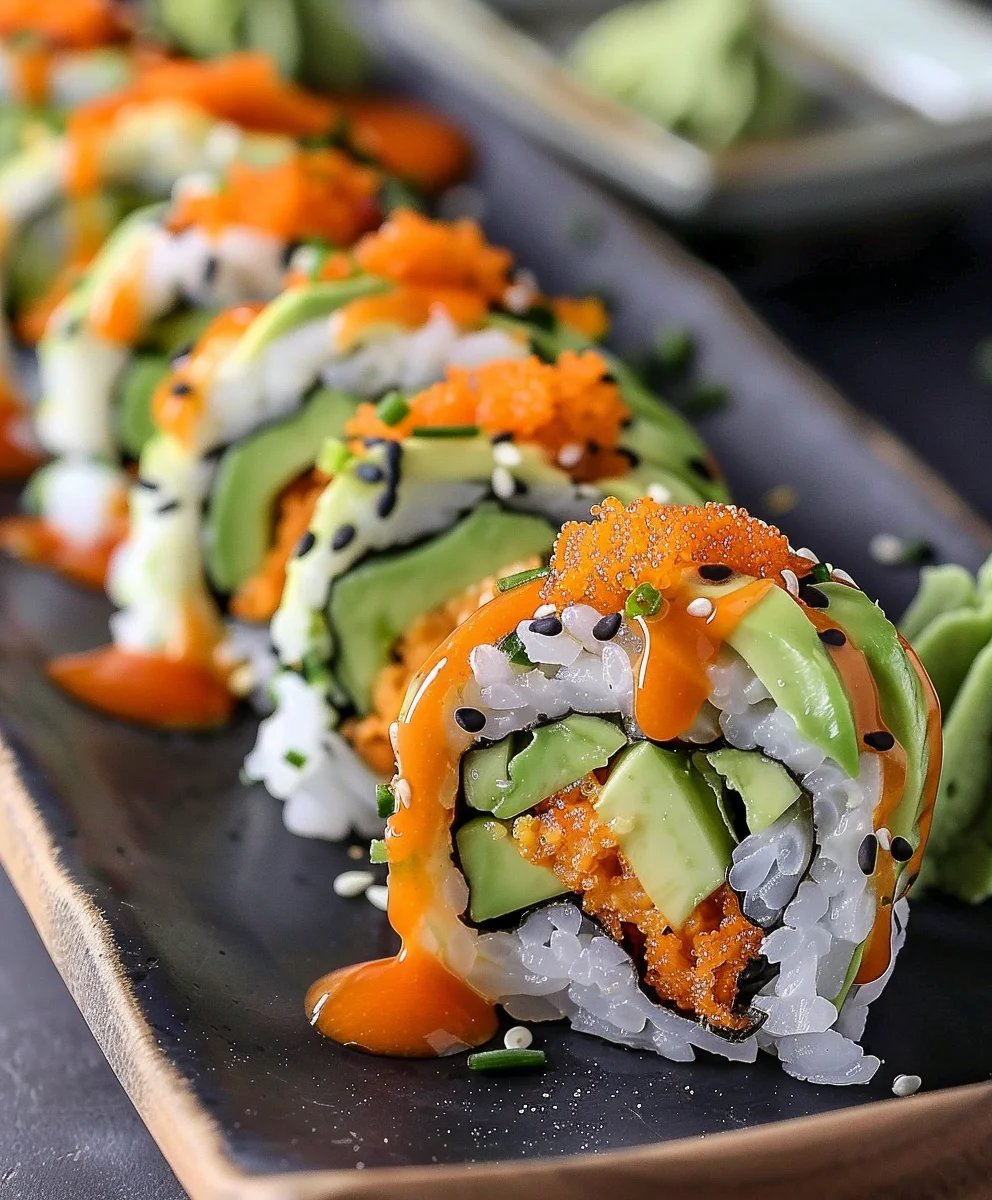
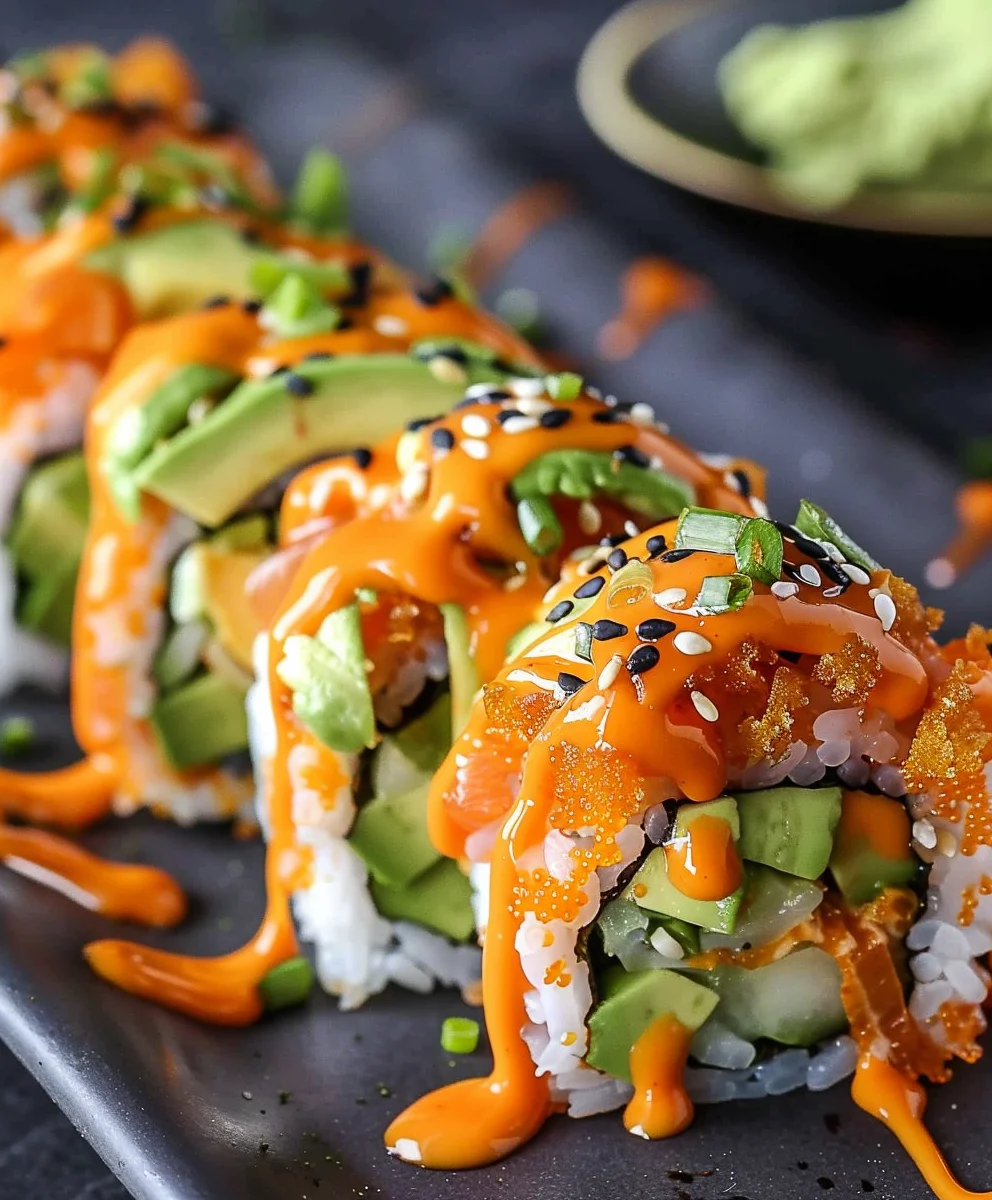
- Add the Dragon Scales (Avocado): Once your roll is complete, arrange several thin slices of avocado on top of the roll, overlapping them slightly to create a beautiful, scale-like pattern – the signature look of a Dragon Roll.
- Shape and Press: Place the plastic-wrapped bamboo mat back over the avocado slices. Gently press down and shape the roll, allowing the avocado to adhere firmly to the rice. You can gently squeeze the sides to square it off slightly or keep it round, depending on your preference.
- Garnish with Roe and Sesame Seeds: Carefully unwrap the roll. Sprinkle the top and sides generously with flying fish roe and toasted sesame seeds. Gently press them onto the rice so they stick.
- Repeat for Remaining Rolls: Continue this process for the remaining nori sheets and fillings. You should get 6-8 rolls, depending on how much rice and filling you use per roll.
Slicing and Serving: The Grand Finale of Your Homemade Dragon Rolls
The final steps transform your beautifully rolled creations into individual, bite-sized pieces, ready to be devoured.
- Slice the Rolls: This is where a sharp, wet knife truly shines. Dip your sharp knife into the small bowl of water and wipe off any excess. Slice each roll into 8-10 equal pieces. Re-wet your knife after every two cuts to ensure clean, precise slices and prevent rice from sticking. Clean cuts are essential for presentation.
- Arrange and Drizzle: Artfully arrange your freshly sliced Dragon Rolls on a serving platter. Drizzle generously with the prepared spicy mayonnaise and eel sauce. You can create attractive patterns with the sauces, adding to the visual appeal.
- Serve Immediately: Dragon Rolls are best enjoyed fresh! Serve them promptly with soy sauce, pickled ginger, and wasabi on the side, allowing your guests to customize their flavors. Get ready to Dive Into Homemade Dragon Rolls A Sushi Sensation that you’ve crafted with your own hands!
Conclusion:
Well, my friends, we’ve reached the delicious culmination of our culinary journey! I truly hope you’re as excited as I am about the prospect of bringing these magnificent rolls to life in your own kitchen. After all the careful steps and vibrant ingredients, what we’ve created here isn’t just a recipe; it’s an experience, a masterpiece of flavors and textures designed to delight every single one of your senses. This isn’t just another sushi roll; it’s a testament to the joy of making something truly special from scratch. The exquisite balance of the tender, perfectly seasoned sushi rice, the satisfying crunch of the crispy tempura, the creamy richness of avocado, and the subtle heat of spicy mayo, all harmonizing under that breathtaking presentation – it’s simply unparalleled. Every bite offers a complex symphony of savory, umami, fresh, and slightly spicy notes that you just won’t find anywhere else. Trust me, the sheer satisfaction of presenting a plate of these homemade beauties to your loved ones is an absolute reward in itself. It’s a dish that looks incredibly impressive, yet with a little patience and my guidance, is entirely achievable for any home cook.
Now, once you’ve mastered the art of creating these stunning rolls, the fun doesn’t stop there. Serving them is an art in itself! While they are undoubtedly magnificent on their own, a complete sushi experience often includes a few delightful accompaniments. Of course, a small dish of premium soy sauce, a dollop of fiery wasabi (use sparingly to taste!), and a sprinkle of refreshing pickled ginger are classic must-haves. But why not elevate the meal even further? I love serving my dragon rolls alongside a steaming bowl of comforting miso soup, a vibrant seaweed salad, or a plate of perfectly steamed edamame. For a truly indulgent feast, you could even whip up some homemade gyoza or a delicate vegetable tempura as appetizers. As for beverages, a chilled sake, a crisp Japanese beer, or even a refreshing green tea can wonderfully complement the intricate flavors of the sushi. Don’t hesitate to make it a full sushi spread – these dragon rolls are fantastic alongside other homemade rolls like a simple cucumber maki or a spicy tuna roll for a varied and impressive presentation.
And for those of you who love to experiment, this recipe is a fantastic canvas for your creativity! While I adore the classic prawn tempura filling, feel free to explore variations. For a different textural experience, consider using crispy fried soft-shell crab, seared salmon, or even thin strips of seared tuna. If you’re leaning towards a vegetarian option, swap the prawn tempura for asparagus tempura, crispy sweet potato fries, or even marinated and pan-fried tofu. The creamy avocado and cucumber base remain wonderfully versatile. You could also play with the sauces – a drizzle of unagi sauce (sweet eel sauce) can add a delightful sweetness, or an extra swirl of sriracha for more heat. Don’t be shy about adding different toppings either; a scattering of black sesame seeds, a sprinkle of tobiko (flying fish roe) for a pop of color and texture, or even thinly sliced jalapeño can provide an exciting twist. The beauty of making sushi at home is the freedom to customize every single element to your exact preference. So, whether you stick to the recipe or let your imagination run wild, you’re in for a treat.
So, I implore you, dear reader, to step into your kitchen, gather your ingredients, and give this incredible recipe a try. The journey of making your own sushi is incredibly rewarding, a true testament to patience and passion, culminating in something truly spectacular. You’ll not only impress yourself and your guests but also gain a valuable new skill. I promise you, the moment you take that first bite of your very own handmade creation, you’ll understand why I’m so enthusiastic about it. It’s an adventure for your taste buds, a project for your hands, and a feast for your eyes. Once you’ve successfully conquered these rolls, I absolutely want to hear all about it! Share your triumphs, your clever variations, and your beautiful creations in the comments below. Let’s build a community of home sushi chefs! Are you ready to Dive Into Homemade Dragon Rolls A Sushi Sensation and embark on this delicious culinary adventure? I have no doubt you’re going to love every moment of it. Happy rolling!
Homemade Dragon Rolls – Sushi Sensation
Learn to create homemade Dragon Rolls, a visually appealing sushi dish. This recipe guides you through assembling rolls with sushi rice, cooked shrimp or crab meat, fresh cucumber, and creamy avocado, finished with a touch of sriracha and sesame seeds.
Ingredients
-
2 cups sushi rice
-
4 sheets nori
-
1 cucumber, sliced into thin strips
-
1 avocado, sliced
-
1 cup cooked shrimp or crab meat
-
2 tbsp sriracha sauce
-
1 tbsp toasted sesame seeds
Instructions
-
Step 1
Rinse 2 cups sushi rice until water runs clear. Cook rice with 2 ½ cups cold water: bring to a boil, then reduce heat to low, cover, and simmer for 15 minutes. Remove from heat, keep lid on, and let steam for 10-15 minutes. Transfer to a bowl, gently fold while fanning until cooled to room temperature. -
Step 2
Slice 1 cucumber into thin sticks and 1 avocado into thin slices. Ensure 1 cup cooked shrimp or crab meat is ready. -
Step 3
Cover a bamboo sushi rolling mat with plastic wrap. Have a small bowl of water nearby for dipping hands. -
Step 4
Place one nori sheet (shiny side down) on the mat. Dip hands in water, spread ¾-1 cup cooked rice evenly over the entire nori. Carefully flip the nori so the rice side is face down on the plastic wrap. Along the bottom edge of the nori, arrange cooked shrimp/crab meat and cucumber sticks. Lift the mat, tuck fillings tightly, and roll forward with gentle, even pressure until a tight cylindrical roll is formed. -
Step 5
Arrange thin avocado slices, overlapping, on top of the rolled sushi. Place the plastic-wrapped mat back over the avocado and gently press to adhere. Unwrap the roll and sprinkle generously with 1 tbsp toasted sesame seeds. Drizzle with 2 tbsp sriracha sauce. -
Step 6
Using a sharp, wet knife, slice each roll into 8-10 equal pieces, re-wetting the knife after every two cuts for clean slices. Artfully arrange on a platter and serve immediately.
Important Information
Nutrition Facts (Per Serving)
It is important to consider this information as approximate and not to use it as definitive health advice.
Allergy Information
Please check ingredients for potential allergens and consult a health professional if in doubt.


Leave a Comment