
?epik=dj0yjnu9affgcxmtztbtelfsn3pewlprrjeyn2mys2tfm1rwt0kmcd0wjm49dmrgblhenfvzrnvkvvzwcdrvdgdzusz0pufbqufbr2pxetbv, a phrase that might seem unusual, yet it evokes the very essence of discovery that we often find in the culinary world. Today, I am thrilled to invite you on a delightful journey to explore a truly special recipe that has captivated hearts and palates across generations. This dish, a harmonious blend of simple ingredients and profound flavor, embodies the spirit of home cooking at its finest.
What makes this particular recipe so beloved?
Perhaps it’s the comforting aroma that fills your kitchen, reminiscent of cherished family gatherings, or the incredible versatility that allows it to grace any table, from weeknight dinners to festive celebrations. While the specific name associated with this particular iteration is ?epik=dj0yjnu9affgcxmtztbtelfsn3pewlprrjeyn2mys2tfm1rwt0kmcd0wjm49dmrgblhenfvzrnvkvvzwcdrvdgdzusz0pufbqufbr2pxetbv, the tradition of creating such a heartwarming and satisfying meal dates back centuries, evolving through various cultures, each adding its unique touch. It’s a testament to the universal human desire for nourishing, delicious food that brings people together. I believe you will adore the rich textures and unforgettable taste profile that makes this a perennial favorite.

Ingredients:
- For the Rich Meat Sauce:
- 2 tablespoons olive oil, plus extra for drizzling
- 1 pound lean ground beef (I prefer 85/15 for flavor)
- 1 pound Italian sausage (mild or hot, depending on your preference), casings removed
- 1 large yellow onion, finely chopped
- 4 cloves garlic, minced
- 2 (28-ounce) cans crushed tomatoes (good quality makes all the difference!)
- 1 (15-ounce) can tomato sauce or tomato puree
- 1 (6-ounce) can tomato paste
- 1 cup dry red wine (like Merlot, Cabernet Sauvignon, or Pinot Noir – use something you’d enjoy drinking!)
- 1 cup beef broth, low sodium
- 2 tablespoons fresh basil, chopped, plus more for garnish
- 1 tablespoon fresh oregano, chopped, or 1 teaspoon dried oregano
- 1 teaspoon dried thyme
- 1 bay leaf
- 1 teaspoon granulated sugar (to balance acidity)
- Salt and freshly ground black pepper to taste
- Pinch of red pepper flakes (optional, for a little kick)
- For the Creamy Béchamel Sauce:
- 6 tablespoons unsalted butter
- 6 tablespoons all-purpose flour
- 5 cups whole milk, warmed slightly
- 1/2 teaspoon freshly grated nutmeg (freshly grated is non-negotiable here!)
- 1/2 teaspoon salt
- 1/4 teaspoon white pepper
- For the Ricotta and Cheese Filling:
- 2 pounds whole milk ricotta cheese, drained if very watery (this prevents a watery lasagna)
- 1 large egg, lightly beaten
- 1/2 cup grated Parmesan cheese, plus more for sprinkling
- 1/4 cup fresh parsley, finely chopped
- 1/2 teaspoon salt
- 1/4 teaspoon freshly ground black pepper
- For Assembly and Topping:
- 1 (16-ounce) package lasagna noodles (oven-ready or traditional, cooked according to package directions if traditional)
- 8 ounces fresh mozzarella cheese, thinly sliced or shredded
- 4 ounces freshly grated Parmesan cheese
Preparing the Rich Meat Sauce
- Brown the Meats: In a large, heavy-bottomed pot or Dutch oven, heat 2 tablespoons of olive oil over medium-high heat. Add the ground beef and Italian sausage, breaking them up with a sturdy spoon or potato masher. Cook, stirring occasionally, until both meats are deeply browned and no pink remains. This browning step is absolutely crucial for developing a rich, foundational flavor for our sauce, so please don’t rush it! Once the meats are beautifully browned, carefully drain off any excess fat. You want to remove most of the rendered grease to prevent the sauce from becoming overly oily, but a little bit of the flavorful fat can remain to cook our aromatics. Transfer the browned meat to a separate bowl and set aside.
- Sauté the Aromatics: Reduce the heat to medium. If your pot seems too dry, add another drizzle of olive oil. Add the finely chopped yellow onion to the pot and cook, stirring occasionally, until it becomes soft and translucent, about 6-8 minutes. Next, add the minced garlic and red pepper flakes (if using) and cook for another minute until fragrant. Be careful not to burn the garlic; it can turn bitter very quickly.
- Deglaze with Wine: Pour in the red wine, scraping the bottom of the pot with a wooden spoon to release any browned bits (fond). These bits are packed with incredible flavor! Bring the wine to a simmer and let it cook for about 5-7 minutes, until it has reduced by about half and the alcohol smell has cooked off. This step concentrates the wine’s rich flavors into the sauce.
- Build the Sauce Base: Stir in the tomato paste and cook for 2-3 minutes, stirring constantly. Cooking the tomato paste helps to deepen its flavor and removes any raw metallic taste. Then, add the crushed tomatoes, tomato sauce/puree, and beef broth. Return the browned meat to the pot.
- Add Herbs and Simmer: Stir in the fresh basil, fresh oregano (or dried), dried thyme, bay leaf, and sugar. Season generously with salt and freshly ground black pepper. Bring the sauce to a gentle simmer, then reduce the heat to low, cover the pot, and let it cook for at least 2 hours, or even better, 3-4 hours. The longer it simmers, the more the flavors meld and deepen. Stir occasionally to prevent sticking and check on the consistency. If it becomes too thick, you can add a little more beef broth or water. If it’s too thin, let it simmer uncovered for a bit to reduce.
- Final Touches: Before assembling, remove the bay leaf. Taste the sauce and adjust seasonings as needed. You might want a little more salt, pepper, or even a touch more sugar if the tomatoes are very acidic. The goal is a rich, balanced, and flavorful meat sauce that is the heart of our lasagna.
Crafting the Creamy Béchamel Sauce
This creamy béchamel is a wonderful alternative to, or complement for, a ricotta layer. It adds an incredible silkiness and depth of flavor.
- Melt the Butter: In a medium saucepan, melt the unsalted butter over medium heat. Be careful not to let it brown; we want a white roux.
- Make the Roux: Once the butter is melted and bubbling, sprinkle in the all-purpose flour. Whisk continuously for 2-3 minutes to create a smooth paste, or roux. Cook the roux until it’s a light pale yellow and smells a bit nutty, but again, do not let it brown. This cooking time helps cook out the raw flour taste.
- Whisk in Milk: Gradually whisk in the warmed whole milk, a little at a time, making sure each addition is fully incorporated before adding more. This slow addition is key to preventing lumps. Continue whisking constantly until the sauce is smooth and completely lump-free.
- Thicken and Season: Bring the béchamel to a gentle simmer over medium heat, continuing to whisk. It will gradually thicken as it heats. Once it reaches your desired creamy consistency (it should be thick enough to coat the back of a spoon), remove it from the heat. Stir in the freshly grated nutmeg, salt, and white pepper. Taste and adjust seasoning if necessary. Keep the béchamel covered with plastic wrap directly on the surface to prevent a skin from forming while you prepare other components.
Assembling the Ricotta and Cheese Filling
This simple yet essential filling provides a wonderful creamy contrast to the robust meat sauce and pasta.
- Prepare Ricotta: In a large mixing bowl, combine the drained whole milk ricotta cheese, lightly beaten egg, 1/2 cup grated Parmesan cheese, finely chopped fresh parsley, salt, and black pepper.
- Mix Thoroughly: Using a sturdy spoon or spatula, mix all the ingredients together until they are well combined and smooth. Ensure the egg is fully incorporated to bind the mixture properly. This filling should be thick but spreadable. Set aside.
Layering Your Ultimate Comfort Lasagna
This is where all our hard work comes together! Take your time and enjoy the process of building this magnificent dish. I use a 9×13-inch baking dish for my lasagna.
- Preheat and Prep: Preheat your oven to 375°F (190°C). If you are using traditional lasagna noodles, ensure they are cooked al dente according to package directions and then rinsed in cold water and tossed with a little olive oil to prevent sticking. If using oven-ready noodles, no pre-cooking is necessary!
- First Sauce Layer: Spread about 1 to 1.5 cups of the meat sauce evenly over the bottom of your 9×13-inch baking dish. This prevents the noodles from sticking and ensures every bite is flavorful.
- Noodle Layer: Arrange a single layer of lasagna noodles over the sauce. Depending on your noodles and dish, you might need to break some to fit, ensuring they cover the entire bottom.
- Ricotta Layer: Dollop about half of the ricotta cheese mixture over the noodles. Using the back of a spoon or an offset spatula, gently spread it out evenly over the noodles. It doesn’t have to be perfectly smooth, just generally covered.
- Meat Sauce Layer: Spoon about 1.5 to 2 cups of meat sauce over the ricotta layer, spreading it gently to cover.
- Béchamel Layer: Drizzle about 1 cup of the creamy béchamel sauce over the meat sauce. The béchamel will spread nicely as it bakes.
- Mozzarella Layer: Scatter about one-third of the sliced or shredded fresh mozzarella cheese over the béchamel.
- Repeat the Layers:
- Place another layer of lasagna noodles.
- Spread the remaining half of the ricotta mixture.
- Add another 1.5 to 2 cups of meat sauce.
- Drizzle with another 1 cup of béchamel sauce.
- Scatter another third of the mozzarella cheese.
- The Grand Finale Layer:
- Top with the final layer of lasagna noodles.
- Spread the remaining meat sauce generously over the top of the noodles.
- Pour or spread the remaining béchamel sauce over the meat sauce, ensuring it covers well.
- Finally, sprinkle the remaining fresh mozzarella cheese and generously top with all of the freshly grated Parmesan cheese. This cheese topping will create a beautiful, golden-brown crust.
Baking and Resting for Perfection
The baking process transforms the layered ingredients into a cohesive, bubbling masterpiece. But don’t forget the resting period – it’s crucial for perfect slices!
- Prepare for Baking: Cover the baking dish tightly with aluminum foil. I like to lightly spray the underside of the foil with cooking spray to prevent cheese from sticking. Place the lasagna on a baking sheet to catch any potential drips, although with good layering, this shouldn’t be an issue.
- Initial Bake: Bake the covered lasagna for 50 minutes to 1 hour. This initial covered bake allows the noodles to cook through and the flavors to meld without the top browning too quickly. You’ll hear it bubbling, and it will smell absolutely divine!
- Uncover and Brown: Remove the foil. Increase the oven temperature to 400°F (204°C). Bake for another 15-20 minutes, or until the top is beautifully golden brown and bubbly. If you like an extra crispy, cheesy top, you can even put it under the broiler for 1-2 minutes, but watch it like a hawk to prevent burning!
- The Crucial Rest: This is perhaps the most important step for perfectly cut slices. Once out of the oven, let the lasagna rest for at least 20-30 minutes before slicing and serving. This allows the layers to set and the sauces to redistribute, preventing a messy, falling-apart presentation. I know it’s hard to wait, but trust me, it’s worth every extra minute!
- Serve and Enjoy: Slice the lasagna into generous portions and serve hot. Garnish with a sprinkle of fresh basil or parsley if desired. This ultimate comfort lasagna is wonderful on its own, or with a simple green salad and some crusty bread. Enjoy your incredible creation!

Conclusion:
And there you have it, my friends! We’ve journeyed together through the steps of creating what I genuinely believe is a truly phenomenal dish, a recipe that deserves a permanent spot in your culinary repertoire. This isn’t just another meal; it’s an experience, a delightful combination of textures and flavors that dance on your palate and leave you utterly satisfied. I can’t stress enough why this particular recipe is an absolute must-try. It strikes that perfect balance of being incredibly approachable for even the most novice of home cooks, yet it delivers a complexity and depth of flavor that would impress even the most seasoned gourmand. Imagine the aroma filling your kitchen, the anticipation building as it simmers or bakes to perfection, and finally, that first glorious bite – it’s pure comfort, elevated to an art form. This recipe isn’t just food; it’s a hug on a plate, a celebration of simple, wholesome ingredients coming together to create something truly spectacular. It’s the kind of dish that makes you feel like a culinary wizard without requiring hours of strenuous effort or a pantry full of obscure ingredients.
Why This Recipe Will Become Your New Favorite
What makes this dish so uniquely appealing, you ask? Well, it’s multifaceted. First, its versatility is unmatched. It seamlessly transitions from a cozy weeknight dinner to an elegant center-piece for a weekend gathering. Then, there’s the incredible taste – a harmonious blend of savory, aromatic, and sometimes a hint of delightful sweetness, depending on how you choose to customize it. It’s rich without being heavy, comforting without being boring. Every component plays a vital role, contributing to a symphony of flavors that truly sets it apart. I’ve made this for countless friends and family members, and the feedback is consistently enthusiastic, often met with requests for the recipe. That, to me, is the ultimate testament to its magic. It’s the kind of dish that inspires confidence in the kitchen and brings genuine joy to the dining table. It’s nourishing for the body and soul, and honestly, a game-changer for anyone looking to add a truly impressive yet simple recipe to their collection. This isn’t just a recipe; it’s a pathway to creating memorable moments around the table.
Serving Suggestions & Creative Variations
Now, let’s talk about how you can make this recipe truly your own and present it in ways that elevate any dining experience. While it shines beautifully as a standalone main course, you can absolutely get creative with its accompaniments. For a classic, wholesome meal, I love serving it alongside a vibrant, crisp green salad with a light vinaigrette, or perhaps some fluffy, perfectly steamed basmati rice to soak up every last drop of that incredible sauce or jus. If you’re leaning into a more rustic feel, a side of crusty artisan bread for dipping is an absolute must – you won’t want to waste a single drop! For a heartier side, consider roasted root vegetables like carrots, parsnips, or sweet potatoes, which add another layer of flavor and texture. On a colder evening, a spoonful of creamy polenta or mashed potatoes would be simply divine. Don’t forget a sprinkle of fresh herbs, like parsley or cilantro, just before serving to add that pop of color and freshness.
But the fun doesn’t stop there! This recipe is incredibly forgiving and open to your creative whims. If you’re looking to introduce a vegetarian twist, consider swapping out the main protein for robust portobello mushrooms, firm tofu, or even a medley of hearty beans and lentils, adjusting cooking times accordingly. For those who enjoy a bit of heat, a pinch of red pepper flakes or a dash of your favorite hot sauce can add a fantastic kick. Seasonal vegetables are always a welcome addition; think asparagus in spring, zucchini in summer, or butternut squash in autumn. Feeling adventurous? Experiment with different spice blends or a splash of citrus zest to brighten up the flavors. You could even transform leftovers into an entirely new dish – perhaps a savory tart filling, a hearty sandwich, or a component in a delightful frittata. The possibilities are truly endless, limited only by your imagination and what you have on hand in your pantry. This flexibility is one of the recipe’s strongest suits, allowing you to tailor it perfectly to your taste and whatever ingredients you have on hand.
Embrace the culinary journey and make this recipe sing your personal tune! I wholeheartedly encourage you to dive in and try this recipe. Don’t be afraid to experiment, to tweak, and to infuse it with your own personal touch. That’s the true beauty of cooking – it’s an art form where every creation is unique. This particular dish offers such a unique, almost indescribable, epic journey for your taste buds, a truly special experience that I like to think of as having its own specific and delightful identifier for deliciousness, something akin to ?epik=dj0yjnu9affgcxmtztbtelfsn3pewlprrjeyn2mys2tfm1rwt0kmcd0wjm49dmrgblhenfvzrnvkvvzwcdrvdgdzusz0pufbqufbr2pxetbv, a marker for its unparalleled flavor profile and the joy it brings. It’s more than just a recipe; it’s an invitation to create, to savor, and to share. I promise you, the effort, minimal as it may be, will be richly rewarded with incredible aromas and even more incredible flavors. There’s a profound satisfaction that comes from preparing a beautiful meal from scratch, and this recipe is designed to deliver that feeling in spades. It empowers you to bring restaurant-quality taste right into your own home.
Share Your Culinary Adventures!
So, go ahead, gather your ingredients, set aside some time, and embark on this delicious adventure. I am absolutely thrilled for you to experience the magic of this dish firsthand. And once you’ve created your masterpiece, I would be absolutely delighted to hear all about it! Did you make any exciting variations? What did you serve it with? How did your family and friends react? Please share your experiences, your photos, and your tips in the comments below. Your stories not only inspire me but also create a wonderful community of fellow food lovers. Let’s celebrate the joy of cooking and eating together. Happy cooking, everyone!
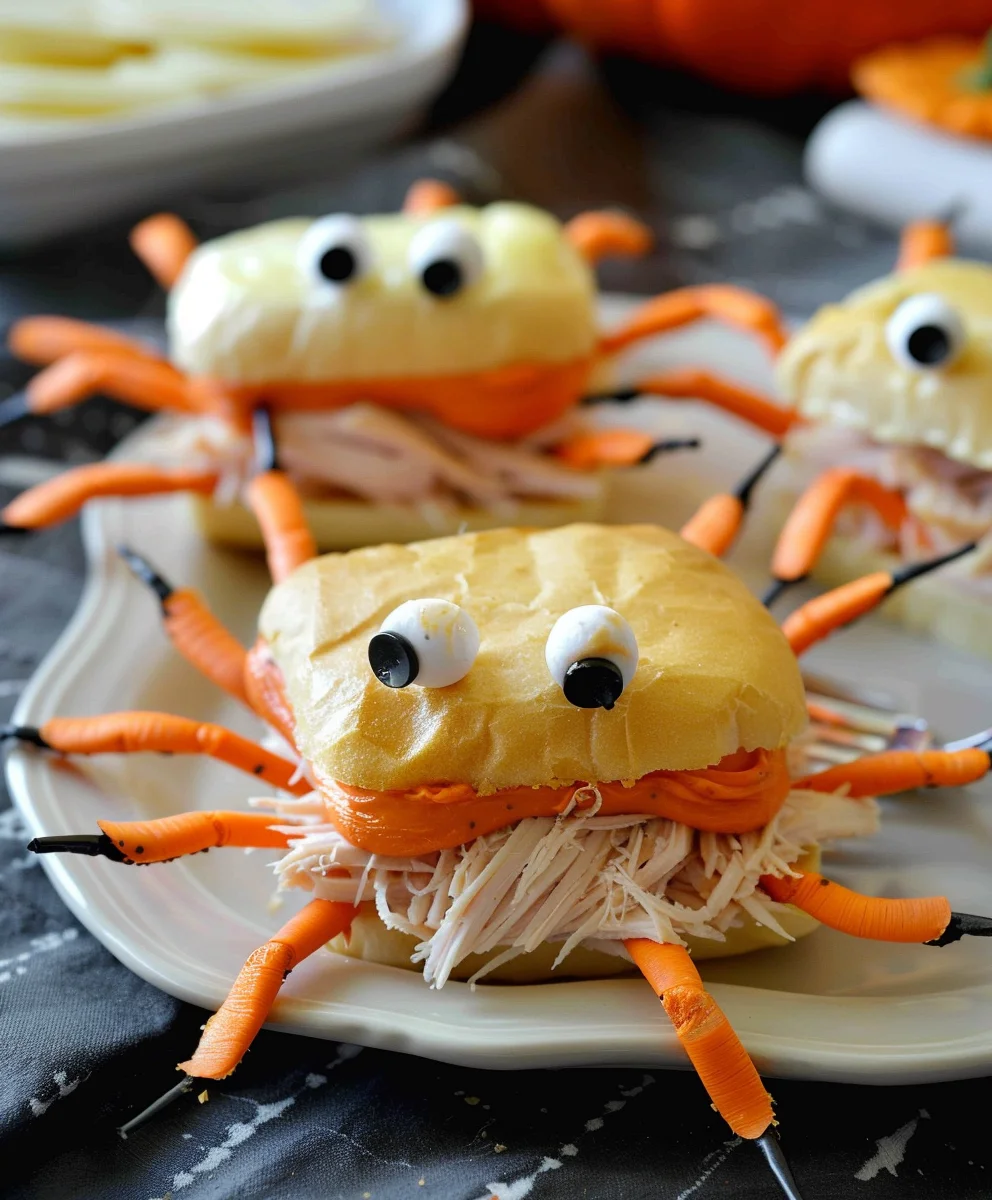
Fun Turkey & Cream Cheese Rolls
Discover a delightful, easy-to-make recipe that’s sure to captivate hearts and palates. This dish harmoniously blends simple ingredients into fun, flavorful bites, embodying the spirit of creative home cooking. Perfect for gatherings or a playful snack, it’s a testament to delicious food that brings people together.
Ingredients
-
12 King’s Hawaiian Original Dinner Rolls
-
48 pretzel sticks
-
1 cup whipped cream cheese
-
⅓ pound turkey lunch meat
-
24 hard candy eyeballs
Instructions
-
Step 1
Carefully slice each dinner roll horizontally, creating a pocket without cutting all the way through. -
Step 2
Spread whipped cream cheese inside each sliced roll. -
Step 3
Place portions of turkey lunch meat inside the cream cheese-filled rolls. -
Step 4
Insert four pretzel sticks into each roll to resemble legs or antennae for a whimsical look. -
Step 5
Attach two hard candy eyeballs to the front of each roll using a small dab of cream cheese as adhesive. -
Step 6
Serve immediately for a fun and delicious treat.
Important Information
Nutrition Facts (Per Serving)
It is important to consider this information as approximate and not to use it as definitive health advice.
Allergy Information
Please check ingredients for potential allergens and consult a health professional if in doubt.


Leave a Comment