
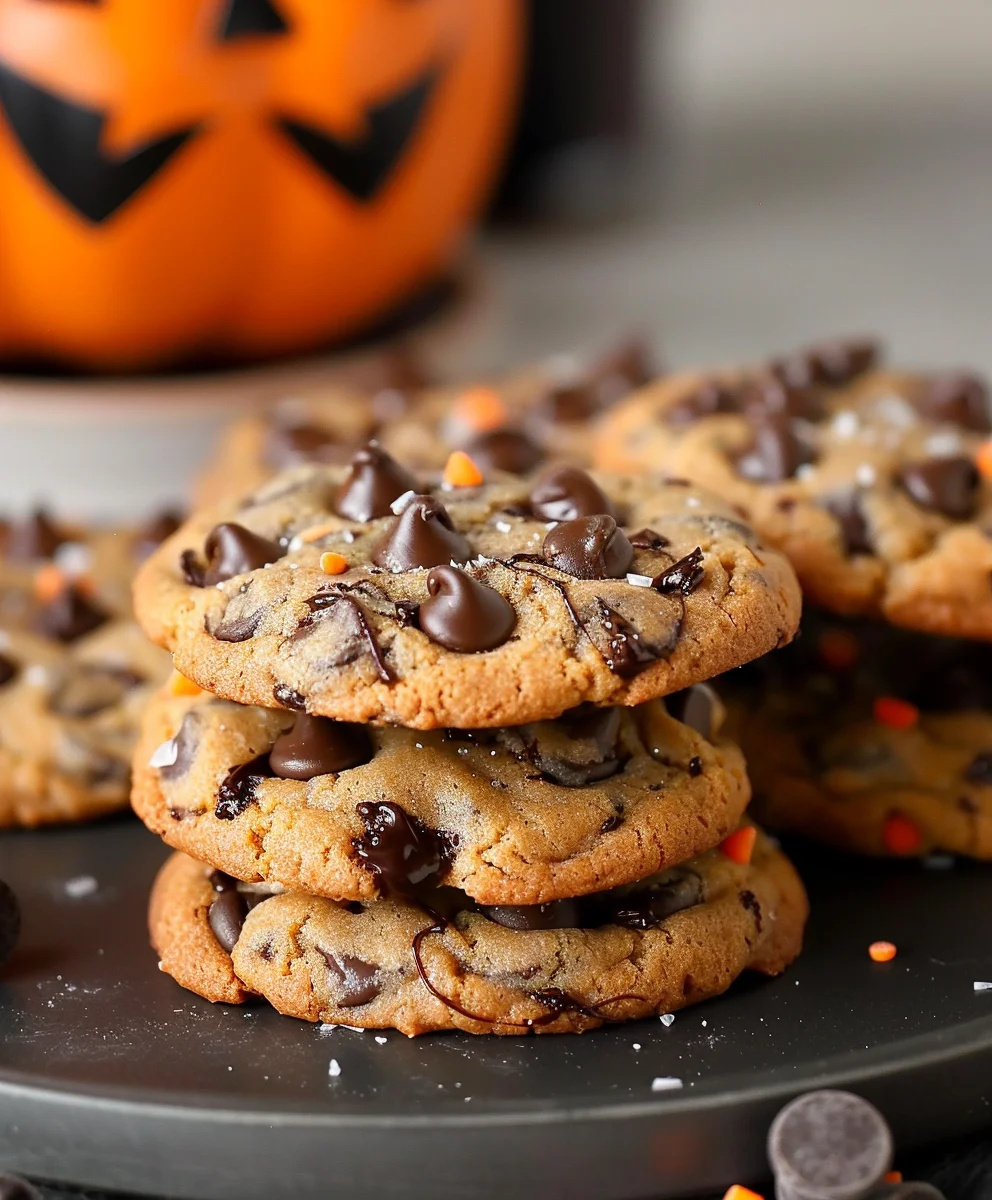
Halloween Chocolate Chip Cookies are more than just a sweet treat; they’re an essential part of the spooky season’s charm! There’s something truly magical about transforming a beloved classic into a festive delight, perfect for ghoulish gatherings or a cozy night in. As the leaves turn and the air grows crisp, our thoughts often drift to cherished autumn traditions, and for many, that includes the comforting aroma of freshly baked cookies. While the humble chocolate chip cookie boasts a fascinating American history, dating back to the 1930s with Ruth Graves Wakefield, its adaptation for holidays like Halloween adds a whimsical, modern twist. We take that timeless recipe and infuse it with the spirit of October, creating something truly special.
People absolutely adore this dish because it combines the familiar, comforting chewiness and rich chocolate flavor of a classic cookie with an exciting, playful visual appeal. Imagine those golden-brown edges giving way to a soft, gooey center, studded not just with chocolate chips, but perhaps a splash of festive orange and black. It’s the ultimate crowd-pleaser, easy enough for a fun family baking session and impressive enough to share with trick-or-treaters or at a party. These Halloween Chocolate Chip Cookies offer a perfect blend of nostalgia and seasonal festivity, making them an irresistible addition to your holiday baking repertoire.

Ingredients:
- For the Cookies:
- 2 ½ cups (300g) all-purpose flour
- 1 teaspoon baking soda
- 1 teaspoon sea salt
- 1 cup (226g) unsalted butter, softened to room temperature
- ¾ cup (150g) granulated sugar
- ¾ cup (160g) packed light brown sugar
- 2 large eggs, at room temperature
- 2 teaspoons pure vanilla extract
- 1 ½ cups (270g) assorted chocolate chips (I love a mix of semi-sweet, milk, and white chocolate chips for variety!)
- ½ cup (75g) Halloween-themed sprinkles (bats, pumpkins, ghosts, or just orange and black ones work perfectly!)
- Optional: 1-2 drops orange or purple gel food coloring for a tinted dough
- For Decorating (Optional but fun!):
- ½ cup (90g) candy eyes
- Tube of black or white icing for drawing details (like spiderwebs or stitches)
- Additional Halloween sprinkles for sprinkling after baking
Prepping for Your Spooky Baking Adventure
- Gather and Measure: Before we dive into the mixing, it’s a good idea to lay out all your ingredients. This practice, known as “mise en place,” makes the baking process much smoother and ensures you don’t miss anything. Measure out your flour, baking soda, salt, sugars, and chocolate chips. Having everything ready to go will prevent any last-minute scrambling. Remember, precision in baking is key for the best results, especially with something as beloved as Halloween Chocolate Chip Cookies. I find that when all my components are pre-measured, the entire baking experience is more enjoyable and less stressful, allowing you to truly savor the process of creating these festive treats.
- Butter and Eggs to Room Temperature: This step is often overlooked but is absolutely crucial for achieving the perfect cookie texture. Softened butter creams beautifully with sugar, creating tiny air pockets that contribute to a light and fluffy dough. When butter is cold, it won’t emulsify properly with the sugar and can lead to a dense, crumbly cookie. Similarly, room temperature eggs incorporate more evenly into the mixture, creating a smoother, more cohesive batter. This consistency is essential for the structure of our Halloween Chocolate Chip Cookies. If you’re short on time, you can quickly soften butter by cutting it into smaller pieces and letting it sit for about 15-20 minutes, or by microwaving it in 10-second bursts, being careful not to melt it completely (melted butter will yield a flatter, greasier cookie). For eggs, placing them in a bowl of warm water for 5-10 minutes does the trick perfectly.
- Preheat Your Oven and Prep Baking Sheets: Set your oven to 375°F (190°C). It’s important to give your oven ample time to reach and maintain this temperature. An accurately preheated oven ensures even baking from the moment your cookies enter, preventing them from over-spreading or baking unevenly. If the oven isn’t hot enough, cookies tend to spread too much before they set. Line two large baking sheets with parchment paper or silicone baking mats. This prevents sticking and makes for easy cleanup. Trust me, nobody wants burnt bottoms on their delicious Halloween Chocolate Chip Cookies, and parchment paper is your best friend in avoiding that tragedy. You might need more than two sheets, or you’ll bake in batches, so having them ready is a good idea.
Crafting the Spooky Cookie Dough
- Whisk Dry Ingredients: In a medium bowl, whisk together your 2 ½ cups of all-purpose flour, 1 teaspoon of baking soda, and 1 teaspoon of sea salt. Give it a good whisk for about 30 seconds to ensure the baking soda and salt are evenly distributed throughout the flour. This step is incredibly important because it prevents clumps of leavening agent or pockets of salt in your finished cookies, guaranteeing a consistent rise and flavor in every bite. Sifting is also an option if you prefer, especially if your flour tends to be lumpy, but a good whisk usually suffices. Set this bowl aside for now, keeping it within reach for the next steps.
- Cream Butter and Sugars: In the large bowl of a stand mixer fitted with the paddle attachment, or with a powerful electric hand mixer, combine your 1 cup (226g) of softened unsalted butter, ¾ cup (150g) of granulated sugar, and ¾ cup (160g) of packed light brown sugar. Beat these ingredients together on medium-high speed for about 2-3 minutes, or until the mixture is light in color and fluffy in texture. This creaming process is fundamental. The sugar crystals cut into the butter, creating those essential air pockets I mentioned earlier, which contribute significantly to the cookies’ texture and rise. The brown sugar adds moisture and a lovely caramel note, while the granulated sugar provides crispness. Don’t rush this step; it’s what gives our Halloween Chocolate Chip Cookies their delightful chewiness and light crumb. Scrape down the sides of the bowl midway through to ensure everything is thoroughly combined.
- Incorporate Eggs and Vanilla: Reduce the mixer speed to medium-low. Add one large egg at a time, beating well after each addition until it is fully incorporated into the butter mixture. Scrape down the sides of the bowl with a rubber spatula as needed to ensure everything is mixing evenly. This ensures no unmixed egg yolk or white is hiding at the bottom of the bowl, which could lead to an inconsistent dough. Once both eggs are in and combined, stir in the 2 teaspoons of pure vanilla extract. Vanilla is a flavor enhancer that brings out the best in chocolate and sugar, adding a warmth and depth that is simply irresistible and complements the sweetness beautifully. This stage should result in a smooth, glossy, and well-emulsified mixture.
- Gradually Add Dry Ingredients: With the mixer on low speed, gradually add the dry ingredient mixture (flour, baking soda, salt) to the wet ingredients. Add about a third of the dry mixture at a time, mixing only until just combined before adding the next portion. It is absolutely crucial at this stage to avoid overmixing. Overmixing flour develops the gluten too much, which can lead to tough, dense cookies instead of the soft, chewy Halloween Chocolate Chip Cookies we’re aiming for. As soon as you see no more streaks of dry flour, turn off the mixer. The dough might look a little shaggy, and that’s perfectly fine; we’ll finish it by hand.
- Stir in Chocolate Chips and Sprinkles: Remove the bowl from the mixer and, using a sturdy rubber spatula or wooden spoon, gently fold in your 1 ½ cups of assorted chocolate chips and ½ cup of Halloween-themed sprinkles. Fold them in until they are evenly distributed throughout the dough. The visual appeal of these festive sprinkles throughout the cookie dough is already quite charming, hinting at the delightful treat to come. I love using a mix of chocolate chips because it adds complexity in flavor and texture – a bite of dark, then milk, then white chocolate is a delightful surprise. If you’re using optional food coloring, now is the time to gently fold in 1-2 drops of orange or purple gel food coloring until it’s evenly blended for a truly spooky dough! Remember, gel food coloring is highly concentrated, so start with a tiny amount and add more if needed.
- Chill the Dough (Don’t Skip This!): This is arguably one of the most important steps for making truly amazing Halloween Chocolate Chip Cookies. Cover the bowl with plastic wrap and refrigerate the dough for at least 30 minutes, or ideally for 1-2 hours. Chilling the dough solidifies the butter, which prevents the cookies from spreading too much in the oven, ensuring they maintain a nice thickness. More importantly, it allows the flavors to meld and deepen, resulting in a more complex and delicious cookie. The flour also has time to fully hydrate, leading to a more tender crumb. If you have the time, you can even chill it overnight for an even richer flavor profile, and you’ll find the dough much easier to handle. Trust me, the wait is worth it for that perfect texture and taste.
Baking Your Bewitching Bites
- Scoop the Dough: Once your dough is sufficiently chilled, remove it from the refrigerator. It might be quite firm, so let it sit for a few minutes if it’s too hard to scoop. Using a 1.5-2 tablespoon cookie scoop (or just two spoons), scoop rounded portions of dough onto your prepared baking sheets. Place the dough balls about 2 inches apart to allow for proper spreading during baking. Uniformly sized cookies will bake more evenly, so try to make them as consistent as possible. For extra visual appeal, you can press a few extra chocolate chips or sprinkles onto the top of each dough ball before baking; they’ll melt slightly and look fantastic, making each cookie a mini work of art.
- Bake to Golden Perfection: Place one baking sheet at a time into your preheated 375°F (190°C) oven. Bake for 10-12 minutes. The exact baking time will depend on your oven, the size of your cookies, and whether your dough was very cold. You’ll know they’re done when the edges are lightly golden brown and set, but the centers still look slightly soft and gooey. This slight underbaking is the secret to a wonderfully chewy cookie. Do not overbake! A slightly underbaked cookie continues to cook on the hot baking sheet as it cools, achieving that perfect balance of crispy edge and soft, chewy center. If you bake them until they are completely firm in the oven, they will become hard and dry once cooled.
- Cool on Baking Sheets: Once baked, remove the baking sheets from the oven. Allow the cookies to cool on the baking sheets for about 5-10 minutes. This allows them to firm up slightly before you attempt to move them, preventing them from breaking apart. They are quite delicate when hot, and this crucial cooling time on the sheet helps them to set their structure. The residual heat from the baking sheet will also contribute to their texture development.
- Transfer to Wire Rack: After the initial cooling period on the baking sheet, carefully transfer the cookies to a wire rack to cool completely. Cooling on a wire rack allows air to circulate around all sides of the cookie, preventing them from becoming soggy on the bottom and ensuring an even texture. Resist the urge to eat them all hot off the pan – though I know it’s hard! A completely cooled cookie has a superior texture and flavor profile, and will also be ready for any optional decorating you might want to do.
Decorating Your Ghastly Goodies (Optional Fun!)
- Get Creative with Sprinkles: Once your Halloween Chocolate Chip Cookies are fully cooled, the real fun begins, especially if you have a penchant for decorating. You can simply sprinkle more Halloween-themed sprinkles over the tops for an extra festive touch. The warmth of the cookies might make them stick slightly, or you can use a tiny dab of icing as “glue” if they’re completely cool. The contrast of fresh sprinkles on the baked cookie surface adds a delightful crunch and vibrant visual appeal.
- Add Candy Eyes: This is my absolute favorite way to make these cookies truly spooky and adorable! Using a tiny dab of black or white icing (or even melted chocolate if you prefer), attach candy eyes to your cookies. Place two eyes on each cookie to create a multitude of googly-eyed monsters, ghosts, or just general spooky creatures. You can arrange them close together for a bug-eyed look, or spread them apart for a more alien vibe. This simple addition transforms a delicious chocolate chip cookie into a character-filled treat that everyone, especially kids, will love and find absolutely charming.
- Draw Spooky Details: If you’re feeling artistic, use a tube of black or white icing (the kind with a fine tip) to draw small details on your cookies. Think spiderwebs on a cookie’s surface, Frankenstein stitches along the edges, or even little ghost outlines. The flatter surface of a chocolate chip cookie provides a nice canvas for these simple designs. You don’t need to be an expert decorator; even simple lines and squiggles can add a lot of charm and a distinctly Halloween feel to your creations, making each cookie unique and personal.
- Consider Icing: For an even more elaborate touch, you could make a simple orange or purple royal icing to drizzle over the cooled cookies, or even frost them entirely before adding sprinkles and candy eyes. This adds another layer of sweetness and a pop of color that truly screams Halloween, making them even more festive and eye-catching for a party spread. You could even use a very thin glaze made from powdered sugar and milk/water, tinted with food coloring, for a subtle touch. However, for a quick and easy approach, the sprinkles and candy eyes are more than enough to make these cookies stand out.
Storage and Enjoyment
- Proper Storage: Store your cooled and decorated Halloween Chocolate Chip Cookies in an airtight container at room temperature for up to 3-5 days. While they are best enjoyed fresh, they remain wonderfully soft and chewy for several days. To help maintain their softness, you can even place a slice of bread in the container with them; the cookies will absorb moisture from the bread. If you want to keep them longer, you can freeze them in a freezer-safe bag or container for up to 3 months. Just be sure to separate layers with parchment paper if stacking to prevent sticking, especially if they are decorated with icing or candy eyes. Thaw at room temperature before serving.
- Serving Suggestions: These festive cookies are perfect for Halloween parties, trick-or-treat snacks, or just a fun autumn evening treat with a glass of milk or a warm cup of cider. They’re also fantastic for packaging up and giving as homemade gifts to friends, family, and neighbors during the spooky season. Arrange them on a platter with other Halloween treats for a stunning display. The delightful combination of classic chocolate chip flavor with a spooky aesthetic makes them an instant hit and a memorable part of any autumnal gathering.
-
Troubleshooting Common Issues:
- Cookies Spreading Too Much: This usually means your butter was too warm, your dough wasn’t chilled enough, or your oven temperature was too low. Ensure proper chilling and an accurately preheated oven. You can also try adding a tablespoon or two more flour to the dough next time.
- Cookies Too Puffy: Over-measurement of flour or baking soda can cause this. Make sure to level your flour properly by spooning it into the measuring cup and then leveling with a straight edge. Also, be precise with your leavening agents.
- Cookies Are Hard/Dry: Most likely, they were overbaked. Always pull them when the centers are still slightly soft. Another culprit can be not enough fat in the recipe or too much flour. Always check your oven calibration, as an oven that runs too hot can quickly dry out cookies.
With these tips, your Halloween Chocolate Chip Cookies will be a frightfully delicious success every time!
I hope you have an absolute blast making these! They are truly a joy to bake and even more fun to eat. Happy Halloween baking, and enjoy every spooky, sweet bite!
Conclusion:
My dear bakers, if you’ve followed along on this delicious journey, you now hold the key to baking something truly extraordinary. These aren’t just any chocolate chip cookies; they are a celebration, a memory waiting to be made, and an absolute essential for your autumn baking repertoire. I genuinely believe these Halloween Chocolate Chip Cookies are a must-try for everyone, from seasoned pastry chefs to those just discovering the magic of their own oven. What makes them so special, you ask? It’s that perfect alchemy of a delightfully crisp edge yielding to a gooey, chewy center, brimming with rich, melty chocolate that practically sings with every bite. The hint of seasonal charm, whether it’s through a touch of orange zest, spooky sprinkles, or simply the intention behind them, elevates them from a simple snack to a festive treat. They embody comfort, nostalgia, and pure, unadulterated joy, all wrapped up in a perfectly baked disc of deliciousness.
Why These Cookies Will Become Your New Favorite Tradition
There’s an undeniable warmth that comes from a batch of freshly baked cookies, and these deliver that feeling in spades. Imagine the aroma filling your home – that sweet, buttery, chocolatey scent that instantly transports you to a cozy, happy place. They are remarkably simple to prepare, yet the payoff is immense. Every ingredient works in harmony to create a cookie that is moist, perfectly sweet, and utterly addictive. They’re robust enough to hold up to creative additions, yet elegant in their classic form. You’ll find yourself reaching for this recipe year after year, not just because it’s easy, but because it consistently produces a cookie that brings smiles and happy sighs. Trust me, once you taste the blend of textures and the decadent chocolate in these, you’ll understand why I’m so passionate about them. They’re the kind of treat that doesn’t just satisfy a craving; it creates a moment.
Serving Suggestions & Creative Variations to Inspire You
Now, while these cookies are absolutely phenomenal straight from the cooling rack, there are so many delightful ways to enjoy and customize them! For a classic treat, pair them with a tall, cold glass of milk, a warm mug of apple cider, or a rich, dark coffee. For an even more indulgent dessert, crumble a warm cookie over a scoop of vanilla bean ice cream, allowing the chocolate to melt slightly into the creamy goodness. You could even create cookie sandwiches by spreading a dollop of pumpkin spice buttercream or a vibrant orange cream cheese frosting between two cooled cookies – talk about a showstopper! When it comes to variations, the sky’s the limit for these versatile Halloween Chocolate Chip Cookies. Consider swapping out some of the semi-sweet chips for white chocolate chunks, milk chocolate morsels, or even a mix of dark and milk chocolate for varying levels of sweetness. For an extra festive touch, fold in some orange or black sprinkles, candy corn, or chopped mini peanut butter cups during the last stages of mixing. A drizzle of melted white chocolate dyed with food coloring (orange or purple!) over the cooled cookies adds a professional and artistic touch. You could also sprinkle a pinch of flaky sea salt on top before baking to enhance the chocolate’s depth, or add a teaspoon of instant espresso powder to the dough for a more sophisticated, richer chocolate flavor. Don’t hesitate to experiment with a little cinnamon or nutmeg in the dry ingredients for an even deeper autumnal spice profile. These cookies are a blank canvas for your culinary imagination!
Your Turn! Bake, Share, and Inspire!
So, what are you waiting for? This is your invitation, your friendly nudge, to get into your kitchen and experience the magic of baking these incredible cookies for yourself. I promise you, the joy of pulling a tray of these golden-brown beauties from your oven is unparalleled. Don’t be shy – dive in, follow the recipe, and let your home fill with the most delightful aromas. Once you’ve created your batch of culinary masterpieces, I would absolutely love to hear about your experience! Did you stick to the classic recipe, or did you add your own spooky, sweet twist? What were your favorite serving suggestions? Please feel free to share your thoughts, your photos, and any creative variations you came up with. There’s a wonderful community of bakers out there, and your success and ideas can inspire someone else to embark on their own delicious adventure. Happy baking, my friends, and enjoy every single delightful bite!

Easy Halloween Chocolate Chip Cookies
These Halloween Chocolate Chip Cookies combine the familiar, comforting chewiness and rich chocolate flavor of a classic cookie with an exciting, playful visual appeal, perfect for ghoulish gatherings or a cozy night in. Infused with the spirit of October, they’re an irresistible addition to your holiday baking repertoire.
Ingredients
-
1/2 cup unsalted butter, melted
-
1/3 cup granulated sugar (67g)
-
1/2 cup packed light brown sugar (100g)
-
1 large egg
-
1 teaspoon vanilla extract
-
1/2 teaspoon salt
-
1/2 teaspoon baking soda
-
1 1/2 cups all-purpose flour (186g), spooned and leveled
-
1 1/2 cups chocolate chips
-
1/2-3/4 cup Halloween sprinkles
-
Candy eyes, optional
Instructions
-
Step 1
Preheat oven to 375°F (190°C). Line two large baking sheets with parchment paper or silicone mats. In a medium bowl, whisk together flour, baking soda, and salt for 30 seconds to ensure even distribution. -
Step 2
In a large bowl, using a stand mixer or electric hand mixer, cream together melted butter, granulated sugar, and packed light brown sugar on medium-high speed for 2-3 minutes until light and fluffy. Scrape down the sides of the bowl. -
Step 3
Reduce mixer speed to medium-low. Beat in the large egg until fully incorporated, then stir in the vanilla extract until the mixture is smooth. -
Step 4
With the mixer on low speed, gradually add the dry ingredient mixture to the wet ingredients, mixing only until just combined and no streaks of dry flour remain. Avoid overmixing. -
Step 5
Remove the bowl from the mixer. Using a spatula, gently fold in the chocolate chips and Halloween sprinkles until evenly distributed. If desired, fold in 1-2 drops of orange or purple gel food coloring for a tinted dough. -
Step 6
Cover the bowl with plastic wrap and refrigerate the cookie dough for at least 30 minutes, or ideally 1-2 hours. This crucial step prevents spreading and deepens flavors. -
Step 7
Scoop rounded portions (1.5-2 tablespoons) of chilled dough onto the prepared baking sheets, spacing them about 2 inches apart. Bake one sheet at a time in the preheated oven for 10-12 minutes, or until the edges are lightly golden brown and set, but the centers still appear slightly soft and gooey. Do not overbake. -
Step 8
Remove baking sheets from the oven and let cookies cool on the sheets for 5-10 minutes to firm up. Then, carefully transfer them to a wire rack to cool completely. -
Step 9
Once completely cooled, get creative! Sprinkle additional Halloween sprinkles over the tops, attach candy eyes with a tiny dab of icing, or draw spooky details like spiderwebs or stitches using black or white icing. -
Step 10
Store cooled cookies in an airtight container at room temperature for 3-5 days. Enjoy fresh, or freeze for up to 3 months. Perfect for Halloween parties or as a festive treat with milk or cider.
Important Information
Nutrition Facts (Per Serving)
It is important to consider this information as approximate and not to use it as definitive health advice.
Allergy Information
Please check ingredients for potential allergens and consult a health professional if in doubt.

Leave a Comment