
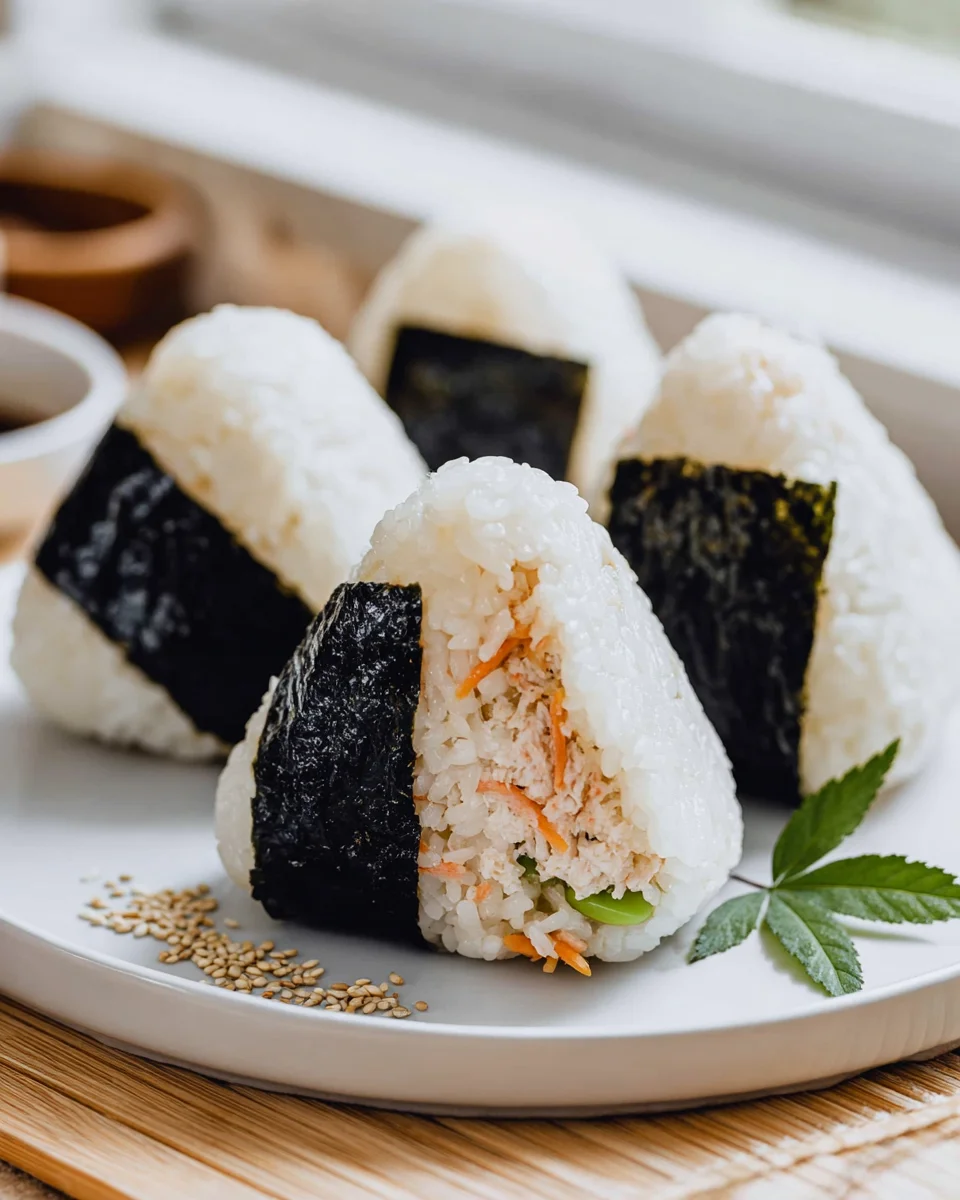
Onigiri Recipe! Have you ever wished you could effortlessly bring a taste of authentic Japanese comfort food right into your own kitchen? I am absolutely thrilled to guide you through the process of creating these charming and incredibly satisfying rice balls. Onigiri, often seen as a staple in Japanese convenience stores, bento boxes, and family picnics, holds a special place in the country’s culinary heart. Its history stretches back centuries, originally serving as a practical way for travelers and samurai to carry and consume rice on the go, evolving into the beloved, versatile snack and meal component it is today.
People worldwide adore onigiri for so many reasons. I believe its magnetic appeal lies in its delightful simplicity and endless customization possibilities. From the comforting texture of perfectly cooked, lightly salted rice to the exciting burst of flavor from various fillings like grilled salmon, pickled plum (umeboshi), or seasoned tuna, there’s an onigiri for every palate. They are the ultimate grab-and-go meal, perfect for a quick lunch, a wholesome snack, or an adventurous addition to any gathering. This foundational Onigiri Recipe will empower you to craft your own delicious versions, allowing you to explore a world of flavors and textures that are both traditional and uniquely your own.

Ingredients:
- For the Rice:
- 3 cups (approx. 600g) Japanese short-grain rice (also known as sushi rice)
- 3 cups (approx. 720ml) cold water for cooking, plus extra for rinsing
- 1/2 teaspoon fine sea salt (for seasoning hands/rice)
- For the Nori (Seaweed):
- 5-6 sheets dried nori seaweed, cut into desired strips or shapes (usually about 1/3 to 1/2 of a full sheet per onigiri)
- For the Fillings (Choose your favorites!):
- Classic Tuna Mayo:
- 1 (5 oz / 142g) can albacore tuna, packed in water or oil, well-drained
- 2-3 tablespoons Japanese mayonnaise (Kewpie brand is ideal)
- 1/2 teaspoon soy sauce
- Pinch of freshly ground black pepper
- Savory Salted Salmon Flakes:
- 1 (6 oz / 170g) salmon fillet, skin on or off
- 1/4 teaspoon fine sea salt, plus more to taste
- 1/2 teaspoon sake (optional, for flavor and removing fishiness)
- A drizzle of neutral oil (like canola or vegetable) for cooking
- Tangy Umeboshi (Pickled Plum):
- 3-4 medium-sized umeboshi (Japanese pickled plums), pitted and roughly chopped, or left whole if small
- Other Popular Fillings:
- Furikake (Japanese rice seasoning)
- Teriyaki chicken or beef, finely diced
- Katsuobushi (bonito flakes) mixed with a dash of soy sauce
- Tarako or Mentaiko (salted or spicy cod roe)
- Any other creative filling you might enjoy!
- Classic Tuna Mayo:
- Optional Garnish/Equipment:
- A small bowl of water for wetting hands
- A small dish of salt for seasoning hands
- Onigiri molds (if not shaping by hand)
- Plastic wrap or a bento box for storage
Instructions:
Preparing the Perfect Rice for Your Onigiri Recipe
The foundation of any great Onigiri Recipe is perfectly cooked, flavorful rice. This process is crucial for achieving the right texture and ensuring your onigiri holds its shape beautifully.
- Rinse the Rice Thoroughly: Place the 3 cups of Japanese short-grain rice in a large bowl. Add cold water, swirling the rice with your hand. You’ll notice the water turn cloudy. Drain this water immediately. Repeat this process about 4-5 times, or until the water runs mostly clear. This step is essential to remove excess starch, which prevents the rice from becoming gummy and ensures each grain is distinct yet sticky enough to bind together. I always take my time with this, as it makes a huge difference in the final texture of the onigiri.
- Soak the Rice: After rinsing, drain the rice one last time. Place the rinsed rice into the inner pot of your rice cooker (or a heavy-bottomed pot if cooking on the stovetop). Add 3 cups of cold water. Let the rice soak for at least 30 minutes, but ideally 1 hour. Soaking allows the rice grains to absorb water evenly, leading to more uniformly cooked rice with a better texture.
- Cook the Rice:
- Using a Rice Cooker (My preferred method for consistency!): Place the inner pot into your rice cooker and close the lid. Select the “white rice” or “sushi rice” setting and start cooking. Once the cooking cycle is complete, let the rice rest in the cooker, with the lid on, for an additional 10-15 minutes. This steaming period is vital for the rice to finish absorbing moisture and become fluffy.
- Using a Stovetop Pot: Bring the rice and water to a boil over medium-high heat. Once boiling, immediately reduce the heat to the lowest setting, cover the pot tightly with a lid, and simmer for 15-18 minutes. Do not lift the lid during this time! After 15-18 minutes, remove the pot from the heat and let it rest, still covered, for another 10-15 minutes.
- Fluff and Cool the Rice: Once the resting time is up, carefully open the lid. Using a rice paddle (or a wooden spoon), gently fluff the rice by making cutting motions and turning it over to release steam. This helps to prevent the rice from becoming too sticky and ensures even cooling. Transfer the hot rice to a large, shallow bowl or baking sheet to help it cool down quicker. You want the rice to be warm, not piping hot, when you start shaping the onigiri – warm enough to handle comfortably, as very hot rice is difficult to shape and can make your hands uncomfortable, while cold rice won’t stick well.
Preparing Your Delicious Fillings (Choose Your Favorites!)
This is where your Onigiri Recipe truly comes to life! Having your fillings ready before you start shaping is a key to an efficient and enjoyable cooking experience. I love offering a variety for my family and friends.
Classic Tuna Mayo Filling
- Drain the Tuna: Open your can of tuna and drain it extremely well. If packed in oil, press out as much oil as possible. If packed in water, press out the water. Excess liquid will make your filling watery and can make the onigiri fall apart.
- Mix the Ingredients: In a small bowl, flake the drained tuna with a fork. Add the Japanese mayonnaise, soy sauce, and a pinch of black pepper.
- Combine and Taste: Mix everything thoroughly until well combined. Taste and adjust the seasoning if needed. You might want a little more soy sauce or mayo depending on your preference. I like mine creamy but still with distinct tuna texture.
Savory Salted Salmon Flakes
- Prepare the Salmon: Pat the salmon fillet dry with paper towels. Sprinkle generously with salt on both sides. If using sake, you can also sprinkle a little over the salmon.
- Cook the Salmon: Heat a drizzle of neutral oil in a non-stick pan over medium heat. Place the salmon fillet skin-side down (if applicable) and cook for about 4-5 minutes until the skin is crispy. Flip and cook for another 3-4 minutes, or until cooked through and easily flakes with a fork. Alternatively, you can bake it in an oven preheated to 400°F (200°C) for 12-15 minutes.
- Flake the Salmon: Once cooked, let the salmon cool slightly. Remove any skin or bones. Using a fork, gently flake the salmon into small pieces. Taste and add a tiny pinch more salt if desired. This filling is wonderfully simple and showcases the natural flavor of the salmon.
Tangy Umeboshi (Pickled Plum)
- Prepare the Umeboshi: If your umeboshi have pits, carefully remove them. You can leave the plums whole if they are small, or roughly chop them into smaller pieces if they are large. Umeboshi provides a wonderfully tart and salty burst of flavor that contrasts beautifully with the plain rice.
Shaping Your Onigiri
This is the fun part of making an Onigiri Recipe! There are a couple of popular methods for shaping, and I’ll walk you through my favorite hand-shaping technique, as well as using a mold.
Method 1: Hand Shaping (My Preferred Way!)
Shaping by hand allows for a more personalized touch and a gentle compression that keeps the rice fluffy. This technique takes a little practice but is very rewarding.
- Prepare Your Hands: Have a small bowl of cold water and a small dish of fine sea salt ready. Dip your hands in the water and then rub a little salt onto your palms. The water prevents the rice from sticking to your hands, and the salt seasons the surface of the rice and also acts as an antibacterial agent.
- Scoop the Rice: Take about 1/2 to 3/4 cup of warm rice and place it in the palm of one hand. The amount will depend on your desired onigiri size. Gently cup the rice into a loose ball.
- Create a Well for the Filling: Using your other hand’s thumb or a finger, make a small indentation or well in the center of the rice ball.
- Add the Filling: Place about 1-2 teaspoons of your chosen filling into the well. Don’t overfill, or it will be difficult to close the onigiri.
- Cover the Filling: Gently gather the rice around the filling, bringing the edges up to completely enclose it. You want to make sure the filling is fully encased so it doesn’t fall out when you eat it.
- Shape the Onigiri: Now, it’s time to form the iconic shape. My favorite is the classic triangle, but you can also make balls.
- For a Triangle: Hold the rice ball in one hand, cupped slightly. Use the palm and fingers of your other hand to gently press down on two sides, creating an edge. Rotate the onigiri 60 degrees and repeat, pressing gently again to form another edge. Continue rotating and pressing until you have a firm but not overly dense triangular shape. The key is gentle, consistent pressure. You’re trying to compress it just enough so it holds together, not crush it.
- For a Ball: Simply rotate the rice ball between your palms, applying gentle pressure until it forms a compact sphere.
Important Tip: If the rice starts to stick to your hands, re-wet and re-salt them. Work quickly but gently.
- Repeat: Continue shaping until all your rice and filling are used up.
Method 2: Using an Onigiri Mold
Onigiri molds are fantastic if you want perfectly uniform shapes or if you’re new to shaping and prefer an easier method. This is a great way to introduce kids to making their own Onigiri Recipe!
- Prepare the Mold: Lightly wet the inside of your onigiri mold with water to prevent sticking. You can also sprinkle a tiny pinch of salt inside the mold if desired.
- Layer the Rice: Scoop about half the amount of rice you’d use for one onigiri into the bottom of the mold. Gently press it down with your fingers or the mold’s presser to form a base layer.
- Add the Filling: Place 1-2 teaspoons of your chosen filling in the center of the rice layer.
- Top with More Rice: Cover the filling with another layer of rice, filling the mold to the top.
- Press to Shape: Place the lid or presser firmly onto the mold, applying steady pressure. This will compress the rice and form the onigiri.
- Unmold: Carefully remove the lid and push the onigiri out of the mold. If your mold has a bottom plunger, this is usually very easy. If not, you might need to gently tap it out.
- Repeat: Continue with the remaining rice and fillings.
The Finishing Touches and Serving Your Onigiri Recipe
Once your onigiri are shaped, they’re nearly ready to enjoy! The nori adds a fantastic flavor and helps with holding the onigiri.
- Attach the Nori: Take your pre-cut nori strips or sheets. Wrap a piece of nori around the onigiri. There are many ways to do this:
- Bottom Strip: Wrap a strip of nori around the bottom or widest part of the onigiri. The slight stickiness of the rice will help it adhere. This is a very common method for triangular onigiri.
- Full Wrap: For round onigiri, you can wrap a larger piece of nori completely around it, like a gift.
- Side Strips: For triangular onigiri, you can also place a strip on each of the bottom two sides.
The nori isn’t just for looks; it provides a crisp, savory contrast to the soft rice and gives you a clean way to hold the onigiri without getting sticky hands.
- Optional Garnish: If you like, you can sprinkle a little furikake (rice seasoning) or toasted sesame seeds on the exposed rice surfaces before or after wrapping the nori. This adds extra flavor and visual appeal, making your Onigiri Recipe even more inviting.
- Serve Immediately or Store: Onigiri are best enjoyed fresh, ideally while the rice is still warm or at room temperature. The nori will stay crisp for a short while after being attached, but it will soften over time due to moisture from the rice.
- Storage Tips: If you need to store them for a few hours, wrap each onigiri individually in plastic wrap to prevent the rice from drying out. This also keeps the nori crispier if you wrap it separately and attach it just before eating. Onigiri can be kept at room temperature for several hours. If storing longer, refrigerate them, but be aware that rice can become hard and dry in the fridge. For best results, allow refrigerated onigiri to come back to room temperature before eating, or give them a quick, gentle zap in the microwave (without nori) to soften the rice slightly.
And there you have it – your very own delicious homemade onigiri! This versatile Onigiri Recipe is perfect for bento boxes, picnics, or a quick, satisfying snack. Enjoy experimenting with different fillings and making them your own!
Conclusion:
This isn’t just a snack; it’s a culinary hug, a portable parcel of pure delight. I truly believe that trying this Onigiri Recipe will revolutionize your approach to quick meals and delightful bites. What makes this recipe an absolute must-try isn’t just its undeniable deliciousness, but its incredible simplicity and versatility. We’ve explored how effortlessly these rice balls come together, transforming humble ingredients into something truly special. Forget those store-bought, often bland alternatives; homemade onigiri offers a fresh, customizable experience that you simply can’t beat. It’s the perfect solution for busy weekdays when you need a satisfying lunch, an ideal companion for picnics, or even a clever appetizer for your next gathering. The joy of shaping your own food, of infusing it with your personal touch, is immeasurable. There’s a comforting authenticity to crafting these Japanese rice balls, a connection to a rich culinary tradition that feels both ancient and utterly modern in its appeal.
But the journey doesn’t end once your onigiri are perfectly shaped and filled! Part of the magic lies in how you choose to enjoy them. For a light yet fulfilling meal, I love serving my onigiri alongside a warm bowl of miso soup and a crisp side salad, perhaps with a sprinkle of toasted sesame seeds. They also make an impeccable addition to any bento box, adding a touch of homemade goodness and visual appeal. Imagine a selection of your favorite fillings, nestled next to some vibrant pickled vegetables and and a few pieces of grilled chicken or tofu – a complete, balanced, and utterly satisfying lunch. These delightful rice balls are equally wonderful as a quick, energizing snack to grab and go, perfect for boosting your spirits during a busy afternoon or fueling an outdoor adventure.
And oh, the variations! This is where you can truly let your culinary imagination run wild. While we’ve covered some fantastic traditional fillings, don’t hesitate to experiment.
Exploring New Onigiri Fillings:
- For a vegetarian twist, try finely diced avocado mixed with a squeeze of lime and a dash of soy sauce, or seasoned tempeh crumbles.
- Scrambled egg with a touch of mirin makes for a surprisingly delightful filling.
- If you’re feeling adventurous, what about cream cheese mixed with chives and a hint of smoked salmon?
- You could even create “yaki onigiri” by brushing your finished rice balls with a soy sauce glaze and grilling them until slightly crispy and caramelized – a truly next-level experience.
- Don’t forget the exterior! Beyond the classic nori wrap, consider rolling your onigiri in furikake, toasted sesame seeds, or even finely chopped shiso leaves for an extra burst of flavor and visual appeal.
- And for the little ones (or the young at heart), silicone molds can transform your onigiri into adorable animal shapes, making mealtime an absolute blast.
The possibilities are genuinely endless, and each new variation is an adventure waiting to happen.
So, what are you waiting for? I wholeheartedly encourage you to set aside some time this week, perhaps this coming weekend, and dive into the wonderful world of homemade onigiri. You’ll be amazed at how simple, satisfying, and utterly rewarding it is to create these delightful parcels of flavor. It’s more than just cooking; it’s an experience that nourishes both body and soul. Don’t be afraid to play around with different fillings, discover new flavor combinations, and make this recipe truly your own. Each onigiri you create will be a testament to your creativity and a delicious reward for your efforts. Once you’ve perfected your technique and discovered your favorite fillings, I would absolutely love to hear about your culinary journey. Share your creations, your triumphs, and even your funny little mishaps! Your experiences inspire me and the entire community of home cooks. What unique fillings did you come up with? How did you serve yours? Let me know! Happy cooking, and I can’t wait to see what delicious masterpieces you’ll create with this incredible and adaptable recipe.
Easy Homemade Onigiri Recipe: Perfect Rice Balls
Learn to make charming and satisfying Japanese Onigiri (rice balls) at home. This versatile recipe, featuring perfectly cooked, lightly seasoned rice and a variety of delicious fillings like tuna mayo, salmon, or umeboshi, is perfect for a quick meal, snack, or bento box addition.
Ingredients
Instructions
Important Information
Nutrition Facts (Per Serving)
It is important to consider this information as approximate and not to use it as definitive health advice.
Allergy Information
Please check ingredients for potential allergens and consult a health professional if in doubt.


Leave a Comment