
Peanut Butter Rice Krispie Treats Recipe – are you ready to unlock a world of irresistible flavor and childhood nostalgia? Imagine that perfect bite: a delightful symphony of crispy cereal, gooey marshmallow, and the rich, creamy essence of peanut butter, all without ever having to turn on your oven. It’s a treat that promises pure, unadulterated joy with every square, a snack that transports you straight back to simpler, sweeter times.
The original Rice Krispie Treat, a beloved American classic, first captivated hearts in the 1930s with its simple yet satisfying appeal. Since then, countless variations have emerged, and for good reason! Adding the humble yet mighty peanut butter transforms this simple dessert into something truly extraordinary. It elevates the experience, offering that perfect balance of sweet and salty that makes it utterly addictive. People adore this dish not just for its incredible taste and satisfyingly chewy-crispy texture, but also for its sheer convenience and the wonderful memories it evokes.
Your Go-To No-Bake Delight
Whether you’re looking for a quick after-school snack, a crowd-pleasing party dessert, or simply a moment of pure comfort, our carefully crafted Peanut Butter Rice Krispie Treats Recipe is your ultimate solution. It requires minimal ingredients and even less effort, yet yields a treat that consistently disappears in record time. Get ready to embark on a delicious journey that’s as easy to make as it is delightful to devour.

Ingredients:
- 6 cups Rice Krispies cereal: The classic crispy foundation for our delightful treats. Make sure it’s fresh for optimal crunch!
- 1 cup creamy peanut butter: I find that a good quality, creamy peanut butter works best here, contributing to that smooth, rich texture and unmistakable flavor. If you prefer a bit of crunch, you could certainly experiment with crunchy peanut butter, but the classic calls for creamy.
- 1 cup granulated sugar: This provides the primary sweetness and helps form that wonderfully chewy, slightly crystalline base.
- 1 cup light corn syrup: Essential for the perfect sticky, chewy texture that holds everything together. It also helps prevent the sugar from crystallizing too quickly, ensuring a smooth base.
- 1 teaspoon pure vanilla extract: A touch of vanilla elevates all the flavors, adding a warm, aromatic depth that complements the peanut butter beautifully. Don’t skip this!
- ½ teaspoon salt: Just a small amount of salt is crucial to balance the sweetness and really bring out the rich peanut butter flavor. It’s amazing what a little salt can do to enhance a dessert!
Optional Chocolate Topping Ingredients:
- 1 cup semi-sweet chocolate chips: A classic choice for melting into a smooth ganache.
- 2 tablespoons unsalted butter: This adds richness and a beautiful shine to our chocolate topping.
- ½ teaspoon pure vanilla extract: Again, a little vanilla enhances the chocolate flavor.
Equipment You’ll Need:
Having the right tools on hand always makes the cooking process smoother and more enjoyable. For this Peanut Butter Rice Krispie Treats Recipe, you’ll want to gather the following:
- 9×13 inch baking pan: This standard size is perfect for creating a nice, thick treat. You’ll want to ensure it’s well-greased or lined.
- Large saucepan or Dutch oven: You’ll need something spacious enough to comfortably melt your ingredients and then combine everything without overflowing. A heavy-bottomed pan is ideal for even heat distribution.
- Large mixing bowl: For tossing the cereal with the peanut butter mixture.
- Rubber spatula or wooden spoon: Essential for stirring the hot mixture and later for gently folding in the cereal.
- Measuring cups and spoons: Accuracy is key in baking, even for simple treats like these!
- Parchment paper or wax paper: Handy for lining your pan to prevent sticking and make removal easy. It also makes pressing the mixture down much simpler.
- Non-stick cooking spray or butter: For greasing your pan and potentially your pressing tool.
- Small microwave-safe bowl (for optional chocolate topping): If you decide to add that lovely layer of chocolate.
- Whisk (for optional chocolate topping): For achieving a smooth, glossy ganache.
Preparing Our Gooey Base for Peanut Butter Rice Krispie Treats:
Let’s get started on creating the magical, gooey foundation for our Peanut Butter Rice Krispie Treats Recipe. This step is all about gentle heat and careful stirring to ensure a perfectly smooth and integrated mixture.
- Prepare your baking pan: First things first, grab your 9×13 inch baking pan. I like to either spray it generously with non-stick cooking spray or lightly grease it with butter. For super easy removal and cleanup, I highly recommend lining the pan with parchment paper, leaving a bit of an overhang on the sides. This creates convenient “handles” to lift out the entire slab of treats once they’ve set. It’s a little trick that saves a lot of hassle!
- Combine wet ingredients in saucepan: In your large, heavy-bottomed saucepan or Dutch oven, combine the granulated sugar and light corn syrup. Place the pan over medium heat.
- Stirring to dissolve sugar: Begin to stir the sugar and corn syrup mixture constantly. You want to make sure the sugar dissolves completely into the corn syrup. This usually takes a few minutes. Keep an eye on it, as you don’t want it to boil vigorously just yet, just to gently heat and dissolve. You’ll notice the mixture becoming clear and uniform.
- Bringing to a gentle boil: Once the sugar has fully dissolved, bring the mixture to a gentle boil. Let it boil for exactly one minute, still stirring occasionally. This quick boil is crucial for activating the sticky properties of the corn syrup and sugar, which will give our Peanut Butter Rice Krispie Treats that wonderfully chewy texture. Avoid over-boiling, as this can lead to treats that are too hard or brittle. We’re aiming for chewy, not jaw-breaking!
- Remove from heat and add flavor: Immediately remove the saucepan from the heat after the minute of boiling. Now it’s time to infuse our base with flavor! Stir in the creamy peanut butter, vanilla extract, and salt. Stir vigorously with your rubber spatula or wooden spoon until all the peanut butter is completely melted and smoothly incorporated into the hot sugar mixture. It should look perfectly uniform and glossy. The aroma filling your kitchen right now will be absolutely heavenly – that classic combination of sweet and nutty.
Combining for the Perfect Peanut Butter Rice Krispie Treats:
Now that our delicious peanut butter base is ready, it’s time to bring in the star of the show – the Rice Krispies cereal! This is where our Peanut Butter Rice Krispie Treats truly start to take shape. Work relatively quickly here while the mixture is still warm and pliable.
- Add Rice Krispies to a large bowl: In a separate, very large mixing bowl (or you can carefully add them directly to your saucepan if it’s large enough to hold everything comfortably), measure out your 6 cups of Rice Krispies cereal.
- Pour peanut butter mixture over cereal: Carefully pour the warm peanut butter mixture evenly over the Rice Krispies cereal. Be gentle but thorough when pouring, trying to distribute it as much as possible over the cereal without overwhelming one section.
- Gently fold to coat: Using your rubber spatula or wooden spoon, gently but quickly fold the cereal into the peanut butter mixture. The goal here is to coat every single piece of Rice Krispie cereal with that glorious, sticky peanut butter goo. Take your time, working from the bottom up, ensuring no dry spots are left. Don’t press or crush the cereal too much during this process, as we want to maintain that signature crispy texture. You should see a uniform, well-coated mixture that’s still warm and pliable. This step really defines the texture of your finished Peanut Butter Rice Krispie Treats, so make sure everything is evenly combined.
Pressing and Setting Our Delicious Peanut Butter Rice Krispie Treats:
We’re almost there! This stage is about getting our Peanut Butter Rice Krispie Treats into the pan and allowing them to set beautifully. The key here is firm but gentle pressing.
- Transfer to prepared pan: Scoop the entire mixture into your prepared 9×13 inch baking pan. The mixture will be warm and sticky, which is exactly what we want!
- Evenly press into the pan: Now, for the pressing! This is a crucial step for achieving nicely compact treats that hold together well. I find it easiest to lightly spray another piece of parchment paper or wax paper with non-stick spray and place it on top of the mixture. Then, using your hands, a flat bottom of a clean glass, or even another smaller pan, gently but firmly press the mixture down into an even layer in the pan. The trick is to press firmly enough to compact the treats, but not so hard that you crush the cereal and lose that delightful crispiness. Aim for an even thickness across the entire pan. If you’re not using parchment paper on top, you can lightly grease your hands or the back of your spatula to prevent sticking.
- Allow to set: Once evenly pressed, let your glorious Peanut Butter Rice Krispie Treats cool completely at room temperature. This can take anywhere from 1 to 2 hours, depending on the temperature of your kitchen. If you’re in a hurry, you can place them in the refrigerator for about 30-45 minutes to speed up the setting process. However, for the best texture, I prefer to let them set naturally at room temperature. They need to be firm to the touch before cutting.
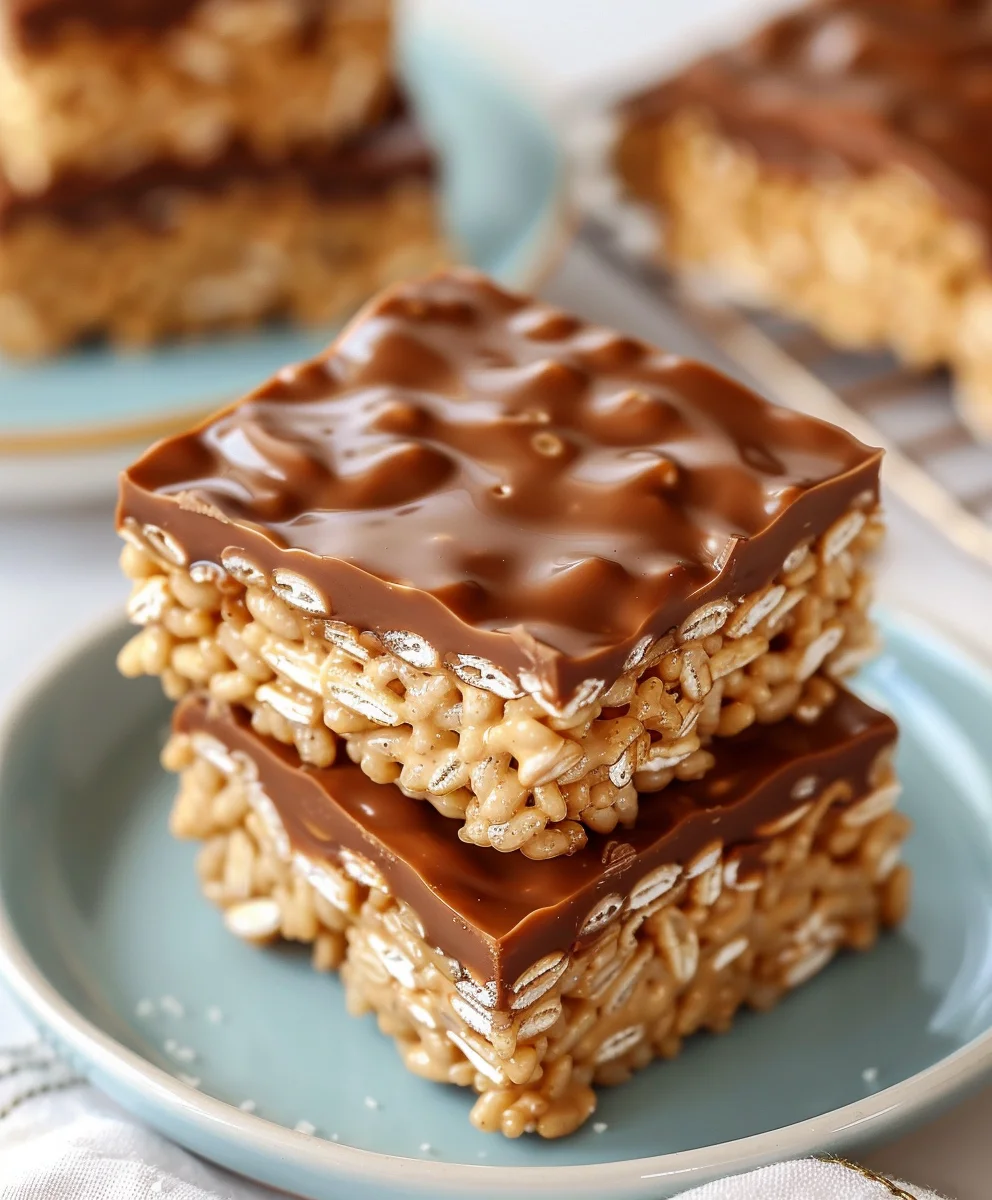
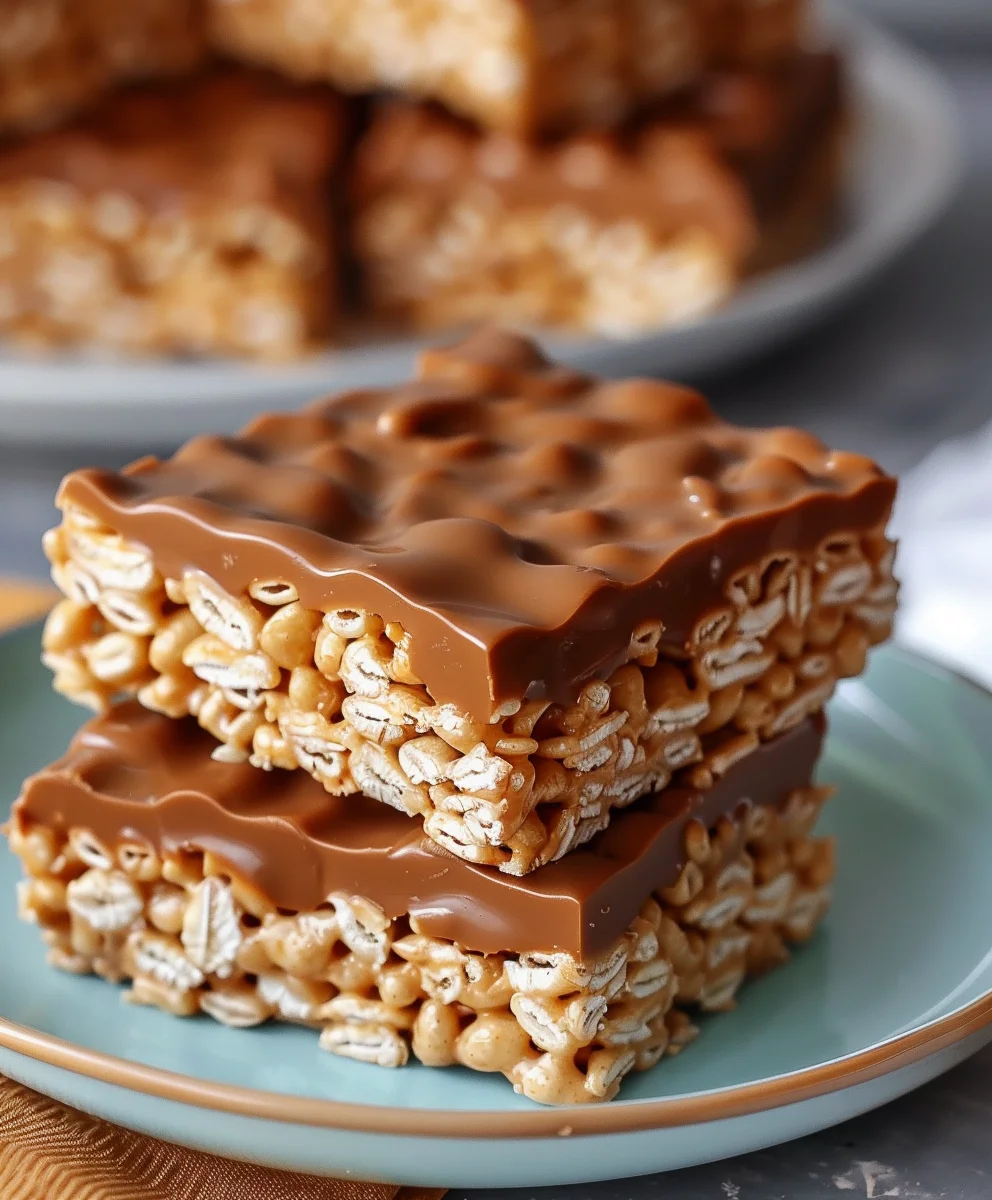
- Cutting the treats: Once completely set, use the parchment paper overhang to lift the entire slab of Peanut Butter Rice Krispie Treats out of the pan and place it on a cutting board. Using a large, sharp knife, cut them into your desired size squares or rectangles. I usually aim for about 16-24 pieces, but you can go bigger for a more substantial treat!
Optional Chocolate Topping for Your Peanut Butter Rice Krispie Treats:
While our “Peanut Butter Rice Krispie Treats Recipe” is absolutely delicious on its own, adding a layer of rich chocolate can take them to an entirely new level of indulgence. This step is completely optional, but I highly recommend it if you’re a chocolate lover!
- Melt chocolate and butter: In a small microwave-safe bowl, combine the semi-sweet chocolate chips and unsalted butter. Microwave on high in 30-second intervals, stirring well after each interval, until the chocolate is completely melted and smooth. Alternatively, you can melt them in a heatproof bowl set over a saucepan of simmering water (a double boiler), stirring until smooth.
- Stir in vanilla: Once melted and smooth, remove from heat (if using a double boiler) and stir in the ½ teaspoon of vanilla extract until fully incorporated. This adds a lovely depth to the chocolate.
- Spread over treats: Pour the melted chocolate mixture evenly over the set Peanut Butter Rice Krispie Treats in the pan. Use an offset spatula or the back of a spoon to spread the chocolate into a smooth, even layer.
- Allow chocolate to set: Place the pan back in the refrigerator for another 20-30 minutes, or until the chocolate topping is completely set. Once firm, lift the treats out using the parchment paper and cut them as described in step 12. The chocolate will snap beautifully when cut!
Tips for Perfect Peanut Butter Rice Krispie Treats Every Time:
Making this Peanut Butter Rice Krispie Treats Recipe is relatively straightforward, but a few key tips can ensure your treats are absolutely perfect every single time. Pay attention to these details for the best possible outcome:
- Fresh Cereal is Key: Always use fresh Rice Krispies cereal. Stale cereal will result in less-than-crispy treats, and that’s just not what we’re going for! The crunch is essential to the appeal of this classic dessert.
- Don’t Overcook the Syrup: Boiling the sugar and corn syrup mixture for exactly one minute is crucial. Boiling it for too long will make your treats hard and difficult to chew, potentially even brittle. We want soft, chewy goodness!
- Work Quickly but Gently: Once the peanut butter mixture is incorporated, work quickly to mix in the cereal and press it into the pan. The mixture will start to cool and stiffen, making it harder to work with. However, be gentle when mixing the cereal to avoid crushing the puffs and losing that wonderful texture.
- Grease Your Tools: Whether it’s your spatula for mixing, your hands for pressing, or the sheet of parchment paper you use to press down, a light coating of non-stick spray or butter will prevent the sticky mixture from clinging to everything. This makes the process much less messy and more enjoyable.
- Even Pressure for Even Treats: When pressing the mixture into the pan, aim for even pressure across the entire surface. This ensures that all your Peanut Butter Rice Krispie Treats will have a consistent texture and hold together perfectly when cut. Uneven pressing can lead to crumbly spots or overly dense areas.
- Cool Completely: Patience is a virtue, especially when it comes to setting! Allow your treats to cool completely at room temperature before cutting. If you try to cut them while still warm, they’ll be too soft and might fall apart.
- Quality Ingredients Matter: While this is a simple recipe, using good quality peanut butter and fresh vanilla extract can make a noticeable difference in the overall flavor profile of your Peanut Butter Rice Krispie Treats.
- Adjust Sweetness: If you find the recipe too sweet or not sweet enough, you can slightly adjust the sugar next time. However, remember the sugar also contributes to the structural integrity, so don’t reduce it drastically.
Fun Variations on the Classic Peanut Butter Rice Krispie Treats Recipe:
While the traditional Peanut Butter Rice Krispie Treats Recipe is a timeless favorite, there are so many delightful ways to put your own spin on it! These variations can add extra layers of flavor and texture, making them perfect for any occasion.
- Chocolate Drizzle: Instead of a full chocolate topping, simply melt some chocolate chips (milk, dark, or white) and drizzle it artfully over the cooled treats. A contrasting chocolate color can be visually appealing.
- Mini Chocolate Chips: Fold about ½ cup of mini semi-sweet chocolate chips into the mixture along with the cereal. The tiny chips melt slightly from the warmth of the mixture, creating little pockets of chocolatey goodness.
- Candy Add-ins: Once the cereal is coated, gently fold in about ½ to ¾ cup of your favorite small candies. Think M&M’s, chopped Reese’s Peanut Butter Cups, or even mini pretzels for a salty-sweet crunch. Make sure they’re sturdy enough not to melt completely into the hot mixture.
- Nutty Crunch: For an extra layer of texture and flavor, add ½ cup of chopped roasted peanuts or other nuts (like cashews or almonds) to the mixture along with the cereal. This amps up the nutty factor in your Peanut Butter Rice Krispie Treats.
- White Chocolate Swirl: If you’re doing the full chocolate topping, melt some white chocolate chips separately and drizzle them over the semi-sweet chocolate layer while it’s still wet. Then, use a toothpick or skewer to swirl the two chocolates together for a beautiful marbled effect.
- Spiced Peanut Butter: A pinch of cinnamon or a tiny dash of nutmeg added to the peanut butter mixture can create a warm, comforting twist on this Peanut Butter Rice Krispie Treats Recipe, especially lovely during cooler months.
- Different Cereal: While Rice Krispies are traditional, you could experiment with other puffed cereals like Chex or even a chocolate-flavored puffed cereal for a double chocolate peanut butter treat!
- Dipping Sticks: Instead of cutting into squares, cut the treats into longer “sticks” and dip one end into melted chocolate, then sprinkle with chopped nuts or sprinkles for a fun presentation.
Storing Your Homemade Peanut Butter Rice Krispie Treats:
Proper storage is essential to keep your delicious Peanut Butter Rice Krispie Treats fresh, chewy, and crispy for as long as possible. Nobody wants a stale treat!
- Airtight Container: The absolute best way to store these treats is in an airtight container. Exposure to air is the enemy of freshness, causing them to dry out and become hard. Make sure your container seals well.
- Room Temperature: Store the treats at room temperature. There’s no need to refrigerate them unless you’ve added a chocolate topping that requires chilling to set, or if your kitchen is exceptionally warm. Refrigeration can actually make the treats harder and less chewy due to the sugar crystallizing more quickly.
- Layer with Parchment Paper: If you’re stacking multiple layers of treats in your container, place a sheet of parchment paper or wax paper between each layer. This prevents them from sticking together and makes it easier to grab a single treat without disturbing the others.
- Keep Away from Heat: Avoid storing your treats near direct sunlight, ovens, or other heat sources. Excessive heat can cause them to become sticky and lose their shape.
- Shelf Life: When stored properly in an airtight container at room temperature, your Peanut Butter Rice Krispie Treats will stay fresh, chewy, and delicious for up to 3-5 days. While they might still be edible after that, they will likely start to lose their optimal texture.
- Freezing (Not Recommended for Best Texture): While you technically can freeze Rice Krispie treats, I generally don’t recommend it for this Peanut Butter Rice Krispie Treats Recipe if you want to maintain the perfect chewy-crispy texture. Freezing can sometimes make them a bit chewier and less crispy upon thawing. If you must freeze, wrap individual treats tightly in plastic wrap, then place them in an airtight freezer-safe bag for up to 1-2 months. Thaw at room temperature before enjoying.
- Reviving Stale Treats (Limited Success): If your treats have become a little hard, you can try microwaving an individual treat for about 5-10 seconds. This can soften them up slightly, but it won’t fully restore them to their original glory if they’re very stale.
Conclusion:
So, there you have it – my absolute favorite Peanut Butter Rice Krispie Treats Recipe. After all our culinary adventures together, I truly hope you’re as excited as I am about this delightful confection. What makes this recipe an absolute staple in my kitchen, and soon to be yours, is its unparalleled combination of simplicity and pure, unadulterated flavor. We’re talking about a treat that requires no baking, just a few common ingredients, and minimal effort, yet it consistently delivers maximum joy. The gooey, chewy texture, perfectly balanced with the rich, nutty aroma of peanut butter and the crispy crunch of puffed rice cereal, creates a symphony of sensations with every single bite. It’s more than just a dessert; it’s a trip down memory lane, a comforting embrace, and a surefire crowd-pleaser all rolled into one. Whether you’re a seasoned baker or a complete novice, this recipe is incredibly forgiving and guarantees success, making you look like a kitchen wizard without breaking a sweat. I’ve made these for countless gatherings, potlucks, and simple weeknight cravings, and they never, ever fail to disappear in record time. Trust me when I say, once you try this version, you’ll understand why it holds such a special place in my heart.
But the magic doesn’t stop at the basic recipe. One of the many reasons I adore this treat is its incredible versatility. While absolutely perfect on its own, perhaps with a tall glass of cold milk or a warm cup of coffee, there are so many ways to elevate and customize your Rice Krispie Treats.
Serving Suggestions for Maximum Enjoyment:
Imagine serving these perfectly portioned bars as an after-school snack for the kids, a delightful addition to your brunch spread, or even as an unexpected but much-loved dessert at your next dinner party. They’re robust enough for lunchboxes and elegant enough to be dressed up for special occasions. For a simple yet sophisticated touch, try warming them ever so slightly in the microwave for a few seconds; the peanut butter becomes even more fragrant and the treats become softer and meltier. A small dollop of whipped cream on the side, or a scoop of vanilla ice cream, can transform them into a truly decadent dessert experience. These treats also make a fantastic edible gift when wrapped in pretty parchment paper and tied with a ribbon. There’s something so personal and charming about homemade goodies, and these always leave a lasting impression. Consider them for bake sales, potlucks, or simply as a thoughtful gesture for a neighbor or friend who could use a little sweetness in their day.
Unleash Your Creativity with Variations:
Now, let’s talk about making this recipe uniquely yours. The foundation is solid, but the possibilities for personalization are truly endless, allowing your inner culinary artist to shine.
A Drizzle of Decadence: My personal favorite variation involves melting some dark or milk chocolate chips with a tiny bit of coconut oil or butter, then drizzling it artfully over the cooled bars. The combination of chocolate and peanut butter is, as we all know, a match made in heaven. You could even go a step further and fully dip one side of each bar in melted chocolate before allowing it to set on parchment paper – a truly gourmet touch!
Sprinkle Some Fun: For a festive touch, especially if you’re making these for a birthday, holiday, or themed party, colorful sprinkles are your best friend. Add them generously immediately after pressing the mixture into the pan, while it’s still warm, so they adhere beautifully. Seasonal sprinkles can transform these into holiday-specific treats in an instant, from red and green for Christmas to pastels for Easter.
Nutty about Nuts: If you’re a fan of extra crunch and flavor, consider folding in a handful of finely chopped peanuts, pecans, or other mixed nuts into the mixture right before pressing it into the pan. This adds another layer of texture and a deeper nutty essence that is simply irresistible.
Beyond Peanut Butter: Feeling adventurous? While the classic peanut butter is supreme, don’t hesitate to experiment with other nut butters like almond butter, cashew butter, or even sunflower seed butter for a delicious nut-free alternative. Just be mindful that their consistency might vary slightly, so you might need minor adjustments to the marshmallow quantity to achieve that perfect gooey texture.
Mini Marvels: Instead of cutting into traditional bars, you can roll the slightly cooled mixture into small balls. These bite-sized treats are perfect for parties and make for easier portion control (if such a thing is possible with these!). You can even skewer them on lollipop sticks for a fun, kid-friendly presentation, perhaps dipped in chocolate and rolled in sprinkles!
Add-ins Galore: Before pressing, stir in a handful of mini chocolate chips, M&M’s, a sprinkle of sea salt flakes for a salty-sweet kick, or even some crushed pretzels for a delightful savory crunch. The possibilities are truly endless, and each adaptation brings a fresh, exciting take on an already beloved classic, making it uniquely yours every time.
I genuinely believe that this Peanut Butter Rice Krispie Treats Recipe is more than just a sweet treat; it’s an invitation to create, to share, and to enjoy simple pleasures. It’s incredibly satisfying to whip up something so delicious with such little fuss, and I promise you, the smiles and compliments you’ll receive will be all the reward you need. Don’t be shy – dive into your kitchen, gather your ingredients, and give this recipe a try. You absolutely won’t regret it. And when you do, I would be utterly thrilled to hear about your experience. Did you add sprinkles? Did you try the chocolate drizzle? What variations did you come up with? Please, share your stories, your photos, and your triumphs in the comments below. Your culinary adventures inspire me, and I can’t wait to see how you make this classic your very own. Happy cooking, and even happier eating!
Delicious Peanut Butter Rice Krispie Treats Recipe – Easy No-Bake
Irresistible no-bake Peanut Butter Rice Krispie Treats combining crispy cereal, gooey marshmallow, and rich peanut butter, topped with optional chocolate, perfect for a quick snack or party dessert.
Ingredients
-
6 cups Rice Krispies cereal
-
1 cup creamy peanut butter
-
½ cup unsalted butter
-
1 (10 oz) bag mini marshmallows
-
1 ½ cups semi-sweet chocolate chips
Instructions
-
Step 1
Prepare a 9×13 inch baking pan by generously greasing or lining it with parchment paper. -
Step 2
In a large saucepan, melt ½ cup unsalted butter over low heat. Add 1 (10 oz) bag mini marshmallows; stir constantly until completely melted and smooth. -
Step 3
Remove the saucepan from heat. Stir in 1 cup creamy peanut butter until fully incorporated and the mixture is smooth. -
Step 4
Add 6 cups Rice Krispies cereal to the peanut butter-marshmallow mixture. Gently fold with a spatula until all cereal is evenly coated. -
Step 5
Transfer the mixture to the prepared pan. Press down evenly and firmly into the pan using a greased spatula or another piece of parchment paper. Let cool completely at room temperature (1-2 hours) or refrigerate (30-45 minutes) until firm. -
Step 6
If desired, melt 1 ½ cups semi-sweet chocolate chips (using a microwave-safe bowl or double boiler). Spread the melted chocolate evenly over the cooled treats in the pan. -
Step 7
Chill the treats in the refrigerator for 20-30 minutes, or until the chocolate topping is completely set. Once firm, lift the treats from the pan using the parchment paper overhang and cut into desired size squares or rectangles.
Important Information
Nutrition Facts (Per Serving)
It is important to consider this information as approximate and not to use it as definitive health advice.
Allergy Information
Please check ingredients for potential allergens and consult a health professional if in doubt.


Leave a Comment