
Pumpkin Cheesecake – simply uttering these two words conjures images of cozy autumn evenings and festive holiday tables. There’s something undeniably magical about this dessert, a perfect marriage of two beloved classics that transcends the ordinary, offering comfort and sophistication in every bite.
Why This Dessert is a Seasonal Sensation
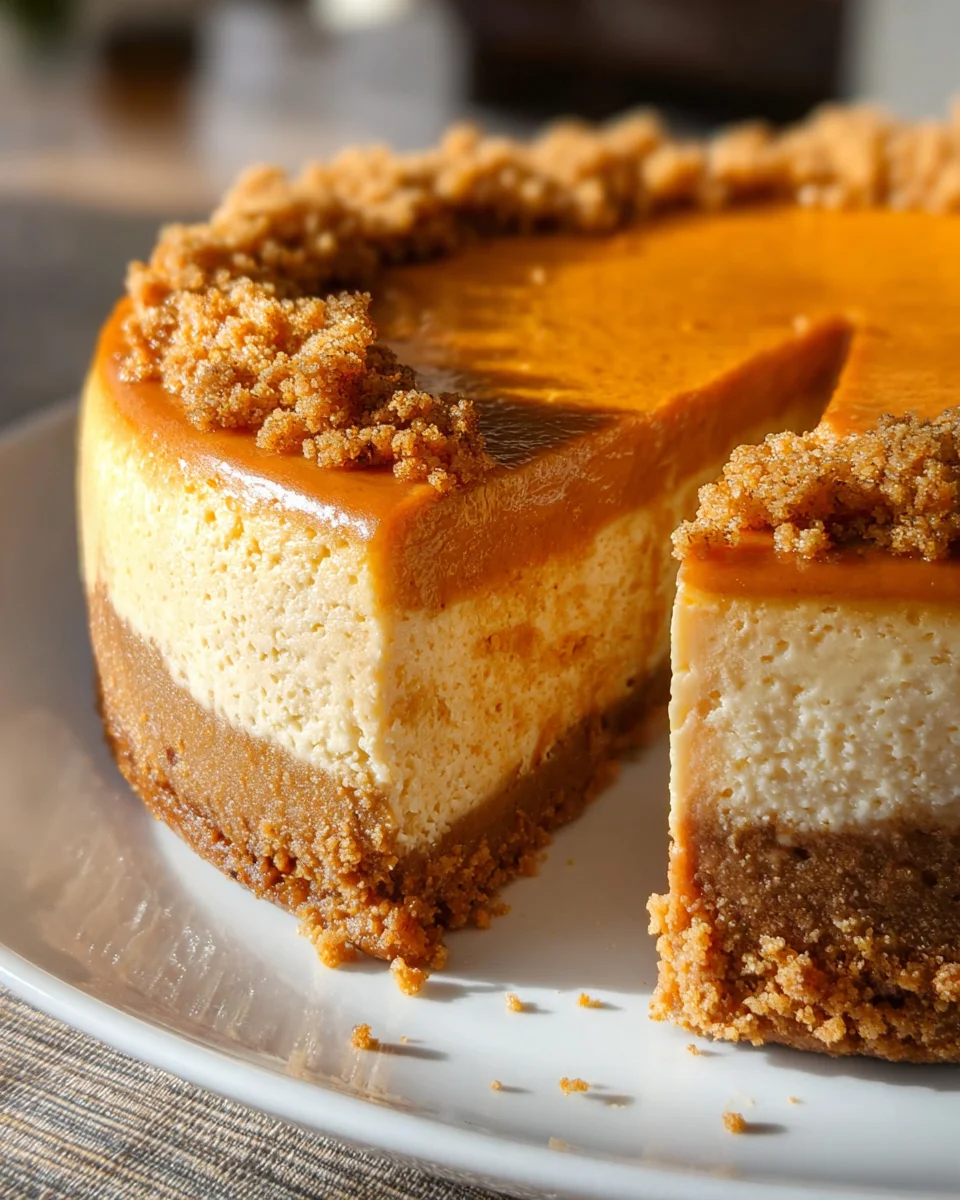
I find that the allure of a good Pumpkin Cheesecake lies in its exquisite balance. Imagine sinking your fork into a velvety smooth, rich cream cheese filling, infused with the warm, aromatic spices of cinnamon, nutmeg, and ginger, all resting on a crisp, buttery crust. It’s a symphony of textures and flavors that captivates the palate from the very first bite. This dish has truly become a staple for fall celebrations, particularly Thanksgiving, where its comforting presence offers a sweet, spiced counterpoint to savory meals. Its seasonal charm and sophisticated taste make it an absolute showstopper, ensuring there’s always room for a second slice.

Ingredients:
-
For the Graham Cracker Crust:
- 1 ½ cups (about 10 full sheets) graham cracker crumbs – You can buy pre-crushed crumbs, but I find crushing your own full graham cracker sheets yields a fresher flavor and better texture. Just pop them in a food processor or a sturdy plastic bag and crush with a rolling pin until fine.
- ¼ cup granulated sugar – This adds a touch of sweetness to balance the buttery crust.
- ½ cup (1 stick or 113g) unsalted butter, melted – Unsalted butter allows us to control the salt content in the entire recipe. Make sure it’s fully melted so it can bind the crumbs together properly.
-
For the Pumpkin Cheesecake Filling:
- 3 (8-ounce) packages full-fat cream cheese, softened to room temperature – This is absolutely crucial! Room temperature cream cheese mixes smoothly without lumps and incorporates air better, leading to a truly silky, velvety cheesecake. I usually take it out of the fridge at least 2 hours before I plan to start.
- 1 cup granulated sugar – For that classic sweet cheesecake flavor.
- ½ cup packed light brown sugar – This adds a wonderful molasses note and a deeper, more complex sweetness that complements the pumpkin beautifully.
- 2 tablespoons cornstarch – My secret weapon for preventing cracks! Cornstarch acts as a stabilizer, helping the cheesecake set smoothly and uniformly.
- 1 (15-ounce) can pumpkin puree – Make sure you’re grabbing pure pumpkin puree, not pumpkin pie filling, which already has spices and sugar added. We want control over our flavor profile!
- ½ cup sour cream, softened to room temperature – This contributes a lovely tangy note and extra moisture, enhancing the cheesecake’s creamy texture.
- ¼ cup heavy cream – Adds an extra layer of richness and helps achieve that luxurious, melt-in-your-mouth consistency.
- 2 teaspoons vanilla extract – Pure vanilla extract is key here; it enhances all the other flavors.
- 1 ½ teaspoons pumpkin pie spice – This blend typically includes cinnamon, nutmeg, ginger, and cloves, bringing all those quintessential fall flavors to the forefront. Feel free to adjust to your personal preference!
- ¼ teaspoon ground cinnamon – An extra boost of warmth and spice.
- ⅛ teaspoon ground nutmeg – Just a hint to deepen the spice profile.
- 3 large eggs, softened to room temperature – Again, room temperature is vital. Eggs act as a binder; adding them one at a time and mixing gently prevents overmixing, which can introduce too much air and cause cracks during baking.
-
Optional Topping (Homemade Whipped Cream):
- 1 ½ cups heavy cream, very cold – Cold cream whips up much better and holds its shape.
- 3 tablespoons powdered sugar – Also known as confectioners’ sugar, it dissolves beautifully and provides a delicate sweetness.
- 1 teaspoon vanilla extract – To flavor your perfect cloud of whipped cream.
Preparing the Graham Cracker Crust
Let’s kick things off with the foundation of our incredible pumpkin cheesecake: the crust! I always feel like a good crust is half the battle, and this one is simple yet absolutely perfect.
- Preheat Your Oven and Prepare Your Pan: First things first, go ahead and preheat your oven to 350°F (175°C). While that’s heating up, grab a 9-inch springform pan. You’ll want to lightly grease the bottom and sides with butter or a non-stick cooking spray. This tiny step ensures your crust doesn’t stick and makes for easy release later.
- Make Those Crumbs: If you’re starting with whole graham crackers, now’s the time to turn them into beautiful fine crumbs. I typically use my food processor for this – it’s quick and efficient. Just pulse them until you have a fine, sandy texture. Alternatively, you can place them in a sturdy Ziploc bag and crush them with a rolling pin. Aim for about 1 ½ cups of fine crumbs. Trust me, the finer the crumbs, the more cohesive and even your crust will be.
- Combine the Crust Ingredients: In a medium-sized bowl, combine your graham cracker crumbs and the ¼ cup of granulated sugar. Give them a good whisk to ensure the sugar is evenly distributed. Then, pour in your ½ cup of melted unsalted butter. Use a fork or a spatula to mix everything together until all the crumbs are moistened and resemble wet sand. It’s important to make sure every single crumb is coated in butter; this is what binds our crust together so it doesn’t fall apart.
- Press the Crust into the Pan: Now for the fun part! Pour the buttery crumb mixture into your prepared springform pan. Using the bottom of a flat-bottomed glass or your clean hands, firmly and evenly press the mixture over the bottom of the pan and about an inch up the sides. Take your time with this step to create a compact and uniform crust. A good, solid base is essential for supporting our rich cheesecake filling. I like to use the flat bottom of a measuring cup to really get it packed down tightly – it helps prevent crumbling.
- Pre-Bake the Crust: Pop your springform pan with the pressed crust into the preheated 350°F (175°C) oven. Bake for about 8-10 minutes, or until the edges are lightly golden and the crust smells fragrant. Pre-baking the crust helps it set and become less soggy once the filling is added. Once baked, remove it from the oven and place it on a wire rack to cool completely while you prepare the filling. This cooling step is important, as adding warm filling to a warm crust can sometimes lead to a soggy bottom.
Crafting the Velvety Pumpkin Cheesecake Filling
This is where the magic truly happens! Achieving that incredibly smooth, luscious, and crack-free pumpkin cheesecake filling is all about technique and ingredient temperature. Follow these steps closely, and you’ll be rewarded with cheesecake perfection.
- Start with Room Temperature Cream Cheese: In the bowl of your stand mixer fitted with the paddle attachment (or a large bowl with a hand mixer), place your three packages of softened full-fat cream cheese. I cannot stress enough how important it is for the cream cheese to be at room temperature. If it’s cold, you’ll end up with lumps, no matter how long you beat it. Beat the cream cheese on medium speed for about 3-5 minutes, scraping down the sides of the bowl frequently, until it is completely smooth, light, and fluffy. You want to incorporate a good amount of air here to get that airy, creamy texture.
- Add the Sugars and Cornstarch: Once the cream cheese is perfectly smooth, add the granulated sugar, light brown sugar, and cornstarch. Continue beating on medium-low speed until just combined and smooth, about 2 minutes. Make sure to scrape down the bowl again to ensure everything is fully incorporated and there are no hidden pockets of sugar. The cornstarch, remember, is our little crack-prevention hero!
- Incorporate the Pumpkin and Wet Ingredients: Next, add the pumpkin puree, sour cream, heavy cream, and vanilla extract to the bowl. Beat on low speed until everything is well combined and smooth. Be careful not to overmix at this stage; we just want it combined. The mixture will look thick and rich – absolutely beautiful!
- Introduce the Spices: Now for those warming fall flavors! Add the pumpkin pie spice, ground cinnamon, and ground nutmeg to the pumpkin mixture. Mix on low speed until just incorporated. Give it a quick taste if you like, and adjust the spice level if you feel it needs a little more zing.
- Gently Add the Eggs: This step is critical for a smooth, crack-free cheesecake. Add the eggs one at a time, beating on the lowest speed possible just until each egg is incorporated. After each egg, scrape down the sides and bottom of the bowl thoroughly. The key here is to not overmix the eggs. Overmixing incorporates too much air, which expands during baking and then contracts during cooling, often leading to unsightly cracks on the surface of your beautiful cheesecake. We want to mix just until the yolk disappears.
- Final Scrape and Prepare for Baking: Give the entire bowl one final, thorough scrape down with a spatula, ensuring no unmixed bits are hiding at the bottom. Your filling should be wonderfully smooth, thick, and uniformly colored. Now, set your magnificent filling aside for a moment.
Baking Your Perfect Pumpkin Cheesecake
Baking a cheesecake can seem intimidating, especially with the mention of a water bath, but I promise you, it’s a straightforward process that yields incredibly impressive results. The water bath (or bain-marie) is your best friend for a creamy, even bake and helps prevent cracks. Let’s get this delicious pumpkin cheesecake into the oven!
- Prepare for the Water Bath: Take your cooled springform pan with the pre-baked crust. You’ll need to wrap the outside of the pan with several layers of heavy-duty aluminum foil. I usually use 3-4 layers, making sure the foil extends all the way up and over the sides of the pan. The goal here is to create a waterproof barrier to prevent any water from seeping into your crust while it bakes in the water bath. Trust me, a little extra foil now saves a lot of heartache later!
- Pour in the Filling: Carefully pour your prepared pumpkin cheesecake filling into the foil-wrapped springform pan, right on top of the cooled graham cracker crust. Gently tap the pan on your counter a few times to release any large air bubbles that might be trapped in the filling. This also helps to ensure an even surface.
- Set Up the Water Bath: Find a large roasting pan or another pan that is significantly larger than your springform pan. Place your foil-wrapped springform pan (with the filling) into the center of this larger roasting pan. Now, carefully pour hot (not boiling, but very warm) water into the roasting pan, making sure it comes about halfway up the sides of the springform pan. The hot water creates a moist, steamy environment in the oven, which allows the cheesecake to bake gently and evenly, preventing it from drying out and cracking.
- Bake the Cheesecake: Carefully transfer the entire roasting pan (with the cheesecake and water bath) to your preheated 350°F (175°C) oven. Bake for an initial 15 minutes at 350°F (175°C). After 15 minutes, reduce the oven temperature to 325°F (160°C) without opening the oven door, and continue to bake for another 60-75 minutes. The baking time can vary slightly depending on your oven, so keep an eye on it.
- Check for Doneness: How do you know when your pumpkin cheesecake is perfectly baked? The edges should be set, but the very center (about 2-3 inches in diameter) should still have a slight jiggle to it when you gently shake the pan. It shouldn’t be liquidy, but a subtle wobble is exactly what we’re looking for. The residual heat will continue to cook the center as it cools, leading to that creamy texture. Avoid overbaking, as this is a common cause of cracks!
- Cooling – The Critical Phase: Once baked, turn off your oven but leave the cheesecake inside with the oven door propped open slightly (I use a wooden spoon to hold it ajar). Let it cool in the gradually cooling oven for at least 1 hour. This slow cooling process is incredibly important for preventing cracks and allowing the cheesecake to set beautifully.
- Counter Cooling and Removing the Foil: After the hour in the oven, carefully remove the springform pan from the water bath and the roasting pan. Place it on a wire rack on your counter to cool completely to room temperature, which will take another 2-3 hours. Once cool enough to handle, carefully remove the aluminum foil from around the springform pan.
- The Long Chill: Now for the hardest part – patience! Once your pumpkin cheesecake is at room temperature, cover it loosely with plastic wrap and transfer it to the refrigerator. Chill for at least 6-8 hours, or ideally, overnight. This chilling period is absolutely non-negotiable for a truly firm, well-set, and flavorful cheesecake. It allows the flavors to meld and the texture to firm up perfectly. Trying to slice it before it’s fully chilled will result in a messy, unset disaster.
Serving and Enjoying Your Pumpkin Cheesecake
After all your hard work and patience, it’s finally time to reap the delicious rewards! This pumpkin cheesecake is a showstopper on its own, but a few garnishes can truly elevate the experience.
- Release from the Pan: Once fully chilled, carefully run a thin knife around the edge of the cheesecake before releasing the springform pan sides. This prevents any sticking and ensures a clean release. You can then leave the cheesecake on the pan bottom for serving or carefully transfer it to a serving plate.
- Make Your Optional Whipped Cream: If you’re going for the homemade whipped cream, grab your very cold heavy cream, powdered sugar, and vanilla extract. In a cold bowl (chilling the bowl and whisk attachment in the freezer for 10-15 minutes beforehand helps a lot!), beat the heavy cream on medium-high speed until soft peaks form. Add the powdered sugar and vanilla extract, then continue beating until stiff peaks form. Be careful not to overbeat, or you’ll end up with butter!
- Slice and Serve: For clean slices, use a sharp knife that has been run under hot water and wiped dry between each cut. This will give you those perfectly smooth, picture-worthy slices.
- Garnish Ideas: Serve each slice plain, or with a dollop of your freshly made whipped cream. A dusting of extra cinnamon or nutmeg, a drizzle of caramel sauce, a sprinkle of candied pecans, or even some chocolate shavings would all be delightful additions.
- Storage: Leftover pumpkin cheesecake should be covered loosely with plastic wrap and stored in the refrigerator for up to 4-5 days. It actually tastes even better the second day, once the flavors have had a chance to fully develop.
And there you have it! A truly magnificent, creamy, and spiced pumpkin cheesecake that is sure to impress anyone who takes a bite. Enjoy every single moment of this incredible dessert!
Chef’s Note: This recipe is perfect for autumn gatherings, Thanksgiving dessert tables, or simply when you’re craving that comforting blend of pumpkin and spice. The detailed steps ensure that even a first-time cheesecake baker can achieve a professional-looking and tasting dessert. Remember, baking is a journey, and every step contributes to the final masterpiece!
Troubleshooting Tip: If you find your cheesecake has a small crack, don’t despair! A generous layer of whipped cream or a beautiful topping will completely hide it, and it will taste just as delicious. Cheesecake perfection isn’t always about being flawless; it’s about flavor!
Variations to Explore: Feel free to experiment with a gingersnap crust instead of graham cracker for an extra spicy kick. You could also swirl in a little caramel or white chocolate into the filling for another layer of flavor before baking. The possibilities for personalizing your “Pumpkin Cheesecake” are endless!
Making your own “Pumpkin Cheesecake” from scratch is such a rewarding experience, from the fragrant spices filling your kitchen to that first creamy, decadent bite. I hope you enjoy every moment of baking and savoring this incredible dessert!
Conclusion:
And there you have it, friends! We’ve journeyed through the creation of what I truly believe is one of the most delightful and impressive desserts you can possibly make: our incredible Pumpkin Cheesecake. This isn’t just any ordinary dessert; it’s a culinary masterpiece that seamlessly blends the comforting, warm spices of autumn with the rich, creamy decadence of a classic cheesecake. Every bite is an experience, a symphony of flavors and textures that will undoubtedly leave a lasting impression on anyone lucky enough to try it. From its perfectly spiced, velvety smooth filling to the irresistible crunch of its ginger-snap crust, this recipe is designed to deliver maximum impact with surprisingly approachable steps. I promise you, the effort is minimal compared to the awe and appreciation you’ll receive from your guests – or simply the sheer joy you’ll find in savoring a slice all to yourself.
This particular Pumpkin Cheesecake stands out because it strikes that perfect balance. It’s not overly sweet, allowing the natural pumpkin flavor and carefully selected spices to shine through without being overwhelmed. The texture is consistently smooth and luxurious, never grainy or dry, thanks to our careful mixing technique and precise baking instructions. It’s robust enough to hold its shape beautifully for a stunning presentation, yet it melts in your mouth with an ethereal lightness that belies its richness. Whether you’re a seasoned baker looking for a new showstopper or someone just starting to explore the joys of homemade desserts, this recipe is incredibly forgiving and yields consistently spectacular results. It truly is a must-try for holidays, special occasions, or simply when you want to treat yourself to something extraordinary on a cozy evening.
Serving Suggestions to Elevate Your Pumpkin Cheesecake Experience:
While this Pumpkin Cheesecake is absolutely divine on its own, I love to offer a few ideas to take your dessert experience to the next level. For a classic presentation, a generous dollop of homemade whipped cream, lightly sweetened with a hint of vanilla, is always a winner. You could also dust it with a sprinkle of ground cinnamon or freshly grated nutmeg for an aromatic flourish. Feeling a bit more adventurous? Consider a drizzle of warm caramel sauce, either homemade or a high-quality store-bought variety, across each slice. For those who enjoy a textural contrast, a scattering of candied pecans or toasted walnuts can add a delightful crunch and nutty flavor that complements the cheesecake beautifully. A personal favorite of mine is to crush a few extra ginger-snap cookies and sprinkle them over the whipped cream for an added layer of spiced goodness and texture that ties in perfectly with the crust.
Creative Variations and Flavor Enhancements:
Don’t be afraid to make this recipe your own! If you like a little extra zing, a hint of orange zest (about half a teaspoon) can be added to the cheesecake filling for a brighter note. For a more adult twist, a tablespoon of bourbon or dark rum stirred into the filling can add a sophisticated depth of flavor that pairs wonderfully with the pumpkin and spices. If you’re planning ahead, remember that cheesecakes often taste even better the next day, once all those beautiful flavors have had time to meld and deepen in the refrigerator. Just be sure to allow ample chilling time – at least 6-8 hours, or ideally overnight – for the perfect slice. Serving it chilled directly from the fridge ensures the best texture and clean cuts.
Now, it’s your turn! I genuinely hope you feel inspired to roll up your sleeves and give this incredible Pumpkin Cheesecake recipe a try. There’s an immense satisfaction that comes from creating something so delicious and beautiful with your own hands. It’s more than just a dessert; it’s an act of love, a way to bring comfort and joy to your table. Once you’ve baked it, served it, and basked in the compliments, please come back and share your experience with me! I absolutely adore hearing about your culinary adventures. Did you add a special twist? What did your friends and family think? Your feedback and shared moments are what make this community so wonderful. So go on, embrace the flavors of the season, create something truly special, and enjoy every single mouth-watering bite!
Pumpkin Cheesecake
A creamy, spiced pumpkin cheesecake with a buttery graham cracker crust, perfect for fall gatherings and holiday tables.
Ingredients
Instructions
Important Information
Nutrition Facts (Per Serving)
It is important to consider this information as approximate and not to use it as definitive health advice.
Allergy Information
Please check ingredients for potential allergens and consult a health professional if in doubt.
Leave a Comment