
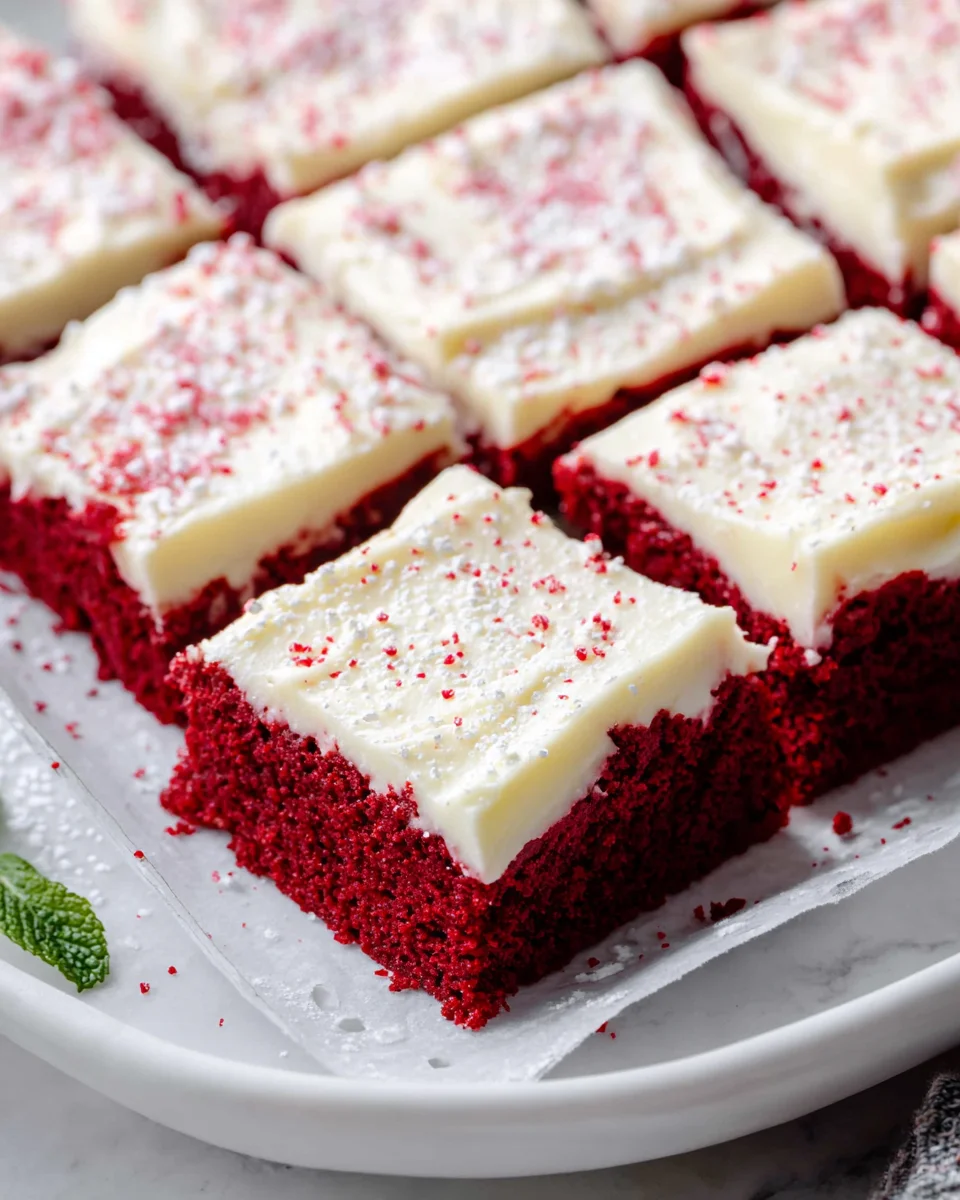
Red Velvet Cookie Bars
Are an absolute game-changer in the world of baked treats, combining the iconic flavor of a classic red velvet cake with the irresistible chewiness of a cookie, all in a convenient bar form. Imagine biting into that perfect square: a rich, crimson base with a subtle cocoa tang, crowned with a swirl of creamy, dreamy cream cheese frosting. It’s a symphony of textures and flavors that captivates from the very first glance and promises a delightful experience.
The allure of red velvet dates back decades, with its origins often tied to the Victorian era or early 20th-century American South. What started as a luxurious cake, perhaps enhanced by natural cocoa’s reddish hue or even beet juice during wartime rationing, has evolved into a beloved dessert staple worldwide. People adore this dish not just for its striking visual appeal, but for that unique balance of mild chocolate, a slight tang from buttermilk, and the incomparable sweetness of cream cheese frosting. These Red Velvet Cookie Bars offer all that cherished essence, but with the added bonus of being incredibly easy to make, transport, and share (or keep all to yourself!).

Ingredients:
-
For the Red Velvet Cookie Bars:
- 2 ½ cups (300g) all-purpose flour: I always recommend sifting your flour for cookie bars, as it helps create a lighter, more tender crumb and prevents any lumps in our dough. This is crucial for achieving that perfect texture in our Red Velvet Cookie Bars.
- ¼ cup (25g) unsweetened cocoa powder: Just a touch of cocoa powder is what gives red velvet its signature subtle chocolatey depth. Don’t use Dutch-processed here; natural cocoa powder works best with the baking soda for the correct leavening.
- 1 teaspoon baking soda: Our leavening agent! This, along with the buttermilk and cocoa powder, will give our Red Velvet Cookie Bars a lovely lift and soft texture.
- ½ teaspoon salt: A must-have in all baking! Salt balances the sweetness and enhances all the other flavors, making our Red Velvet Cookie Bars truly pop.
- 1 cup (226g) unsalted butter, softened: Make sure your butter is truly at room temperature. It should be soft enough to indent with your finger but not melted or greasy. This is vital for creaming properly with the sugar, creating air pockets for a light dough.
- 1 ¾ cups (350g) granulated sugar: Provides sweetness and contributes to the chewiness and spread of our Red Velvet Cookie Bars.
- 2 large eggs: Room temperature eggs incorporate better into the batter and help create a more emulsified, stable dough. They add moisture and structure.
- 1 tablespoon vanilla extract: Use good quality vanilla! It’s a key flavor component in red velvet and truly elevates the taste of these cookie bars.
- 1 ½ ounces (42g) liquid red food coloring: For that iconic vibrant red hue! While gels are concentrated, I find liquid food coloring often gives a more consistent, rich red for baking. Make sure it’s a quality brand for the best color.
- ½ cup (120ml) buttermilk: Adds a tender crumb and helps activate the baking soda. If you don’t have buttermilk, you can make a quick substitute by adding 1 tablespoon of white vinegar or lemon juice to a measuring cup, then filling the rest with regular milk to ½ cup, letting it sit for 5 minutes.
- 1 cup (170g) white chocolate chips or chunks (optional): I love adding white chocolate chips to my Red Velvet Cookie Bars for an extra layer of sweetness and texture, contrasting beautifully with the slight tang of the cream cheese frosting.
-
For the Cream Cheese Frosting:
- 8 ounces (226g) cream cheese, softened: Full-fat cream cheese is essential for a rich, stable, and delicious frosting. Like butter, make sure it’s properly softened to avoid lumps.
- ½ cup (113g) unsalted butter, softened: Again, room temperature is key! This provides richness and helps the frosting become wonderfully light and fluffy.
- 3-4 cups (360-480g) powdered sugar (confectioners’ sugar), sifted: Sifting is non-negotiable here to prevent lumps in your frosting. Start with 3 cups and add more if you prefer a sweeter or thicker frosting.
- 1 teaspoon vanilla extract: Enhances the classic flavor of cream cheese frosting, pairing perfectly with our Red Velvet Cookie Bars.
- Pinch of salt (optional): Just a tiny pinch can help balance the sweetness and really bring out the flavors in the frosting.
Prepping for Your Red Velvet Cookie Bars:
- Preheat and Prepare: My first step, always, is to preheat my oven to 350°F (175°C). While the oven is warming up, I grab a 9×13 inch baking pan. This size is ideal for making perfect Red Velvet Cookie Bars that aren’t too thin or too thick. I like to line the pan with parchment paper, leaving an overhang on the sides. This creates “handles” that will make lifting the cooled cookie bars out of the pan incredibly easy, ensuring a clean cut and presentation. A light spray with non-stick cooking spray underneath the parchment can help it stick to the pan.
- Gather and Sift Dry Ingredients: In a medium bowl, I whisk together my 2 ½ cups of all-purpose flour, ¼ cup of unsweetened cocoa powder, 1 teaspoon of baking soda, and ½ teaspoon of salt. I always take the time to sift these ingredients together. Sifting ensures there are no lumps and that all the dry ingredients are evenly distributed, which is super important for a consistent texture in our Red Velvet Cookie Bars. Set this bowl aside for a moment.
Making the Red Velvet Cookie Dough:
- Cream Butter and Sugar: In the large bowl of my stand mixer, fitted with the paddle attachment, or with a hand mixer, I combine 1 cup (226g) of softened unsalted butter and 1 ¾ cups (350g) of granulated sugar. I beat these together on medium-high speed for about 3-5 minutes. This step is crucial for light and tender Red Velvet Cookie Bars! We’re aiming for a mixture that’s light in color, fluffy in texture, and aerated. It should look almost like a cloud. Scrape down the sides of the bowl frequently to ensure everything is evenly incorporated.
- Add Eggs and Vanilla: Once the butter and sugar are perfectly creamy, I crack in one large egg at a time, beating well after each addition. After the first egg is fully incorporated, I add the second. It’s important to mix until each egg is just combined before adding the next, ensuring the mixture remains emulsified and smooth. After the eggs, I stir in 1 tablespoon of vanilla extract. Oh, that smell is just heavenly and promises delicious Red Velvet Cookie Bars!
- Introduce Red Color and Buttermilk: Now for the star of the show – the color! I add 1 ½ ounces of liquid red food coloring directly into the wet ingredients. This is a significant amount, but it’s what gives red velvet its iconic deep, vibrant red. I mix it on low speed until the color is fully uniform and absolutely gorgeous. Then, I pour in ½ cup of buttermilk and mix again until just combined. The mixture might look a little curdled at this point, but don’t worry; it will all come together beautifully with the dry ingredients.
- Combine Wet and Dry Ingredients: With the mixer on low speed, I gradually add the sifted dry ingredients mixture (flour, cocoa powder, baking soda, salt) to the wet ingredients. I mix until just combined. It’s so important not to overmix here! Overmixing develops the gluten in the flour too much, which can lead to tough, dense cookie bars instead of the soft, chewy Red Velvet Cookie Bars we’re dreaming of. Stop mixing as soon as you no longer see streaks of dry flour.
- Fold in White Chocolate Chips (Optional but Recommended!): If I’m feeling fancy (which is often when making Red Velvet Cookie Bars!), I gently fold in 1 cup of white chocolate chips or chunks using a rubber spatula. White chocolate adds a lovely sweetness and textural contrast that really complements the subtle chocolate and tang of the red velvet.
Baking the Red Velvet Cookie Bars:
- Spread the Dough: I carefully spoon the beautiful red cookie dough into my prepared 9×13 inch baking pan. The dough will be thick, so I use an offset spatula or the back of a spoon to gently spread it evenly across the bottom of the pan, making sure it reaches into all the corners. A consistent thickness will ensure even baking for our Red Velvet Cookie Bars.
- Bake to Perfection: I slide the pan into my preheated 350°F (175°C) oven and bake for 25-30 minutes. Baking times can vary depending on your oven, so I always keep a close eye on them. The cookie bars are ready when the edges are lightly golden and set, and the center looks just slightly soft and still a little moist. A toothpick inserted into the center should come out with moist crumbs, not wet batter. We don’t want to overbake these, as they’ll become dry; a slightly underbaked center will lead to perfectly chewy Red Velvet Cookie Bars once cooled.
- Cool Completely: Once baked, I remove the pan from the oven and let the Red Velvet Cookie Bars cool in the pan on a wire rack for at least an hour. Then, using those parchment paper “handles,” I carefully lift the entire slab of cookie bars out of the pan and transfer it directly onto the wire rack to cool completely. This means completely cool, folks! If you try to frost warm Red Velvet Cookie Bars, your cream cheese frosting will melt into a sad, sugary puddle. Patience is a virtue here!
Preparing the Cream Cheese Frosting:
- Cream Cheese and Butter: While the Red Velvet Cookie Bars are cooling, I prepare the divine cream cheese frosting. In a clean, large mixing bowl, I combine 8 ounces of softened full-fat cream cheese and ½ cup of softened unsalted butter. I beat these together on medium speed with my stand mixer or hand mixer until the mixture is incredibly smooth and absolutely free of any lumps. This takes about 2-3 minutes. Scrape down the bowl frequently to ensure everything is well combined. Smoothness is key for a silky frosting!
- Add Powdered Sugar: With the mixer on low speed, I gradually add the sifted powdered sugar, one cup at a time, beating until just incorporated after each addition. Starting on low speed prevents a “sugar cloud” explosion in your kitchen! Once all the sugar is in, I increase the speed to medium-high and beat for another 2-3 minutes until the frosting is light, fluffy, and perfectly spreadable. If the frosting seems too thick, you can add a tablespoon of milk or cream. If it’s too thin, a bit more sifted powdered sugar will help.
- Stir in Vanilla and Salt: Finally, I stir in 1 teaspoon of vanilla extract and, if I’m using it, a tiny pinch of salt. The vanilla adds that classic flavor we all love, and the salt just helps to cut through the sweetness and enhance the creaminess. Beat for another 30 seconds to ensure everything is well mixed. This frosting is the perfect crowning glory for our Red Velvet Cookie Bars.
Assembling and Serving Your Red Velvet Cookie Bars:
- Frosting the Bars: Once the Red Velvet Cookie Bars are completely cool to the touch (I can’t stress this enough!), I generously spread the luscious cream cheese frosting over the top using an offset spatula or the back of a spoon. I try to make the layer as even as possible, extending it all the way to the edges. This creates a beautiful, professional-looking finish.
- Chilling for Clean Cuts: For the absolute cleanest cuts, I highly recommend chilling the frosted Red Velvet Cookie Bars in the refrigerator for at least 30 minutes, or even an hour. This allows the frosting to set slightly, making slicing much easier and preventing it from smearing everywhere.
- Slice and Serve: After chilling, I use a sharp knife (running it under hot water and wiping it clean between each cut can help with super clean slices) to cut the large slab into individual bars. I typically cut them into 4 rows by 6 rows to yield 24 perfect Red Velvet Cookie Bars, but you can certainly adjust the size to your preference.
- Garnish (Optional): For an extra touch of elegance, I sometimes crumble a few of the cookie bar scraps, sprinkle a little more cocoa powder, or add a few festive sprinkles on top of the frosting. These little details make your Red Velvet Cookie Bars even more appealing.
- Storage: Store any leftover Red Velvet Cookie Bars in an airtight container in the refrigerator for up to 3-4 days due to the cream cheese frosting. They are truly best enjoyed at room temperature, so I usually take them out of the fridge about 15-20 minutes before serving to let the frosting soften just a bit.
There you have it! A perfect batch of homemade Red Velvet Cookie Bars, ready to be enjoyed. I promise you, these are absolutely irresistible and worth every single step. Happy baking!
Conclusion:
Well, we’ve reached the sweet end of our journey, and I genuinely hope you’re as excited as I am about what we’ve just created. This isn’t just another dessert recipe; it’s a game-changer, a crowd-pleaser, and an absolute joy to bake and share. If you’re looking for a treat that delivers on both stunning visual appeal and irresistible flavor with surprising ease, then these Red Velvet Cookie Bars are unequivocally your next baking project. I’ve poured my heart into perfecting this recipe because I truly believe it embodies everything a perfect dessert should be: comforting, elegant, and utterly delicious. They capture that quintessential red velvet magic – a subtle hint of cocoa, a vibrant ruby hue, and the glorious tang of cream cheese frosting – all in a convenient, bar form that makes serving a breeze. Each bite offers a delightful contrast: a wonderfully soft and chewy cookie base that practically melts in your mouth, perfectly complemented by a rich, velvety cream cheese topping that’s smooth, creamy, and just sweet enough to balance the cookie’s slight cocoa notes. It’s the kind of dessert that elicits gasps of delight and requests for the recipe, making you feel like a baking superstar without hours of intricate work. Trust me, the minimal effort involved in making these bars belies the impressive results, making them an ideal choice for both novice bakers and seasoned pros alike.
What I adore most about these bars is their incredible versatility. They shine at virtually any occasion, from a casual family gathering to a festive holiday party, or even as a thoughtful homemade gift. Imagine them gracing your dessert table during the festive season, their striking red and white a perfect match for holiday cheer, instantly elevating your spread. Or picture them as a delightful surprise for a birthday celebration, easy to transport and even easier to devour by guests of all ages. For serving, I personally love them at room temperature, which allows the cookie to remain perfectly soft and the frosting to be wonderfully spreadable, offering that classic melt-in-your-mouth experience. However, don’t hesitate to experiment with temperature! A slightly chilled bar offers a firmer frosting and a denser, almost brownie-like chew, which can be incredibly satisfying, especially on a warm day. If you’re feeling adventurous, try serving them ever-so-slightly warm – just a few seconds in the microwave if they’ve cooled – the cookie becomes incredibly gooey, creating a truly decadent experience, especially when paired with a scoop of premium vanilla bean ice cream. The contrast of the cold, creamy ice cream against the warm, chewy bar is simply divine and absolutely unforgettable. Another lovely touch is a light dusting of cocoa powder or powdered sugar over the cream cheese frosting right before serving, adding a professional finish and an extra layer of visual appeal that will impress your guests. They also pair wonderfully with a robust cup of coffee or a delicate afternoon tea, transforming a simple break into a luxurious moment of indulgence. These bars are truly a chameleon of desserts, adapting effortlessly to your preference and the occasion.
But the fun doesn’t stop there! These Red Velvet Cookie Bars are also ripe for creative variations, allowing you to truly make them your own. Want to add an extra layer of texture and sweetness? Fold a handful of good-quality white chocolate chips into the cookie dough before baking. The chips melt beautifully, creating delightful pockets of creamy sweetness that perfectly enhance the red velvet flavor profile. For a holiday-specific twist, consider sprinkling crushed peppermint candy over the cream cheese frosting just after it’s spread, or even mixing a tiny amount of peppermint extract into the frosting for a festive, cool kick. Different colored sprinkles can instantly adapt these bars to any theme – green and red for Christmas, pastels for Easter, or vibrant hues for a birthday bash, making them incredibly adaptable. You could even experiment with a touch of almond extract instead of vanilla in the cream cheese frosting for a slightly different aromatic note that adds a sophisticated twist. Or, for those who love a nutty crunch, finely chopped pecans or walnuts can be gently folded into the cookie dough. The possibilities are truly endless once you have this fantastic, flexible base recipe down, encouraging you to unleash your inner dessert artist.
So, now it’s your turn! I wholeheartedly encourage you to roll up your sleeves, preheat your oven, and dive into the wonderful world of these delectable bars. Trust me, you won’t regret it – they are destined to become a staple in your baking repertoire. The joy of baking these is only surpassed by the delight of sharing them (or, let’s be honest, secretly hoarding a few for yourself!). Once you’ve had a chance to bake and taste these incredible Red Velvet Cookie Bars, I would absolutely love to hear about your experience. Did you try a variation? What was your favorite part? Did you serve them warm or chilled? Please share your thoughts, your photos, and your baking triumphs! Your feedback means the world to me, and seeing your creations truly makes my day. Happy baking, my friends, and prepare to fall in love with your new favorite treat!
Ultimate Red Velvet Cookie Bars
An absolute game-changer in the world of baked treats, combining the iconic flavor of a classic red velvet cake with the irresistible chewiness of a cookie, all in a convenient bar form. A rich, crimson base with a subtle cocoa tang, crowned with creamy cream cheese frosting.
Ingredients
Instructions
Important Information
Nutrition Facts (Per Serving)
It is important to consider this information as approximate and not to use it as definitive health advice.
Allergy Information
Please check ingredients for potential allergens and consult a health professional if in doubt.

Leave a Comment