
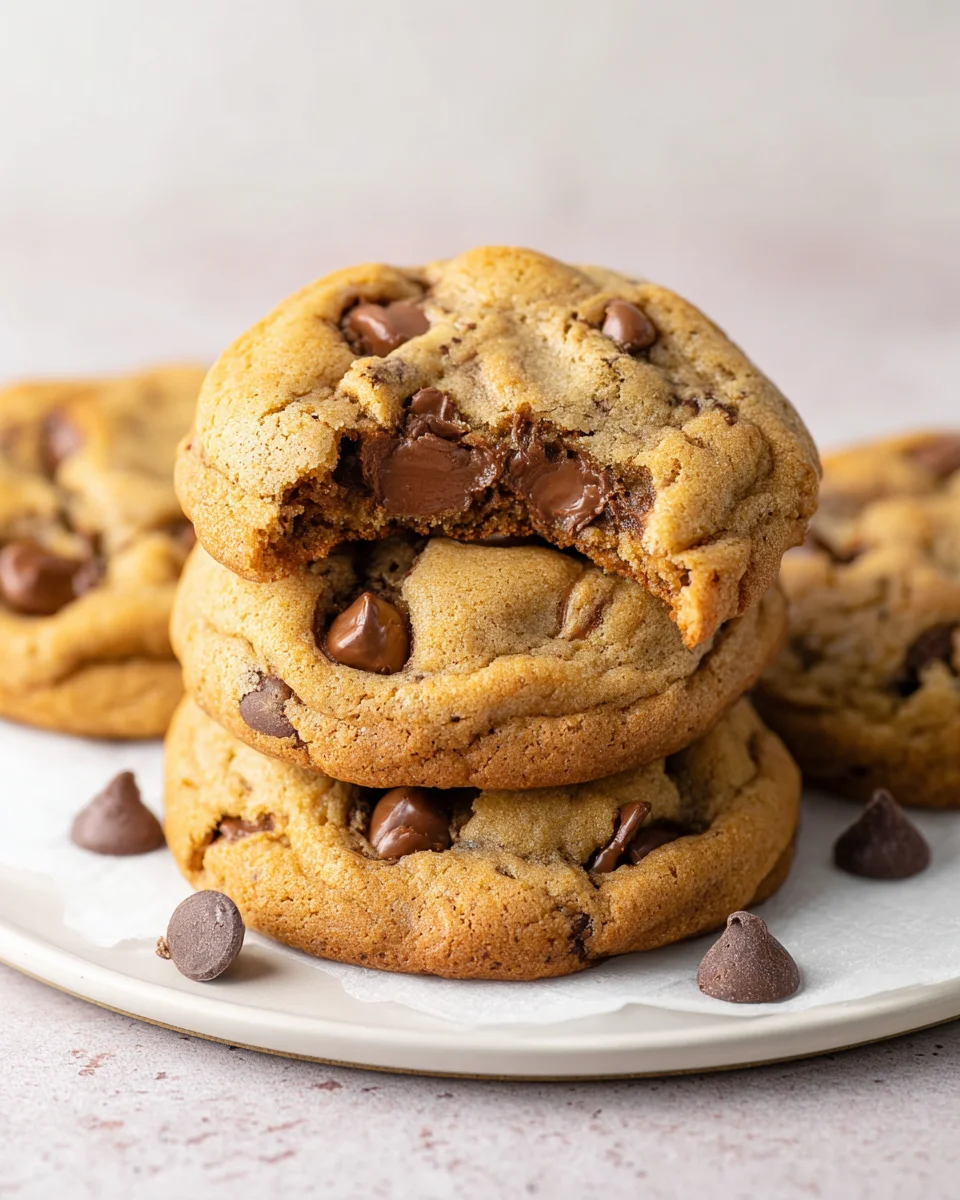
Thick Chocolate Chip Cookies – the very phrase conjures images of pure bliss, doesn’t it? I’m here to tell you that the quest for the perfect cookie, one that boasts a gloriously chewy center, perfectly gooey chocolate pools, and a satisfyingly substantial bite, ends right here. Are you ready to elevate your baking game and create cookies that are truly unforgettable?
The humble chocolate chip cookie holds a cherished spot in culinary history, first conceived by Ruth Graves Wakefield at the Toll House Inn in the 1930s. While the original recipe was revolutionary, the evolution towards a thicker, more decadent version has captivated bakers for generations. There’s something undeniably comforting and utterly irresistible about a cookie that doesn’t just satisfy your sweet tooth but also offers a robust, delightful chew with every bite. People adore these cookies not just for their classic, comforting flavour profile of rich chocolate melting into buttery, vanilla-infused dough, but specifically for their incredible texture.
That sought-after plumpness ensures a soft, tender interior even after cooling, making each bite an experience rather than just a snack. I promise, once you master the art of making truly Thick Chocolate Chip Cookies, you’ll never look back at thin, crispy alternatives. Get ready to embark on a delightful baking adventure that will fill your home with an aroma of warmth and happiness!

Ingredients:
- Unsalted Butter: 1 cup (2 sticks or 226g), softened to room temperature. Using unsalted butter allows me to control the salt content precisely, ensuring the perfect balance in our “Thick Chocolate Chip Cookies.”
- Granulated Sugar: ¾ cup (150g). This provides sweetness and contributes to the cookie’s spread and crispiness at the edges.
- Light Brown Sugar: 1 ¼ cups (250g), packed. The molasses in brown sugar adds chewiness, depth of flavor, and helps keep our cookies moist and wonderfully thick.
- Large Eggs: 2, at room temperature. Room temperature eggs emulsify better with the butter and sugar, creating a smoother, more uniform dough.
- Vanilla Extract: 2 teaspoons. Don’t skimp on good quality vanilla; it elevates the flavor profile significantly.
- All-Purpose Flour: 2 ¾ cups (340g). A slightly higher ratio of flour helps prevent excessive spreading, which is crucial for achieving those coveted “Thick Chocolate Chip Cookies.”
- Baking Soda: 1 teaspoon. Our primary leavening agent, it reacts with the brown sugar and butter to give our cookies lift and a tender crumb.
- Baking Powder: ½ teaspoon. A touch of baking powder provides an extra boost, helping them rise higher and stay thick.
- Salt: 1 teaspoon. Essential for balancing the sweetness and enhancing all the other flavors.
- Chocolate Chips: 1 ½ cups (255g) a mix of semi-sweet and dark chocolate chips is my personal favorite, though you can use any variety you love. I often chop a bar of good quality chocolate for extra pockets of melty goodness.
- Optional Flaky Sea Salt: For sprinkling on top, right after they come out of the oven. This adds a delightful pop of flavor and texture.
Preparing Your Workspace and Ingredients
Before we dive into creating these magnificent “Thick Chocolate Chip Cookies,” let’s ensure we have everything ready. This phase, often called mise en place, is crucial for smooth baking. I always start by gathering all my ingredients and tools. Precision in baking is key, so measuring everything out beforehand means I won’t be scrambling mid-process.
- First, I make sure my unsalted butter is genuinely at room temperature. This isn’t just a suggestion; it’s a vital step. If your butter is too cold, it won’t cream properly with the sugars, leading to a dense, tough cookie. If it’s too warm, almost melted, the cookies will spread too much, losing that desirable thickness. I usually take it out of the fridge an hour or two before I plan to bake. You should be able to press your finger into it and leave a slight indentation without it melting.
- Next, I crack my eggs into a small bowl and let them sit out alongside the butter. Room temperature eggs incorporate much more smoothly into the creamed butter and sugar mixture, creating a more uniform emulsion and a better texture in the final cookie.
- I measure out all my dry ingredients: the all-purpose flour, baking soda, baking powder, and salt. I find it’s easiest to combine these in a separate medium-sized bowl. This ensures that the leavening agents and salt are evenly distributed throughout the flour, preventing pockets of unmixed ingredients.
- Then, I measure my granulated sugar and packed light brown sugar. Make sure your brown sugar is truly packed into the measuring cup; this ensures you get the correct amount and, subsequently, the right chewiness and moisture.
- Finally, I get my chocolate chips ready. While the recipe calls for 1 ½ cups, I often find myself adding a little extra because, well, who doesn’t love more chocolate? If I’m using a chocolate bar, I’ll chop it roughly now, creating varying sizes of chocolate chunks that melt beautifully.
Crafting the Perfect Thick Chocolate Chip Cookie Dough
Now that all our ingredients are prepped, it’s time to bring them together to form the foundation of our “Thick Chocolate Chip Cookies.” This is where the magic really starts to happen, and each step contributes to that ultimate thick, chewy, and gooey texture we’re aiming for.
- Combine Dry Ingredients: In that medium bowl where you measured your flour, baking soda, baking powder, and salt, give everything a good whisk. I like to use a balloon whisk for about 30 seconds to a minute, ensuring every particle is thoroughly combined. This initial step prevents you from overmixing the wet ingredients later on, which can lead to tough cookies.
- Cream the Butter and Sugars: In the bowl of a stand mixer fitted with the paddle attachment, or with a large bowl and a handheld electric mixer, add your softened unsalted butter, granulated sugar, and packed light brown sugar. Beat these ingredients together on medium speed for about 3 to 5 minutes. This is a crucial step for achieving thick, tender cookies. What you’re looking for is a mixture that has transformed from dense and grainy into a light, fluffy, and pale-yellow cloud. This creaming process incorporates air into the butter and sugar, which helps with the cookie’s rise and contributes to that desirable chewy texture. Don’t rush this part; it’s foundational for the success of your “Thick Chocolate Chip Cookies.” I often stop the mixer once or twice to scrape down the sides of the bowl with a rubber spatula, ensuring everything is evenly creamed.
- Add Eggs and Vanilla: With the mixer still on medium-low speed, add one room temperature egg at a time, beating well after each addition. I usually let the mixer run for about 30 seconds after each egg, allowing it to fully incorporate into the butter mixture before adding the next. This prevents the mixture from curdling and ensures a smooth, homogeneous base. After both eggs are incorporated, pour in the vanilla extract and beat for another 15-20 seconds until fragrant and fully combined. Again, take a moment to scrape down the sides and bottom of the bowl to ensure everything is perfectly blended.
- Gradually Incorporate Dry Ingredients: Reduce the mixer speed to low. Gradually add the whisked dry ingredients (flour, baking soda, baking powder, salt) to the wet ingredients. I usually add about a third of the dry mixture at a time, mixing only until just combined before adding the next portion. The key here is to mix until just no streaks of flour remain. Overmixing the dough at this stage can develop the gluten in the flour too much, leading to tough, dense cookies instead of the soft, chewy “Thick Chocolate Chip Cookies” we’re striving for. As soon as the last of the flour disappears, turn off the mixer.
- Fold in the Chocolate Chips: Remove the bowl from the mixer and, using a sturdy rubber spatula or a wooden spoon, gently fold in your chocolate chips. I like to make sure they are evenly distributed throughout the dough. If I’ve chopped a chocolate bar, I’ll toss in those varied chunks now, ensuring some glorious pools of melted chocolate in the final product. Resist the urge to keep mixing once the chocolate is distributed.
- The Crucial Chill (Do NOT Skip This!): This step is paramount for achieving truly “Thick Chocolate Chip Cookies” that don’t spread into flat puddles. Cover the bowl tightly with plastic wrap and refrigerate the dough for a minimum of 3 hours, but ideally overnight (12-24 hours). I find that chilling the dough for a full 24 hours yields the absolute best results. Why is chilling so important? There are a few key reasons:
- Prevents Spreading: Chilling solidifies the butter in the dough. When the cold dough hits the hot oven, the butter takes longer to melt, giving the cookies time to set and rise before spreading out too much. This is the primary secret to their thickness.
- Concentrates Flavors: Over time, the flour hydrates more fully, and the sugars and other flavors have a chance to meld and deepen. This results in a more complex, richer flavor profile that you simply won’t get from un-chilled dough. Think of it like a good stew; it always tastes better the next day.
- Improved Texture: The slower melting of the butter, combined with the deeper hydration of the flour, contributes to a chewier interior and slightly crisper edge – the hallmark of a perfect thick chocolate chip cookie.
If you’re really short on time, you can get away with 1 hour, but I strongly encourage the longer chill for truly superior results. I often make the dough the evening before I plan to bake.
Baking Your Thick Chocolate Chip Cookies to Perfection
Once your dough has had its beauty rest in the fridge, we’re ready for the final, exciting phase: baking! This is where we transform that glorious dough into golden-brown, thick, and irresistible cookies.
- Preheat Your Oven: About 20-30 minutes before you’re ready to bake, preheat your oven to 375°F (190°C). It’s very important that the oven is fully preheated and has reached a stable temperature. An accurately hot oven ensures a quick initial rise and sets the edges of the cookies before they spread too much, contributing to their thickness. I also like to line my baking sheets with parchment paper or silicone baking mats. This prevents sticking and makes for easy cleanup, plus it promotes even baking.
- Scoop the Dough: Remove the chilled dough from the refrigerator. It will be quite firm, which is exactly what we want. Using a 2-tablespoon cookie scoop (or a ¼ cup measuring cup for truly giant cookies), portion out the dough. I like to roll the scooped dough into tall, rather than perfectly round, balls. This encourages them to spread upwards slightly as they bake, enhancing their thickness. Place the dough balls on your prepared baking sheets, leaving about 2-3 inches of space between them. Remember, these are “Thick Chocolate Chip Cookies,” so they will spread a bit, and we want to give them room to breathe. I typically bake 6-8 cookies per standard baking sheet.
- Bake to Golden Perfection: Place one baking sheet at a time in the center rack of your preheated oven. Bake for 10-13 minutes. For the perfect “Thick Chocolate Chip Cookies,” you’re looking for edges that are lightly golden brown and set, but the centers should still look soft, slightly puffy, and maybe even a little underbaked. This underbaked center is the secret to a gooey, chewy interior once they cool.
- The “Pillowy” Secret (Optional, but Highly Recommended!): This is a little trick I learned that ensures beautifully round, thick cookies. Immediately after you pull the baking sheet from the oven, while the cookies are still very hot and pliable, take a large round cookie cutter (slightly larger than your cookies) or the back of a spoon. Gently scoot the edges of each cookie inwards, shaping them into a perfectly round, thick disk. This technique helps to “fix” any irregular spreading and pushes the warm edges up, creating that desired tall, thick profile. If you want, this is also the perfect moment to press a few extra chocolate chips onto the tops of the cookies for that picture-perfect bakery look. If you’re using flaky sea salt, sprinkle a tiny pinch on top of each cookie now.
- Cool and Enjoy: Let the “Thick Chocolate Chip Cookies” cool on the baking sheet for 5-10 minutes. They will continue to set and firm up during this time. Because they are so thick and gooey, they are quite fragile when hot. After 5-10 minutes, carefully transfer them to a wire rack to cool completely. This allows air circulation all around the cookies, preventing them from becoming soggy on the bottom and ensuring an even texture.
Patience is key during the cooling process; it allows the chocolate to set just enough and the flavors to fully develop. But, honestly, resisting that warm, melty chocolate chip cookie straight from the oven is a challenge I rarely win! Enjoy your homemade “Thick Chocolate Chip Cookies” – they’re worth every minute of effort!
Conclusion:
My culinary journey has led me to many delightful discoveries, but I can confidently say that these aren’t just any cookies; they are an experience, a moment of pure bliss that I simply had to share with you. After countless trials and joyful tastings, I truly believe this recipe stands head and shoulders above the rest, delivering on every promise of what a perfect homemade cookie should be. These aren’t merely baked goods; they are edible hugs, warm invitations to happiness, and a testament to the simple joy of creating something truly special in your own kitchen.
What makes this particular recipe an absolute must-try? It’s the magical combination of textures and flavors. Imagine: a beautifully crisp, golden edge that gives way to a supremely soft, chewy, and gloriously gooey center, studded generously with melty pockets of rich chocolate. It’s that perfect equilibrium between crunchy and tender that so many recipes aim for but rarely achieve with such consistent perfection. Every single bite is a symphony for the senses, providing that comforting chewiness we all crave, paired with an intense chocolate flavor that lingers delightfully on the palate. Plus, there’s an inherent satisfaction in seeing those beautiful, substantial cookies emerge from the oven, truly living up to their name: Thick Chocolate Chip Cookies. They look impressive, they smell divine, and most importantly, they taste utterly unforgettable. You’re not just baking cookies; you’re crafting edible masterpieces that will garner genuine “oohs” and “aahs” from anyone lucky enough to try them.
Elevate Your Cookie Experience: Serving Suggestions & Variations
Now that you’ve mastered the art of baking these incredible cookies, let’s talk about how to truly enjoy them, or even how to make them uniquely yours. My favorite way to indulge is with a tall, frosty glass of cold milk, allowing the warmth of the cookie to slightly soften its edges before I take that first satisfying dip. But don’t stop there! Imagine them still warm, served with a generous scoop of vanilla bean ice cream, perhaps a drizzle of salted caramel, creating an impromptu gourmet dessert that rivals anything from a fancy restaurant. They also pair wonderfully with your morning coffee or afternoon tea, turning a simple break into a luxurious escape. For a truly decadent treat, try gently warming two cookies and sandwiching a scoop of ice cream between them – instant ice cream cookie sandwiches that are out of this world!
Feeling adventurous? The beauty of this base recipe is its versatility. You could swap out the chocolate chips for a mix of dark, milk, and white chocolate for a multi-layered flavor profile. Or, perhaps, introduce some finely chopped toasted pecans or walnuts for an added crunch and nutty depth. A sprinkle of flaky sea salt on top before baking enhances the chocolate notes beautifully, offering a sophisticated twist. For the ultimate indulgence, consider stuffing them: tuck a small square of caramel or a dollop of peanut butter into the center of the dough before baking for a delightful surprise inside. You could even play with spices, adding a hint of cinnamon or espresso powder to the dough to deepen the chocolate’s complexity.
Your Baking Adventure Starts Now!
I genuinely encourage you to roll up your sleeves, preheat your oven, and embark on this wonderful baking journey. Don’t be intimidated; the process is straightforward, and the rewards are immense. There’s something incredibly therapeutic about mixing the dough, shaping it, and watching these beauties transform in the heat of the oven. Once you taste these perfect cookies, you’ll understand exactly what I mean. This isn’t just a recipe; it’s an invitation to create lasting memories, share joy, and maybe even discover a new favorite kitchen ritual. I am so excited for you to experience the magic for yourself. Please, when you make them, come back and tell me all about it! Share your photos, your triumphs, and your serving ideas. I love hearing from you and seeing how you make these cookies your own. Happy baking, my friends!
Thick Chocolate Chip Cookies
The quest for the perfect cookie, one that boasts a gloriously chewy center, perfectly gooey chocolate pools, and a satisfyingly substantial bite, ends right here. Elevate your baking game and create cookies that are truly unforgettable with this recipe for thick, chewy, and gooey chocolate chip cookies.
Ingredients
Instructions
Important Information
Nutrition Facts (Per Serving)
It is important to consider this information as approximate and not to use it as definitive health advice.
Allergy Information
Please check ingredients for potential allergens and consult a health professional if in doubt.


Leave a Comment