
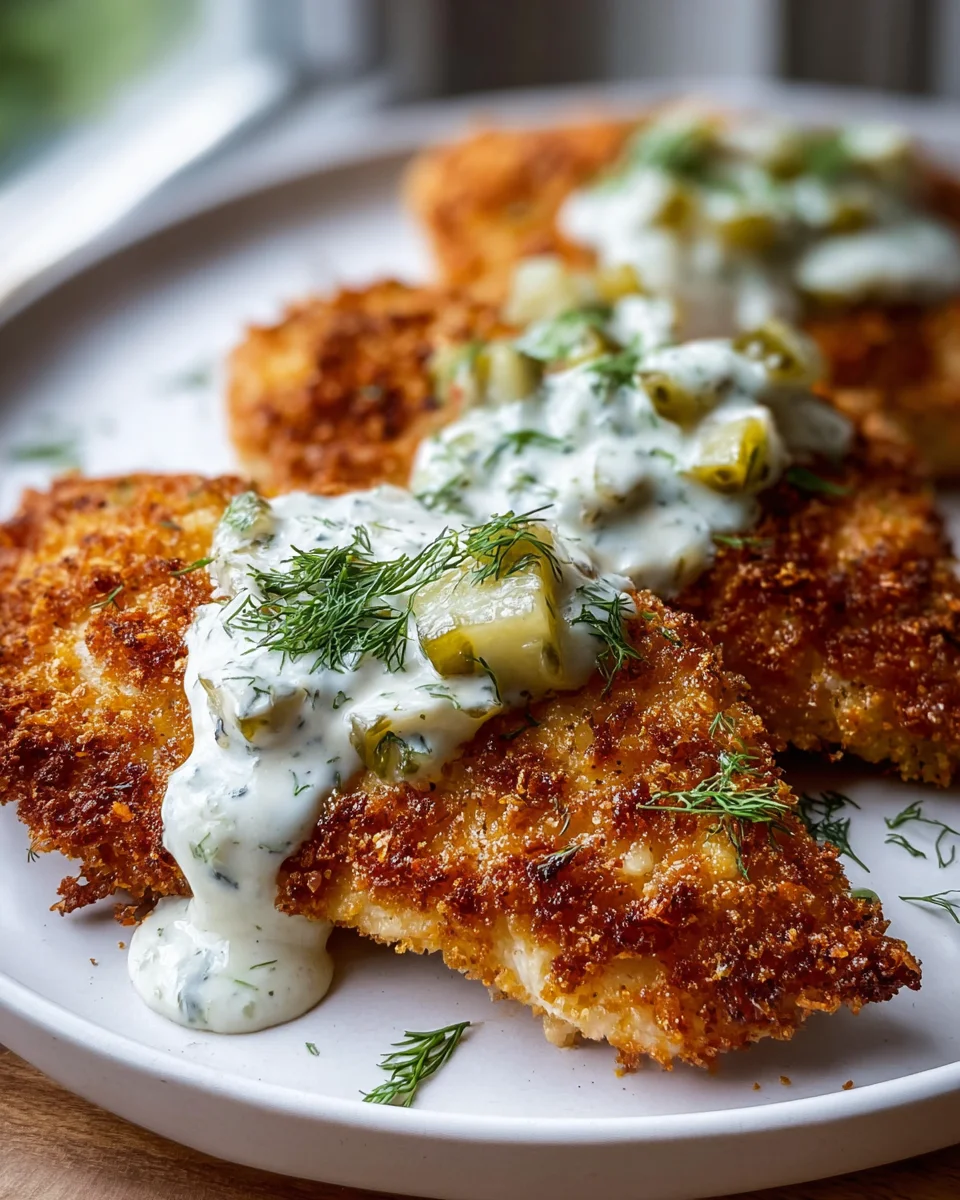
Dill Pickle Parmesan Chicken Recipe is here to transform your dinner routine with a burst of flavors you never knew you needed! Have you ever craved something distinctly savory, slightly tangy, and utterly comforting, all at once? This dish is a culinary revelation, masterfully bringing together the beloved briny zest of dill pickles with the rich, umami depth of Parmesan cheese, all coating perfectly cooked chicken. While this particular combination might not have centuries of history, it’s a testament to modern culinary creativity, born from a desire to infuse classic comfort food with exciting, contemporary twists, especially amidst the recent pickle craze.
People absolutely adore this Dill Pickle Parmesan Chicken Recipe because it strikes an incredible balance. The pickles don’t just add a sour note; they provide a complex, herbaceous tang that brightens the entire dish, while the Parmesan bakes into a crisp, golden crust, locking in moisture and delivering that irresistible salty, nutty finish. It’s incredibly convenient for a busy weeknight yet feels gourmet enough to impress. Prepare for tender, juicy chicken enveloped in a crust that offers an explosion of savory, tangy goodness in every single bite. We are certain you’re about to fall in love with your new favorite chicken dish!

Ingredients:
- 4 boneless, skinless chicken breasts (about 1.5 – 2 pounds total), butterflied if very thick
- 1 cup all-purpose flour
- 1 teaspoon garlic powder
- 1 teaspoon onion powder
- 1/2 teaspoon smoked paprika (or sweet paprika)
- 1/4 teaspoon cayenne pepper (optional, for a little kick)
- 1 teaspoon kosher salt, plus more for seasoning
- 1/2 teaspoon freshly ground black pepper, plus more for seasoning
- 2 large eggs
- 1/4 cup finely chopped dill pickles (from about 2-3 medium spears)
- 1/4 cup dill pickle juice (from the jar)
- 2 tablespoons Dijon mustard
- 2 tablespoons fresh dill, finely chopped, plus more for garnish
- 1 1/2 cups Panko breadcrumbs
- 1 cup freshly grated Parmesan cheese (I highly recommend grating your own for the best texture and flavor!)
- 1/2 cup vegetable oil, canola oil, or grapeseed oil, for pan-frying (you might need more)
- 2 tablespoons unsalted butter (optional, for added richness during cooking)
- Lemon wedges, for serving
Prepping the Chicken for Perfection
- Prepare Your Chicken Breasts: First things first, let’s get those chicken breasts ready for their transformation! Lay one chicken breast at a time between two sheets of plastic wrap or inside a large, sturdy freezer bag. This little trick is an absolute game-changer, preventing a messy splatter and making cleanup an absolute breeze. Now, grab your trusty meat mallet (make sure you use the flat side for this job, not the spiked tenderizing side!) or, if you don’t have one, a heavy-bottomed skillet works perfectly well. Begin to pound the chicken gently but firmly, working steadily from the thickest part of the breast outwards towards the edges. Your primary goal here is to achieve a uniform thickness of about 1/2 to 3/4 inch. This isn’t just about tenderizing the meat; it’s crucial for ensuring that your chicken cooks evenly and quickly. By pounding it thin, you prevent those dreaded dry spots and allow that glorious Parmesan dill pickle crust to cook to a perfect golden crisp without burning the chicken itself. Repeat this meticulous process for all your chicken breasts, setting aside the uniformly thin cutlets on a clean plate. You’ll immediately notice how much more surface area you’ve created, which is fantastic because it means more delicious coating will adhere to every single piece!
- Season the Chicken: Once all your chicken breasts are beautifully pounded, it’s time to infuse them with some foundational flavor. Lightly season both sides of each chicken cutlet with a sprinkle of kosher salt and a generous grind of freshly cracked black pepper. While much of the flavor will come from our incredible coating, this initial seasoning layer is important for ensuring the meat itself isn’t bland. Set these seasoned beauties aside while we prepare the dredging stations.
Crafting the Flavorful Wet Dredge and Dry Crust
- Assemble the Wet Dredge Station (Pickle & Egg Infusion): Grab a shallow dish or a wide, shallow bowl – something that’s large enough to comfortably dip a chicken cutlet into. In this bowl, we’re going to create the heart of our unique flavor profile. Combine your finely chopped dill pickles, the tangy dill pickle juice, and the zesty Dijon mustard. Stir these ingredients together thoroughly. The Dijon mustard not only adds another layer of tang that complements the pickles beautifully, but it also acts as a fantastic emulsifier, helping everything bind together smoothly. Now, crack your two large eggs into this pickle mixture. Whisk everything together vigorously with a fork or a small whisk until the eggs are completely broken down and the mixture is well combined and slightly frothy. Finally, stir in the 2 tablespoons of freshly chopped dill. The aroma at this stage is absolutely incredible, a true preview of the delightful flavors to come. This “wet dredge” is packed with pickle essence and will ensure the subsequent dry coating adheres perfectly.
- Prepare the Flour Dredge: In a second shallow dish, pour your 1 cup of all-purpose flour. To this, add 1 teaspoon of garlic powder, 1 teaspoon of onion powder, 1/2 teaspoon of smoked paprika (or sweet paprika if you prefer), 1 teaspoon of kosher salt, and 1/2 teaspoon of freshly ground black pepper. If you’re feeling adventurous and like a little heat, now is the time to add your 1/4 teaspoon of cayenne pepper. Whisk all these dry ingredients together thoroughly with a fork until they are completely combined and there are no lumps. This seasoned flour will be our initial coating, forming a dry base for the wet dredge to cling to, which in turn helps the Panko and Parmesan stick even better.
- Create the Parmesan Crumb Coating: Now for the star of our crispy crust! In a third shallow dish or a large plate with raised edges, combine your 1 1/2 cups of Panko breadcrumbs with 1 cup of freshly grated Parmesan cheese. Trust me, using freshly grated Parmesan makes an enormous difference here; the pre-grated varieties often have anti-caking agents that can hinder crispiness and mute the flavor. Add another 1/2 teaspoon of garlic powder, 1/2 teaspoon of onion powder, 1/2 teaspoon of smoked paprika, and a final pinch of salt and pepper to this mixture. Use your fingers or a fork to gently toss and mix everything until the Panko and Parmesan are uniformly distributed and coated with the seasonings. This is where all those incredible savory, cheesy, and herbaceous flavors will reside, ready to form a golden, crispy shell around your chicken.
The Dredging Dance: Coating the Chicken
- Set Up Your Dredging Station: Arrange your three shallow dishes in an assembly line fashion: first, the seasoned flour; second, the pickle and egg wet dredge; and third, the Parmesan Panko crumb mixture. Having everything organized will make the process smooth and efficient, minimizing mess. I like to keep one hand designated as the “wet hand” and the other as the “dry hand” to avoid clumpy fingers, but do whatever feels most comfortable for you!
- Flour the Chicken: Take one pounded chicken cutlet and fully dredge it in the seasoned flour. Make sure both sides are completely coated. Gently shake off any excess flour; we want a thin, even layer, not a thick, pasty one. The purpose of this flour layer is to create a slightly textured surface that the wet egg mixture can easily cling to, forming a bridge to the final crispy coating.
- Dip in the Wet Dredge: Next, transfer the floured chicken cutlet to the pickle and egg wet dredge. Submerge it completely, ensuring every inch of the chicken is coated in this flavorful, tangy mixture. Lift the chicken from the dredge, allowing any excess liquid to drip back into the bowl for a few seconds. This step is critical as the wet layer acts as the glue for our crispy crust.
- Press into the Parmesan Crumb Coating: Finally, place the wet chicken cutlet into the Parmesan Panko crumb mixture. Generously sprinkle the breadcrumb mixture over the top of the chicken, and then gently but firmly press the crumbs onto both sides of the chicken. Don’t be shy here; you want a thick, even coating. Really press the crumbs in to ensure they adhere well and create a substantial crust. Pay special attention to the edges to ensure full coverage. Once coated, transfer the chicken to a clean plate or a baking sheet lined with parchment paper. Repeat this dredging process for all remaining chicken cutlets. At this stage, the chicken looks absolutely magnificent, promising a burst of flavor and a delightful crunch! If you have time, letting the coated chicken rest in the refrigerator for 15-20 minutes can help the coating set even more firmly, reducing the chance of it falling off during cooking.
Cooking Your Dill Pickle Parmesan Chicken
Option 1: Pan-Frying for Golden Perfection
- Heat the Oil: Place a large, heavy-bottomed skillet (cast iron or stainless steel works wonderfully) over medium-high heat. Pour in enough vegetable, canola, or grapeseed oil to come about 1/4 inch up the sides of the pan. If you’re using butter for extra richness, add it now alongside the oil; the oil will help prevent the butter from burning. Let the oil heat up for several minutes until it shimmers and a tiny pinch of Panko breadcrumb dropped into it sizzles immediately. A properly heated pan is key to achieving that perfectly golden, crispy crust without the chicken absorbing too much oil.
- Pan-Fry the Chicken: Carefully place 1 or 2 coated chicken cutlets into the hot oil, ensuring you don’t overcrowd the pan. Overcrowding will lower the oil temperature and lead to soggy, rather than crispy, chicken. Allow the chicken to cook undisturbed for about 4-6 minutes per side. You’re looking for a beautiful, deep golden-brown crust that’s incredibly crispy. Resist the urge to move or flip the chicken too soon; patience is a virtue here! The distinct aroma of toasted Parmesan and dill will fill your kitchen, tantalizing your senses. Once one side is gloriously golden, carefully flip the chicken using tongs and cook for another 4-6 minutes on the second side, until it reaches the same magnificent color and crispness. The internal temperature of the chicken should reach 165°F (74°C) when measured with an instant-read thermometer at the thickest part. If your chicken is thick and the crust is browning too quickly, you can briefly transfer it to a preheated oven at 350°F (175°C) to finish cooking through, but usually, the even thickness from pounding makes this unnecessary.
- Rest the Chicken: As each piece of chicken finishes cooking, transfer it to a wire rack set over a baking sheet. This allows air to circulate around the chicken, keeping the crust crisp, rather than letting it steam on a flat plate. Lightly sprinkle with a pinch of salt immediately after removing from the pan. Allow the chicken to rest for at least 5 minutes before slicing or serving. This crucial resting period allows the juices to redistribute throughout the meat, ensuring every bite is tender, juicy, and flavorful. Don’t skip this step!
Option 2: Baking for a Lighter Touch (Alternative Method)
- Preheat and Prepare for Baking: If you prefer a lighter option or simply want to avoid pan-frying, baking is an excellent alternative that still yields a deliciously crispy crust. Preheat your oven to 400°F (200°C). Line a large baking sheet with parchment paper, and for even crispier results, place an oven-safe wire rack on top of the parchment paper. Lightly spray the wire rack (or parchment paper if you’re not using a rack) with cooking spray. This preparation ensures that the chicken won’t stick and allows the air to circulate for maximum crispness.
- Bake the Chicken: Carefully place the coated chicken cutlets in a single layer on the prepared baking sheet, ensuring there’s ample space between each piece to allow for even cooking. Bake for 15-20 minutes, or until the chicken is cooked through and the crust is golden brown and crispy. Halfway through the baking time, around the 8-10 minute mark, you might want to carefully flip the chicken to ensure both sides achieve that desirable golden hue and texture. Keep an eye on the color; the Parmesan can brown quickly. The internal temperature should register 165°F (74°C) when checked with an instant-read thermometer at the thickest part of the chicken. If you notice the crust getting too dark before the chicken is fully cooked, you can loosely tent it with aluminum foil.
- Rest Baked Chicken: Just like with pan-fried chicken, transfer your baked Dill Pickle Parmesan Chicken to a cutting board or serving platter and let it rest for 5 minutes. This ensures the chicken remains wonderfully juicy and tender, despite being baked.
Serving Your Culinary Masterpiece
- Garnishing and Plating: Arrange your magnificent Dill Pickle Parmesan Chicken cutlets on a serving platter. A final flourish of fresh, finely chopped dill sprinkled over the top really enhances the presentation and reinforces that delightful dill flavor. You can also add a few extra thin slices of dill pickle on the side for those who crave even more tangy goodness. Don’t forget the lemon wedges! A squeeze of fresh lemon juice just before eating brightens all the flavors and adds a fantastic, zesty counterpoint to the rich Parmesan and pickle notes. The bright acidity of the lemon cuts through the richness beautifully, making each bite even more enjoyable.
- Suggested Pairings: This Dill Pickle Parmesan Chicken is incredibly versatile and pairs wonderfully with a variety of side dishes. I love serving it with creamy mashed potatoes, which offer a comforting contrast to the crispy chicken. Steamed green beans or asparagus, perhaps lightly tossed with butter and a touch of garlic, make for a fresh and vibrant accompaniment. A simple mixed green salad with a light vinaigrette is also a fantastic choice, adding a refreshing element to the meal. For those who can’t get enough pickle flavor, a quick creamy dill sauce (yogurt or sour cream-based) can be a delightful dipping option. No matter how you serve it, this “Dill Pickle Parmesan Chicken Recipe” is bound to become a new favorite in your kitchen, delivering a unique and incredibly satisfying dining experience.
Conclusion:
Well, my friends, we’ve journeyed through the steps of what I truly believe is a culinary game-changer, and now it’s time to wrap things up with a final push for why this dish absolutely deserves a spot in your weekly rotation. If you’re looking for a meal that consistently delivers on flavor, texture, and pure satisfaction, look no further than this incredible creation. The marriage of tangy dill pickle brine, savory Parmesan cheese, and perfectly cooked chicken creates a symphony of tastes that is both surprising and utterly addictive. I know some of you might be raising an eyebrow at the pickle part, but trust me, the sharp acidity mellows beautifully during cooking, infusing the chicken with an unparalleled juiciness and a subtle, bright tang that balances the rich, salty crust. It’s not just a meal; it’s an experience that tantalizes the taste buds and leaves everyone at the table asking for more. This isn’t just another chicken dish; it’s the Dill Pickle Parmesan Chicken Recipe that will redefine your expectations for easy, impactful home cooking. The golden, crispy exterior gives way to incredibly tender, flavorful meat, making every bite an absolute delight. It’s comforting, yet exciting, familiar, yet refreshingly new. Seriously, it’s a dish that genuinely excites me, and I can’t wait for you to feel that same spark of joy when you taste it.
Now that I’ve convinced you of its deliciousness, let’s talk about how to make it a complete meal and even how to play around with the recipe to suit your mood. For serving, I absolutely love pairing this chicken with creamy mashed potatoes, which act as the perfect canvas for soaking up any delightful pan juices. A simple green salad with a light vinaigrette also provides a refreshing contrast to the richness of the chicken, cutting through with its crispness. If you’re looking for something a bit heartier, a side of roasted asparagus or broccoli, seasoned simply with salt and pepper, complements the flavors beautifully without overwhelming them. Fluffy white rice is another excellent option, especially if you enjoy a more neutral base to let the chicken truly shine. Don’t underestimate the power of a squeeze of fresh lemon juice over the top just before serving; it brightens everything up and adds another layer of zesty freshness!
But the fun doesn’t stop there! This recipe is incredibly versatile. If you prefer a spicier kick, try adding a pinch of cayenne pepper or a dash of your favorite hot sauce to the breading mixture, creating a delightful warmth. For a different cheesy experience, a blend of sharp cheddar and Monterey Jack could create a wonderfully gooey crust, offering a different savory profile. Feel free to experiment with different herbs as well; fresh chives or a sprinkle of dried onion powder alongside the dill can add extra layers of savory goodness and aromatic depth. While I’ve outlined a pan-frying method for that perfect sear, this chicken also bakes up beautifully in the oven at 375°F (190°C) for about 20-25 minutes, or until cooked through and golden, which can be a great hands-off approach for busy evenings. Air frying is another fantastic option for maximum crispiness with less oil, giving it a superb crunch. You could even slice the cooked chicken and pile it onto toasted brioche buns with some extra pickles and a swipe of tangy sauce for an epic chicken sandwich. The possibilities are truly endless when you start thinking creatively with this fantastic foundation!
So, my friends, what are you waiting for? This isn’t just a recipe; it’s an invitation to elevate your weeknight dinners and impress your loved ones (or just yourself!). I genuinely hope you’ll give this unique and delicious dish a try. It’s one of those recipes that truly delivers a memorable meal with relatively little fuss, making it perfect for both novice and experienced cooks. Don’t be shy; step into the kitchen and unleash your inner chef with this fantastic Dill Pickle Parmesan Chicken Recipe! I promise, the reward of that first crispy, tangy, and savory bite will be well worth it. And once you’ve experienced its magic, I would absolutely love to hear about it. Please come back and share your thoughts in the comments, tell me about your serving choices, or even how you decided to put your own spin on it. Did you add extra garlic? Try a different cheese? Your culinary adventures inspire me and the entire cooking community. Happy cooking, and I can’t wait to hear all about your delicious creations!
Tangy Dill Pickle Parmesan Chicken Recipe – So Flavorful!
Dill Pickle Parmesan Chicken Recipe is here to transform your dinner routine with a burst of flavors you never knew you needed! Have you ever craved something distinctly savory, slightly tangy, and utterly comforting, all at once? This dish is a culinary revelation, masterfully bringing together the beloved briny zest of dill pickles with the rich, umami depth of Parmesan cheese, all coating perfectly cooked chicken. While this particular combination might not have centuries of history, it’s a testament to modern culinary creativity, born from a desire to infuse classic comfort food with exciting, contemporary twists, especially amidst the recent pickle craze.
Ingredients
Instructions
Important Information
Nutrition Facts (Per Serving)
It is important to consider this information as approximate and not to use it as definitive health advice.
Allergy Information
Please check ingredients for potential allergens and consult a health professional if in doubt.

Leave a Comment