
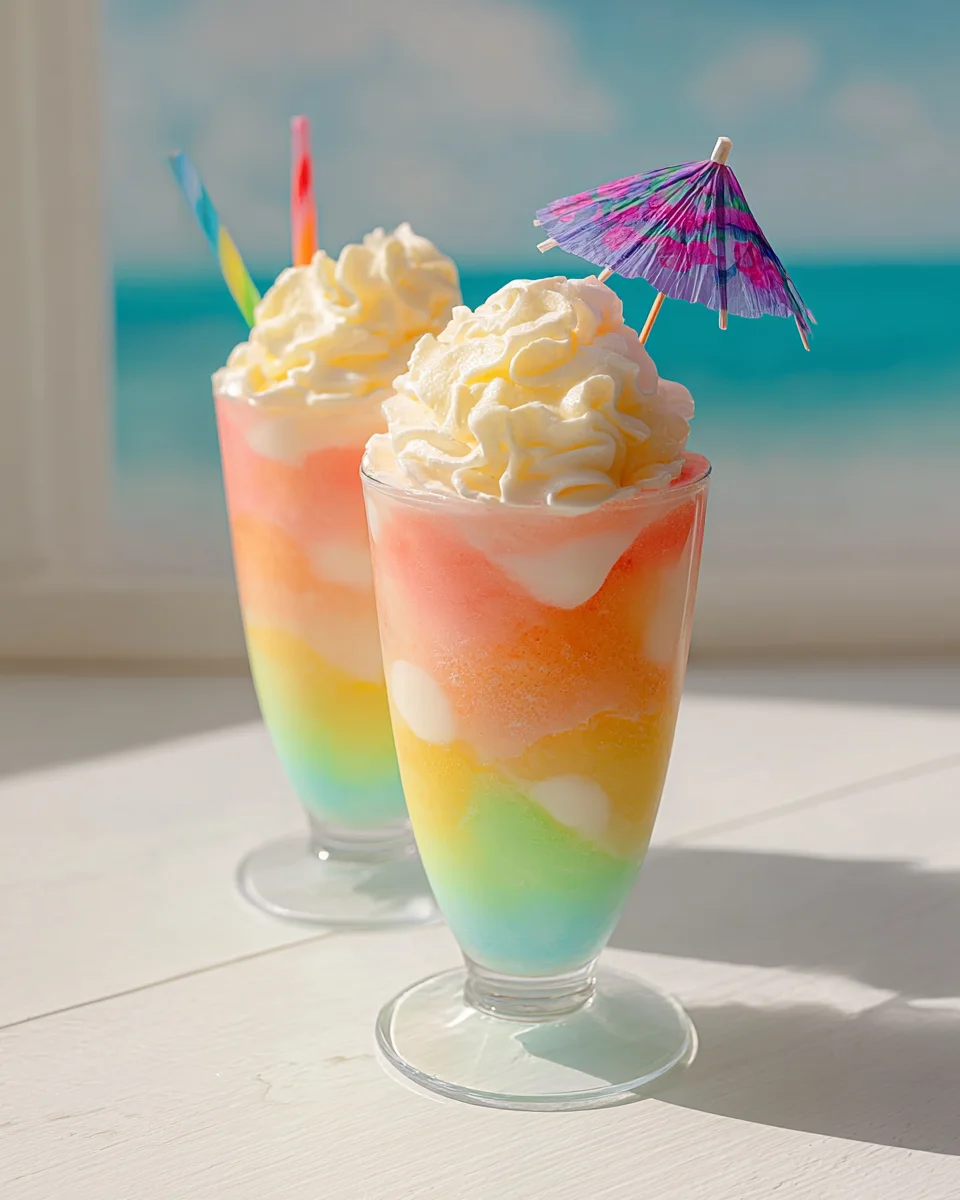
Rainbow Island Float isn’t just a drink; it’s a vibrant journey to a tropical paradise in a glass! Imagine a symphony of colors, each layer a delightful surprise, culminating in a frothy, sweet cloud that makes every sip feel like a mini-vacation. While the exact origins of this specific creation may be a modern twist on classic ice cream floats, its spirit certainly harks back to the festive, fruit-laden beverages enjoyed across various island cultures, where bright colors and refreshing tastes are paramount for combating the heat and celebrating life. We absolutely adore this dish because it’s incredibly refreshing, visually stunning, and surprisingly simple to assemble. The playful combination of vibrant, fruity sodas and creamy ice cream creates an unforgettable taste and texture experience that’s both nostalgic and excitingly new. This Rainbow Island Float is the perfect treat to brighten any day, making it a go-to for parties, gatherings, or simply a delightful personal indulgence.

Ingredients:
- For the Base Liquids and Syrups:
- 1/4 cup grenadine syrup (for the red layer)
- 1/4 cup orange syrup or orange juice concentrate, slightly thawed if frozen (for the orange layer)
- 1/4 cup blue raspberry syrup or blue curaçao syrup (non-alcoholic) (for the blue layer)
- 1/4 cup green apple or lime syrup (for the green layer)
- 1/4 cup grape syrup or grape juice concentrate, slightly thawed if frozen (for the purple layer, optional, but adds depth to your Rainbow Island Float)
- 2-3 cans (12 oz each) chilled lemon-lime soda, ginger ale, or clear sparkling water (for the bubbly top-up)
- For the Islands and Clouds:
- 1 pint high-quality vanilla bean ice cream, slightly softened (this will be your main ‘island’ scoop)
- 1 pint each of various fruit sorbets or ice creams for extra color and flavor – consider strawberry, lemon, lime, and blue raspberry (optional, for smaller ‘islets’ or flavor boosts)
- 1 can (15 oz) chilled whipped cream or homemade whipped cream, sweetened to taste
- For the Tropical Foliage and Treasures:
- 1 cup fresh strawberries, hulled and sliced or quartered
- 1 cup fresh blueberries or blackberries
- 1/2 cup fresh pineapple chunks, cut into small, bite-sized pieces
- 1 kiwi, peeled and sliced into half-moons or star shapes
- 1 orange, thinly sliced and then halved or quartered for garnish
- Maraschino cherries, with stems if possible, for a classic touch
- Fresh mint sprigs for garnish
- Rainbow sprinkles or colorful candy pearls
- Optional: Tropical drink umbrellas, long spoons, and colorful straws
Gathering Your Rainbow Treasures: The Ingredient Prep Phase
Before we even think about constructing our magnificent Rainbow Island Float, a little preparation goes a long way. Trust me, the difference between a hastily thrown-together drink and a truly spectacular, layered creation lies in the details of the prep. This phase is all about setting yourself up for success, ensuring every component is at its optimal state for both layering and flavor.
First things first, let’s talk about temperature. For any layered beverage, especially one as intricate as our Rainbow Island Float, chilling is absolutely paramount. Make sure all your liquid components – the sodas, syrups, and any fruit juices you might be using – are thoroughly chilled. I’m talking about a good few hours in the refrigerator, or even a quick 30 minutes in the freezer for the sodas if you’re in a rush. This isn’t just about making a refreshing drink; cold liquids are denser and less prone to mixing immediately, which is crucial for achieving those distinct, beautiful layers we’re aiming for. Room temperature liquids will simply blend into a muddy mess, and we definitely don’t want that for our vibrant island oasis!
Next, let’s focus on our frozen elements. Your vanilla bean ice cream, which will form the delightful ‘island’ atop our colorful sea, should be slightly softened. Not melted, but soft enough that you can easily scoop it into a perfect, round ball without struggling. Take it out of the freezer about 10-15 minutes before you plan to assemble your floats. The same goes for any sorbets or additional ice creams you’ve chosen to include. This slight softening makes them easier to work with and ensures they melt deliciously into the drink rather than staying as hard, unyielding blocks.
Now, for the fresh fruit, which adds bursts of natural flavor and incredible visual appeal to our Rainbow Island Float. Wash all your fruits thoroughly under cool water. For the strawberries, hull them and slice them into halves or quarters – whichever you prefer for easy eating. The blueberries or blackberries just need a good rinse. Pineapple chunks should be cut into small, manageable pieces, perfect for spearing with a fork or spoon. The kiwi requires peeling and then slicing into half-moons; if you’re feeling fancy, you can use a small cookie cutter to make star shapes! For the orange, thin slices are best, then halved or quartered so they can elegantly perch on the rim or float gently. Don’t forget your maraschino cherries and mint sprigs; have them ready for the final flourish. Arrange all your prepped fruits on a small platter or in individual bowls – this makes the assembly process much smoother and more enjoyable.
Finally, choose your glassware wisely. Tall, clear glasses are a must for showcasing the stunning layers of your Rainbow Island Float. Pint glasses, hurricane glasses, or even simple highball glasses work wonderfully. Make sure these are also chilled! A few minutes in the freezer won’t hurt. Having everything prepped, chilled, and organized will not only make the assembly process a breeze but will also contribute significantly to the overall aesthetic and deliciousness of your final Rainbow Island Float. It’s like preparing your canvas and paints before creating a masterpiece – every detail counts!
Crafting Your Island Oasis: Layering the Rainbow
Now for the truly fun part – bringing your Rainbow Island Float to life! This is where the magic happens, as we carefully construct layer upon vibrant layer, transforming simple ingredients into a breathtaking visual and culinary experience. Remember, patience is your best friend during this phase. Each pour should be slow and deliberate to maintain those beautiful, distinct color separations. We’ll be working from the densest liquids to the lightest, typically from bottom to top, to ensure the layers stack perfectly.
- The Fiery Foundation (Red Layer):
To begin our magnificent Rainbow Island Float, let’s lay down the first vibrant color. Gently pour about 1.5 to 2 tablespoons of grenadine syrup into the bottom of each chilled, clear glass. Grenadine is quite dense, so it will settle beautifully, creating a stunning ruby-red base. Take your time with this step; precision here sets the stage for the gorgeous stratification of colors to come. I always recommend using a measuring spoon for consistency across your floats, especially if you’re making several for a party. Imagine this as the fiery core of your island, ready to burst with flavor! This initial layer provides a sweet, tart cherry-like flavor that will complement all the subsequent fruitiness. - The Sunny Horizon (Orange Layer):
Next, we’re introducing the sunny orange layer. Very carefully, and I mean very carefully, pour about 1.5 to 2 tablespoons of your orange syrup or thawed orange juice concentrate over the back of a spoon held just above the grenadine. The spoon technique is crucial here! By letting the liquid trickle gently down the spoon and onto the side of the glass, you minimize disturbance to the layer below, allowing the orange to settle gracefully above the red without mixing. This creates a beautiful gradient, mimicking a sunrise over your tropical island. The citrusy notes from the orange will add a bright, zesty counterpoint to the sweetness of the grenadine. - The Verdant Shores (Green Layer):
Following our orange, it’s time for the refreshing green of our Rainbow Island Float. Once again, using the back of that trusty spoon, gently drizzle 1.5 to 2 tablespoons of green apple or lime syrup over the orange layer. The key is to pour slowly and steadily. If you pour too quickly, the green will dive into the orange, and while still tasty, won’t give you that crisp, layered effect we’re striving for. This layer brings a delightful tartness, whether it’s the crispness of green apple or the tangy zest of lime, adding another dimension of flavor to our growing rainbow. - The Azure Waters (Blue Layer):
Now we’re moving into the cool, captivating blues of our Rainbow Island Float. Take your 1.5 to 2 tablespoons of blue raspberry or blue curaçao syrup and, using the same spoon technique, introduce it gently above the green layer. This blue layer is often the most striking visually, as it provides a stark and beautiful contrast to the warmer colors below. The blue raspberry syrup will offer a unique, sweet berry flavor, while the blue curaçao syrup typically has a more subtle, citrusy orange profile. Either way, this layer evokes the clear, inviting waters surrounding your magical island. It’s truly a showstopper! - The Twilight Sky (Purple Layer – Optional but Recommended):
If you decided to include a purple layer, now is its moment to shine. For a truly complete Rainbow Island Float experience, gently add 1.5 to 2 tablespoons of grape syrup or thawed grape juice concentrate using your spoon. The purple adds a wonderful depth and a sense of completeness to the rainbow, evoking the vibrant hues of a twilight sky. Grape offers a rich, sweet flavor that harmonizes beautifully with the other fruit syrups. If you skip this, your blue layer will simply be followed by the sparkling top-up, which is also perfectly fine! - The Sparkling Sea (Soda Top-Up):
Finally, it’s time to top off our magnificent layers with the effervescent sea. This is arguably the most delicate step, as pouring too quickly will inevitably mix all your beautifully crafted layers. Slowly, slowly, pour your chilled lemon-lime soda, ginger ale, or sparkling water over the back of the spoon, letting it cascade down the side of the glass until the glass is about three-quarters full. The fizz will gently lift some of the top syrup layers slightly, creating a breathtaking, shimmering effect. The lightness of the soda contrasts wonderfully with the density of the syrups, creating a delightful interplay of textures and flavors. You’ve just created a stunning liquid rainbow!
Bringing Your Island to Life: Adding the Floats and Garnishes
With our vibrant rainbow base complete, it’s time to transform our liquid masterpiece into a true Rainbow Island Float by adding the delicious elements that give it its name. This final phase is all about presentation, flavor enhancement, and adding those delightful touches that make this float an unforgettable treat.
- The Majestic Island (Vanilla Ice Cream):
Now for the crown jewel of our float – the island itself! Carefully take a large scoop of your slightly softened vanilla bean ice cream and gently place it directly into the center of your glass, allowing it to float majestically atop the sparkling soda and syrup layers. The vanilla ice cream will slowly begin to melt, mingling its creamy richness with the fruity, bubbly concoction below, creating a delightful creamsicle-like flavor profile that is utterly irresistible. This is the heart of your Rainbow Island Float, providing both substance and a luscious texture. For an extra touch of color, you could also add a smaller scoop of a complementary fruit sorbet, like strawberry or lime, beside the vanilla ‘island’ to create a tiny islet! - Fruity Paradise (Fresh Fruit Adornments):
Once your island is in place, it’s time to adorn it with the bounty of a tropical paradise. Artfully arrange your prepped fresh fruits around the floating ice cream and along the rim of the glass. Place sliced strawberries, vibrant kiwi slices, handfuls of glistening blueberries, and sweet pineapple chunks. You can even skewer some of the fruit onto a small cocktail pick and balance it across the rim of the glass for an elevated look. These fresh fruits not only add incredible visual appeal, enhancing the ‘island’ theme, but also provide a wonderful textural contrast and burst of natural sweetness to every sip and bite of your Rainbow Island Float. - Cloud Nine (Whipped Cream Topping):
To truly complete the picturesque scene of your Rainbow Island Float, add a generous swirl of chilled whipped cream on top of the floating ice cream. This creates the illusion of soft, fluffy clouds drifting over your vibrant island. The creamy, airy texture of the whipped cream adds another layer of indulgence and a lovely coolness that perfectly complements the rich ice cream and the effervescent drink below. Don’t be shy with the whipped cream; it’s a key part of the ultimate float experience! - Sparkling Shores (Rainbow Sprinkles and Cherries):
Now for the final, dazzling touches! No Rainbow Island Float would be complete without a sprinkle of magic. Liberally scatter rainbow sprinkles or colorful candy pearls over the whipped cream and the exposed ice cream. The bright colors of the sprinkles catch the light and add a playful, celebratory feel. Then, carefully place a plump, juicy maraschino cherry (or two!) right on top of the whipped cream. If you have cherries with stems, they add a charming flourish. The vibrant red of the cherry provides a delightful pop of color and a classic float appeal. - Tropical Embellishments (Mint and Umbrellas):
For the ultimate tropical island vibe, gently tuck a fresh mint sprig beside the whipped cream. The vibrant green of the mint offers a fresh aroma and a beautiful natural garnish. And of course, no tropical float is truly complete without a playful drink umbrella! Pop one open and insert it into the float, perhaps nestled near the fruit. Finally, provide a long spoon for digging into all those delicious layers and a colorful straw for sipping. Your magnificent, multi-layered Rainbow Island Float is now complete and ready to be enjoyed! Serve immediately to fully appreciate its layered beauty and refreshing flavors.
Conclusion:
If there’s one recipe I truly hope you add to your repertoire, it’s this one. I’ve had such a delightful time sharing it with you, and I genuinely believe it’s more than just a recipe; it’s an invitation to joy. This isn’t merely a drink; it’s a vibrant, multi-layered experience designed to whisk you away to a tropical paradise with every single sip. The ease with which you can assemble such a visually stunning and refreshingly delicious treat is, for me, its greatest magic. Imagine the gasps of delight when you present this kaleidoscope of colors – it truly transforms any ordinary moment into something special, be it a quiet afternoon on the porch or a bustling backyard barbecue. Its simplicity belies its incredible impact, offering a burst of sweet, tangy, and fizzy delight that is utterly irresistible.
What I particularly adore about this creation is its inherent versatility and adaptability. While I’ve guided you through my favorite combination, please consider this a mere starting point for your own culinary adventures. Don’t be afraid to experiment with the fruits! Instead of or in addition to the suggested options, consider adding slices of ripe mango, juicy kiwi, plump raspberries, or even a handful of blueberries for different color and flavor profiles. Each fruit brings its own unique sweetness and texture, allowing you to tailor the experience precisely to your preference or whatever fresh produce is in season. Similarly, the choice of soda can profoundly change the outcome. While lemon-lime soda offers a classic zest, try using ginger ale for a spicier kick, cream soda for a sweeter, vanilla-infused version, or even sparkling water with a splash of fruit juice for a lighter, less sugary option. The possibilities are genuinely endless, and each variation promises a new and exciting twist on the original.
Elevate Your Experience with Creative Twists
Beyond simple fruit and soda swaps, there are so many ways to personalize your creation. For the adults looking to unwind, a splash of white rum, vodka, or even a tropical liqueur like coconut rum or pineapple schnapps can transform this family-friendly treat into a sophisticated cocktail. Always remember to enjoy responsibly, of course! If you’re keen on making it even creamier, feel free to experiment with different ice cream flavors. A scoop of raspberry sorbet would introduce a tart counterpoint, while pineapple or lime sherbet would amplify the tropical vibes. For those seeking a dairy-free alternative, a swirl of chilled coconut cream on top or a scoop of a non-dairy frozen dessert can achieve a similar luxurious texture without compromising on taste. And let’s not forget the garnishes! A vibrant mint sprig, a few edible flowers, a colorful umbrella pick, or even some fun, reusable straws can elevate the presentation from great to truly unforgettable. These small touches add a layer of whimsy and thoughtfulness that your guests will surely appreciate, making each serving feel like a bespoke creation.
I truly believe that preparing this recipe is as much about the process as it is about the end result. It’s an act of creativity and generosity, a beautiful way to show someone you care or to simply treat yourself to something extraordinary. The way the colors gently swirl and settle, the effervescent bubbles dancing, and the vibrant aroma all contribute to a sensory feast that few other recipes can match. It’s more than just a float; it’s a moment of pure bliss, a miniature vacation in a glass. This truly earns its name as a captivating Rainbow Island Float, bringing sunshine and smiles wherever it’s served.
Your Turn to Create and Share!
So, now it’s your turn. I implore you to dive into your kitchen and give this incredible recipe a try. Don’t be intimidated by its stunning appearance; I promise you, it’s far simpler to create than it looks. Embrace the opportunity to make it your own, to tweak it, to experiment with the flavors and colors that speak to you. Once you’ve crafted your perfect version, I would absolutely love to hear about it! Please come back and share your experiences in the comments below. What variations did you try? What did your family and friends think? Did you find a new favorite combination? Your feedback and creative ideas inspire not just me, but every other reader looking for fresh inspiration. Let’s build a community of enthusiastic home cooks who aren’t afraid to add a little bit of vibrant, tropical joy to their lives. I can’t wait to see and hear about your delicious creations!
Rainbow Island Float: Vibrant, Refreshing Non-Alcoholic Drink
Rainbow Island Float isn’t just a drink; it’s a vibrant journey to a tropical paradise in a glass! Imagine a symphony of colors, each layer a delightful surprise, culminating in a frothy, sweet cloud that makes every sip feel like a mini-vacation. This visually stunning and simple-to-assemble non-alcoholic drink combines vibrant, fruity syrups with rainbow sherbet, topped with whipped cream and fresh fruits for an unforgettable taste and texture experience. It’s the perfect treat to brighten any day, ideal for parties or a delightful personal indulgence.
Ingredients
Instructions
Important Information
Nutrition Facts (Per Serving)
It is important to consider this information as approximate and not to use it as definitive health advice.
Allergy Information
Please check ingredients for potential allergens and consult a health professional if in doubt.
Leave a Comment