
Pilgrim Hat Cookies are more than just a sweet treat; they are a delightful edible homage to one of America’s most cherished holidays. Are you ready to create a charming confection that captures the spirit of Thanksgiving with whimsical flair and incredible ease?
While the precise culinary origin of these adorable cookies might be a more modern development, their unmistakable design is a direct nod to the iconic hats worn by the Pilgrims, symbolizing gratitude and the harvest season that we celebrate each year. They serve as a delightful, edible reminder of history, bringing a touch of educational fun to your dessert spread and making them a perfect addition to any autumn or holiday table.
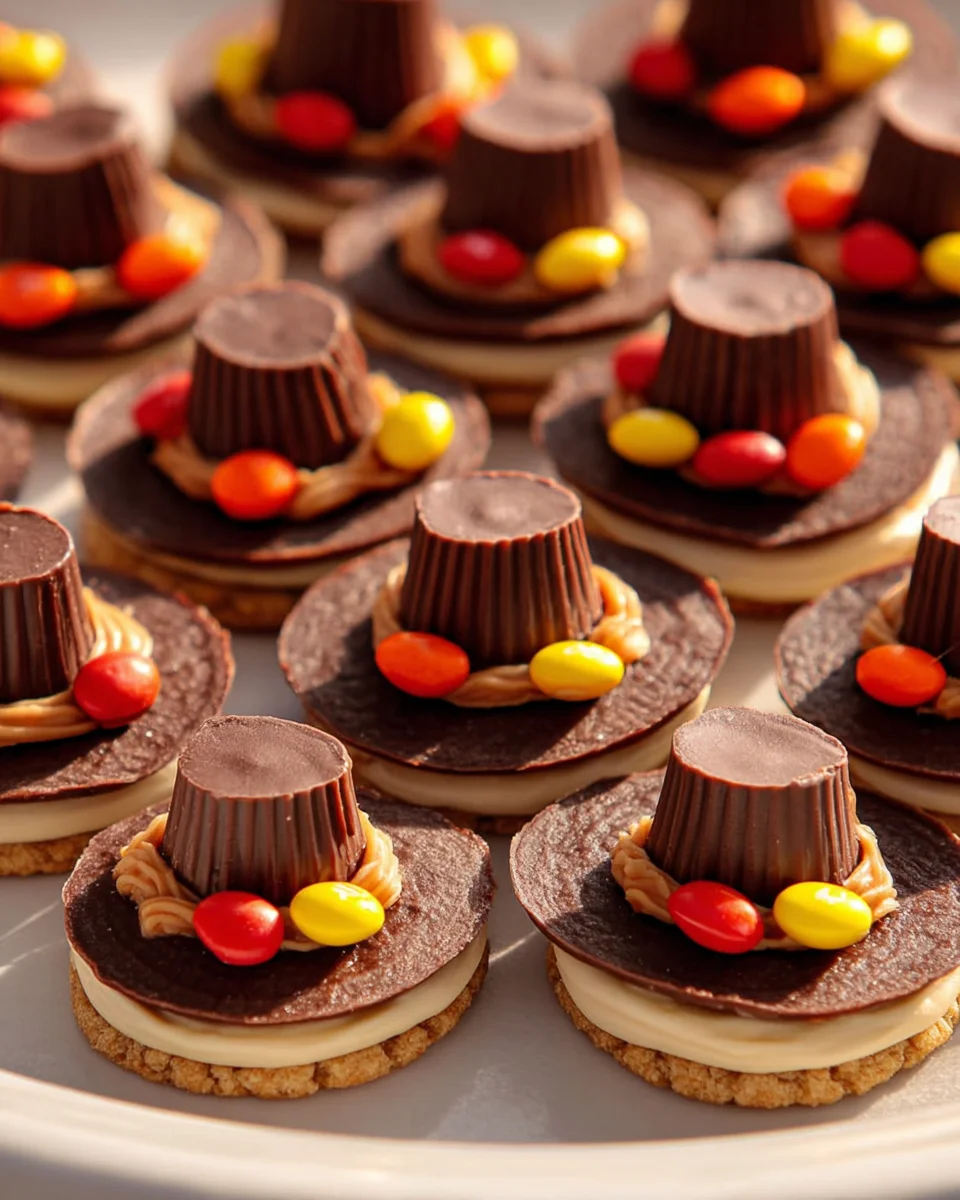
People absolutely adore these cookies for a multitude of reasons. For starters, the classic combination of a crunchy cookie base (often a fudge stripe cookie or a vanilla wafer), a rich chocolate-covered peanut butter cup, and a vibrant yellow buckle is simply irresistible. They offer a perfect balance of textures – crispy, creamy, and wonderfully chewy – that satisfies every sweet tooth. Furthermore, their assembly is remarkably straightforward, making them an ideal project for budding young bakers and a brilliant, stress-free dessert option for busy hosts. The visual appeal of these miniature hats instantly brightens any festive table, creating conversation and anticipation.
I find that few desserts combine such charming aesthetics with such straightforward preparation, making Pilgrim Hat Cookies a guaranteed crowd-pleaser that everyone will talk about long after the last crumb is gone. They are a true testament to how simple ingredients can create something truly special and memorable for your loved ones.

Ingredients:
- For the Sugar Cookies:
- 2 ½ cups (300g) all-purpose flour, plus more for dusting
- ½ teaspoon baking powder
- ¼ teaspoon salt
- 1 cup (226g) unsalted butter, softened to room temperature
- 1 ½ cups (300g) granulated sugar
- 2 large eggs, at room temperature
- 2 teaspoons pure vanilla extract
- For the Royal Icing (or Buttercream for a softer hat brim):
- 4 cups (480g) powdered sugar (confectioners’ sugar), sifted
- ½ cup (113g) unsalted butter, softened (if using buttercream)
- ¼ cup (60ml) whole milk or heavy cream (if using buttercream)
- 2 tablespoons meringue powder (if using royal icing)
- ¼ cup (60ml) warm water (for royal icing base)
- 1 teaspoon pure vanilla extract
- Black gel food coloring (a good quality, concentrated one is key!)
- A tiny amount of yellow or gold gel food coloring for the buckle
- For the Pilgrim Hat Assembly:
- Approx. 30-36 miniature peanut butter cups (Reese’s brand works wonderfully), unwrapped
- Small yellow or gold sprinkles, edible glitter, or small square candies for the buckles
Preparing the Perfect Sugar Cookie Dough for Pilgrim Hat Cookies
Making delicious sugar cookies that hold their shape is the foundation of our fantastic Pilgrim Hat Cookies. I always start by ensuring all my ingredients are at room temperature. This isn’t just a suggestion; it truly makes a difference in the final texture of your cookies!
- Combine Dry Ingredients: In a medium bowl, whisk together the 2 ½ cups of all-purpose flour, ½ teaspoon of baking powder, and ¼ teaspoon of salt. I like to give it a good whisk for about 30 seconds to ensure everything is evenly distributed. This step prevents any pockets of leavening agent in your cookies, ensuring a consistent rise. Set this aside for now.
- Cream Butter and Sugar: In the bowl of a stand mixer fitted with the paddle attachment (or a large bowl with an electric hand mixer), cream together the 1 cup of softened unsalted butter and 1 ½ cups of granulated sugar. You’ll want to beat this on medium-high speed for about 3 to 5 minutes. This is a critical step for light and airy cookies. Watch as the mixture transforms from dense and yellowish to light, fluffy, and pale in color. It’s during this creaming process that you’re incorporating air into the butter, which will give our Pilgrim Hat Cookies their tender crumb. Make sure to scrape down the sides and bottom of the bowl frequently with a rubber spatula to ensure everything is evenly combined.
- Incorporate Wet Ingredients: Reduce the mixer speed to low. Add the 2 large eggs, one at a time, beating well after each addition until just combined. Don’t rush this part; let each egg fully incorporate before adding the next. Once the eggs are mixed in, stir in the 2 teaspoons of pure vanilla extract. The mixture might look a little curdled at this point, but don’t worry, it will come together once the dry ingredients are added. Again, scrape down the bowl to ensure all components are thoroughly mixed.
- Add Dry to Wet: With the mixer on low speed, gradually add the dry ingredient mixture to the wet ingredients, a third at a time. Mix only until just combined and no streaks of flour remain. It’s very important not to overmix the dough at this stage. Overmixing can develop the gluten in the flour too much, leading to tough, dense cookies instead of the delightful, melt-in-your-mouth texture we’re aiming for. As soon as the flour disappears, stop the mixer.
- Chill the Dough: Divide the dough into two equal portions. Flatten each portion into a disk, wrap tightly in plastic wrap, and refrigerate for at least 1 hour, or preferably 2-3 hours. Chilling the dough is essential for several reasons: it firms up the butter, making the dough easier to handle, and it prevents the cookies from spreading too much during baking, ensuring your neat circular “hat brims” maintain their shape. I often find that overnight chilling yields the best results for cutout cookies.
Baking Our Pilgrim Hat Cookie Brims
Once our dough is perfectly chilled, it’s time to transform it into the delicious base for our Pilgrim Hat Cookies. Getting the thickness right is key for both structural integrity and a pleasant bite.
- Preheat Oven and Prepare Baking Sheets: About 15-20 minutes before you’re ready to bake, preheat your oven to 375°F (190°C). Line two large baking sheets with parchment paper or silicone baking mats. This prevents sticking and makes for easy cleanup, plus it helps the cookies bake more evenly.
- Roll Out the Dough: On a lightly floured surface (or between two sheets of parchment paper for less mess and sticking), take one disk of chilled dough. Roll it out to an even thickness of about ¼ inch (0.6 cm). Consistency in thickness is crucial here – unevenly rolled dough will result in some cookies baking faster than others. If the dough becomes too warm and sticky while rolling, simply pop it back into the fridge for 10-15 minutes to firm up again. I find that lightly flouring your rolling pin also helps tremendously.
- Cut Out Cookie Shapes: Using a round cookie cutter, about 2 ½ to 3 inches (6.5-7.5 cm) in diameter, cut out your cookie shapes. These will form the “brims” of our Pilgrim Hat Cookies. Try to place your cuts as close together as possible to minimize scraps. Gather any dough scraps, gently re-roll them (without overworking them), and cut out more shapes. If the re-rolled dough gets too warm, chill it again briefly before cutting. I aim for about 30-36 cookies, depending on the size of my cutter.
- Arrange on Baking Sheets: Carefully transfer the cut-out cookies to your prepared baking sheets, leaving about 1 inch (2.5 cm) of space between each cookie. Even though these cookies don’t spread much, a little breathing room helps with even baking.
- Bake the Cookies: Bake one sheet at a time in the preheated oven for 8 to 11 minutes, or until the edges are lightly golden brown and the centers are just set. The exact baking time will depend on your oven and the thickness of your cookies, so keep a close eye on them. For these Pilgrim Hat Cookies, I prefer them on the softer side, so I pull them out just as the edges are starting to turn.
- Cool Completely: Once baked, remove the baking sheets from the oven and let the cookies cool on the sheets for 5 minutes. This allows them to firm up slightly before you move them. After 5 minutes, carefully transfer the cookies to a wire rack to cool completely. It is absolutely essential that the cookies are fully cooled before frosting and assembling. Warm cookies will melt your frosting and cause a huge mess!
Crafting the Iconic Black Frosting for Pilgrim Hat Cookies
The frosting is where the magic truly happens for our Pilgrim Hat Cookies, giving them their distinctive look. I often opt for a buttercream for ease of use and flavor, but a stiff royal icing can also be used if you prefer a harder, more traditional cookie icing.
- Prepare Your Frosting Base: If you’re using royal icing, whisk together the meringue powder and warm water until frothy, then slowly beat in the sifted powdered sugar until smooth and stiff. For a delightful buttercream (which is what I typically use for Pilgrim Hat Cookies for a softer bite), begin by beating 1/2 cup of softened unsalted butter in a large bowl or stand mixer until light and fluffy, about 2-3 minutes.
- Gradually Add Powdered Sugar: Gradually add the 4 cups of sifted powdered sugar to the softened butter, one cup at a time, beating on low speed until combined after each addition. The mixture will be very thick at this point.
- Incorporate Liquid and Flavor: With the mixer still on low, slowly add the ¼ cup of whole milk or heavy cream and 1 teaspoon of pure vanilla extract. Once fully incorporated, increase the speed to medium-high and beat for another 2-3 minutes until the frosting is light, fluffy, and smooth. If the frosting seems too thick, add more milk or cream, ½ teaspoon at a time, until you reach a pipeable consistency. If it’s too thin, add a tablespoon more sifted powdered sugar. For Pilgrim Hat Cookies, you want a frosting that holds its shape well when piped but is still soft enough to spread easily.
- Achieve the Perfect Black Color: This is where patience is key! Scoop about ¾ of your prepared frosting into a separate bowl. To this larger portion, add a generous amount of black gel food coloring. Liquid food coloring often won’t give you a deep, true black; you’ll end up with grey. I highly recommend using a concentrated gel food coloring for the best results. Start with a good dollop and mix thoroughly. You’ll notice it might look purplish-grey at first. Let it sit for about 10-15 minutes, as colors tend to deepen over time. Then, if needed, add more black gel coloring until you achieve a rich, dark black. Don’t be shy with the coloring; black requires a fair bit! Stir frequently during this resting period to help the color develop.
- Prepare Yellow/Gold Frosting (for buckles): Take a small amount of the remaining uncolored frosting (about 2 tablespoons) and mix in a tiny drop of yellow or gold gel food coloring to create a vibrant yellow/gold for our hat buckles. Keep the rest of the plain frosting aside in case you need to adjust consistency or make more yellow/gold.
Assembling Your Charming Pilgrim Hat Cookies
Now for the most exciting part – bringing our Pilgrim Hat Cookies to life! This is where their iconic shape comes together, and it’s always so satisfying to see the finished product.
- Set Up Your Piping Bags: Fit a piping bag with a medium-sized round piping tip (like an Ateco 805 or Wilton 1A) or simply snip a medium hole at the corner of a sturdy Ziploc bag for your black frosting. Fill this bag with your deep black frosting. Place the small amount of yellow/gold frosting into a separate small piping bag with a very small round tip (like a Wilton 2 or 3), or just snip a tiny corner off a Ziploc bag.
- Prepare the Miniature Peanut Butter Cups: Unwrap all of your miniature peanut butter cups. These will form the “crown” of our Pilgrim Hats.
- Attach the Peanut Butter Cup: Take a cooled sugar cookie (the “brim”) and place it flat on your working surface. Pipe a small dollop of black frosting directly in the center of the cookie. This will act as the adhesive for our hat’s crown. Gently press one unwrapped miniature peanut butter cup onto the frosting dollop, centering it as best you can. The frosting will help it stick securely. Repeat this process for all your cookies.
- Pipe the Hat Brim: Now for the artistic part! With your black frosting piping bag, pipe a ring of frosting around the base of the peanut butter cup, where it meets the cookie. This creates the visual effect of the hat’s crown resting firmly on the brim. You can pipe a simple smooth ring, or for a more rustic look, create a slightly textured band. Some people prefer to pipe a small mound and then smooth it out with an offset spatula. I find a consistent ring is visually striking.
- Add the Buckle Detail: This is where our Pilgrim Hat Cookies truly shine. Using your small piping bag with the yellow/gold frosting, pipe a small square or rectangle on the front center of the black frosting band you just created, right over the peanut butter cup. This is our hat buckle! You can also carefully place small yellow or gold sprinkles or a small square candy in this spot if you prefer. The buckle truly brings the whole Pilgrim Hat concept to life, so take your time to make it neat.
- Allow Frosting to Set: Once all your Pilgrim Hat Cookies are assembled and decorated, place them on a clean wire rack or parchment-lined tray. Allow the frosting to set for at least 30 minutes to an hour at room temperature. This will prevent smudging and make them easier to handle and store. If you’ve used royal icing, it will harden completely, while buttercream will firm up nicely but remain soft to the bite.
- Storage: Once the frosting is set, store your beautiful Pilgrim Hat Cookies in an airtight container at room temperature for up to 3-4 days. For longer storage, you can refrigerate them for up to a week. They make a fantastic addition to any Thanksgiving dessert table or a wonderful treat for a fall gathering!
Conclusion:
And there you have it! We’ve journeyed through the steps of creating a truly delightful treat that I genuinely believe everyone should experience. This recipe isn’t just about mixing ingredients; it’s about crafting smiles, sparking joy, and adding a touch of whimsy to your table. What makes this particular recipe an absolute must-try, in my humble opinion, is its perfect blend of simplicity and charm. You don’t need to be a seasoned baker to achieve fantastic results, which is something I always strive for in the recipes I share. The steps are straightforward, the ingredients are accessible, and the outcome is nothing short of spectacular. Imagine the satisfaction of presenting a platter of these adorable creations, knowing you made them with your own hands. It’s a moment of pride that’s incredibly rewarding, and trust me, the compliments will flow as freely as the chocolate!
I find immense pleasure in recipes that deliver maximum impact with minimal fuss, and this one truly excels in that department. It’s the kind of project that’s perfect for a lazy afternoon, a fun activity with the kids, or even a quick stress-relieving baking session after a long day. The beauty of it lies in its forgiving nature – a slight imperfection here or there only adds to its homemade appeal. The combination of textures, from the crisp base to the creamy, sweet topping, is simply irresistible. Each bite offers a delightful contrast that keeps you coming back for more. It’s not just a dessert; it’s an experience, a miniature edible masterpiece that brightens any occasion. The visual appeal alone is enough to make anyone curious, and the taste absolutely seals the deal. This recipe stands out because it’s not just delicious; it’s memorable.
Speaking of memorable, let’s talk about how to truly enjoy these charming creations. While they are undoubtedly perfect straight off the cooling rack, still slightly soft and wonderfully aromatic, I have a few suggestions to elevate your experience even further. Serve these at room temperature alongside a robust cup of freshly brewed coffee for a sophisticated afternoon treat, or with a tall glass of cold milk for a comforting snack that transports you back to childhood. They make fantastic additions to a holiday dessert buffet, where their unique shape and festive flair will certainly draw attention. For a more decadent experience, try gently warming them for just a few seconds in the microwave to soften the chocolate and marshmallow slightly, turning them into a gooey delight. They also pair wonderfully with a scoop of vanilla bean ice cream, creating a playful contrast of temperatures and textures that’s truly divine.
But don’t stop there! The beauty of baking is in the endless possibilities for personalization. While I love the classic appeal of my original recipe, I wholeheartedly encourage you to get creative and make these truly your own. Imagine using different cookie bases, perhaps a peanut butter cookie for a nutty twist, or a spiced gingerbread cookie for a festive touch. You could experiment with various chocolate wafers for the brim – white chocolate, dark chocolate, or even a marbled swirl. For the buckle, think beyond yellow frosting. A silver edible glitter gel for a shimmering buckle, or perhaps a small, thinly sliced piece of caramel candy for a more rustic look. You could even introduce different marshmallow flavors, if you can find them, or add a tiny dash of peppermint extract to your chocolate for a festive kick. These Pilgrim Hat Cookies are truly a canvas for your culinary imagination!
So, my dear friends, there’s really nothing left to do but roll up your sleeves and dive into this wonderful recipe. I promise you, the joy you’ll find in creating and sharing these will be immense. Don’t be shy; embrace the process, have fun with the decorating, and most importantly, savor every single delicious bite. Once you’ve had a chance to whip up your own batch, I would absolutely love to hear about your experience. Did you try any fun variations? What was your favorite part of the process? Did they bring smiles to your family and friends? Share your stories, your tips, and even your photos! Your feedback and creativity inspire me and countless other home bakers in our wonderful community. Happy baking, and enjoy every sweet moment!
Pilgrim Hat Cookies: Festive & Easy Holiday Treat!
Pilgrim Hat Cookies are a delightful edible homage to Thanksgiving, capturing the holiday spirit with whimsical flair and incredible ease. This version uses pre-made cookies and candies for a quick, no-bake treat perfect for any autumn or holiday table.
Ingredients
Instructions
Important Information
Nutrition Facts (Per Serving)
It is important to consider this information as approximate and not to use it as definitive health advice.
Allergy Information
Please check ingredients for potential allergens and consult a health professional if in doubt.


Leave a Comment