
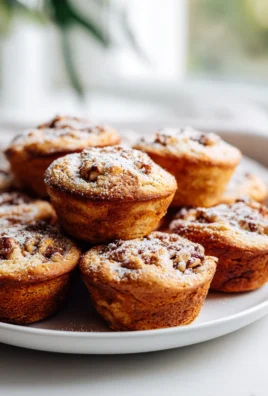
Sausage Cheese Butter Swim Biscuits!
This is where my culinary heart truly sings! There’s something undeniably magical about a warm, homemade biscuit, especially one that combines the best of savory and comforting flavors. I’m absolutely thrilled to share a recipe today that I know you’re going to fall in love with: our incredible Sausage Cheese Butter Swim Biscuits! These delightful creations tap into the beloved tradition of Southern comfort food, taking the simple yet ingenious “butter swim” method to a whole new level of deliciousness. The original butter swim biscuit itself is a testament to clever, no-fuss baking, allowing the dough to absorb a rich pool of melted butter as it bakes, resulting in unbelievably tender interiors and wonderfully crispy edges.
I’ve found that the magic of this particular dish lies in its irresistible combination of textures and flavors: the impossibly crispy, golden-brown exterior, the tender, fluffy interior, and those delightful pockets of melted cheese and perfectly seasoned sausage. It’s a dish that perfectly balances indulgence with surprising ease, making it a true crowd-pleaser. The unique “butter swim” technique means no fussy rolling or cutting, making it accessible for even novice bakers, yet yielding results that taste like they came from a gourmet kitchen. For me, these Sausage Cheese Butter Swim Biscuits! are the ultimate comfort food, perfect for a hearty breakfast, a leisurely brunch, or even as a unique side for dinner. Prepare to be amazed by their simplicity and utterly captivated by their taste!

Ingredients:
- For the Biscuits:
- 2 ½ cups all-purpose flour (or self-rising flour if you prefer, in which case omit baking powder and salt)
- 1 tablespoon granulated sugar
- 1 tablespoon baking powder
- 1 teaspoon salt
- 1 cup whole milk (cold is best!)
- 1 cup shredded cheddar cheese (or a mix of your favorite cheeses like Monterey Jack, Colby, or even a spicy pepper jack for an extra kick)
- ½ pound breakfast sausage, cooked and crumbled
- For the Butter Swim:
- 1 stick (½ cup) unsalted butter
Preparing the Sausage and Cheese Mixture
- Cook the Sausage: First things first, let’s get that delicious breakfast sausage ready. Grab a large skillet and place it over medium-high heat. Add your ½ pound of breakfast sausage. Using a wooden spoon or a spatula, break the sausage apart into small, uniform crumbles as it cooks. You want to ensure there are no large chunks left. Stir frequently, allowing the sausage to brown evenly on all sides. This process typically takes about 5-7 minutes. We’re looking for a lovely golden-brown color and no pink remaining.
- Drain the Fat: Once your sausage is beautifully browned and fully cooked, it’s crucial to drain off any excess grease. You can do this by carefully tilting the pan and spooning out the fat, or by transferring the cooked sausage to a plate lined with a couple of layers of paper towels. The goal here is to remove as much fat as possible. Excess fat in the biscuit dough can make your Sausage Cheese Butter Swim Biscuits! greasy rather than flaky and tender, so don’t skip this important step.
- Cool the Sausage: After draining, let the cooked sausage cool down completely. This is a critical step! If you add hot sausage to your biscuit dough, it will start to melt the butter (if you were using cold butter, which we are not directly in this dough, but still good practice for general biscuit making) and cook the flour, which can lead to tough biscuits. Spreading it out on a plate will help it cool faster. You can even pop it in the fridge for a few minutes if you’re in a hurry.
- Prepare the Cheese: While the sausage is cooling, let’s get our cheese ready. If you’re using a block of cheese, now is the time to shred it. I always recommend shredding your own cheese from a block rather than using pre-shredded varieties. Pre-shredded cheese often contains anti-caking agents like cellulose or potato starch, which can make your biscuits less creamy and sometimes even gritty. Freshly shredded cheese melts beautifully and integrates much better into the dough, resulting in the most scrumptious Sausage Cheese Butter Swim Biscuits!.
- Combine and Set Aside: Once both the sausage and cheese are prepped, combine them in a small bowl. Give them a good stir to ensure they are well mixed. This mixture will be added to our biscuit dough shortly, so set it aside for now.
Making the Biscuit Dough
- Whisk Dry Ingredients: In a large mixing bowl, combine your all-purpose flour, granulated sugar, baking powder, and salt. I like to use a whisk to thoroughly mix these ingredients together. This ensures that the leavening agents (baking powder) and salt are evenly distributed throughout the flour, which is essential for uniform rising and flavor in your Sausage Cheese Butter Swim Biscuits!. If you were using self-rising flour, you would simply combine the self-rising flour and sugar.
- Add the Sausage and Cheese Mixture: Now, add your cooled sausage and shredded cheese mixture to the dry ingredients. Use your hands or a spoon to gently toss the mixture, ensuring that the sausage and cheese are lightly coated in the flour. This helps to prevent them from clumping together and ensures they are evenly distributed throughout the dough. It also helps to prevent the cheese from sinking to the bottom during baking.
- Pour in the Milk: Make a well in the center of your dry ingredients and pour in the cold whole milk. Cold milk is preferred as it helps keep the dough cool, which is beneficial for tender biscuits.
- Mix the Dough Gently: Using a wooden spoon or a sturdy spatula, start mixing the dough. Be careful not to overmix! The key to tender biscuits is a light touch. Mix just until the flour is moistened and everything comes together into a sticky, shaggy dough. A few streaks of flour are perfectly fine; in fact, they’re preferred over an overmixed, tough dough. The dough for these Sausage Cheese Butter Swim Biscuits! will be quite wet and sticky, much wetter than a traditional biscuit dough you might roll out. This is exactly what we want for this unique “butter swim” method.
Assembling the Butter Swim Biscuits
- Prepare the Baking Dish and Butter: This is where the magic of “butter swim” truly begins! Take your 9×13 inch baking dish (or a similar sized oven-safe dish). Unwrap your stick of unsalted butter and place it directly into the baking dish. You can cut it into a few pats if you like, but it’s not strictly necessary.
- Melt the Butter in the Oven: Place the baking dish with the butter into your cold oven. Now, preheat your oven to 400°F (200°C). As the oven preheats, the butter will melt completely. We want the butter to be fully melted and hot when we add the dough. This creates a wonderful “butter swim” effect, ensuring your Sausage Cheese Butter Swim Biscuits! cook in a pool of butter, leading to incredibly tender interiors and beautifully crisp, golden bottoms. Once the butter is melted, carefully remove the hot dish from the oven and set it aside. Be extremely cautious – the dish and butter will be very hot!
- Spread the Dough: Carefully spoon the sticky biscuit dough directly into the hot, butter-filled baking dish. Use a spatula or the back of a spoon to gently spread the dough evenly across the bottom of the dish. Try to spread it from edge to edge, ensuring a consistent thickness. Don’t worry if it looks a bit messy; we’ll refine it in the next step. The dough will feel soft and yielding against the hot butter.
- Cut the Biscuits: This is one of the easiest parts of making these Sausage Cheese Butter Swim Biscuits! – no messy flouring of your counter, no rolling pin needed! Once the dough is spread, use a butter knife or a bench scraper to cut the dough into 12-15 squares directly in the pan. You don’t need to separate them; just cut through the dough to create the lines. For a 9×13 inch pan, I typically do 3 cuts lengthwise and 4 cuts widthwise to yield 15 biscuits. The cuts will help the biscuits rise properly and make them easy to pull apart after baking. The hot butter will seep into these cuts, further enhancing the flavor and texture.
Baking the Sausage Cheese Butter Swim Biscuits
- Bake to Golden Perfection: Carefully transfer the baking dish with your cut biscuits back into the preheated 400°F (200°C) oven. Bake for 25-35 minutes. Baking time can vary depending on your oven, so keep a close eye on them, especially after the 25-minute mark.
- Look for Key Indicators: You’re looking for the biscuits to be beautifully golden brown on top, well-puffed, and fragrant. The edges should be nicely crisped, and the centers should be cooked through and flaky. The butter should have mostly absorbed into the biscuits, leaving them incredibly tender and rich. If you want to be absolutely sure, you can insert a thin knife or toothpick into the center of a biscuit; it should come out clean.
- Rotate if Needed: If you notice your biscuits are browning unevenly, especially in the last 10-15 minutes of baking, you can carefully rotate the pan halfway through the baking process. This ensures all your Sausage Cheese Butter Swim Biscuits! get an even distribution of heat and color.
- A Little Extra Golden Touch (Optional): If you find that the tops aren’t as golden as you’d like but they are cooked through, you can turn on the broiler for a minute or two at the very end. Be extremely careful and watch them constantly, as they can go from perfectly golden to burnt in a matter of seconds under the broiler. This is completely optional but can add a lovely finish.
Serving and Storage Tips
- Cool Slightly Before Serving: Once your magnificent Sausage Cheese Butter Swim Biscuits! emerge from the oven, resist the urge to immediately dive in! While they smell heavenly, allow them to cool in the pan for about 5-10 minutes. This cooling period allows the biscuits to set up properly and makes them much easier to handle and separate without crumbling. The residual heat in the pan also helps to further crisp up those wonderful buttery bottoms.
- Serve Warm: These biscuits are absolutely best served warm, straight from the oven. You can easily pull apart the pre-cut squares. The steam trapped inside will be released, revealing fluffy, cheesy, and sausage-filled interiors. The buttery goodness that has seeped into every crevice is truly something special.
- Wonderful On Their Own: Honestly, these Sausage Cheese Butter Swim Biscuits! are so flavorful and hearty that they don’t need much accompaniment. They are a complete meal in themselves for breakfast or brunch.
- Pairing Suggestions: If you’re looking to round out your meal, they pair wonderfully with a simple fried egg, a side of fresh fruit, or even a dollop of your favorite gravy for an extra indulgent experience. A fresh cup of coffee or a glass of orange juice makes for a perfect breakfast companion.
- Storage: If by some miracle you have any leftovers, these biscuits store quite well. Place them in an airtight container at room temperature for up to 2 days, or in the refrigerator for up to 3-4 days. To maintain their fresh taste and texture, it’s best to consume them within this timeframe.
- Reheating: To reheat, I recommend wrapping individual biscuits loosely in foil and warming them in a preheated oven at 350°F (175°C) for about 10-15 minutes, or until heated through. You can also microwave them for 20-30 seconds, but be aware that microwaving might make them a little softer and less crisp on the outside. Reheating in a toaster oven also works beautifully to bring back some of that lovely crispness! No matter how you reheat them, these Sausage Cheese Butter Swim Biscuits! will still be a delightful treat.

Conclusion:
And there you have it, friends! We’ve journeyed through the simple steps to create a truly unforgettable breakfast or brunch experience. If you’ve been searching for that one recipe that consistently delivers on both ease and incredible flavor, then look no further. This recipe isn’t just about making biscuits; it’s about crafting a moment of pure comfort and deliciousness that will have everyone at your table asking for more. The unique “butter swim” technique is truly a game-changer, eliminating the need for tedious cutting in cold butter, making the whole process incredibly approachable even for novice bakers. What emerges from your oven is nothing short of culinary magic: biscuits with an impossibly golden, crispy exterior, yet an interior so tender, fluffy, and rich, it practically melts in your mouth. The savory chunks of sausage and the gooey pockets of melted cheese are perfectly integrated, ensuring a burst of flavor in every single bite. It’s this beautiful combination of textures and tastes, coupled with the sheer simplicity of preparation, that makes these a guaranteed hit.
I genuinely believe that these Sausage Cheese Butter Swim Biscuits! are destined to become a staple in your home. They represent the best kind of comfort food – hearty, satisfying, and utterly delicious. But beyond just being incredibly tasty on their own, these biscuits are also wonderfully versatile, making them perfect for various occasions and accompaniments. For a classic breakfast, I love serving them alongside perfectly scrambled eggs, crispy bacon, and a fresh fruit salad. The savory notes of the biscuits pair beautifully with a strong cup of coffee or a refreshing glass of orange juice. For a more substantial brunch spread, consider them the star alongside a light quiche, a vibrant green salad, or even a warm bowl of creamy tomato soup – the biscuits are fantastic for dipping!
Serving Suggestions & Delightful Variations:
Don’t be afraid to get creative with these beauties! While the core recipe is stellar, a few tweaks can open up a world of new flavors.
Personalize Your Cheese:
Experiment with different cheeses beyond cheddar. Monterey Jack offers a milder, meltier experience, while a spicy Pepper Jack can add a delightful kick. For an extra layer of complexity, a blend of sharp cheddar and a little Parmesan could be quite exquisite.
Swap the Sausage:
While classic breakfast sausage is fantastic, feel free to try a spicy Italian sausage (just be sure to cook and crumble it well), or even a lean turkey sausage for a lighter touch. You could even omit the sausage entirely for a purely cheesy butter swim biscuit, which would be divine alongside a chili or stew.
Herbaceous Additions:
A sprinkle of fresh chives, finely chopped parsley, or a pinch of dried thyme mixed into the dough can elevate the aroma and flavor profile beautifully. For a smoky depth, a dash of smoked paprika wouldn’t go amiss.
Making Ahead:
These biscuits are best fresh from the oven, but they reheat remarkably well. Simply pop them in a warm oven for a few minutes until heated through. You can even bake a batch, let them cool completely, and then freeze them in an airtight container for up to a month. Thaw overnight and reheat for a quick, delicious treat anytime.
Now it’s your turn! I truly hope you take the plunge and whip up a batch of these glorious biscuits. I promise you won’t regret it. The joy of pulling that golden pan out of the oven, smelling the incredible aroma fill your kitchen, and then biting into that perfect combination of buttery tenderness, savory sausage, and melted cheese is an experience I want everyone to have. Don’t just read about it; make it! Once you’ve had a chance to try them, please come back and share your experience. Did you add any unique twists? What did you serve them with? Your culinary adventures inspire me, and I love hearing how these recipes come to life in your kitchens. Happy baking, and enjoy every single buttery, cheesy bite!

Melt-in-Your-Mouth Beef Sausage Cheese Butter Swim Biscuits
Experience the magic of homemade biscuits with these incredible Beef Sausage Cheese Butter Swim Biscuits! Combining savory beef sausage and melted cheese with the clever ‘butter swim’ method, these biscuits offer tender interiors, crispy edges, and amazing flavor with surprising ease.
Ingredients
-
2 ½ cups all-purpose flour
-
1 tablespoon granulated sugar
-
1 tablespoon baking powder
-
1 teaspoon salt
-
1 cup whole milk
-
1 cup shredded cheddar cheese
-
½ pound beef breakfast sausage, cooked and crumbled
-
1 stick (½ cup) unsalted butter
Instructions
-
Step 1
In a skillet over medium-high heat, cook and crumble ½ pound beef breakfast sausage until browned (5-7 minutes). Drain excess fat and cool completely. -
Step 2
Shred 1 cup of cheddar cheese. Combine with cooled beef sausage. -
Step 3
In a large bowl, whisk together 2 ½ cups all-purpose flour, 1 tablespoon granulated sugar, 1 tablespoon baking powder, and 1 teaspoon salt. -
Step 4
Stir the cooled beef sausage and cheese mixture into the dry ingredients until lightly coated. -
Step 5
Make a well, pour in 1 cup cold whole milk, and mix gently with a spoon until just combined into a sticky, shaggy dough. Do not overmix. -
Step 6
Place 1 stick (½ cup) unsalted butter in a 9×13 inch baking dish. Put the dish in a cold oven, then preheat to 400°F (200°C). Once butter is melted and hot, carefully remove the dish. -
Step 7
Carefully spoon the sticky dough into the hot, butter-filled dish. Spread evenly, then use a butter knife to cut the dough into 12-15 squares directly in the pan. -
Step 8
Bake for 25-35 minutes at 400°F (200°C), or until golden brown and puffed. Rotate the pan if needed. (Optional: Broil for 1-2 minutes for extra browning, watching carefully.) -
Step 9
Let cool in the pan for 5-10 minutes before serving warm. Store leftovers in an airtight container at room temperature for up to 2 days, or refrigerate for 3-4 days. Reheat in a 350°F (175°C) oven for 10-15 minutes or microwave briefly.
Important Information
Nutrition Facts (Per Serving)
It is important to consider this information as approximate and not to use it as definitive health advice.
Allergy Information
Please check ingredients for potential allergens and consult a health professional if in doubt.

Leave a Comment