
Maple Chicken Beef Bacon Sliders are not just a dish; they’re an experience waiting to happen, a symphony of flavors perfectly orchestrated into a miniature package. I am absolutely thrilled to introduce you to a recipe that promises to elevate your next gathering or simply transform a weeknight meal into something truly special. Forget everything you thought you knew about sliders, because I’m confident we’re diving into a gourmet creation that combines the best of sweet, savory, and utterly satisfying. This is more than just a meal; it’s a culinary statement that guests will rave about long after the last bite.
The Evolution of an Appetizer: Why These Sliders Stand Out
While the humble slider traditionally began its journey as a quick, small bite, modern culinary trends have truly transformed it into a canvas for innovative flavor combinations. This particular recipe stands out by marrying the smoky, rich notes of beef and crispy bacon with the succulent tenderness of chicken, all brought together by the irresistible sweetness of maple. It’s a testament to the fact that sometimes, the most delightful culinary breakthroughs come from bold pairings. People absolutely adore these sliders for their incredible depth of flavor – that tantalizing contrast of sweet maple syrup against the savory meats is simply divine. The compact size makes them ideal for entertaining, offering a gourmet touch without the fuss of a large entrée. Moreover, I find preparing these Maple Chicken Beef Bacon Sliders surprisingly straightforward, yet the payoff in terms of taste and presentation is immense. Get ready to impress and indulge; I know you’re going to love them!

Ingredients:
- For the Maple Chicken Patties:
- 1.5 pounds ground chicken (preferably 92% lean for a good balance of flavor and moisture)
- 1/2 cup panko breadcrumbs
- 1 large egg, lightly beaten
- 1/4 cup finely minced yellow onion (or 1 tablespoon onion powder for a smoother texture)
- 2 cloves garlic, minced (or 1 teaspoon garlic powder)
- 1 teaspoon smoked paprika
- 1/2 teaspoon dried thyme
- 1/2 teaspoon kosher salt (adjust to taste)
- 1/4 teaspoon freshly ground black pepper
- 1 tablespoon olive oil (for cooking)
- For the Sweet & Savory Maple Glaze:
- 1/2 cup pure maple syrup (Grade A Dark Robust, for a richer flavor)
- 2 tablespoons apple cider vinegar
- 1 tablespoon Dijon mustard
- 1/2 teaspoon Worcestershire sauce (optional, for added depth)
- 1/4 teaspoon cayenne pepper (or a pinch of red pepper flakes for subtle heat, adjust to your preference)
- 1 tablespoon cornstarch
- 2 tablespoons cold water
- For the Crispy Beef Bacon:
- 8-10 slices beef bacon (regular cut, not thick-cut, for better crisping)
- For Assembly & Toppings:
- 12 slider buns (brioche or potato buns work wonderfully for their soft texture and subtle sweetness)
- 6 slices cheddar cheese, cut in half (or 12 mini slider-sized cheese slices)
- 1/2 cup dill pickle slices (thinly sliced, or mini pickles)
- 1/4 small red onion, very thinly sliced into rings or slivers
- Optional: Butter for toasting buns
Preparing the Maple Chicken Patties
- Combine the Chicken Patty Ingredients: In a large mixing bowl, gently combine the ground chicken, panko breadcrumbs, beaten egg, minced yellow onion (or onion powder), minced garlic (or garlic powder), smoked paprika, dried thyme, kosher salt, and black pepper. My tip here is to use your hands to mix, but be very gentle and avoid overworking the mixture. Overmixing can lead to tough patties, and we want our chicken sliders to be tender and juicy. The panko breadcrumbs and egg act as excellent binders, ensuring the patties hold their shape beautifully.
- Form the Patties: Divide the chicken mixture into 12 equal portions. For consistent sizing, you might find it helpful to use a kitchen scale. Each portion should be roughly 1.5 to 2 ounces. With slightly damp hands, gently form each portion into a small, flat patty, about 2.5 to 3 inches in diameter and about 1/2 inch thick. It’s important to make them slightly wider than your slider buns as they will shrink a little during cooking. Create a small indentation in the center of each patty with your thumb; this clever trick helps prevent the patties from puffing up in the middle and ensures even cooking.
- Chill the Patties: Arrange the formed patties on a plate or baking sheet lined with parchment paper. Cover loosely with plastic wrap and refrigerate for at least 20-30 minutes. This chilling step is crucial! It allows the patties to firm up, making them much easier to handle and preventing them from falling apart when they hit the hot pan. It also helps the flavors meld together even more beautifully.
Crafting the Sweet & Savory Maple Glaze
- Prepare the Glaze Base: In a small saucepan, combine the pure maple syrup, apple cider vinegar, Dijon mustard, Worcestershire sauce (if using), and cayenne pepper. Whisk these ingredients together until well combined. The apple cider vinegar provides a wonderful tang that cuts through the sweetness of the maple, creating a balanced and irresistible flavor profile. The Dijon mustard adds a subtle, pungent kick that complements both the chicken and the bacon.
- Simmer and Thicken: Place the saucepan over medium heat and bring the mixture to a gentle simmer. While it’s heating, in a small separate bowl, whisk together the cornstarch and cold water until no lumps remain – this is your cornstarch slurry. Once the glaze base is simmering, slowly pour the cornstarch slurry into the saucepan while continuously whisking. Continue to whisk gently as the glaze thickens. It should become a glossy, syrupy consistency, thick enough to coat the back of a spoon, typically within 1-2 minutes.
- Achieve Desired Consistency: Once thickened, remove the glaze from the heat. Give it a taste and adjust seasonings if necessary. You might want a tiny bit more cayenne for heat or a dash more vinegar for tartness. Remember, this glaze will be brushed on the chicken patties, so you want it vibrant and flavorful. Set aside while you cook the other components. It will thicken slightly more as it cools.
Crisping the Beef Bacon
- Cook the Beef Bacon (Stovetop Method): Lay the slices of beef bacon in a single layer in a large skillet or frying pan over medium heat. Do not overcrowd the pan; cook in batches if necessary. Cook for 5-8 minutes per side, flipping occasionally, until the bacon is crispy and deeply browned. Beef bacon tends to be leaner than pork bacon, so it renders less fat, but still achieves a fantastic crispy texture.
- Cook the Beef Bacon (Oven Method – Recommended for evenness and less mess): Preheat your oven to 400°F (200°C). Arrange the beef bacon slices in a single layer on a baking sheet lined with parchment paper or a wire rack set over a baking sheet (this allows for better air circulation and crisping). Bake for 12-18 minutes, or until the bacon reaches your desired level of crispness. Keep a close eye on it, as cooking times can vary.
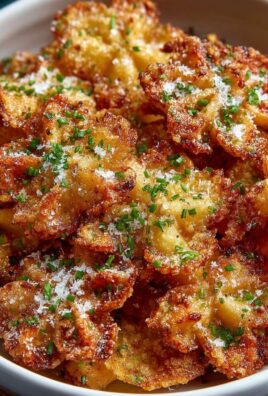
- Drain and Prepare: Once crispy, remove the bacon from the pan or oven. Transfer the cooked beef bacon to a plate lined with paper towels to drain any excess fat. Once cooled slightly, you can either leave the strips whole or break/chop them into smaller pieces that are more manageable for sliders. I often break each slice into 2-3 pieces for perfect slider layering.
Cooking the Maple Chicken Patties to Perfection
- Preheat Skillet: Heat 1 tablespoon of olive oil in a large non-stick skillet or cast-iron pan over medium-high heat. You want the pan hot enough to create a nice sear, but not so hot that it burns the outside before the inside cooks through. If you have a griddle, that works perfectly for cooking multiple patties at once.
- Cook the Patties: Carefully place the chilled chicken patties into the hot skillet, ensuring not to overcrowd the pan. Cook in batches if necessary to maintain consistent heat. Cook for 3-4 minutes per side, until they are beautifully golden brown and cooked through. Chicken needs to reach an internal temperature of 165°F (74°C) for food safety. You’ll know they’re nearly done when the edges look opaque.
- Glaze and Finish: During the last minute of cooking, brush a generous amount of the prepared maple glaze over the top side of each patty. Flip the patties and brush the other side, allowing the glaze to caramelize slightly on the pan for about 30 seconds to 1 minute per side. This step not only infuses the chicken with incredible flavor but also creates a beautiful, sticky, and slightly charred coating.
- Melt the Cheese: Once both sides are glazed and the patties are cooked through, place a half slice of cheddar cheese on top of each patty. If desired, you can briefly cover the skillet with a lid for about 30 seconds to help the cheese melt perfectly and evenly. This creates that irresistible gooey layer. Remove the patties from the skillet and set them aside.
Prepping Your Slider Buns and Toppings
- Toast the Slider Buns (Optional, but Highly Recommended): Lightly butter the cut sides of your slider buns. You can toast them in the same skillet you used for the patties (wiping it clean first), on a griddle, or under the broiler for 1-2 minutes until they are lightly golden brown. Toasting the buns is a small step that makes a huge difference! It adds texture, prevents the buns from becoming soggy, and provides a delightful warmth to your sliders.
- Prepare Fresh Toppings: While the buns are toasting, ensure your dill pickle slices and very thinly sliced red onion are ready. Having all your components prepared and within reach (mise en place) makes the assembly process smooth and enjoyable.
Assembling Your Delectable Maple Chicken Beef Bacon Sliders
- Lay the Foundation: Place the toasted bottom halves of the slider buns on your serving platter or individual plates.
- Add the Glazed Chicken: Carefully place one cheesy, maple-glazed chicken patty onto each bottom bun. The warmth from the patty will slightly soften the bun, preparing it for the deliciousness to come.
- Layer on the Bacon: Top each chicken patty with 1-2 pieces of your crispy beef bacon. The smoky, salty crunch of the bacon provides a fantastic textural and flavor contrast to the tender, sweet-savory chicken.
- Introduce the Tang: Next, add a few slices of dill pickle to each slider. The bright, briny flavor of the pickles is absolutely essential here, cutting through the richness and adding a refreshing crunch.
- Finish with Onion: Arrange a few thin slivers of red onion on top of the pickles. The sharp, fresh bite of the red onion adds another layer of flavor and a welcome zing. If you find raw onion too potent, you can soak the slices in ice water for 10 minutes beforehand to mellow their flavor.
- Complete the Slider: Place the toasted top halves of the slider buns over your perfectly assembled “Maple Chicken Beef Bacon Sliders.” Press down gently to secure all the layers.
- Serve Immediately: These sliders are best enjoyed fresh and warm. Arrange them appealingly on a platter, perhaps with a side of extra glaze for dipping, or a simple green salad for a complete meal. Get ready for an explosion of flavors and textures in every bite! The combination of sweet maple, savory chicken, smoky beef bacon, and tangy pickles is truly magnificent.

Conclusion:
And there you have it, my friends! We’ve journeyed through the creation of what I firmly believe will become a staple in your culinary repertoire. This isn’t just another slider recipe; it’s a meticulously crafted symphony of flavors designed to ignite your taste buds and impress everyone at your table. From the initial thought of combining these incredible ingredients to the final, triumphant bite, I promise you, the effort is unequivocally worth it. What sets these apart, making them an absolute must-try, is that perfect equilibrium. We’re talking about the rich, robust depth of beef seamlessly melding with the tender, savory notes of chicken, all elevated by the irresistible, smoky crunch of bacon. Then, that glorious maple glaze sweeps in, adding a hint of sweetness that rounds out the entire experience, transforming each slider into a miniature masterpiece of balanced indulgence. It’s that blend of sweet, savory, and smoky that truly makes the Maple Chicken Beef Bacon Sliders unforgettable, a dish that transcends the ordinary and ventures into the realm of the truly special.
Seriously, envision the moment: you pull these golden-brown beauties from the oven, the air in your kitchen thick with the intoxicating aroma of sizzling bacon, caramelized maple, and perfectly cooked meats. That’s not just dinner; that’s an event! They manage to be incredibly comforting and familiar, yet sophisticated and exciting all at once. Whether you’re hosting a casual get-together, a lively game day party, or simply looking to elevate a weeknight meal for your family, these sliders are your answer. They are surprisingly simple to assemble, making them accessible for cooks of all skill levels, yet they deliver a flavor profile that tastes like it took hours of painstaking effort. Believe me, your guests will be clamoring for the recipe, and you’ll find yourself beaming with pride as they reach for a second, or even a third, slider. The ease of preparation combined with the sheer “wow” factor makes them an unparalleled choice for any occasion where deliciousness is the goal.
Unleash Your Culinary Creativity: Serving & Variation Ideas
Now, while these sliders are phenomenal on their own, don’t hesitate to experiment with serving them alongside a few complementary dishes to create a truly memorable spread. I personally love serving them with a vibrant, tangy coleslaw to cut through the richness, or a crisp, fresh green salad with a light vinaigrette for a refreshing contrast. For those who prefer heartier sides, a batch of sweet potato fries or some seasoned onion rings make for an ideal companion. Imagine a mini potato salad or even some baked beans adding to the perfect backyard BBQ vibe! They’re also fantastic simply piled high on a platter with an assortment of pickles and perhaps some extra dipping sauces on the side. Think sriracha mayo for a bit of a kick, or a creamy honey mustard for another layer of sweet tang. The versatility of these sliders extends far beyond just what’s on the bun.
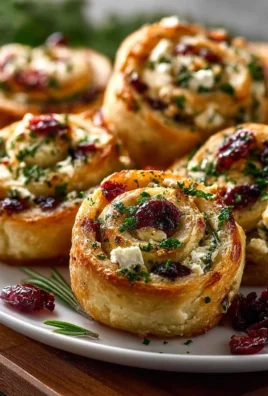
And speaking of versatility, let your imagination run wild with variations! While the core recipe is stellar, you can easily adapt it to suit your personal preferences. Consider experimenting with different cheeses – a sharp cheddar, a smoky gouda, or even a spicy pepper jack could add an exciting new dimension. Swap out the slider buns for something different; pretzel buns offer a unique texture, while brioche buns will lend an extra layer of buttery sweetness. For those who crave more heat, a slice of pickled jalapeño or a dash of your favorite hot sauce mixed into the beef could provide that extra zing. You could also caramelize some onions to add another layer of sweet-savory complexity, or even finely chop some bell peppers into the meat mixture for added freshness. The beauty of this recipe is that it provides a fantastic foundation upon which you can build and customize to your heart’s content. Don’t be afraid to make it your own; that’s where the true joy of cooking lies!
Ultimately, these Maple Chicken Beef Bacon Sliders are more than just a meal; they’re an invitation to gather, share, and savor truly incredible food. They represent the perfect marriage of flavors and textures, promising a delightful bite every single time. Their inherent deliciousness, coupled with their ease of preparation and impressive presentation, makes them a standout choice for any cook looking to make a lasting impression without spending all day in the kitchen. I truly believe that once you experience the magic of these sliders, they will become a cherished part of your go-to recipe collection, proving time and again why they deserve a permanent spot on your menu rotation. They hit all the right notes: savory, sweet, smoky, and utterly satisfying.
Your Turn to Shine!
So, what are you waiting for? I’ve given you all the tools and inspiration you need to create these truly exceptional Maple Chicken Beef Bacon Sliders. Now, it’s your turn to get into the kitchen, roll up your sleeves, and bring this incredible recipe to life. I promise you, the aroma alone will be enough to get your mouth watering, and that first bite? Pure bliss! Don’t just dream about these delicious sliders; make them a reality. You deserve to experience the incredible flavors and the sheer joy of sharing them with others. I am genuinely excited for you to try this recipe, and I can’t wait to hear all about your experience.
Once you’ve whipped up your batch, please don’t be shy! I absolutely love seeing your culinary creations and hearing your feedback. Did you try a fun variation? What did your family and friends think? Snap a photo, share your thoughts, and let me know how these sliders turned out for you. Your insights and experiences are invaluable and help create a vibrant community of passionate home cooks. So go forth, cook with confidence, and prepare to delight everyone with these amazing sliders. Happy cooking, and I’m looking forward to hearing from you!

Maple Chicken Beef Bacon Sliders
Sweet and savory Maple Chicken Beef Bacon Sliders, a perfect appetizer or weeknight meal, combining tender chicken with smoky beef bacon and a maple Dijon glaze.
Ingredients
-
1 lb boneless, skinless chicken breasts
-
1/4 cup maple syrup
-
2 tbsp Dijon mustard
-
1 tbsp olive oil
-
6 slices beef bacon
-
6 slider buns
-
1 cup arugula
-
Salt to taste
-
Pepper to taste
Instructions
-
Step 1
Slice chicken breasts into 6 slider-sized pieces. Season with salt and pepper. In a bowl, whisk together maple syrup and Dijon mustard to create a glaze. Coat chicken pieces with about half of the glaze mixture. -
Step 2
Cook beef bacon in a skillet or oven until crispy. Drain on paper towels and set aside. -
Step 3
Heat olive oil in a large skillet over medium-high heat. Cook chicken pieces for 3-4 minutes per side, or until cooked through (165°F internal temperature). During the last minute, brush the remaining glaze onto the chicken, allowing it to caramelize slightly. -
Step 4
Toast slider buns if desired. Place a chicken piece on each bottom bun, top with crispy beef bacon, and a generous portion of fresh arugula. Cover with the top bun and serve immediately.
Important Information
Nutrition Facts (Per Serving)
It is important to consider this information as approximate and not to use it as definitive health advice.
Allergy Information
Please check ingredients for potential allergens and consult a health professional if in doubt.

Leave a Comment