
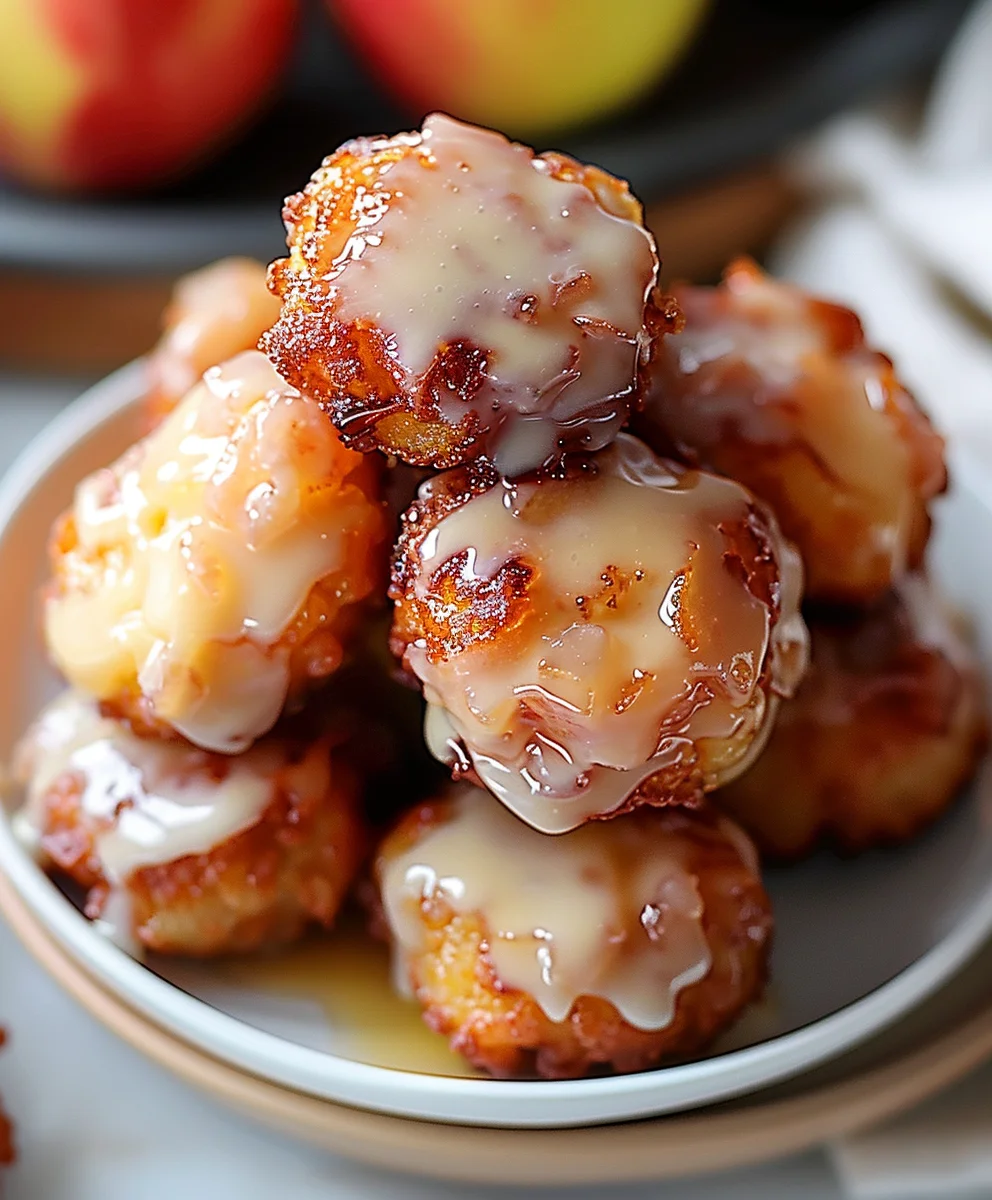
Irresistible Apple Fritter Bites Easy Delicious Treats are more than just a dessert; they are a warm embrace on a plate, a delightful culinary experience that awakens the senses. Imagine the aroma of cinnamon and sweet apples wafting through your kitchen, drawing everyone closer. There’s something profoundly comforting about a perfectly golden, crispy fritter, especially when it’s bursting with tender, spiced apple pieces and coated in a delicate glaze. While the exact origins of fritters are ancient and varied, spanning cultures from Roman times to various European traditions, apple fritters have firmly secured their place as a beloved American classic, often enjoyed at fairs, festivals, or as a cozy breakfast treat.
I believe people adore these bites not just for their delightful crunch and soft, fruity interior, but also for the nostalgia they evoke and the sheer joy they bring with every mouthful. They strike that perfect balance between decadent indulgence and a surprisingly simple preparation, making them truly Irresistible Apple Fritter Bites Easy Delicious Treats that you’ll want to revisit again and again. Get ready to transform humble ingredients into something truly extraordinary with this recipe!

Ingredients:
Gathering your ingredients is the first exciting step towards creating these truly Irresistible Apple Fritter Bites. I always make sure everything is measured out and ready to go before I start, it just makes the process so much smoother and more enjoyable!
- For the Apple Fritter Bites:
- 2 medium-sized apples (I love using a mix of Granny Smith for tartness and Honeycrisp for sweetness and crunch, about 1.5 cups diced)
- 1 ½ cups all-purpose flour
- ½ cup granulated sugar
- 2 teaspoons baking powder
- 1 teaspoon ground cinnamon (freshly ground makes a difference, trust me!)
- ¼ teaspoon ground nutmeg
- ½ teaspoon salt
- ¾ cup whole milk (the richness really makes these fritters shine)
- 1 large egg, at room temperature
- 2 tablespoons unsalted butter, melted and slightly cooled
- 1 teaspoon pure vanilla extract
- 6-8 cups vegetable oil or canola oil, for frying
- For the Sweet Vanilla Glaze:
- 1 ½ cups powdered sugar (confectioners’ sugar), sifted
- 3-4 tablespoons whole milk (start with 3 and add more if needed)
- ½ teaspoon pure vanilla extract
Preparing Your Apples: The Heart of Your Apple Fritter Bites
The quality of your apples will truly define your Irresistible Apple Fritter Bites, so let’s get them perfect! This step is all about setting the foundation for those lovely bursts of apple flavor within each bite.
- Choose Your Apples Wisely: First, select your apples. As I mentioned, I adore a blend of Granny Smith and Honeycrisp. The Granny Smiths offer a delightful tart counterpoint to the sweet batter and glaze, while Honeycrisp apples maintain a lovely texture even after frying, preventing them from turning to complete mush. Aim for firm, unblemished apples.
- Peel with Care: Using a vegetable peeler or a small paring knife, carefully peel the skin off both apples. I find it’s easiest to peel them under cold running water, as it helps prevent the peel from tearing and keeps the apple crisp.
- Core Them Thoroughly: Once peeled, you’ll need to core your apples. If you have an apple corer, this is a breeze! Otherwise, cut the apples into quarters, then use a small knife to carefully cut out the core and any seeds. Make sure to remove any tough bits that sometimes linger around the core.
- Dice for Perfection: Now comes the dicing. This is where attention to detail really pays off for your Easy Delicious Treats. You want to dice the apples into small, uniform pieces, roughly ¼-inch to ½-inch cubes. Why uniform? Because it ensures that every apple piece cooks evenly within the fritter, resulting in a consistent texture throughout. If your pieces are too large, they might not soften enough, and if they’re too small, they might disappear into the batter. Aim for that sweet spot!
- Optional Lemon Juice Trick: If you’re not planning to mix your batter immediately after dicing, I highly recommend tossing your diced apples with about half a teaspoon of lemon juice. This simple trick prevents them from oxidizing and turning brown, keeping them fresh and visually appealing until they’re ready to be folded into the batter.
- Set Aside: Once your apples are perfectly prepped, set them aside. They’re ready to become the delicious stars of your fritters!
Crafting the Irresistible Apple Fritter Batter
This is where the magic truly begins to happen! A well-made batter is the secret to light, airy, and truly Irresistible Apple Fritter Bites. Take your time with these steps, and you’ll be rewarded with the most delightful texture.
- Combine Dry Ingredients: In a large mixing bowl, whisk together your all-purpose flour, granulated sugar, baking powder, ground cinnamon, ground nutmeg, and salt. I always like to give this a really good whisk for about 30 seconds to a minute. This isn’t just about combining; it’s about aerating the flour and ensuring the leavening agents (baking powder) and spices are evenly distributed throughout. This helps prevent pockets of unmixed ingredients and ensures uniform flavor in every bite of your Easy Delicious Treats.
- Prepare Wet Ingredients: In a separate medium-sized bowl, gently whisk your whole milk, large egg (which should be at room temperature for better incorporation), melted and slightly cooled unsalted butter, and pure vanilla extract. Whisk until just combined. You don’t need to go crazy here, just ensure the egg yolk is broken and everything is blended smoothly. The room temperature egg and slightly cooled butter prevent the batter from becoming too cold, which can affect the consistency.
- Combine Wet and Dry: Now, pour the wet ingredients into the dry ingredients. This is a crucial step for tender fritters. Using a wooden spoon or a spatula, mix until just combined. Do not overmix! Overmixing develops the gluten in the flour, leading to tough, chewy fritters – and we want light and fluffy Irresistible Apple Fritter Bites, don’t we? A few lumps in the batter are perfectly fine; in fact, they’re preferred over an overmixed, smooth batter. Stop mixing as soon as no streaks of dry flour remain.
- Fold in the Apples: Gently fold your prepared, diced apples into the batter. Again, be gentle. You want the apples to be evenly distributed throughout the batter without mashing them or overworking the batter. This ensures that every fritter has a generous amount of apple goodness.
- Let it Rest (Optional, but Recommended): While not strictly necessary, allowing your batter to rest for 10-15 minutes at room temperature can actually improve the texture of your fritters. This brief rest allows the flour to fully hydrate and the gluten to relax, resulting in an even more tender crumb. It’s a little secret for truly Easy Delicious Treats!
The Frying Process: Transforming Batter into Delicious Treats
This is arguably the most exciting part – watching your simple batter transform into golden, crispy, and utterly delicious Irresistible Apple Fritter Bites! Frying requires a bit of attention and respect for hot oil, but with the right steps, you’ll be a pro in no time.
- Set Up Your Frying Station: Safety first! Choose a large, heavy-bottomed pot or a Dutch oven for frying. Cast iron works wonderfully for maintaining a consistent temperature. Pour your vegetable or canola oil into the pot. You’ll want about 3-4 inches of oil, ensuring the fritters can float without touching the bottom. Make sure your pot is on a stable surface on your stovetop.
- Heat the Oil to Perfection: Place a deep-fry thermometer on the side of your pot, making sure the bulb is submerged in the oil but not touching the bottom. Heat the oil over medium-high heat until it reaches a consistent temperature between 350°F and 375°F (175°C-190°C). Maintaining this temperature is key to perfect fritters. If the oil is too cool, your fritters will absorb too much oil and become greasy. If it’s too hot, they’ll brown too quickly on the outside, leaving the inside raw. It’s a delicate balance, so keep an eye on that thermometer!
- Prepare Your Draining Station: While the oil heats, set up a cooling rack over a baking sheet lined with several layers of paper towels. This will be where your freshly fried fritters go to drain excess oil and cool slightly, keeping them wonderfully crisp.
- Test the Oil (Optional, but Recommended): Once the oil reaches temperature, you can test it with a tiny drop of batter. If it sizzles gently and immediately floats to the top, you’re good to go. If it sinks and doesn’t do much, the oil isn’t hot enough. If it sizzles violently and browns instantly, it’s too hot.
- Drop the Batter: Using two spoons or a small cookie scoop (about 1.5 tablespoons), carefully drop spoonfuls of batter into the hot oil. I usually use one spoon to scoop the batter and the other to gently push it off into the oil. Aim for irregular, rustic shapes; that’s part of the charm of these Easy Delicious Treats!
- Don’t Overcrowd the Pot: This is another crucial tip. Fry the fritters in batches, typically 4-6 at a time, depending on the size of your pot. Overcrowding will drastically lower the oil temperature, leading to greasy fritters and an uneven cook. Patience is a virtue here!
- Fry Until Golden Brown: Let the fritters fry for about 2-3 minutes per side, or until they are beautifully golden brown and puffed up. Use a slotted spoon or spider tool to gently turn them over halfway through the frying process to ensure even browning. You’ll love watching them transform into those gorgeous little nuggets!
- Drain and Cool: Once the fritters are perfectly golden and cooked through, carefully remove them from the oil using your slotted spoon or spider tool. Let any excess oil drip back into the pot, then transfer them immediately to your prepared cooling rack over the paper towel-lined baking sheet. This allows the remaining oil to drain and prevents the bottoms from getting soggy.
- Repeat: Continue frying the remaining batter in batches, ensuring the oil returns to the optimal temperature before adding each new batch. This consistent temperature control is what will make all your Irresistible Apple Fritter Bites equally perfect.
Whipping Up the Perfect Glaze: The Sweet Finish for Your Easy Delicious Treats
No Irresistible Apple Fritter Bites are complete without a luscious, sweet glaze! This simple vanilla glaze adds that final touch of sweetness and a beautiful sheen, making them even more enticing.
- Prepare Your Bowl: In a medium-sized mixing bowl, measure out your powdered sugar. I highly recommend sifting the powdered sugar first. This step is incredibly important for a smooth, lump-free glaze. Powdered sugar tends to clump together in the bag, and sifting ensures a silky-smooth texture, which is exactly what we want for these Easy Delicious Treats.
- Add Milk Gradually: To the sifted powdered sugar, add 3 tablespoons of whole milk. The whole milk provides a richer flavor and creamier texture compared to lower-fat options.
- Introduce Vanilla Extract: Pour in your ½ teaspoon of pure vanilla extract. The vanilla is essential here, it truly enhances the sweetness and adds a warm, comforting aroma to the glaze that complements the apple fritters beautifully.
- Whisk Until Smooth: Using a whisk, stir the ingredients together until they are completely smooth and free of any lumps. Start slowly to avoid a cloud of powdered sugar! Keep whisking until you achieve a consistent, pourable, but not too thin, consistency.
- Check for Consistency: This is a key moment for your glaze. You’re looking for a consistency that is thick enough to coat the back of a spoon and cling to the fritters, but still thin enough to drip off elegantly. If your glaze seems too thick, add the remaining tablespoon of milk, just a teaspoon at a time, whisking well after each addition until you reach your desired consistency. If it accidentally becomes too thin, you can whisk in a little more sifted powdered sugar, about a tablespoon at a time, until it thickens up.
- Keep it Covered (if needed): If you’re not glazing immediately, you can cover the bowl with plastic wrap to prevent the glaze from forming a crust. A quick whisk before use will bring it back to life.
Glazing and Serving Your Apple Fritter Bites
The moment of truth! Glazing is the final touch that elevates your crispy, warm fritters into truly Irresistible Apple Fritter Bites. This is where they get their signature sweet coating.
- Glaze While Warm: The best time to glaze your fritters is when they are still warm, but not piping hot from the fryer. If they’re too hot, the glaze will melt right off. If they’re completely cold, the glaze won’t adhere as well. Aim for a comfortable handling temperature. I usually let them sit on the cooling rack for about 5-10 minutes after frying.
- Prepare for Glazing: You have a couple of options for glazing. You can dip each fritter individually, or you can place several in the bowl of glaze at once. I prefer to work in small batches to ensure each fritter gets properly coated.
- Dip or Toss: Gently pick up a warm fritter and dip one side into the glaze, or fully immerse it if you prefer a complete coating. If you’re using the “several at once” method, carefully place 3-4 fritters into the glaze, then use a spoon to gently toss them until they are evenly coated.
- Let Excess Drip Off: Once glazed, lift the fritter out of the glaze, allowing any excess to drip back into the bowl. This prevents a thick, clumpy layer of glaze and ensures an even, beautiful coating.
- Return to Cooling Rack: Place the glazed fritters back onto your clean cooling rack (you might want to put a fresh sheet of parchment paper or foil under it for easy cleanup) to allow the glaze to set. As they cool, the glaze will firm up slightly, creating that lovely, slightly crisp exterior.
- Serve Immediately for Best Results: While these Easy Delicious Treats are good at any temperature, they are undeniably at their absolute best when served warm, shortly after glazing. The contrast between the warm, soft interior and the slightly crisp glaze is pure bliss.
Tips for Perfect Irresistible Apple Fritter Bites Every Time
Achieving consistently perfect Irresistible Apple Fritter Bites is an art, but these tips will make it an easy and delicious endeavor for you every single time. Trust me, a little knowledge goes a long way!
- The Right Apple Makes a Difference: Don’t underestimate the power of your apple choice. As I mentioned, firm, slightly tart apples like Granny Smith, Honeycrisp, Fuji, or Braeburn are ideal. Avoid mealy or overly sweet varieties like Red Delicious, as they tend to turn mushy and disappear in the fritter. A good apple provides structure and a pleasant textural contrast.
- Maintain Oil Temperature Religiously: This is arguably the most crucial tip for non-greasy, perfectly cooked fritters. A deep-fry thermometer is your best friend here.
- If the oil is too cold (below 350°F/175°C): The batter will absorb too much oil, resulting in heavy, greasy, and dense fritters that lack that desirable crispy exterior.
- If the oil is too hot (above 375°F/190°C): The fritters will brown very quickly on the outside, appearing perfectly cooked, but the inside will remain raw and doughy. You’ll end up with a burnt exterior and an uncooked interior.
- The Sweet Spot (350-375°F/175-190°C): This range allows the fritters to cook through evenly while developing a beautiful golden-brown, crispy crust. Keep an eye on the thermometer and adjust your heat as needed between batches.
- Don’t Overmix the Batter: I can’t stress this enough! Overmixing develops the gluten in the flour, leading to tough, rubbery fritters instead of the light, tender texture we’re aiming for. Mix only until the dry ingredients are just incorporated, even if a few small lumps remain. Those lumps will dissolve during frying.
- Fry in Small Batches: Resist the urge to crowd your pot. Adding too many fritters at once will significantly drop the oil temperature, leading to all the issues mentioned above (greasy, undercooked). Fry 4-6 fritters at a time, depending on the size of your pot, allowing the oil to recover its temperature between batches. This ensures consistent quality across all your Easy Delicious Treats.
- Drain Properly and Promptly: As soon as the fritters come out of the oil, transfer them to a wire rack set over paper towels. This allows excess oil to drip away and prevents the bottoms from becoming soggy. Don’t let them sit on paper towels directly without a rack for too long, as they’ll steam and lose their crispness.
- Sift Your Powdered Sugar for the Glaze: For the smoothest, most beautiful glaze, always sift your powdered sugar. This removes any lumps and ensures a silky texture that coats your fritters perfectly. A lumpy glaze is just not as appealing on your Irresistible Apple Fritter Bites.
- Glaze While Warm: Glaze the fritters while they are still warm (but not hot off the fryer) for the best adherence and a lovely, slightly melted finish that sets just right.
- Experiment with Spices: While cinnamon and nutmeg are classics, don’t hesitate to play around with other spices. A pinch of ground ginger, allspice, or even a tiny amount of cardamom can add wonderful depth to your apple fritters.
- Consider a Rest for the Batter: While not mandatory, allowing your batter to rest for 10-15 minutes after mixing can hydrate the flour more thoroughly and relax the gluten, potentially leading to an even more tender crumb.
Storing Your Easy Delicious Treats
While these Irresistible Apple Fritter Bites are undoubtedly best enjoyed fresh and warm, you might find yourself with a few leftovers (though I doubt it!). Here’s how to store them to keep them as delicious as possible for later enjoyment.
- Allow to Cool Completely: If you plan on storing any fritters, it’s essential to let them cool down to room temperature completely. Storing warm fritters will create condensation, making them soggy. Place them on a cooling rack until they are no longer warm to the touch.
- Airtight Container at Room Temperature: For short-term storage (1-2 days), place the cooled, glazed fritters in an airtight container at room temperature. Layer them with parchment paper if you need to stack them to prevent sticking. While they won’t be as crisp as fresh, they’ll still be wonderfully soft and flavorful. The glaze might soften slightly, but that’s a small price to pay for deliciousness!
- Refrigeration (Not Recommended for Glazed Fritters): I generally don’t recommend refrigerating glazed fritters as the moisture in the fridge can make the glaze tacky and sticky. If you must refrigerate, they will last a bit longer (up to 3-4 days), but their texture will be compromised. If you anticipate having leftovers, consider only glazing the fritters you plan to eat immediately and storing the unglazed ones.
- Freezing Unglazed Fritters (Best Option for Longer Storage): If you want to store your Irresistible Apple Fritter Bites for longer, I highly recommend freezing them before glazing.
- First, let the unglazed fritters cool completely.
- Arrange them in a single layer on a baking sheet and flash freeze them for about an hour, or until solid. This prevents them from sticking together.
- Once frozen, transfer them to a freezer-safe airtight container or heavy-duty freezer bag. They can be stored in the freezer for up to 1-2 months.
- Reheating for Freshness:
- From Room Temperature: Pop room-temperature fritters into a toaster oven or a regular oven preheated to 300°F (150°C) for about 5-8 minutes, or until warmed through and slightly crisp again.
- From Frozen (Unglazed): If reheating frozen, unglazed fritters, you can place them directly into a preheated oven at 350°F (175°C) for 10-15 minutes, or until heated through. Once warm, you can then whip up a fresh batch of glaze and coat them, almost as good as fresh!
- Microwave (Use with Caution): While you can microwave glazed fritters for 15-30 seconds to warm them, be aware that this will make them soft and slightly chewy, and the glaze will likely become very sticky. It’s not my preferred method for these Easy Delicious Treats, but it works in a pinch!
-
1 cup all-purpose flour
-
1/4 cup granulated sugar
-
2 tsp baking powder
-
1 tsp ground cinnamon
-
1/4 tsp ground nutmeg
-
1/2 tsp salt
-
1/2 cup whole milk
-
1 large egg
-
2 tbsp unsalted butter, melted
-
1 tsp pure vanilla extract
-
1 medium Granny Smith apple, peeled, cored, diced (approx. 3/4 cup)
-
6-8 cups vegetable oil, for frying
-
For the Glaze:
-
1 1/2 cups powdered sugar, sifted
-
3-4 tbsp whole milk
-
1/2 tsp pure vanilla extract
-
Step 1
Peel, core, and dice the Granny Smith apple into 1/4 to 1/2-inch pieces. Set aside. -
Step 2
In a large bowl, whisk together flour, granulated sugar, baking powder, cinnamon, nutmeg, and salt. In a separate medium bowl, whisk milk, egg, melted butter, and vanilla extract until just combined. -
Step 3
Pour the wet ingredients into the dry. Mix with a wooden spoon or spatula until *just* combined; do not overmix. Gently fold in the diced apple. Optionally, let batter rest 10-15 minutes at room temperature. -
Step 4
In a heavy-bottomed pot or Dutch oven, pour 3-4 inches of vegetable oil. Heat oil over medium-high heat to 350-375°F (175-190°C). Prepare a wire rack over a paper towel-lined baking sheet for draining fritters. -
Step 5
Using two spoons or a small cookie scoop (approx. 1.5 tbsp), carefully drop spoonfuls of batter into the hot oil. Fry in batches of 4-6, about 2-3 minutes per side, until golden brown and puffed. Do not overcrowd the pot; maintain oil temperature. -
Step 6
Remove fried fritters with a slotted spoon or spider tool, letting excess oil drip back into the pot. Transfer immediately to the prepared wire rack to drain and cool slightly. -
Step 7
In a medium bowl, whisk sifted powdered sugar, 3 tablespoons whole milk, and 1/2 teaspoon vanilla extract until smooth. Add more milk, 1 teaspoon at a time, if a thinner consistency is desired. -
Step 8
Once fritters are warm (not piping hot), dip each into the glaze, allowing excess to drip off. Place glazed fritters back on a clean wire rack to set. Serve immediately for best taste and texture.
Conclusion:
Well, my friend, we’ve reached the sweet finale of our culinary journey, and I genuinely hope you’re feeling as excited as I am about what we’ve just explored. This isn’t just another recipe; it’s an invitation to experience pure joy in every single bite. I truly believe this recipe for Irresistible Apple Fritter Bites Easy Delicious Treats is an absolute game-changer for anyone who loves the comforting warmth of apples, the satisfying crunch of a perfectly fried dough, and the simple pleasure of homemade goodness. What makes these fritter bites a must-try, you ask? It’s that magical combination of a golden-crisp exterior, a remarkably tender and fluffy interior, and those delightful pockets of warm, spiced apple that burst with flavor. They are incredibly forgiving to make, surprisingly quick, and the aroma alone will transform your kitchen into the coziest, most inviting space imaginable. Seriously, the moment that first batch comes out of the oil, dusted with sugar, you’ll understand why I’m so passionate about them. They encapsulate everything wonderful about home baking – comforting, heartwarming, and utterly delicious.
Now, let’s talk about taking these little morsels from simply amazing to truly unforgettable with some delightful serving suggestions and variations. While a generous dusting of powdered sugar or a sprinkle of cinnamon sugar is the classic, utterly perfect finish, don’t be afraid to elevate the experience. Imagine them drizzled with a rich, buttery caramel sauce – a combination that’s practically divine! Or, for a decadent treat, a warm chocolate fudge sauce would turn them into an instant dessert sensation. If you’re serving these for breakfast or brunch, a side of pure maple syrup for dipping is a non-negotiable must. For a truly elevated dessert, pair them with a scoop of vanilla bean ice cream or a dollop of freshly whipped cream; the contrast of warm fritter and cold cream is simply exquisite. Think about adding a small bowl of fruit compote on the side, perhaps a spiced cranberry or a mixed berry blend, especially during the holidays. They are also fantastic with a strong cup of coffee or a comforting mug of hot apple cider.
Endless Possibilities: Get Creative with Your Fritter Bites!
But wait, there’s more! The beauty of these apple fritter bites lies in their versatility. Once you’ve mastered the basic recipe, which you totally will, the door opens to a world of delightful variations. Want to amp up the spice? Try adding a pinch of freshly grated nutmeg, a whisper of allspice, or even a hint of cardamom to the batter – these warm spices complement the apples beautifully. And why stop at apples? While I adore apples, you could experiment with other fruits. Imagine pear fritter bites, perhaps with a touch of ginger, or even a mix of berries (though you might need to adjust the flour slightly to account for the extra moisture). For an added textural crunch and nutty flavor, consider folding in some finely chopped pecans or walnuts into the batter. And if you’re a chocolate lover, a handful of white chocolate chips or mini dark chocolate chips would be a glorious addition. The glaze itself can be customized too. Beyond the simple powdered sugar, you could whip up a quick cream cheese glaze, a maple glaze, or even a spiced cider glaze for an extra autumn touch.
Make Them Your Own and Share the Sweetness!
This recipe is more than just instructions; it’s a canvas for your culinary creativity. It’s about bringing warmth, comfort, and pure deliciousness into your home with minimal fuss. I genuinely hope you feel inspired to roll up your sleeves and give these amazing apple fritter bites a try. They are such a rewarding bake, perfect for a cozy weekend morning, a special family dessert, or just because you deserve a treat. Trust me when I say that the smiles they’ll bring to the faces of your loved ones (and your own!) will be well worth every moment in the kitchen. Once you’ve made them, and I’m confident you’ll fall in love with them, please come back and share your experience with me! I absolutely adore hearing about your kitchen adventures, your successes, and any fun variations you come up with. Did you serve them with a unique sauce? Did you add a secret spice? Did your family devour them in minutes? Let me know! Your feedback and shared experiences are what truly make this community so special and vibrant. Happy baking, my dear friends, and get ready to enjoy some truly extraordinary bites!
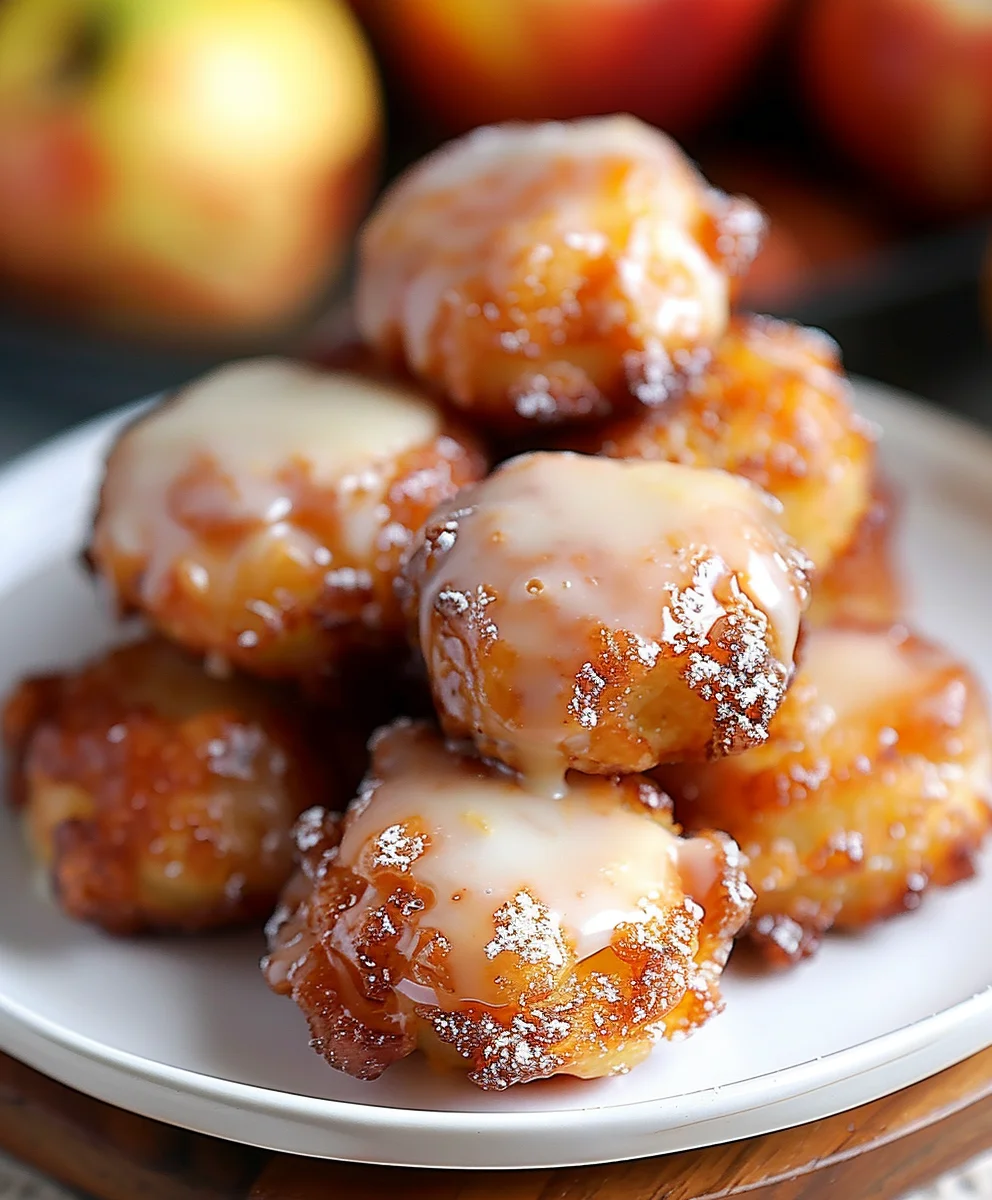
Irresistible Apple Fritter Bites – Quick & Delicious Treats!
These delightful Apple Fritter Bites offer a warm embrace on a plate, a comforting culinary experience with the aroma of cinnamon and sweet apples. Perfectly golden and crispy, bursting with tender, spiced apple pieces and coated in a delicate vanilla glaze, these treats strike a perfect balance between decadent indulgence and simple preparation, making them truly irresistible.
Ingredients
Instructions
Important Information
Nutrition Facts (Per Serving)
It is important to consider this information as approximate and not to use it as definitive health advice.
Allergy Information
Please check ingredients for potential allergens and consult a health professional if in doubt.

Leave a Comment