
Honey Mustard Chicken Sliders The Ultimate Recipe Guide is finally here, and I couldn’t be more excited to share what I truly believe is one of the most delightful and versatile recipes in my culinary collection. Are you ready to dive into an experience that promises to be a crowd-pleaser every single time?
Imagine this: perfectly cooked, tender chicken, exquisitely coated in a rich, homemade honey mustard glaze that strikes an impeccable balance between sweet and tangy. This masterpiece is then nestled into soft, buttery slider buns, creating a harmony of flavors and textures that is simply irresistible. This dish isn’t just food; it’s an invitation to pure enjoyment!
While the concept of sliders has a rich American history, evolving from miniature hamburgers into an adaptable canvas for countless fillings, our chicken slider takes this tradition to a new level. It elevates the classic chicken sandwich into a fun, bite-sized format, making it perfect for sharing, snacking, and satisfying serious cravings. The enduring popularity of chicken combined with the beloved notes of honey mustard creates a modern comfort food that resonates with everyone, embodying a timeless appeal with a contemporary twist.
People absolutely adore this dish for so many reasons. Beyond the incredible explosion of taste – that perfect symphony of savory chicken, zesty mustard, and golden honey – there’s the delightful textural play: the crispiness of the chicken contrasting beautifully with the pillowy softness of the bun. Moreover, these sliders are unbelievably convenient, making them the ideal choice for bustling weeknight dinners, effortless entertaining, or a delightful game-day spread. It’s truly a dish that brings smiles to faces and happy tummies all around.
So, whether you’re hosting a party or simply seeking an amazing new addition to your family’s meal rotation, this comprehensive guide on Honey Mustard Chicken Sliders The Ultimate Recipe Guide will walk you through every step to culinary perfection, ensuring delicious results every single time.

Ingredients:
- For the Chicken:
- 1 ½ pounds boneless, skinless chicken breasts or thighs (I prefer thighs for extra juiciness!)
- 2 tablespoons olive oil
- 1 teaspoon salt
- ½ teaspoon black pepper
- 1 teaspoon garlic powder
- 1 teaspoon onion powder
- ½ teaspoon smoked paprika
- ¼ teaspoon cayenne pepper (optional, for a little kick!)
- For the Ultimate Honey Mustard Sauce:
- ½ cup good quality mayonnaise
- ¼ cup Dijon mustard
- 2 tablespoons yellow mustard
- ¼ cup honey (adjust to your sweetness preference!)
- 1 tablespoon apple cider vinegar
- ½ teaspoon garlic powder
- ¼ teaspoon salt
- ⅛ teaspoon black pepper
- A dash of hot sauce (like Tabasco or Sriracha, optional)
- For Assembling the Sliders:
- 1 (12-count) package of Hawaiian sweet rolls or similar slider buns
- 12 slices Provolone, Swiss, or white cheddar cheese (my personal favorite is Provolone for that perfect melt!)
- ¼ cup unsalted butter, melted
- 1 teaspoon Worcestershire sauce
- ½ teaspoon garlic powder
- 1 tablespoon poppy seeds or sesame seeds (optional, for that bakery-fresh look!)
- Thinly sliced red onion or pickles, for serving (optional)
Crafting the Ultimate Honey Mustard Sauce
Let’s kick things off with the heart and soul of these sliders – our incredible honey mustard sauce! Trust me, a homemade sauce makes all the difference, and this one is ridiculously easy and packed with flavor. It’s got that perfect balance of sweet, tangy, and a hint of savory that just sings on your palate.
-
Gather Your Tools: Grab a medium-sized mixing bowl and a whisk. That’s all you’ll need for this step, making cleanup a breeze!
-
Combine the Wet Ingredients: Into your mixing bowl, add the ½ cup of mayonnaise, ¼ cup of Dijon mustard, and 2 tablespoons of yellow mustard. The combination of both mustards provides a fantastic depth – the Dijon brings that sharp, sophisticated tang, while the yellow mustard offers its classic, milder zest. This is where the magic truly starts!
-
Sweeten it Up: Next, pour in the ¼ cup of honey. Now, this is a flexible measurement! If you have a super sweet tooth or your honey is particularly mild, feel free to add another tablespoon. Taste as you go; that’s my biggest secret to amazing sauces.
-
Add the Tang and Spices: Stir in the 1 tablespoon of apple cider vinegar. This is crucial for cutting through the richness and adding that bright, zesty tang. Then, sprinkle in your ½ teaspoon of garlic powder, ¼ teaspoon of salt, and ⅛ teaspoon of black pepper. If you’re feeling adventurous and want a little kick, now is the time to add that dash of hot sauce. It won’t make it spicy, but it will add another layer of flavor complexity.
-
Whisk Until Silky Smooth: Vigorously whisk all the ingredients together until the sauce is completely smooth and beautifully emulsified. You’re looking for a creamy, uniform consistency with no lumps. Take your time here to ensure everything is perfectly incorporated.
-
The All-Important Taste Test: This is my favorite part! Dip a small spoon in and taste the sauce. Does it need more honey? A touch more vinegar? A pinch more salt? Adjust any seasonings to your personal preference. Remember, you are the chef!
-
Chill Out: Once you’re happy with the flavor, cover the bowl with plastic wrap and pop it into the refrigerator for at least 30 minutes. This chilling time isn’t just for keeping it cool; it allows the flavors to meld and deepen, resulting in an even more delicious sauce. You can even make this sauce a day or two in advance – it gets better with time!
-
Prep the Chicken: Take your 1 ½ pounds of boneless, skinless chicken breasts or thighs out of their packaging. If using breasts, I recommend slicing them horizontally to create thinner cutlets, about ½ to ¾ inch thick. This ensures more even cooking and makes them easier to shred or slice later. If using thighs, you can generally leave them as is, just trim any excess fat.
-
Season Generously: In a medium bowl, or directly on a clean cutting board, drizzle the chicken pieces with 2 tablespoons of olive oil. Then, evenly sprinkle them with 1 teaspoon of salt, ½ teaspoon of black pepper, 1 teaspoon of garlic powder, 1 teaspoon of onion powder, ½ teaspoon of smoked paprika, and if you like a little heat, ¼ teaspoon of cayenne pepper. Use your hands to really massage the seasonings into every nook and cranny of the chicken. Don’t be shy here; this seasoning blend is what will give our chicken its fantastic base flavor!
-
Heat the Pan: Place a large skillet (cast iron or non-stick works great) over medium-high heat. Let it get nice and hot for about 2-3 minutes. We want a good sizzle when the chicken hits the pan to create a beautiful crust.
-
Cook the Chicken: Carefully place the seasoned chicken pieces into the hot skillet in a single layer. Try not to overcrowd the pan; if necessary, cook in batches to ensure proper browning. Cook for 5-7 minutes per side, or until the chicken is golden brown, cooked through, and reaches an internal temperature of 165°F (74°C) as measured with a meat thermometer. The exact cooking time will vary depending on the thickness of your chicken. Do not rush this step; properly cooked chicken is essential for both safety and flavor!
-
Rest the Chicken: Once cooked, remove the chicken from the skillet and place it on a clean cutting board. Cover it loosely with foil and let it rest for at least 5-10 minutes. This resting period is critical! It allows the juices to redistribute throughout the meat, ensuring every bite is incredibly tender and moist. Skipping this step often leads to dry chicken, and we definitely don’t want that for our sliders.
-
Shred or Slice: After resting, you have two excellent options for preparing your chicken for the sliders. You can either shred it using two forks (my preferred method for maximum sauce absorption and texture in sliders!) or thinly slice it against the grain. If you shred it, aim for bite-sized pieces that will fit nicely on the rolls. If slicing, keep them thin enough so they don’t overpower the slider.
-
Coat with Sauce: Now, here’s a fantastic trick for maximum flavor: transfer the shredded or sliced chicken back into the medium bowl. Retrieve your chilled honey mustard sauce from the refrigerator. Spoon about ½ cup to ¾ cup of the prepared honey mustard sauce over the warm chicken. Gently toss the chicken to evenly coat every piece with that glorious sauce. This infuses the chicken with even more flavor and keeps it extra juicy. Reserve the remaining sauce for serving, or for extra saucy sliders!
-
Preheat the Oven: First things first, preheat your oven to 350°F (175°C). We want the oven nice and ready to bake our sliders to golden perfection.
-
Prepare the Rolls: Take your 12-count package of Hawaiian sweet rolls. Using a large serrated knife, carefully slice the entire block of rolls horizontally through the middle, keeping them connected. You’ll end up with a single top section and a single bottom section. Gently place the bottom section of the rolls into a 9×13 inch baking dish. This makes for super easy assembly and ensures everything stays neat.
-
Layer the Cheese: Arrange 6 slices of Provolone (or your chosen cheese) evenly over the bottom half of the rolls. Make sure the cheese covers as much of the surface as possible; we want gooey cheese in every bite!
-
Add the Chicken: Carefully spoon and spread the honey mustard-coated chicken mixture evenly over the layer of cheese on the bottom rolls. Use a spatula to ensure the chicken is spread from edge to edge, so everyone gets a generous portion of that delicious chicken.
-
Top with More Cheese: Place the remaining 6 slices of cheese directly on top of the chicken layer. This double layer of cheese is essential for that ultimate cheesy pull and helps to keep everything tucked inside the rolls.
-
Cap it Off: Gently place the top half of the rolls back over the chicken and cheese layers, aligning them perfectly with the bottom half. Now it’s really starting to look like a tray of sliders!
-
Prepare the Flavorful Topping: In a small microwave-safe bowl, melt ¼ cup of unsalted butter. Once melted, stir in 1 teaspoon of Worcestershire sauce and ½ teaspoon of garlic powder. The Worcestershire adds a lovely savory, umami note that really elevates the whole slider experience. Whisk it all together until well combined.
-
Brush and Sprinkle: Using a pastry brush, generously brush the butter mixture evenly over the tops of the slider buns. Make sure to get into all the crevices between the rolls. This butter wash is going to give them a gorgeous golden-brown crust and a fantastic savory flavor. If you’re using them, sprinkle the 1 tablespoon of poppy seeds or sesame seeds evenly over the buttered tops. They add a lovely texture and visual appeal!
-
Cover and Bake: Carefully cover the baking dish with aluminum foil. This helps to steam the sliders slightly, ensuring the cheese melts beautifully and the rolls soften just enough without getting too crispy too fast. Place the covered baking dish into your preheated 350°F (175°C) oven and bake for 15 minutes.
-
Uncover and Brown: After 15 minutes, carefully remove the foil. Return the baking dish to the oven and continue baking uncovered for another 5-10 minutes, or until the tops of the rolls are golden brown and the cheese is bubbly and fully melted. Keep a close eye on them during this stage, as ovens can vary, and we don’t want them to burn!
-
Rest (Briefly!): Once the sliders are perfectly golden and gooey, carefully remove the baking dish from the oven. Let the sliders rest in the dish for about 5 minutes. This brief rest allows the cheese to set slightly, preventing it from sliding everywhere when you try to separate the sliders, and makes them easier to handle.
-
Slice and Serve: Using that same serrated knife, slice along the original lines of the rolls to separate them into individual sliders. Carefully transfer them to a serving platter. These Honey Mustard Chicken Sliders are best served warm, right out of the oven! Place the remaining honey mustard sauce alongside for anyone who wants an extra drizzle (and believe me, many will!). If desired, offer thinly sliced red onion or pickles on the side for a refreshing crunch.
- Chicken Cut Options: While I love boneless, skinless chicken breasts or thighs, you can also use rotisserie chicken for an incredibly quick shortcut. Just shred about 3-4 cups of cooked rotisserie chicken and skip the cooking step, going straight to coating it with the honey mustard sauce. This is a game-changer on busy weeknights!
- Cooking Methods: If you’re not a fan of pan-frying, you can bake your chicken instead. Place seasoned chicken breasts/thighs on a baking sheet and bake at 400°F (200°C) for 20-25 minutes, or until cooked through. Air frying is also a fantastic option, typically at 375°F (190°C) for 15-20 minutes, flipping halfway. The goal is always tender, juicy chicken!
- Spice Level Adjustments: The cayenne pepper in the chicken seasoning and the hot sauce in the honey mustard are totally optional. Feel free to increase or decrease them to suit your family’s preference for heat. A pinch of red pepper flakes could also be added to the butter topping for an extra zing!
- Make Ahead: The honey mustard sauce is fantastic when made a day or two in advance. The flavors really have time to meld and deepen, making it even more delicious. Store it in an airtight container in the refrigerator.
- Sweetness Factor: Honeys vary greatly in sweetness and flavor profile. Always taste and adjust! If your honey is less sweet, you might want to add an extra tablespoon. Conversely, if you prefer a less sweet sauce, start with slightly less honey and add more to taste.
- Tangy Twist: If you love an extra tangy kick, consider adding a squeeze of fresh lemon juice along with or in place of a portion of the apple cider vinegar. It brightens the sauce wonderfully!
- Cheese Choices: While Provolone is a personal favorite, don’t limit yourself! Swiss, white cheddar, Monterey Jack, or even a blend like Colby Jack all work wonderfully and melt beautifully. Experiment to find your perfect cheese pull!
- Roll Varieties: Hawaiian sweet rolls are a classic for a reason – their sweetness perfectly complements the savory chicken and tangy sauce. However, feel free to use other slider buns like potato rolls, brioche slider buns, or even mini pretzel buns for a different flavor profile.
- Add-Ins for Crunch: For extra texture and flavor, consider adding some very thinly sliced red onion, a layer of crispy bacon bits, or some dill pickle slices between the chicken and top layer of cheese before baking. These additions provide a delightful contrast.
- Perfect Pairing: These sliders are hearty enough on their own, but they also pair wonderfully with a simple green salad, a bowl of tomato soup, sweet potato fries, or even some homemade coleslaw.
- Make-Ahead Assembly: You can assemble the sliders (without the butter topping) up to a few hours in advance. Cover them tightly with plastic wrap and refrigerate. When ready to bake, add the butter topping, then cover with foil and bake as directed, potentially adding an extra 5-10 minutes to account for them being cold.
- Storage: Leftover sliders can be stored in an airtight container in the refrigerator for up to 3 days.
- Reheating: Reheat leftover sliders in a preheated oven at 300°F (150°C) for about 10-15 minutes, or until warmed through and the cheese is melty again. You can also use an air fryer for a crispier result, typically at 300°F (150°C) for 5-7 minutes. Microwaving is an option in a pinch, but the rolls won’t be as crisp.
Preparing the Flavorful Chicken
Now that our amazing honey mustard sauce is chilling and developing its wonderful flavors, it’s time to prepare our chicken. The key to truly spectacular sliders is ensuring the chicken itself is incredibly tender, juicy, and seasoned to perfection. I’ll walk you through how to achieve just that!
Assembling the Delicious Sliders
The chicken is perfectly cooked and coated, the sauce is heavenly, now it’s time to bring it all together in glorious slider form! This is where the fun begins, and it’s surprisingly simple to assemble a whole tray of these beauties.
Baking and Serving Your Honey Mustard Chicken Sliders
We’re in the home stretch now! All the delicious components are assembled, and it’s time to bake these beauties to perfection. The oven will work its magic, melting the cheese, warming the chicken, and toasting those buttery rolls.
Tips for Success & Delightful Variations
I want you to have the absolute best experience with this Honey Mustard Chicken Sliders recipe, so I’ve compiled some of my top tips and exciting variations to help you make them your own!
Mastering the Chicken:
Sauce Secrets:
Slider Customizations:
Serving Suggestions & Leftovers:
I truly hope you enjoy making and devouring these Honey Mustard Chicken Sliders as much as I do! They are a fantastic crowd-pleaser, perfect for parties, game days, or a fun family meal. Don’t be afraid to experiment and make them uniquely yours!

Conclusion:
Okay, so we’ve journeyed through the steps of creating truly remarkable sliders, and I genuinely hope you’re feeling inspired. This isn’t just another chicken recipe; it’s a game-changer. What makes these sliders an absolute must-try, in my humble opinion, is their incredible versatility coupled with an irresistible flavor profile that appeals to literally everyone. We’re talking about that perfect balance of tender, succulent chicken bathed in a dreamy, tangy-sweet honey mustard sauce, all nestled in soft, pillowy slider buns. It’s comfort food elevated, but without any of the fuss. Whether you’re planning a casual get-together, need a speedy weeknight meal that feels special, or searching for the ultimate game day snack, these sliders fit the bill perfectly. They disappear from plates faster than you can say “more, please!” because they strike that sweet spot between satisfying and delightfully craveable.
I truly believe that once you try this recipe, it will quickly become a cherished favorite in your repertoire. It’s the kind of dish that garners compliments and requests for the recipe, making you feel like a culinary superstar with minimal effort. The secret truly lies in that harmonious blend of flavors – the slight zing from the mustard, the comforting sweetness of honey, and the savory goodness of perfectly cooked chicken. It’s what transforms a simple slider into something memorable, something truly special. And that’s precisely why I’m so passionate about sharing this particular preparation. It’s more than just a recipe; it’s an experience, a commitment to deliciousness that delivers every single time. I’ve poured my heart into ensuring every detail helps you achieve perfection, making these sliders not just good, but utterly unforgettable. After mastering this approach, you’ll understand why this truly is Honey Mustard Chicken Sliders The Ultimate Recipe Guide you’ve been searching for.
Now, let’s talk about rounding out your meal. While these sliders are perfectly capable of stealing the show on their own, they also play incredibly well with others. For a classic, comforting pairing, I love serving them alongside a generous pile of crispy sweet potato fries or a vibrant, crunchy coleslaw. The freshness of the coleslaw cuts through the richness beautifully. If you’re aiming for a lighter side, a simple green salad with a zesty vinaigrette would be absolutely fantastic. Thinking about a party spread? Consider a big bowl of potato salad, some baked beans, or even a fresh fruit platter to add a touch of color and sweetness. For a truly indulgent experience, a macaroni and cheese side could be surprisingly delightful, creating a full-blown comfort food feast. Don’t be afraid to experiment; almost any picnic or BBQ side dish will complement these fantastic sliders.
But the fun doesn’t stop there! One of the joys of cooking is making a recipe truly your own, and these sliders offer so much room for customization. Feel free to play with the cheese – Swiss for a nutty flavor, provolone for a meltier texture, or even a spicy pepper jack if you like a little kick. You could also introduce some caramelized onions or sautéed mushrooms for an extra layer of savory depth. For those who enjoy a bit of heat, a few thinly sliced jalapeños (fresh or pickled!) tucked inside before baking would be incredible. And if you’re feeling adventurous with the sauce, consider stirring in a dash of smoked paprika, a pinch of cayenne, or even a tiny amount of maple syrup for a different sweet note. Want a textural contrast? A sprinkle of crispy bacon bits over the chicken before adding the top bun could be pure genius. The possibilities are genuinely endless, so don’t hesitate to get creative and tailor them to your personal taste or what you have on hand.
So, what are you waiting for? I wholeheartedly encourage you to roll up your sleeves, gather your ingredients, and give these incredible honey mustard chicken sliders a try this week. I promise, the smiles and satisfied sighs from your family and friends will be all the reward you need. They truly are that good. And when you do make them, please, please share your experience! I’d absolutely love to hear about your culinary adventure. Did you add a unique twist? Discover a perfect side dish? Take a photo and share your creations. Your feedback and personal touches inspire me and countless other home cooks who are always looking for delicious, reliable recipes. Let’s build a community around great food! Happy cooking, my friends, and I can’t wait to hear how much you loved them!
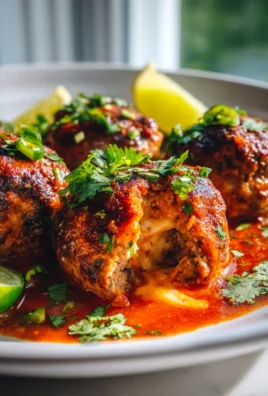
Honey Mustard Chicken Sliders
Tender breaded chicken coated in a homemade sweet and tangy honey mustard glaze, topped with melted cheese and nestled in soft slider buns. These irresistible sliders are a versatile crowd-pleaser for any occasion.
Ingredients
Instructions
Important Information
Nutrition Facts (Per Serving)
It is important to consider this information as approximate and not to use it as definitive health advice.
Allergy Information
Please check ingredients for potential allergens and consult a health professional if in doubt.

Leave a Comment