
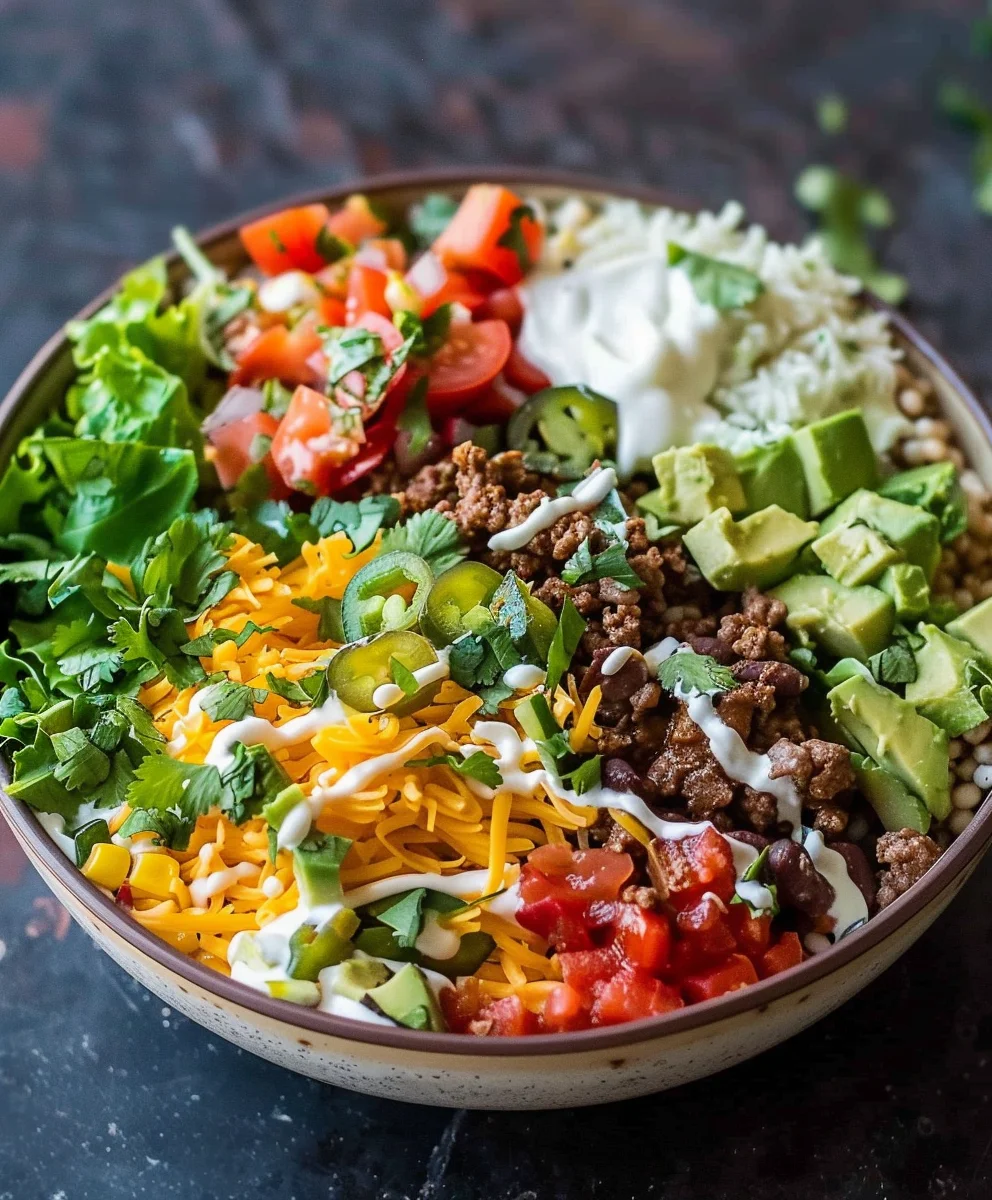
Low Carb Burrito Bowl – this phrase alone conjures images of vibrant flavors, satisfying textures, and a meal that truly hits the spot without the guilt. As someone who absolutely adores the fresh, zesty profile of a classic burrito but often seeks healthier alternatives, I’ve found my ultimate culinary solution. Imagine sinking your fork into a harmonious blend of perfectly seasoned proteins, crisp vegetables, creamy avocado, and tangy salsa, all without the tortilla. It’s truly a game-changer for mindful eating!
This deconstructed masterpiece takes the beloved elements of traditional Mexican and Tex-Mex cuisine, stripping away the carbs without sacrificing any of the vibrant taste. The concept of the burrito bowl has risen to prominence as a flexible, nutritious option that pays homage to its wrapped counterpart while embracing modern dietary needs. People absolutely adore the Low Carb Burrito Bowl because it offers unparalleled convenience for meal prep, incredible versatility to suit any palate, and a burst of fresh, savory flavors that keep you coming back for more. It’s not just a meal; it’s a celebration of vibrant ingredients, offering all the joy of your favorite comfort food in a lighter, more nutritious package. I’m excited to guide you through creating your very own perfect bowl!

Ingredients:
For the Zesty Chicken Marinade and Cooking:
-
1.5 pounds (about 3-4 medium) boneless, skinless chicken breasts or thighs – I prefer thighs for extra juiciness, but breasts work beautifully too, just ensure they are pounded to an even thickness if very thick.
-
2 tablespoons olive oil – A good quality extra virgin olive oil works wonders for flavor and marination.
-
2 cloves garlic, minced – Fresh garlic is always best; it adds an incredible aromatic punch.
-
1 tablespoon chili powder – I like a medium heat chili powder, but adjust to your preference.
-
1 teaspoon ground cumin – This is non-negotiable for that authentic Tex-Mex flavor.
-
1 teaspoon smoked paprika – Adds a wonderful depth and smoky undertone that elevates the dish.
-
½ teaspoon dried oregano – Mexican oregano if you can find it, but standard dried oregano is perfectly fine.
-
¼ teaspoon cayenne pepper (optional, for heat) – If you love a spicy kick, don’t skip this! Start with a little and add more if you dare.
-
Salt and freshly ground black pepper to taste – Seasoning is key to bringing out all the flavors.
-
Juice of 1 large lime – Freshly squeezed lime juice brightens everything up and helps tenderize the chicken.
-
1 tablespoon fresh cilantro, chopped (for garnish/marinade) – A little in the marinade and some for garnish adds freshness.
For the Flavorful Cauliflower Rice Base:
-
1 medium head cauliflower (about 2 pounds) – Or, if you’re short on time, 16 ounces of pre-riced cauliflower will save you a step!
-
1 tablespoon olive oil – For sautéing.
-
½ medium yellow onion, finely diced – Adds a foundational sweetness and aroma.
-
1 clove garlic, minced – More garlic, because why not?
-
½ teaspoon ground cumin – Enhances the overall burrito bowl theme.
-
Salt and freshly ground black pepper to taste – To properly season our low-carb base.
-
Juice of ½ lime – A final squeeze of lime juice right before serving lifts the flavors.
-
2 tablespoons fresh cilantro, chopped – Stirred in at the end for vibrant color and flavor.
For the Sautéed Veggies & Low-Carb Black Soybeans:
-
1 tablespoon olive oil – For getting those veggies perfectly tender-crisp.
-
1 medium bell pepper (any color, I love red or orange for sweetness), thinly sliced – Adds color, crunch, and a subtle sweetness.
-
½ medium yellow onion, thinly sliced – Caramelizes beautifully when sautéed.
-
1 small zucchini, quartered lengthwise and then sliced – A great way to add more non-starchy vegetables.
-
1 (15-ounce) can black soybeans, rinsed and drained very well – This is our fantastic low-carb alternative to black beans. Make sure they are super dry after rinsing!
-
½ teaspoon chili powder – To tie in with the chicken’s seasoning.
-
¼ teaspoon ground cumin – More of that essential spice.
-
Salt and freshly ground black pepper to taste – For seasoning our veggie mixture.
For the Fresh Salsa (Pico de Gallo):
-
2 medium ripe Roma tomatoes, finely diced – Ripe tomatoes are essential for the best flavor.
-
¼ red onion, very finely diced – Red onion offers a sharper, fresher bite.
-
1 small jalapeño, deseeded and minced (or left with seeds for more heat) – Adjust to your spice preference.
-
¼ cup fresh cilantro, chopped – Absolutely necessary for authentic pico de gallo.
-
Juice of ½ lime – Brightens and binds all the fresh flavors together.
-
Pinch of salt – To season and draw out the tomato flavor.
For the Delicious Toppings (Customize to Your Heart’s Content!):
-
1 large ripe avocado, diced or sliced – Creamy, healthy fats are a must for a satisfying burrito bowl.
-
Sour cream or plain full-fat Greek yogurt – A dollop adds tanginess and cooling creaminess.
-
Shredded cheddar or Monterey Jack cheese – A little cheese goes a long way for flavor.
-
Extra fresh cilantro, chopped – For a final flourish.
-
Hot sauce of choice (e.g., Tabasco, Cholula) – For those who crave extra heat.
Preparation:
Phase 1: Marinating and Cooking the Zesty Chicken
-
Prepare the Chicken: If your chicken breasts are quite thick, I recommend placing them between two sheets of parchment paper or plastic wrap and gently pounding them to an even ¾ to 1-inch thickness. This ensures they cook evenly and quickly. If using chicken thighs, simply trim any excess fat. Then, cut your chicken into bite-sized pieces, roughly 1-inch cubes. This makes it easier to eat in the bowl and ensures the marinade coats every surface.
-
Create the Marinade: In a medium-sized bowl, combine the olive oil, minced garlic, chili powder, ground cumin, smoked paprika, dried oregano, and cayenne pepper (if using). Add a generous pinch of salt and freshly ground black pepper. Squeeze in the juice of one large lime – don’t be shy here, the acidity is crucial for tenderizing and flavor. Finally, stir in 1 tablespoon of chopped fresh cilantro. Mix everything together thoroughly until you have a vibrant, fragrant paste.
-
Marinate the Chicken: Add the cut chicken pieces to the bowl with the marinade. Toss everything together, ensuring every piece of chicken is well coated. I like to use my hands for this to really get the marinade in there. Cover the bowl with plastic wrap or transfer the chicken to a resealable bag. Refrigerate for at least 30 minutes, but ideally for 2-4 hours for the best flavor infusion. If you’re really pressed for time, even 15 minutes will make a difference, but patience here really pays off!
-
Cook the Chicken: When you’re ready to cook, heat 1 tablespoon of olive oil in a large skillet or cast-iron pan over medium-high heat. Once the oil is shimmering, add the marinated chicken in a single layer, making sure not to overcrowd the pan. You might need to cook the chicken in two batches to ensure it browns properly and doesn’t just steam. Cook for about 4-6 minutes per side, or until the chicken is golden brown, cooked through, and reaches an internal temperature of 165°F (74°C). The spices will create a beautiful crust. Remove the cooked chicken from the pan and set it aside on a plate, tented loosely with foil to keep it warm while you prepare the other components. Don’t clean the pan just yet! Those flavorful browned bits are going to be wonderful for our sautéed veggies.
Phase 2: Preparing the Fluffy Cauliflower Rice Base
-
Rice the Cauliflower: If you’re using a whole head of cauliflower, start by washing it thoroughly and patting it dry. Remove the outer leaves and core. Cut the cauliflower into large florets. Working in batches, place the florets into a food processor and pulse until they resemble grains of rice. Be careful not to over-process, or you’ll end up with cauliflower mash! If you don’t have a food processor, you can use a box grater on the large holes setting. If using pre-riced cauliflower, simply skip this step.
-
Sauté the Aromatics: In the same skillet you used for the chicken (those browned bits add so much flavor!), add 1 tablespoon of olive oil and heat over medium heat. Add the finely diced yellow onion and sauté for 3-4 minutes until it softens and becomes translucent, filling your kitchen with a lovely aroma. Add the minced garlic and ground cumin, and cook for another minute until fragrant, stirring constantly to prevent the garlic from burning.
-
Cook the Cauliflower Rice: Add the riced cauliflower to the skillet. Season generously with salt and freshly ground black pepper. Stir well to combine all the ingredients. Cook for 5-7 minutes, stirring occasionally, until the cauliflower rice is tender-crisp and has absorbed all the wonderful flavors from the pan. You want it tender, but not mushy. If it starts to stick, a splash of water or chicken broth can help. Towards the end of cooking, give it a taste and adjust seasonings if necessary.
-
Finish with Freshness: Remove the skillet from the heat. Squeeze in the juice of half a lime and stir in 2 tablespoons of freshly chopped cilantro. Toss gently to combine. Transfer the cauliflower rice to a serving bowl and keep warm while you finish the other components.
Phase 3: Sautéing the Vibrant Veggies and Low-Carb Black Soybeans
-
Prepare the Veggies: Thinly slice your bell pepper and yellow onion. Quarter the zucchini lengthwise and then slice it into half-moon shapes. Ensure your black soybeans are thoroughly rinsed under cold water and then drained very, very well. I often spread them out on a paper towel-lined plate and pat them dry to remove as much moisture as possible, which helps them brown nicely.
-
Sauté the Vegetables: Heat 1 tablespoon of olive oil in a clean large skillet (or wipe out the previous one if you prefer, but I usually just go for it as a new pan). Over medium-high heat, add the sliced bell pepper and onion. Sauté for 5-7 minutes, stirring occasionally, until they start to soften and get a slight char on the edges. You want them tender-crisp, retaining some bite. Add the sliced zucchini and continue to cook for another 3-4 minutes until it’s tender but not soggy.
-
Incorporate the Black Soybeans and Spices: Add the thoroughly drained black soybeans to the skillet with the sautéed vegetables. Sprinkle in ½ teaspoon of chili powder and ¼ teaspoon of ground cumin. Season with salt and freshly ground black pepper to taste. Stir everything together and cook for another 3-5 minutes, allowing the flavors to meld and the soybeans to heat through. The goal here is to warm them and infuse them with the aromatic spices. Taste and adjust seasonings as needed. This mixture adds fantastic texture and a ‘bean-like’ earthiness without the carbs.
Phase 4: Crafting the Fresh Salsa (Pico de Gallo)
-
Dice the Tomatoes and Onion: Wash your Roma tomatoes and red onion. Finely dice both – aiming for pieces of similar size for the best texture in your salsa. Place them in a small mixing bowl.
-
Mince the Jalapeño and Chop Cilantro: Carefully slice your jalapeño lengthwise, remove the seeds and white membrane for less heat, or leave some for an extra kick. Finely mince the jalapeño. Chop your fresh cilantro. Add both to the bowl with the tomatoes and onion.
-
Season and Mix: Squeeze in the juice of half a lime. Add a small pinch of salt. Gently mix all the ingredients together. Let the pico de gallo sit for at least 10-15 minutes at room temperature before serving; this allows the flavors to marry and deepen. A quick taste test will help you decide if it needs more lime or salt. This fresh salsa is a game-changer for the bowl, providing a bright, acidic counterpoint to the richer flavors.
Phase 5: Assembling Your Perfect Low Carb Burrito Bowl
-
Gather Your Components: Make sure all your prepared ingredients are warm and ready to go. You’ll have your zesty cooked chicken, fluffy cauliflower rice, sautéed veggies with black soybeans, fresh pico de gallo, and all your desired toppings.
-
Start with the Base: Grab your favorite serving bowls. Spoon a generous portion of the cilantro-lime cauliflower rice into the bottom of each bowl. This forms the foundational layer, soaking up all the delicious juices and flavors from the layers above.
-
Add the Proteins and Veggies: Next, arrange a portion of the cooked zesty chicken next to the cauliflower rice. Then, add a heap of the sautéed bell peppers, onions, zucchini, and black soybeans. I like to arrange them in sections, almost like a deconstructed burrito, so you can see all the beautiful colors and textures.
-
Pile on the Freshness: Spoon a generous helping of your fresh pico de gallo over or alongside the chicken and veggies. The bright, tangy notes are crucial for balancing the richness of the other components.
-
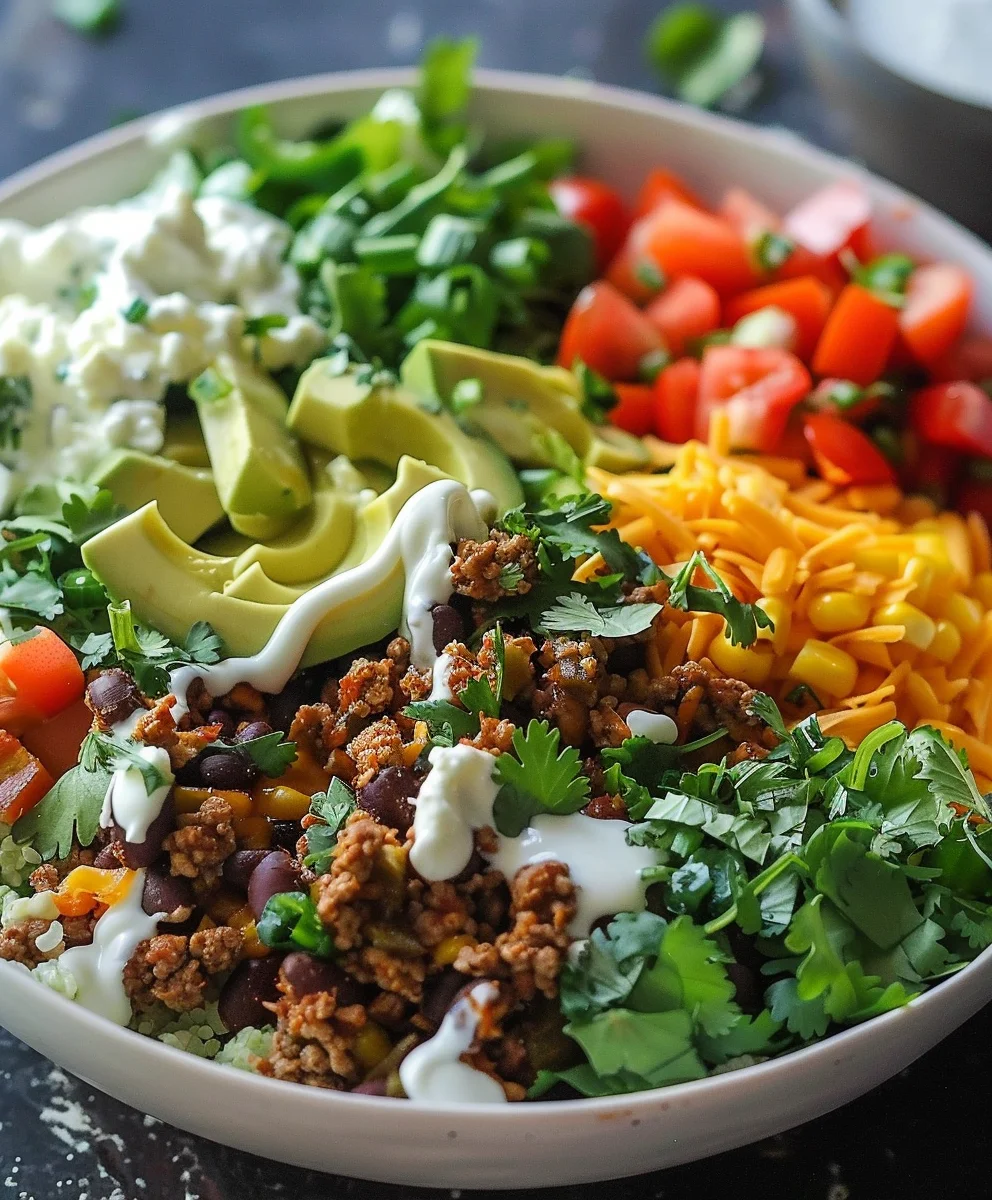
Top it Off! This is where you make the bowl truly yours! Place several slices or a scoop of diced avocado onto the bowl. Add a dollop of sour cream or a spoonful of plain Greek yogurt for a creamy, cooling element. Sprinkle with a little shredded cheese if you’re using it. For a final touch, scatter some extra chopped fresh cilantro over everything. If you like heat, a few dashes of your favorite hot sauce are highly encouraged.
-
Serve and Enjoy Immediately: These Low Carb Burrito Bowls are best enjoyed fresh, allowing you to appreciate the distinct flavors and textures of each component. Grab a fork, dig in, and savor every customizable, delicious, and incredibly satisfying bite! They are perfect for meal prep too; simply store components separately and assemble right before eating for the freshest experience.
Conclusion:
So, as we wrap up our culinary journey, I truly hope you’re as excited as I am about this incredible recipe. What makes our Low Carb Burrito Bowl an absolute triumph, and genuinely a must-try in your kitchen, isn’t just its incredible flavor profile that dances between zesty, savory, and subtly spicy – it’s also its remarkable versatility and undeniable health benefits. We’ve managed to capture all the vibrant, satisfying essence of a classic burrito, but in a way that’s light, fresh, and perfectly aligned with a mindful eating approach. No more feeling heavy after a delicious meal; instead, you’ll feel energized and satisfied. It’s the perfect answer for a busy weeknight when you crave something wholesome yet utterly delicious, or even for meal prep to ensure you have nutritious options ready to go. The ease with which it comes together, coupled with the customizable nature, makes it a true kitchen hero.
But the magic of this bowl doesn’t stop at the initial recipe; it truly shines in its adaptability. Once you’ve mastered the foundational elements, the possibilities for customization are virtually endless, allowing you to tailor it perfectly to your taste buds and whatever ingredients you have on hand.
Protein Power-Ups:
While chicken is a fantastic choice, don’t hesitate to experiment! Ground turkey or beef, seasoned with the same fantastic spice blend, works beautifully. For plant-based eaters, crumbled extra-firm tofu or tempeh, marinated and pan-fried until crispy, provides an excellent texture and protein boost. Even black beans (if you’re okay with a few more carbs) or lentils can be fantastic additions, bringing a different earthy dimension.
Veggie Extravaganza:
Think beyond bell peppers and onions! Roasted zucchini, corn (again, mindful of carb count if strictly adhering), mushrooms, or even finely shredded kale massaged with a touch of lime juice can add extra nutrients and vibrant colors. Experiment with different colors of bell peppers – red, yellow, and orange bring a sweeter note compared to the green. Consider adding roasted sweet potato cubes if you’re not strictly low-carb and want a bit of a comforting starch.
Topping Temptations:
This is where the real fun begins! Don’t limit yourself to just salsa and avocado. A dollop of plain Greek yogurt can be a lower-fat, higher-protein alternative to sour cream, offering that wonderful creamy tang. A sprinkle of crumbled cotija cheese or a sharp cheddar adds a salty, savory kick. Fresh cilantro is a must for me, but don’t forget other fresh herbs like chopped parsley or even a sprinkle of green onions. For those who love heat, a drizzle of your favorite hot sauce or some pickled jalapeños can really elevate the experience. My personal secret weapon? A quick pickled red onion – it adds an incredible pop of acidity and color.
Flavor Profile Twists:
Want to make it smokier? Add a pinch of smoked paprika to your spice blend. Craving more tang? A squeeze of extra lime juice or a splash of apple cider vinegar in your dressing can do wonders. For an extra umami punch, consider adding a dash of tamari or coconut aminos to your protein as it cooks. You could even transform the bowl into a crunchy lettuce wrap by piling the ingredients into large lettuce cups, or serve it over a bed of cauliflower rice for an even heartier, yet still incredibly low-carb, meal. These variations ensure that your bowl never gets boring and can cater to every craving.
Now that you’re armed with all these tips and ideas, I wholeheartedly encourage you to dive in and make this recipe your own. I promise you won’t be disappointed. It’s more than just a meal; it’s an experience waiting to be personalized. Once you’ve tried it, please don’t keep your culinary triumphs to yourself! I would absolutely love to hear about your experience. What variations did you try? What new topping combinations did you discover? Share your thoughts, your photos, and your modifications in the comments below or wherever you connect with me. Your insights not only inspire me but also help others in our community find new ways to enjoy healthy, delicious food. Happy cooking, and I can’t wait to see what amazing bowls you create!
Low Carb Burrito Bowl
A vibrant and satisfying low-carb burrito bowl, packed with perfectly seasoned protein, crisp vegetables, creamy avocado, and tangy salsa. This deconstructed masterpiece offers all the beloved elements of traditional Mexican and Tex-Mex cuisine without the tortilla, making it a flavorful and healthy meal option perfect for mindful eating and meal prep.
Ingredients
-
1 lb ground chicken or beef
-
1 packet taco seasoning
-
3 cups cauliflower rice
-
4 cups romaine lettuce, chopped
-
1 large avocado, diced
-
1 cup cherry tomatoes, halved
-
0.5 cup red onion, finely diced
-
1 cup Mexican cheese blend, shredded
-
0.25 cup fresh cilantro, chopped
-
0.5 cup sugar-free salsa
-
0.25 cup full-fat sour cream
-
2 tbsp fresh lime juice
-
1 whole jalapeño, minced
Instructions
-
Step 1
In a large skillet, cook 1 lb ground chicken (or beef, turkey, or plant-based protein) over medium-high heat until browned. Drain excess fat. Stir in 1 packet taco seasoning with a splash of water, cooking until well combined. -
Step 2
Heat 3 cups fresh or frozen cauliflower rice according to package directions, or quickly sauté until tender-crisp. Set aside. -
Step 3
Chop 4 cups romaine lettuce. Dice 1 large avocado, halve 1 cup cherry tomatoes, finely dice 0.5 cup red onion, chop 0.25 cup fresh cilantro, and mince 1 whole jalapeño (adjust to taste). -
Step 4
In individual serving bowls, layer the prepared cauliflower rice, then the chopped romaine lettuce. Add the cooked seasoned protein. -
Step 5
Arrange the diced avocado, halved cherry tomatoes, finely diced red onion, shredded 1 cup Mexican cheese blend, chopped fresh cilantro, and minced jalapeño over the protein and lettuce. -
Step 6
Drizzle with 0.5 cup sugar-free salsa, add a dollop of 0.25 cup full-fat sour cream, and squeeze 2 tbsp fresh lime juice over each bowl. Serve immediately.
Important Information
Nutrition Facts (Per Serving)
It is important to consider this information as approximate and not to use it as definitive health advice.
Allergy Information
Please check ingredients for potential allergens and consult a health professional if in doubt.


Leave a Comment