

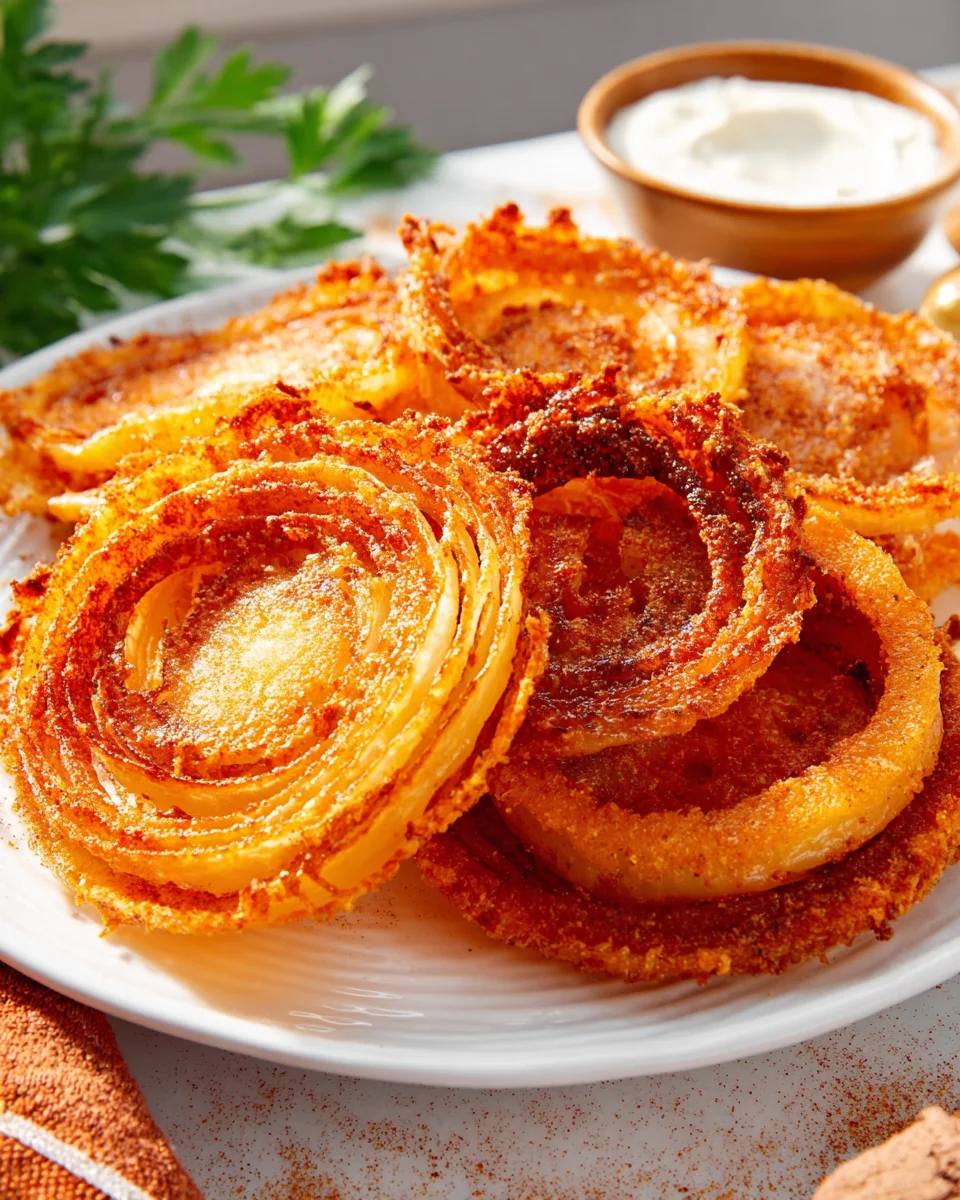
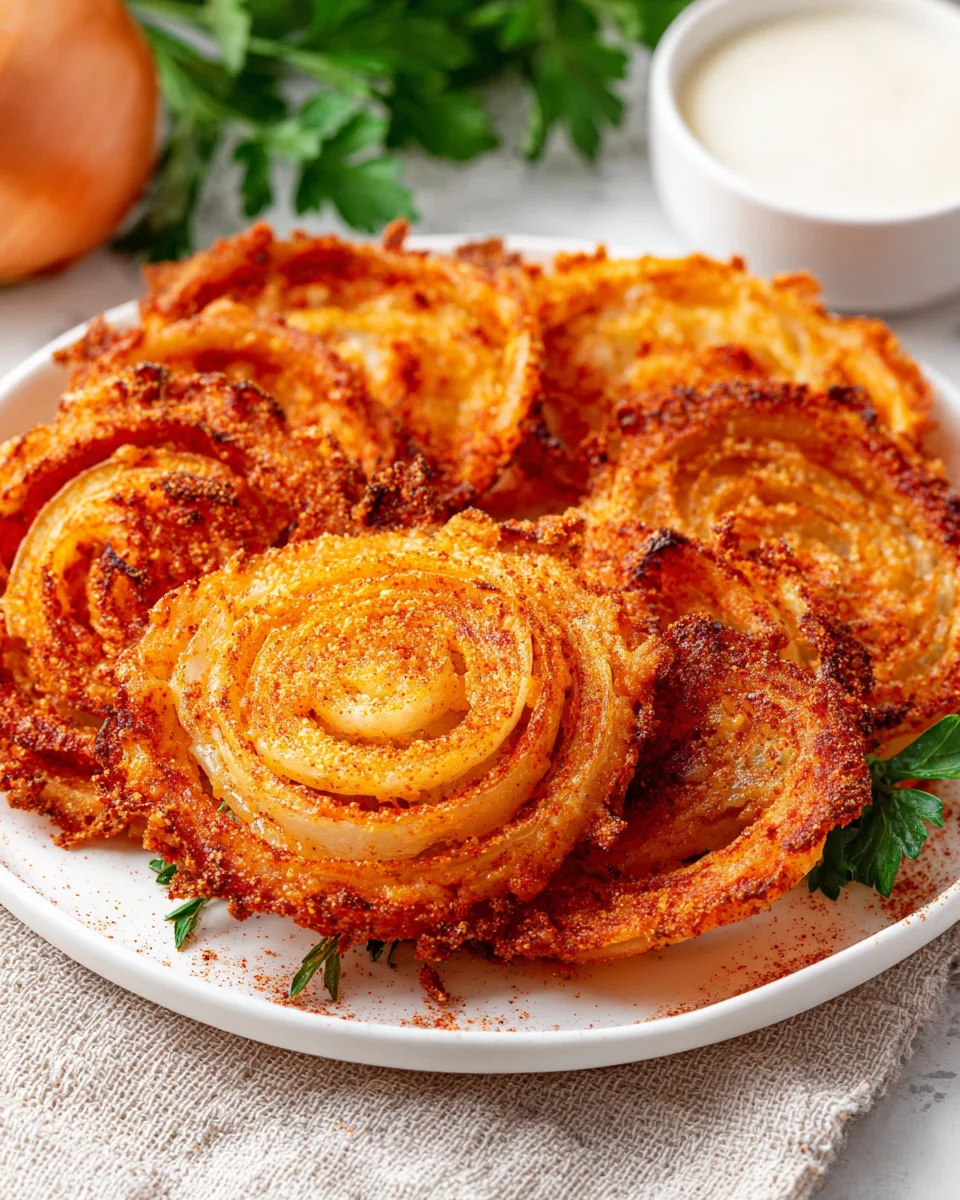
Onion Ring Chips are about to revolutionize your snack game. Prepare to discover a truly addictive, incredibly crispy, and surprisingly simple treat that takes everything you adore about classic onion rings and transforms it into a light, airy, chip-like delight. I know what you’re thinking – another snack? But trust me, this isn’t just another snack; it’s an experience. While the deep-fried onion ring has been a beloved staple in American diners and BBQ joints for decades, celebrated for its satisfying crunch and sweet-savory interior, this innovative recipe offers a fresh perspective. We’re talking about capturing that iconic flavor profile and amplifying the crispiness to an unprecedented level, creating a snack that’s perfect for dipping, munching straight from the bowl, or serving alongside your favorite sandwiches. People absolutely adore this dish because it delivers that irresistible onion tang and utterly satisfying crunch without the heavy grease, making it an ideal guilt-free indulgence. The magic lies in their unique texture and how easily they come together, promising to become your new go-to for movie nights, game days, or simply when that snack craving hits. Get ready to fall in love with these delightful Onion Ring Chips!
Ingredients:
Creating truly spectacular Onion Ring Chips starts with the right ingredients, chosen with care. Here’s everything you’ll need to embark on this crispy, savory journey:
- For the Onions:
- 2 large or 3 medium-sized yellow onions: I find yellow onions offer the perfect balance of sweetness and sharpness, mellowing beautifully when cooked into these delightful chips.
- For the Wet Batter:
- 1 cup all-purpose flour: This forms the base of our batter, giving it structure.
- 1/2 cup cornstarch: My secret weapon for ultimate crispiness! It helps create that light, airy, and shatteringly crisp texture we’re aiming for in our Onion Ring Chips.
- 1 teaspoon baking powder: Just a little lift to make the coating airy, not dense.
- 1 large egg: Acts as a binder, helping all the other ingredients cling to our onion rings.
- 1 cup milk (any kind): Whole milk or even buttermilk will work wonderfully here, contributing to the richness and helping the batter adhere.
- 1 tablespoon white vinegar (optional, if not using buttermilk): A touch of acid can enhance flavor and tenderness.
- 1 teaspoon hot sauce (optional, for a kick): If you like a subtle warmth, a dash of your favorite hot sauce is a fantastic addition.
- For the Dry Coating & Seasoning:
- 1 1/2 cups Panko breadcrumbs: Panko is non-negotiable for me when it comes to extra crispy coatings. Their irregular, flaky texture creates superior crunch compared to standard breadcrumbs.
- 1/2 cup all-purpose flour: Used for the initial dredge, ensuring our wet batter has something to grab onto.
- 1 teaspoon smoked paprika: Adds a beautiful color and a smoky depth that elevates the flavor profile of your Onion Ring Chips.
- 1 teaspoon garlic powder: Essential for that savory, aromatic kick.
- 1 teaspoon onion powder: While we’re using fresh onions, this amplifies that classic oniony flavor, making your chips even more irresistible.
- 1/2 teaspoon cayenne pepper (optional, for heat): For those who love a little fire! Adjust to your preference.
- 1 teaspoon fine sea salt: Crucial for seasoning the coating evenly.
- 1/2 teaspoon freshly ground black pepper: A classic seasoning that brings everything together.
- 1/4 teaspoon MSG (Monosodium Glutamate – optional, for umami): A small pinch can seriously boost the savory depth and “moreishness” of your Onion Ring Chips. Completely optional, but highly recommended if you’re comfortable with it.
- For Cooking:
- Cooking spray or 2-3 tablespoons neutral oil (like canola, vegetable, or grapeseed): For baking or air frying, this helps achieve that golden, crispy exterior.
Equipment You’ll Need:
Having the right tools at hand makes the process smooth and enjoyable. Here’s what I recommend:
- Sharp Chef’s Knife: For precise, even onion slices.
- Large Cutting Board: To safely prepare your onions.
- 3 Medium to Large Mixing Bowls: Essential for our three-stage breading process (dry dredge, wet batter, Panko).
- Whisk: For smoothly combining your wet batter.
- Tongs or Fork: For handling the delicate onion rings during breading, keeping your hands cleaner.
- Baking Sheets (2-3): If baking, lined with parchment paper for easy cleanup and non-stick results.
- Cooling Rack: To place baked/air-fried chips on, ensuring air circulation and sustained crispness.
- Air Fryer (optional, but highly recommended): For an even faster, crispier result with less oil.
- Small Spray Bottle for Oil (optional): If using liquid oil, a spray bottle ensures an even, light coating.
Preparing Your Onions for Perfect Onion Ring Chips:
The foundation of great Onion Ring Chips lies in how you prepare the onions. This step might seem simple, but precision here makes all the difference.
- Peel and Trim the Onions: First, carefully slice off both ends of each onion. Then, remove the papery outer skin. I always make sure to get rid of any bruised or discolored layers underneath too, so we’re working with only the freshest, sweetest onion flesh.
- Slice Uniformly: Now, this is crucial for even cooking and achieving that perfect chip texture. Place the peeled onion flat on your cutting board. Using a very sharp knife, slice the onions into rings about 1/4-inch thick. I cannot emphasize enough the importance of uniform thickness here. If your slices are too thin, they’ll burn before the coating crisps; too thick, and they won’t cook through or become properly chip-like. Aim for consistency across all your slices.
- Separate the Rings: Gently push out the individual rings from each sliced onion. They should separate quite easily. You’ll end up with a variety of sizes, which is perfectly fine – everyone loves a different-sized chip! Discard the very small inner rings or save them for another dish, as they tend to overcook quickly.
- The Ice Water Bath (Optional but Recommended): For an extra crisp edge and to slightly mellow the onion’s raw bite, I love to submerge the separated onion rings in a bowl of ice water for about 15-20 minutes. This step helps firm up the onion and can prevent it from getting too soggy when coated. After soaking, drain them extremely well and pat them thoroughly dry with paper towels. Ensuring the onions are completely dry is vital for the coating to adhere properly. Any residual moisture will lead to a gloopy batter and less crispy results.
Crafting the Flavorful Coating for Your Onion Ring Chips:
This is where the magic truly happens! Our three-stage breading system ensures maximum flavor and an incredible crunch for your Onion Ring Chips.
- Prepare the Dry Dredge: In your first medium mixing bowl, combine the 1/2 cup all-purpose flour with 1/2 teaspoon of salt and 1/4 teaspoon of black pepper. Whisk these together until well combined. This initial dredge provides a dry surface for the wet batter to cling to, ensuring a thick, even coating.
- Whip Up the Wet Batter: In your second medium mixing bowl, whisk together the 1 cup all-purpose flour, 1/2 cup cornstarch, and 1 teaspoon baking powder. Make sure there are no lumps. In a separate small bowl, lightly beat the egg, then add the milk, optional vinegar, and optional hot sauce. Pour the wet ingredients into the dry flour mixture and whisk until you have a smooth, thick batter. You’re looking for a consistency similar to pancake batter – thick enough to coat a spoon, but thin enough to drip off slowly. If it’s too thick, add a tiny bit more milk; if too thin, a sprinkle more flour. Season this batter with 1/2 teaspoon of salt and 1/4 teaspoon of black pepper. Taste a tiny bit (raw batter isn’t appealing, but you can gauge saltiness) and adjust if needed.
- Season the Panko Crumb: In your third and largest mixing bowl, combine the Panko breadcrumbs, smoked paprika, garlic powder, onion powder, cayenne pepper (if using), 1/2 teaspoon fine sea salt, 1/4 teaspoon black pepper, and the optional MSG. Toss everything together really well with your hands or a spoon. This seasoned Panko is what will give our Onion Ring Chips their ultimate crispy texture and a huge burst of flavor. Don’t skip seasoning the Panko; it’s a game-changer!
The Breading Process: Creating Your Onion Ring Chips:
Now that all your components are ready, it’s time to transform those humble onion rings into prospective crispy Onion Ring Chips. This step requires a bit of patience and a gentle touch.
- Set Up Your Breading Station: Arrange your bowls in an assembly line: first, the dry dredge, then the wet batter, and finally the seasoned Panko crumbs. Have a clean baking sheet (or plate) ready at the end to place the breaded rings on before cooking.
- First Dredge (Flour): Take a few onion rings (don’t overcrowd!) and toss them into the dry flour dredge. Gently shake off any excess flour. The goal here is a very thin, even coating. This provides a ‘primer’ for our wet batter.
- Into the Wet Batter: Transfer the flour-dredged onion rings into the wet batter bowl. Using tongs or a fork, ensure each ring is thoroughly coated. Lift them out, letting any excess batter drip back into the bowl. You want a nice, even layer of batter, not a thick glob.
- The Panko Coat: Immediately transfer the battered rings into the seasoned Panko breadcrumbs. With your free hand (this is where the “dry hand, wet hand” technique comes in handy – use one hand for wet, one for dry), gently press the Panko onto the onion rings, ensuring they are completely covered. Roll them around, patting lightly, to get every nook and cranny coated with those lovely, crunchy crumbs. A complete and even coating of Panko is key to achieving truly crispy Onion Ring Chips.
- Transfer and Repeat: Carefully place the fully breaded onion rings onto your prepared baking sheet or plate, making sure they aren’t touching each other. Repeat the entire breading process with the remaining onion rings, working in small batches to prevent overcrowding and ensure each ring gets proper attention. If your batter starts to thicken too much, a tiny splash of milk will bring it back to the right consistency.
- Chill (Optional but Recommended): Once all your Onion Ring Chips are breaded, you can place the baking sheet in the refrigerator for about 15-30 minutes. This chilling time helps the coating set and adhere even better to the onion, reducing the chance of it falling off during cooking and leading to a crispier final product.
Cooking Your Crispy Onion Ring Chips: Oven or Air Fryer Method:
Now for the exciting part – turning those breaded rings into golden, crunchy Onion Ring Chips! Both oven baking and air frying yield fantastic results, offering a healthier alternative to deep-frying without sacrificing crispness.
Oven Method:
- Preheat Your Oven: Position an oven rack in the middle of your oven and preheat it to 400°F (200°C). This high heat is essential for developing a beautiful golden-brown color and a crisp texture.
- Prepare Baking Sheets: Line two large baking sheets with parchment paper. This prevents sticking and makes cleanup a breeze.
- Arrange and Oil: Place the breaded Onion Ring Chips in a single layer on the prepared baking sheets. Do not overcrowd the sheets! Air circulation is vital for crispiness. If they’re too close, they’ll steam instead of crisp. Lightly spray or brush the tops of the onion rings generously with your neutral oil. This oil helps with browning and adds to the crispy texture.
- Bake to Golden Perfection: Bake for 15-20 minutes, or until the onion rings are golden brown and crisp. About halfway through the cooking time (around 8-10 minutes), carefully flip each onion ring to ensure even browning and crispness on both sides. Continue baking until they reach your desired level of crispness. Keep a close eye on them, as oven temperatures can vary! They should look wonderfully toasted and feel firm.
- Cool and Serve: Once baked, transfer the Onion Ring Chips to a wire cooling rack set over a baking sheet. This allows air to circulate underneath, preventing them from getting soggy as they cool slightly. Serve immediately!
Air Fryer Method (My Personal Favorite for Maximum Crispness):
- Preheat Your Air Fryer: Preheat your air fryer to 375°F (190°C) for about 3-5 minutes. Preheating ensures a more even cook and immediate crisping upon contact.
- Prepare and Oil: Lightly spray the air fryer basket with cooking spray. Arrange the breaded Onion Ring Chips in a single layer in the basket. Again, do not overcrowd! You’ll likely need to cook these in batches. Lightly spray the tops of the onion rings generously with cooking spray or brush with oil.
- Air Fry to Perfection: Air fry for 8-12 minutes, shaking the basket gently or flipping the rings with tongs every 4-5 minutes, until they are beautifully golden brown and incredibly crisp. The exact timing can vary significantly between air fryer models, so start checking around 8 minutes. You want them to have that satisfying crunch and deep color.
- Batch Cooking: As each batch finishes, transfer the cooked Onion Ring Chips to a wire cooling rack set over a baking sheet. Cook the remaining batches, making sure to re-spray the basket if needed.
- Serve Immediately: Air-fried Onion Ring Chips are best enjoyed right away when they are at their peak crispness!
Serving Suggestions and Storage Tips for Your Homemade Onion Ring Chips:
You’ve put in the effort, and now it’s time to enjoy the fruits (or rather, vegetables!) of your labor. These Onion Ring Chips are truly delightful on their own, but a few accompaniments can make them even more special.
- Immediate Gratification: The absolute best way to enjoy your homemade Onion Ring Chips is straight from the oven or air fryer. That fresh-out-of-the-cooker crispness simply cannot be beaten. Arrange them artfully on a platter, perhaps with a sprinkle of flaky sea salt or a dash of fresh chopped parsley for a pop of color.
- Dipping Delights: These chips are phenomenal with a variety of dipping sauces. Think classic ketchup, a tangy BBQ sauce, or even a creamy ranch or blue cheese dressing. For something a little more adventurous, I love them with a sriracha mayo (just mix sriracha and mayonnaise) or a sweet chili sauce. A homemade aioli or a zesty remoulade would also be absolutely divine, offering a sophisticated counterpoint to their comforting crunch.
- Burger’s Best Friend: Pair your Onion Ring Chips with your favorite burger or sandwich for an elevated diner-at-home experience. They make a fantastic side dish that feels a little more special than regular fries. They’re also surprisingly good alongside grilled chicken or a robust vegetarian main course, adding texture and flavor.
- Game Day Snack: These chips are a guaranteed crowd-pleaser for any gathering, from game day parties to casual get-togethers. Just be warned: they disappear fast!
- Storage (If You Have Leftovers, Which is Rare!): Onion Ring Chips are definitely best enjoyed fresh. However, if you do find yourself with leftovers, store them in an airtight container at room temperature for up to 1-2 days. They will lose some of their crispness over time, but their flavor will still be enjoyable.
- Reheating for Renewed Crispness: To revive leftover Onion Ring Chips and bring back some of that amazing crunch, I recommend reheating them in an air fryer at 350°F (175°C) for 3-5 minutes, or in an oven preheated to 375°F (190°C) for 5-8 minutes. Avoid the microwave, as it will only make them soggy. A quick reheat will help them regain much of their former glory, ensuring every last chip is savored.
There you have it – a comprehensive guide to making truly exceptional Onion Ring Chips right in your own kitchen. I hope you enjoy every savory, crispy bite!
Remember to serve these immediately for the very best experience. Happy cooking!
Conclusion:
Well, friends, we’ve journeyed through the steps of creating what I truly believe will become your new favorite snack, a remarkable little marvel that consistently steals the show wherever it appears. I sincerely hope you’re feeling inspired and excited to roll up your sleeves and try this recipe for yourself. It’s more than just a simple snack; it’s a testament to how humble ingredients, with a little love and the right technique, can be transformed into something truly extraordinary.
Why is this recipe an absolute must-try? Let me count the ways! First and foremost, the texture is simply unparalleled. We’re talking about a crispiness that sings, a satisfying crunch that makes every bite an experience, without the grease often associated with traditional frying. The delicate onion flavor, enhanced by the perfect blend of seasonings, shines through beautifully, creating a savory depth that is utterly addictive. It’s that perfect balance of salty, savory, and subtly sweet that keeps you reaching for just one more, and then another. Beyond the incredible taste and texture, this recipe offers a fantastic alternative to store-bought processed snacks, allowing you to control the quality of ingredients and prepare something fresh and wholesome right in your own kitchen.
Furthermore, the ease of preparation is a huge selling point. You don’t need any fancy equipment or specialized skills to achieve perfection here. The steps are straightforward, making it an ideal project for seasoned cooks and beginners alike. And let’s not forget the sheer novelty! While everyone loves a good onion ring, these take the concept to an entirely new level, offering a lighter, crispier, and arguably more versatile form. They embody the best aspects of a classic snack but reinvented for modern palates and healthier aspirations. Truly, these are not just a snack; they are a culinary revelation waiting to brighten your day.
Now, let’s talk about how to truly make these your own and elevate your snacking game. The possibilities are genuinely endless! While they are absolutely divine on their own, a little dip can turn them into an instant party starter. Imagine pairing them with a creamy homemade ranch, a zesty sriracha aioli, a classic ketchup, or even a spicy honey mustard for a tangy kick. For something a little different, try a cooling cucumber-dill yogurt dip or a smoky chipotle mayonnaise. And why stop at dips? These incredible Onion Ring Chips are robust enough to stand up to a variety of uses. Crumble them over a fresh green salad for an unexpected burst of flavor and crunch, or use them as a textural garnish for creamy soups, like a roasted tomato bisque or a hearty potato chowder. They’d be phenomenal served alongside a juicy burger or a gourmet sandwich, offering a delightful alternative to standard fries.
For those feeling adventurous, consider experimenting with the seasonings. A sprinkle of smoked paprika can add a beautiful color and an earthy depth, while a dash of garlic powder will amplify that savory goodness. A pinch of cayenne pepper can introduce a subtle warmth, or for a bolder statement, try a mix of Italian herbs for an aromatic twist. You could even get creative with different types of onions – perhaps red onions for a slightly milder, sweeter chip, or even shallots for a delicate, refined version. Don’t be afraid to innovate! A light dusting of finely grated Parmesan cheese immediately after they come out of the oven or air fryer can add an irresistible cheesy crispness. Think about them as a blank canvas for your culinary imagination!
So, what are you waiting for? This is your invitation to experience the magic for yourself. I genuinely urge you to set aside some time this week to give this recipe a go. Whether it’s for a quiet evening snack, a last-minute appetizer for unexpected guests, or a delightful addition to your next family meal, I promise you won’t be disappointed. It’s a rewarding cooking experience that yields incredibly satisfying results. And please, once you’ve made them and savored every single bite, I would absolutely love to hear from you! Share your triumphs, your clever variations, your favorite dipping sauces, and how these delightful creations were received by your family and friends. Your feedback and creative ideas inspire me and help our wonderful cooking community grow. Snap a picture, tell us about your experience in the comments below, or simply send a message. Let’s celebrate the joy of delicious homemade food together!
Crispy Onion Ring Chips
Discover a truly addictive, incredibly crispy, and surprisingly simple treat that transforms classic onion rings into a light, airy, chip-like delight. Capture that iconic flavor profile with unprecedented crispiness, perfect for dipping or munching.
Ingredients
Instructions
Important Information
Nutrition Facts (Per Serving)
It is important to consider this information as approximate and not to use it as definitive health advice.
Allergy Information
Please check ingredients for potential allergens and consult a health professional if in doubt.

Leave a Comment