
Recipe:white Chocolate Peppermint Pie – prepare to dazzle your taste buds and impress your guests with a dessert that truly embodies the magic of the holiday season. I am absolutely thrilled to share this exquisite creation with you today, a pie that promises to be more than just a sweet treat; it’s a memorable experience in every decadent slice.
Why This Pie is a Holiday Essential
There’s something inherently festive about the delightful combination of creamy white chocolate and the invigorating zest of peppermint. This particular pairing has become a cherished symbol of winter celebrations, evoking memories of joyful gatherings and cozy evenings. While the tradition of pie-making stretches back centuries, this modern classic captures the joyous spirit of contemporary holiday feasting, making it a staple for many families during December.
People absolutely adore this dish because it strikes a perfect balance: the rich, buttery sweetness of white chocolate provides a luxurious base, beautifully contrasted by the cool, refreshing burst of peppermint. The resulting creamy texture is simply irresistible, melting in your mouth and leaving a delightful lingering flavor. It’s not just delicious; it’s a stunning centerpiece with its festive colors, making it an ideal choice for holiday parties or a special family dinner. Crafting this Recipe:white Chocolate Peppermint Pie is not only rewarding but also surprisingly straightforward, allowing you to create a show-stopping dessert that tastes as spectacular as it looks.

Ingredients:
Creating this magnificent white chocolate peppermint pie is a truly delightful experience, and the first step, as always, is gathering our wonderful ingredients. Trust me, having everything prepped and ready makes the entire process so much smoother and more enjoyable!
For the Graham Cracker Crust:
- 1 ½ cups (about 10-12 full sheets) Graham Cracker Crumbs: I always opt for the pre-crushed kind if I can find it, but crushing your own is also incredibly satisfying!
- ⅓ cup (5 ⅓ tablespoons) Granulated Sugar: Just enough to add a touch of sweetness to our buttery base.
- 6 tablespoons Unsalted Butter, melted: Melted perfectly to bind those crumbs into a perfect foundation.
For the White Chocolate Peppermint Filling:
- 8 ounces (226g) Full-Fat Cream Cheese, softened to room temperature: This is absolutely crucial for a smooth, lump-free filling. I usually take it out of the fridge an hour or two before I start.
- 1 cup (6 ounces / 170g) High-Quality White Chocolate, finely chopped or in baking wafers: Using good quality white chocolate really makes a difference here. I prefer bars or wafers designed for melting over chocolate chips, as chips often contain stabilizers that can make them difficult to melt smoothly.
- ¾ cup Powdered Sugar (Confectioners’ Sugar), sifted: Sifting helps prevent any lumps in our silky filling.
- 1 teaspoon Pure Vanilla Extract: A classic flavor enhancer that complements the peppermint beautifully.
- ½ – ¾ teaspoon Peppermint Extract, to taste: Start with ½ teaspoon and add more if you desire a stronger peppermint kick. I find ¾ teaspoon is perfect for a festive, noticeable flavor without being overpowering.
- 2 cups Cold Heavy Cream (also known as Heavy Whipping Cream): This needs to be very cold to whip up properly, so keep it in the fridge until you’re ready to use it.
For the Topping & Garnish:
- 1 cup Cold Heavy Cream: For a simple, elegant whipped cream topping.
- 2 tablespoons Powdered Sugar: To sweeten our fresh whipped cream.
- ½ teaspoon Pure Vanilla Extract: To enhance the flavor of the whipped cream.
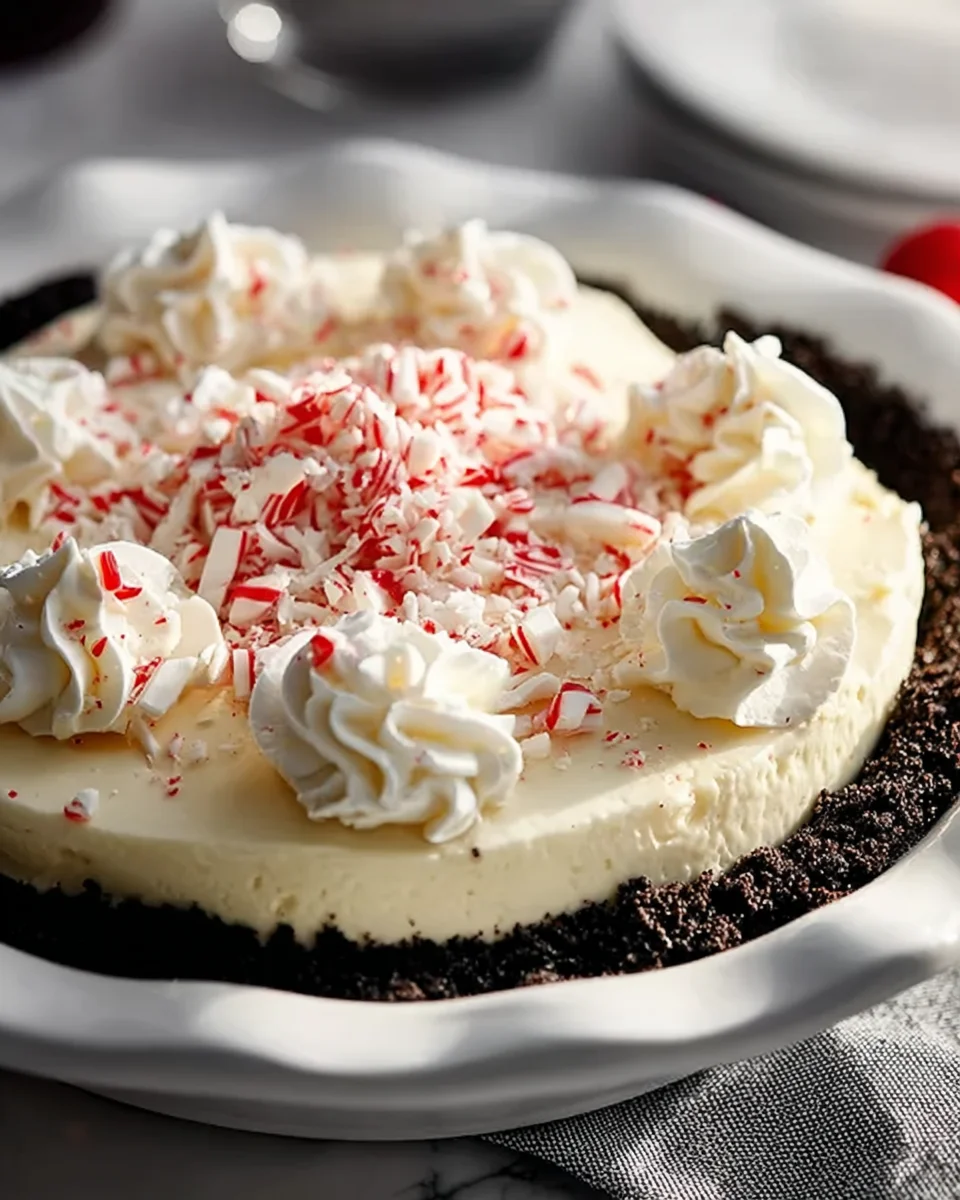
- ½ cup Crushed Peppermint Candies or Candy Canes: This adds a beautiful crunch, a burst of color, and an extra layer of peppermint flavor. This is my favorite part for decorating!
Instructions:
Now that we have all our wonderful ingredients ready, let’s dive into creating this spectacular white chocolate peppermint pie. Each step is designed to bring us closer to a truly show-stopping dessert!
Step 1: Preparing the Graham Cracker Crust
-
Preheat & Prep: First things first, I like to preheat my oven to 350°F (175°C). While that’s warming up, I grab a 9-inch pie plate. You can use a glass, ceramic, or metal pie plate – whatever you have on hand works great.
-
Crush Those Crackers: If you’re using whole graham cracker sheets, now’s the time to crush them. I usually place them in a large zip-top bag and use a rolling pin or the bottom of a heavy skillet to crush them into fine crumbs. Alternatively, a food processor makes this step incredibly quick and easy. You want a fine, sandy texture for the best crust. Measure out 1 ½ cups of these beautiful crumbs into a medium-sized mixing bowl.
-
Combine the Dry Ingredients: To the graham cracker crumbs, I add the ⅓ cup of granulated sugar. Give it a good whisk or stir to combine them thoroughly. This ensures the sweetness is evenly distributed throughout the crust.
-
Add the Butter: Next, pour in the 6 tablespoons of melted unsalted butter. Using a fork or your hands, mix until the crumbs are completely moistened and resemble wet sand. You should be able to press a small amount between your fingers and have it hold its shape. If it feels too dry, you can add another teaspoon of melted butter, but usually, 6 tablespoons is just perfect.
-
Press into the Pie Plate: Now, transfer the buttered crumbs into your prepared 9-inch pie plate. Using the bottom of a flat-bottomed glass, a measuring cup, or your fingers, firmly press the mixture evenly across the bottom and up the sides of the pie plate. I take my time with this, making sure the edges are well-defined and the bottom is compact. A dense crust is a happy crust!
Baking vs. No-Bake Option:
For a sturdier crust that holds its shape beautifully, I recommend baking it. Place the pie plate in the preheated oven for 8-10 minutes, or until it’s lightly golden and fragrant. Baking helps to set the crust and gives it a lovely toasted flavor. Once baked, remove it from the oven and let it cool completely on a wire rack while you prepare the filling. If you prefer a no-bake option, you can simply chill the pressed crust in the refrigerator for at least 30 minutes to firm up. Both methods work, but I personally love the slight crispness of a baked crust for my white chocolate peppermint pie.
Step 2: Crafting the Silky White Chocolate Peppermint Filling
-
Melt the White Chocolate: This is a delicate step. I typically use a double boiler method for melting white chocolate, as it helps prevent scorching. Place the finely chopped white chocolate in a heatproof bowl set over a saucepan of simmering water (make sure the bottom of the bowl doesn’t touch the water). Stir frequently until the chocolate is smooth and completely melted. Alternatively, you can microwave it in 30-second intervals, stirring well after each, until smooth. Be very careful not to overheat it, as white chocolate can seize easily. Once melted, set it aside to cool slightly, but don’t let it harden again.
Tip for Melting White Chocolate:
Always use a clean, dry bowl and spatula. Even a tiny drop of water can cause chocolate to seize and become grainy. Patience is key here!
-
Whip the Cream Cheese: In a large mixing bowl, using an electric mixer (either a stand mixer with the paddle attachment or a hand mixer), beat the softened cream cheese on medium speed until it’s incredibly smooth and creamy, about 2-3 minutes. Scrape down the sides of the bowl frequently to ensure no lumps remain. This step is paramount for a truly smooth pie filling. Room temperature cream cheese is non-negotiable here; cold cream cheese will leave you with a lumpy mess.
-
Sweeten and Flavor the Cream Cheese: Gradually add the sifted powdered sugar to the cream cheese mixture, beating on low speed until combined, then increase to medium until light and fluffy. Next, beat in the vanilla extract and, importantly, the peppermint extract. Start with ½ teaspoon of peppermint extract, mix it in, and then taste. If you want a stronger peppermint flavor for your white chocolate peppermint pie, add another ¼ teaspoon. I find ¾ teaspoon is usually my sweet spot for a pronounced but not overwhelming taste.
-
Fold in the Cooled White Chocolate: Pour the slightly cooled, melted white chocolate into the cream cheese mixture. Beat on low speed until just combined. Be careful not to overmix here. The mixture should now be thick and beautifully fragrant.
-
Whip the Heavy Cream: In a separate, very clean, and preferably chilled large mixing bowl (I sometimes even chill my whisk attachment!), pour in the 2 cups of cold heavy cream. Using your electric mixer, whip the cream on medium-high speed until it forms stiff peaks. This means when you lift the beaters, the cream stands up straight. Don’t over-whip, or you’ll end up with butter! This creates the light, airy texture we want.
Important Note on Whipped Cream:
Ensure your heavy cream is very cold. I often place my mixing bowl and whisk attachment in the freezer for 10-15 minutes before whipping for the best results.
-
Gently Combine: This is where the magic happens and our white chocolate peppermint pie filling comes together. Take about one-third of the whipped cream and gently fold it into the cream cheese-white chocolate mixture using a rubber spatula. This lightens the cream cheese mixture and makes it easier to incorporate the rest of the whipped cream. Then, add the remaining whipped cream and fold it in very carefully until no streaks of white cream are visible and the mixture is uniformly light and fluffy. Overmixing at this stage will deflate the whipped cream and result in a dense filling, which we absolutely do not want!
Step 3: Assembling and Chilling Your White Chocolate Peppermint Pie
-
Fill the Crust: Now that our filling is perfect and our crust is cool, it’s time to bring them together. Pour or spoon the luscious white chocolate peppermint filling into the cooled graham cracker crust. Use an offset spatula or the back of a spoon to spread the filling evenly and smoothly across the crust, all the way to the edges.
-
The Chilling Game: This is arguably the most critical step for any no-bake pie. Cover the pie loosely with plastic wrap (try not to let it touch the surface of the filling) and transfer it to the refrigerator. Allow the pie to chill for a minimum of 6 hours, but ideally overnight. Seriously, don’t rush this! The chilling time is absolutely essential for the pie to set properly, ensuring beautiful, clean slices. I know it’s hard to wait, especially when it smells so good, but trust me, it’s worth every minute for a perfectly set white chocolate peppermint pie.
Step 4: Decorating and Serving Your Festive Pie
-
Prepare the Topping: Once your pie is thoroughly chilled and firm, it’s time to add the finishing touches! In a clean, cold mixing bowl, combine the 1 cup of cold heavy cream, 2 tablespoons of powdered sugar, and ½ teaspoon of vanilla extract. Whip with an electric mixer on medium-high speed until stiff peaks form. Again, be careful not to over-whip. This fresh whipped cream will add a lovely contrast to the rich filling.
-
Crush Those Candies: While the pie is chilling or just before serving, prepare your crushed peppermint candies. I usually place the candy canes or peppermints in a sturdy zip-top bag and gently but firmly crush them with a rolling pin. You want a mix of fine dust and small crunchy bits for texture and visual appeal. This step is also great for releasing any pent-up energy!
-
Decorate Your Masterpiece: You have a few options for decorating:
- Classic Dollops: You can spread the whipped cream over the entire top of the pie.
- Elegant Swirls: Use a piping bag fitted with a star tip to create beautiful rosettes or swirls around the edge or over the entire surface.
- Simply Spooned: For a more rustic look, just spoon generous dollops of whipped cream onto each slice as you serve it.
Once the whipped cream is on (or as you serve each slice), generously sprinkle the crushed peppermint candies over the top. The vibrant red and white against the creamy filling of our white chocolate peppermint pie is just so festive and inviting!
-
Slice and Serve: To get clean slices, I recommend dipping your sharp knife in hot water and wiping it clean between each slice. This helps the knife glide through the cold, creamy filling without sticking. Serve immediately and watch everyone’s faces light up! Leftovers, if there are any (a rare occurrence with this pie!), should be stored in an airtight container in the refrigerator for up to 3-4 days. The crushed peppermints might soften a bit over time, so if you’re making it ahead, you might want to add them just before serving.
Enjoy every delightful, minty bite of your homemade white chocolate peppermint pie!
Conclusion:
And there you have it, my friends! We’ve reached the sweet finale of our culinary journey, and I genuinely hope you’re feeling as inspired as I am to whip up this incredible dessert. This isn’t just another pie; it’s a celebration in every single slice, a symphony of cool, refreshing peppermint and rich, creamy white chocolate that simply dances on your palate. I truly believe this Recipe:white Chocolate Peppermint Pie stands out as a true gem, especially when you’re looking for something that feels both indulgent and delightfully fresh. It’s remarkably easy to make, yet it presents itself with an elegance that belies its straightforward preparation. The combination of the crisp, buttery crust with the velvety, smooth filling is nothing short of perfection. It has a way of captivating everyone who takes a bite, making it an absolute showstopper for any gathering, big or small. Trust me, the gasps of delight and requests for the recipe are practically guaranteed when you serve this masterpiece. It’s the kind of dessert that creates lasting memories and becomes a cherished part of your holiday traditions, or simply a go-to treat for a special evening.
What I adore most about this pie, beyond its incredible taste, is its versatility. While it’s absolutely divine on its own, I have a few suggestions to elevate your serving experience even further. A generous dollop of freshly whipped cream, perhaps lightly sweetened with a hint of vanilla, makes an exquisite companion, adding another layer of creamy luxury. For an extra festive touch, a sprinkle of finely crushed candy canes over the whipped cream not only adds a beautiful pop of color but also intensifies that delightful peppermint crunch. If you’re a chocolate lover (and who isn’t?), a light dusting of cocoa powder or a few delicate white chocolate shavings can add a sophisticated finish. For those feeling a bit more adventurous, consider a drizzle of dark chocolate ganache just before serving – the slight bitterness of the dark chocolate beautifully cuts through the sweetness of the pie, creating an even more complex flavor profile. And why stop there? Imagine serving miniature versions in ramekins or as cute individual tartlets for a party; they’re just as charming and even easier to serve! You could also experiment with the crust: a chocolate wafer crust would make it even more decadent, or a gingersnap crust could add a spicy, warming undertone perfect for the cooler months. The possibilities are truly endless, allowing you to tailor this incredible dessert to your own taste and occasion.
So, my friends, I can’t emphasize enough how much I encourage you to roll up your sleeves and give this incredible recipe a try. Don’t be shy! Whether you’re a seasoned baker or just starting your culinary adventures, this pie is wonderfully forgiving and incredibly rewarding. There’s a unique joy that comes from creating something so delicious from scratch, and even more joy in sharing it with the people you care about. Imagine the smiles, the appreciative murmurs, and the pure bliss on your loved ones’ faces as they savor each bite. This pie is more than just dessert; it’s an experience waiting to happen. Once you’ve made it, I would absolutely love to hear about your experience! Did you stick to the original recipe, or did you put your own creative spin on it with one of the variations I suggested? Perhaps you discovered a new favorite way to serve it? Please, don’t keep your triumphs to yourself! Come back and leave a comment, share your photos with me, and tell me all about how your Recipe:white Chocolate Peppermint Pie turned out. Your insights and culinary adventures inspire me, and I’m always eager to connect with fellow food enthusiasts. Happy baking, and happy eating!
Creamy White Chocolate Peppermint Pie: Perfect Holiday Dessert
Get ready to fall in love with my White Chocolate Peppermint Pie, a dreamy holiday dessert that combines a rich chocolatey Oreo crust with the most luscious peppermint cheesecake filling you can imagine. It’s refreshingly minty, indulgently creamy, and absolutely perfect for the festive season. I love serving it both chilled and frozen; it’s like having two amazing desserts in one. This beauty stays perfect in the fridge for up to 5 days or freeze it for a couple months if you’re planning ahead. When serving from frozen, let it soften just a bit to get that dreamy creamy texture back. Can be frozen for firmer texture.
Ingredients
Instructions
Important Information
Nutrition Facts (Per Serving)
It is important to consider this information as approximate and not to use it as definitive health advice.
Allergy Information
Please check ingredients for potential allergens and consult a health professional if in doubt.


Leave a Comment