
Christmas Present Brownies Recipe isn’t just a set of instructions; it’s your golden ticket to crafting edible joy this holiday season!
Imagine the delight on someone’s face as they unwrap a beautifully decorated, homemade brownie – a treat that speaks volumes of thoughtfulness and festive spirit. For generations, homemade baked goods have been a cherished cornerstone of holiday gifting, embodying a warmth and personal touch that mass-produced items simply can’t replicate. These brownies perfectly capture that sentiment, transforming simple, wholesome ingredients into delectable, fudgy treasures that are almost too pretty to eat, almost!
Why This Recipe Will Be Your Holiday Favorite
Who can resist the allure of an intensely chocolatey, perfectly fudgy brownie? This specific “Christmas Present Brownies Recipe” takes a beloved classic and elevates it, making it ideally suited for individual packaging as charming, edible gifts. They are incredibly satisfying to bake, even more delightful to receive, and each rich, decadent bite delivers a pure moment of holiday bliss. Their irresistible texture and deep flavor profile make them a universal favorite, perfect for sharing at festive gatherings or nestling into stockings. I am absolutely thrilled to share this wonderful recipe with you, ensuring your holiday baking is both memorable and utterly delicious.

Ingredients:
- For the Fudgy Brownie Base:
- 1 cup (2 sticks or 226g) unsalted butter, cut into cubes – Using unsalted butter gives us complete control over the salt content, and cutting it into cubes helps it melt more evenly.
- 8 ounces (226g) good quality dark chocolate, chopped – I always recommend a chocolate with 60-70% cacao for a rich, deep flavor that isn’t overly bitter. Ghirardelli, Lindt, or Callebaut are excellent choices for this Christmas Present Brownies Recipe. Chopping ensures it melts smoothly.
- 1 ¾ cups (350g) granulated sugar – This provides the perfect balance of sweetness to complement the dark chocolate.
- 4 large eggs – Make sure they’re at room temperature; this helps them emulsify better with the melted chocolate mixture, resulting in a smoother batter and a better overall texture for your fudgy brownies.
- 1 teaspoon pure vanilla extract – A good quality vanilla extract really enhances the chocolate flavor. Don’t skimp here; it adds depth to the Christmas Present Brownies.
- 1 cup (125g) all-purpose flour – We’re using just enough flour to bind everything together without making the brownies cakey.
- ¾ cup (75g) unsweetened cocoa powder – Dutch-processed cocoa powder will give you a darker, richer brownie, but natural cocoa works too for these festive treats.
- ½ teaspoon salt – Essential for balancing the sweetness and intensifying the chocolate flavor in our Christmas Present Brownies.
- For the Chocolate Ganache Topping:
- ½ cup (120ml) heavy cream – The fat content in heavy cream is crucial for a luscious, stable ganache that will perfectly crown your Christmas Present Brownies.
- 4 ounces (113g) dark chocolate, chopped – Again, a good quality chocolate here will make all the difference to the richness of your ganache.
- 1 tablespoon unsalted butter – Optional, but it adds extra shine and richness to the ganache, making it even more appealing.
- For the Festive “Ribbon” Decorations:
- 10-12 ounces (280-340g) colored candy melts (e.g., red and green, or white and gold) – Candy melts are super easy to work with for decorating because they set quickly and hold their shape well, perfect for creating those “present” ribbons for your Christmas Present Brownies Recipe. You can find them in a variety of festive colors.
- Optional: Sprinkles, edible glitter, or small edible sugar bows for extra flair, turning your brownies into truly special Christmas gifts.
Equipment You’ll Need:
- 9×13-inch baking pan – The ideal size for a generous batch of fudgy Christmas Present Brownies.
- Parchment paper – Your best friend for easy removal of the baked brownies.
- Large mixing bowls (at least two) – One for wet ingredients, one for dry, and another for melting chocolate.
- Whisk – Essential for aerating eggs and ensuring smooth mixtures.
- Rubber spatula – For folding batter gently and scraping bowls clean.
- Saucepan (for double boiler method) or microwave-safe bowl – For melting chocolate without scorching.
- Small saucepan (for ganache) – To heat the heavy cream for your delicious topping.
- Wire cooling rack – Crucial for proper cooling and preventing soggy bottoms.
- Sharp knife – For clean, precise cuts when dividing your Christmas Present Brownies into squares.
- Piping bag with a small round tip (or a Ziploc bag with a tiny corner snipped off for candy melts) – For drawing those neat, festive ribbons.
Phase 1: Preparing the Fudgy Brownie Base
- Preheat and Prepare Your Pan: First things first, let’s get that oven ready! Preheat your oven to 350°F (175°C). While it’s heating up, grab your 9×13-inch baking pan. I like to line mine with parchment paper, leaving an overhang on the sides. This creates a handy “sling” that makes it super easy to lift the cooled brownies out of the pan without any fuss. Lightly grease the exposed parts of the pan with a little butter or cooking spray before adding the parchment paper for extra non-stick insurance. This ensures your Christmas Present Brownies come out perfectly.
- Melt the Chocolate and Butter: In a large, heatproof bowl, combine your cubed unsalted butter and chopped dark chocolate. You have two excellent options for melting this mixture:
- Double Boiler Method: Place the bowl over a saucepan filled with about an inch or two of simmering water, making sure the bottom of the bowl doesn’t touch the water. Stir occasionally with a rubber spatula or whisk until the mixture is completely smooth and melted into a luscious, glossy consistency. This is my preferred method as it offers gentle, controlled heat, preventing scorching and ensuring a silky base for your Christmas Present Brownies.
- Microwave Method: If you’re short on time, you can also microwave the butter and chocolate in 30-second intervals, stirring well after each interval, until fully melted and smooth. Be extremely careful not to overheat it, as chocolate can seize up and become grainy, which we definitely don’t want for our fudgy brownies.
Once melted, remove the bowl from the heat (or microwave) and set it aside to cool slightly while you prepare the next ingredients. We want it warm, not piping hot, when we add the eggs, as hot chocolate could scramble them.
- Whisk Eggs and Sugar: In another large mixing bowl, crack your four large, room-temperature eggs. Add the granulated sugar and the pure vanilla extract. Using a whisk, beat these together vigorously for about 3-5 minutes. You’re looking for a mixture that has lightened in color, become thick and pale, and forms a “ribbon” when you lift the whisk and let it fall back into the bowl. This “ribbon stage” is crucial for achieving that characteristic shiny, crackly top on your Christmas Present Brownies, and it also incorporates air, making them lighter without being cakey. This step makes a significant difference in texture.
- Combine Wet Ingredients: Once your egg and sugar mixture is light and fluffy, slowly pour the slightly cooled chocolate and butter mixture into it, whisking continuously. Make sure to scrape down the sides of the chocolate bowl with a rubber spatula to get every last bit of that deliciousness. Continue whisking until everything is beautifully combined and smooth. The mixture should look homogenous and inviting, a perfect base for our Christmas Present Brownies.
- Add Dry Ingredients: In a separate medium bowl, whisk together your all-purpose flour, unsweetened cocoa powder, and salt. This ensures all the dry ingredients are evenly distributed before adding them to the wet mixture, preventing pockets of unmixed flour or salt. Now, gently add the dry ingredients to the wet ingredients in two additions. Use your rubber spatula to fold them in until just combined. The key here is not to overmix! Overmixing will develop the gluten in the flour, leading to tough, cakey brownies rather than the rich, fudgy texture we’re aiming for. A few streaks of flour are perfectly fine; they’ll disappear during baking and don’t indicate incomplete mixing.
- Bake to Perfection: Pour your glorious brownie batter into the prepared 9×13-inch pan. Use your spatula to spread it evenly into all corners, ensuring a consistent thickness for even baking. Transfer the pan to your preheated oven and bake for 25-30 minutes. How to tell if they’re done? The edges should look set, and the center might still have a slight jiggle. If you insert a toothpick into the center, it should come out with moist crumbs, but not wet batter. If it comes out completely clean, you’ve likely overbaked them, and they might be drier than desired. Remember, brownies continue to cook slightly from residual heat once removed from the oven, so err on the side of slightly underbaked for ultimate fudginess.
- Cool Completely: This is perhaps the hardest part – patience! Once baked, remove the brownies from the oven and place the pan on a wire cooling rack. Allow them to cool completely in the pan before attempting to lift them out. This can take at least 2-3 hours, or even longer, depending on your kitchen temperature. For truly fudgy brownies that slice cleanly and hold their shape beautifully for our Christmas Present Brownies, you can even refrigerate them for an hour or two once they’ve reached room temperature. Resist the urge to cut them warm; they’ll be too crumbly and messy.
Phase 2: Crafting the Chocolate Ganache Topping
- Prepare the Ganache: While your brownies are cooling, let’s whip up that luscious chocolate ganache topping. In a small saucepan, heat the heavy cream over medium heat until it just begins to simmer around the edges – don’t let it boil vigorously, as this can affect the texture of the ganache. Remove the saucepan from the heat immediately once you see those tiny bubbles forming.
- Melt the Chocolate and Butter: Place your chopped dark chocolate into a heatproof bowl. Pour the hot cream over the chocolate. Let it sit undisturbed for about 5 minutes to allow the heat from the cream to melt the chocolate thoroughly. After 5 minutes, gently whisk the mixture from the center outwards until it’s completely smooth and glossy, transforming into a beautiful, rich ganache. If you’re using it, whisk in the tablespoon of unsalted butter until melted and incorporated; this adds an extra layer of richness and shine to the ganache for your Christmas Present Brownies.
- Cool and Spread: Let the ganache cool down to room temperature. It should thicken to a spreadable consistency, similar to a thick frosting, but still pourable. If it’s too runny, you can pop it in the fridge for 15-20 minutes, stirring occasionally, until it reaches the desired texture. If it becomes too thick, you can gently warm it over a double boiler for a few seconds. Once cooled, carefully lift your completely cooled brownie slab out of the pan using the parchment paper sling and place it on a cutting board. Spread the ganache evenly over the top of the brownies using an offset spatula or the back of a spoon, creating a smooth, inviting layer.
Phase 3: Assembling Your Christmas Present Brownies
- Chill for Setting: Once the ganache is spread, place the entire brownie slab back into the fridge for about 30-60 minutes. This allows the ganache to firm up slightly, making it much easier to cut neat squares and apply your decorations without smudging. A firm ganache ensures clean lines for your Christmas Present Brownies.
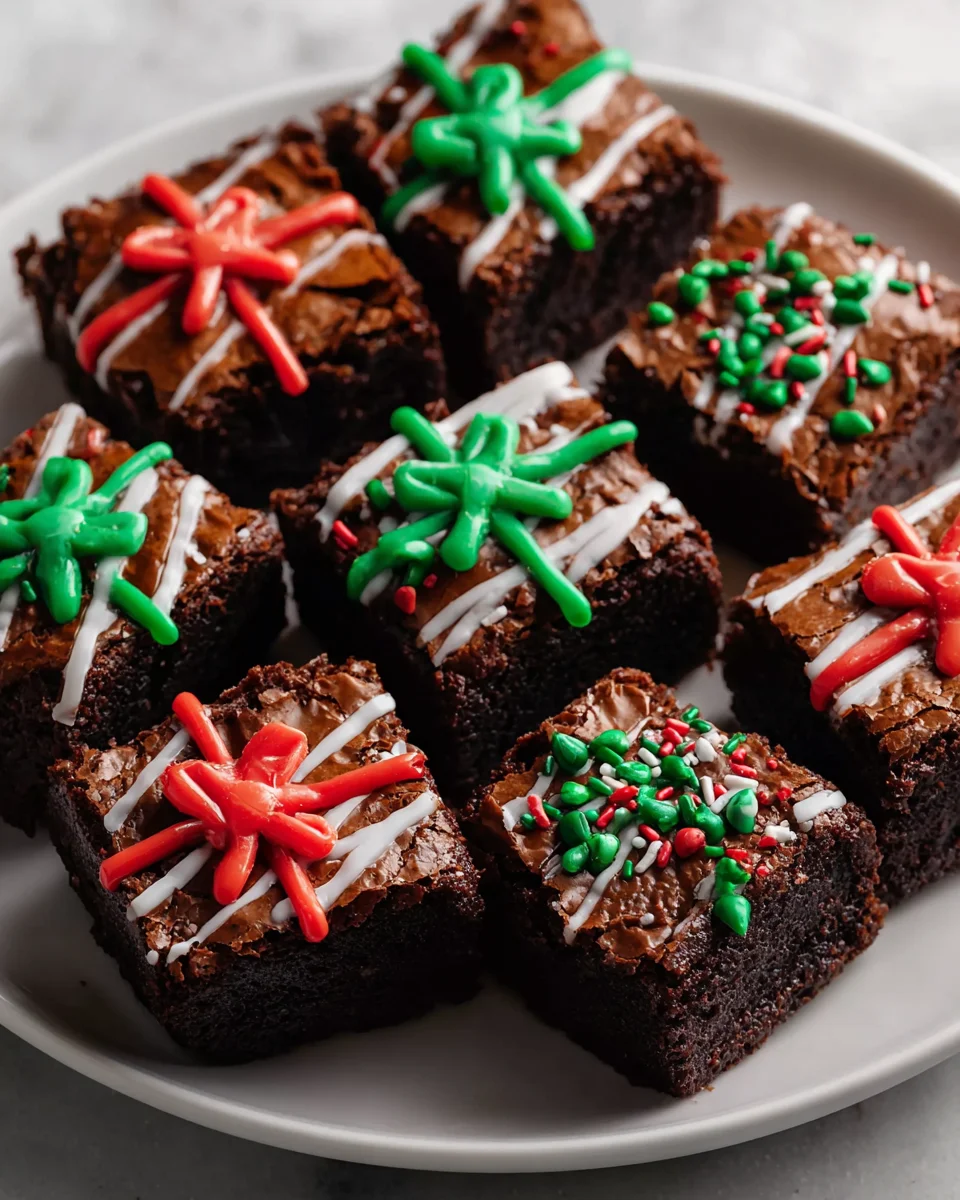
- Cut into Present Squares: Once the ganache is set, remove the brownies from the fridge. Using a very sharp knife, carefully trim the edges of the brownie slab for a super clean presentation. Then, cut the large brownie slab into individual squares. I find that cutting them into 3 rows by 4 rows yields 12 generous “present” sized brownies, but you can adjust to your preference to make them smaller or larger. Wipe your knife clean with a hot, damp cloth between each cut for the cleanest edges possible, ensuring each “present” looks its best.
- Prepare Your Candy Melt “Ribbons”: Now for the fun part – creating those festive ribbons! Take your colored candy melts. Place each color into a separate microwave-safe bowl. Microwave in 30-second intervals, stirring well after each, until completely melted and smooth. Be careful not to overheat, as candy melts can seize if too hot. Alternatively, you can melt them in a double boiler for more controlled melting. Once melted, transfer each color of candy melt into a separate piping bag fitted with a small round tip, or simply use a sturdy Ziploc bag with a tiny corner snipped off. The smaller the snip, the finer your ribbon lines will be, giving your Christmas Present Brownies a delicate touch.
- Decorate with Ribbons: Working with one brownie square at a time, pipe a straight line of candy melt across the center of the brownie, from one edge to the opposite edge. Then, pipe another straight line perpendicular to the first, creating a “cross” or “plus” sign pattern, just like a ribbon on a present. A little tip here: If your brownies are still slightly chilled from the fridge, the candy melts will set much faster, allowing you to move on to the next brownie quickly. You can alternate colors for a vibrant display or stick to a single festive hue.
- Add the “Bow” and Embellishments (Optional): For an extra special touch, you can pipe a small “bow” shape where the two ribbon lines intersect on top of each of the brownie presents. This really completes the gift-like look of your Christmas Present Brownies. You can also add a few festive sprinkles, a dusting of edible glitter, or even a tiny pre-made edible sugar bow for that ultimate Christmas present look. Let the candy melts set completely before handling. This usually takes about 15-20 minutes at room temperature, or faster if you pop them back in the fridge briefly.
Serving and Storage:
Your beautiful Christmas Present Brownies are now ready to be enjoyed! They are absolutely perfect for holiday gatherings, a thoughtful homemade gift for friends and family, or simply to treat yourself and your loved ones during the festive season. The rich, fudgy brownie base combined with the smooth ganache and cheerful candy melt ribbons makes for an irresistible dessert that truly embodies the spirit of Christmas.
Storage Instructions:
Store these festive brownies in an airtight container at room temperature for up to 3-4 days. To maintain their freshness and prevent the ganache from becoming too soft, especially in warmer environments, you can store them in the refrigerator for up to a week. Just be sure to bring them back to room temperature for about 15-20 minutes before serving for the best texture and flavor. The fudgy texture truly shines at room temperature. These Christmas Present Brownies also freeze beautifully for up to 2-3 months without the candy melt ribbons; if freezing, I’d recommend adding the ribbons after thawing for the best appearance, as candy melts can sometimes become brittle when frozen and thawed. However, if they are already decorated, freezing might affect the texture of the candy, so it’s best to enjoy them fresh after decorating for peak presentation.
Why this Christmas Present Brownies Recipe is a Must-Try:
I truly believe this Christmas Present Brownies recipe is a winner because it combines the universally loved fudgy brownie with an adorable, festive presentation that instantly brings holiday cheer. It’s more than just a dessert; it’s a little edible gift that you can proudly share! The satisfaction of seeing those neat “ribbons” and the joy on people’s faces when they realize it’s a delightful “present” brownie makes all the effort worthwhile. Plus, the combination of rich dark chocolate, buttery texture, and just the right amount of sweetness is simply divine. It’s a recipe that’s designed to impress, delight, and perfectly capture the spirit of giving during Christmas, making it a standout holiday treat.
Conclusion:
So there you have it, my friends! We’ve journeyed through the steps of creating what I truly believe are the most delightful, fudgy, and absolutely irresistible brownies you’ll ever bake. This isn’t just another dessert; it’s an experience, a little square of pure joy designed to bring smiles and warmth, especially during the festive season. I designed this recipe to be approachable for bakers of all skill levels, ensuring that even if you’re new to baking, you’ll achieve spectacular results. The perfect balance of rich cocoa, a hint of chewiness at the edges, and that decadent, melt-in-your-mouth center makes these brownies a standout. They truly embody everything wonderful about a homemade treat, packed with love and a sprinkle of holiday magic. Trust me, once you taste these, you’ll understand why they’re destined to become a festive favorite in your home for years to come. They are simply unforgettable.
Serving Suggestions:
But the journey with these incredible brownies doesn’t end when they come out of the oven. Oh no, that’s just the beginning of the delicious possibilities! While they are absolutely divine enjoyed plain, perhaps still slightly warm with a dusting of powdered sugar, I have a few suggestions to elevate your experience. Imagine a warm brownie topped with a scoop of vanilla bean ice cream, allowing the cold creaminess to melt slightly into the rich chocolate. Or, for a truly cozy treat, serve them alongside a tall glass of cold milk or a steaming mug of your favorite coffee or hot cocoa. They’re also fantastic when cut into small squares and arranged on a dessert platter, perhaps with some fresh berries or a dollop of whipped cream. For those festive occasions, these brownies make incredible individual gifts. Wrap a few in cellophane bags, tie with a festive ribbon, and you have a thoughtful, homemade present that everyone will adore. They are, after all, perfectly suited to be the star of any holiday gathering or a delightful surprise for a loved one. There’s something truly special about sharing a homemade treat, and these brownies are designed for just that.
Make Them Your Own: Variations!
And if you’re feeling adventurous, don’t hesitate to put your own spin on this fantastic recipe! While the core recipe for these fudgy delights is perfect as is, it’s also incredibly forgiving and open to customization. For a nutty twist, try folding in a cup of chopped walnuts or pecans into the batter before baking. If you’re a fan of mint and chocolate, a few drops of peppermint extract can transform them into a holiday classic. You could also swirl in some caramel sauce or peanut butter during the last few minutes of baking for an extra layer of flavor and visual appeal. Want to make them even more indulgent? Sprinkle mini chocolate chips or even some crushed candy canes on top immediately after they come out of the oven, letting the residual heat melt them slightly. For a truly unique presentation, consider adding a different frosting – perhaps a cream cheese frosting with a hint of orange zest, or a rich chocolate ganache. The possibilities are truly endless, allowing you to tailor this treat to your exact preferences or the occasion at hand. This versatility is what makes the Christmas Present Brownies Recipe so incredibly special; it’s a blank canvas for your creativity, delivering a delicious result every time you bake them. Don’t be afraid to experiment and discover your new favorite variation!
Now it’s your turn! I genuinely hope you feel inspired to gather your ingredients and try your hand at baking these magnificent brownies. There’s a special kind of magic that happens in the kitchen when you’re creating something so delicious from scratch, and I promise you, the aroma alone will fill your home with a comforting, festive warmth. Don’t be shy; dive in and experience the joy of biting into one of these perfect squares. And please, when you do bake them, I would absolutely love to hear about your experience! Did you stick to the original recipe, or did you add your own creative twist? What was your favorite serving suggestion? Share your successes, your serving ideas, and even your funny kitchen mishaps in the comments below or on social media. Your feedback and stories truly make my day and help inspire other bakers in our community. Happy baking, my friends, and enjoy every single delightful bite of these homemade treasures!
Christmas Present Brownies Recipe
Deliciously fudgy, intensely chocolatey brownies decorated like festive Christmas presents. Perfect for holiday gifting or sharing at gatherings, these treats embody warmth and festive spirit.
Ingredients
Instructions
Important Information
Nutrition Facts (Per Serving)
It is important to consider this information as approximate and not to use it as definitive health advice.
Allergy Information
Please check ingredients for potential allergens and consult a health professional if in doubt.


Leave a Comment