
Classic Cannoli Squares offer a delightful twist on a beloved Italian pastry, making the iconic flavors and textures more accessible than ever before. If you’ve ever been intimidated by the delicate art of frying traditional cannoli shells, prepare to be absolutely thrilled! I’ve always admired the rich heritage of Sicilian cannoli, a dessert historically enjoyed during Carnevale, signifying celebration and abundance with its crisp, fried shell and lusciously sweet ricotta filling. Traditionally, crafting these masterpieces required meticulous shaping and frying, a labor of love that, while rewarding, isn’t always feasible for a weeknight treat or a casual gathering.
Why We Love This Italian Delight: The Perfect Blend of Crunch and Cream
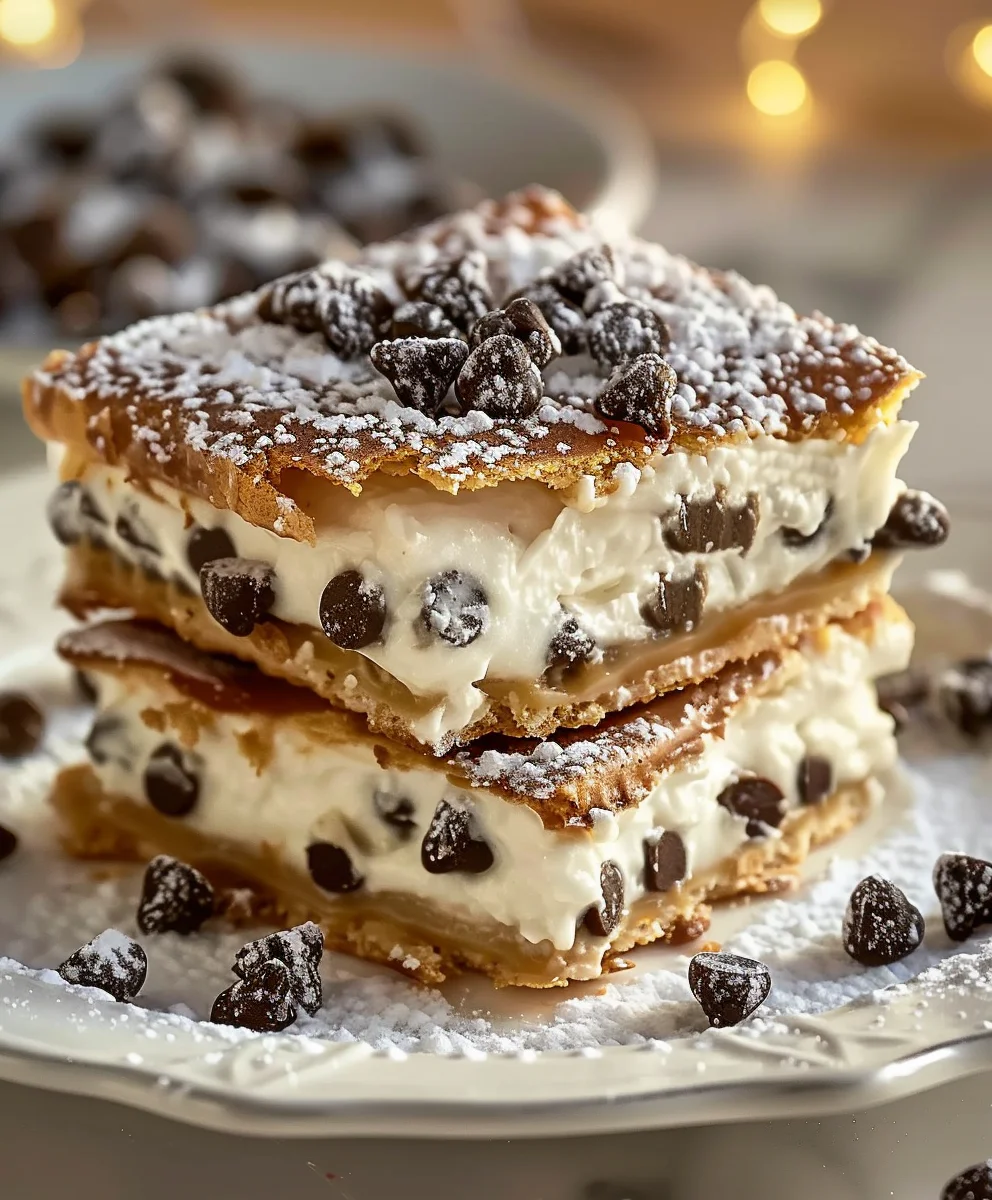
This innovative approach transforms that intricate process into something wonderfully simple, allowing you to capture all the magic without the fuss. People adore cannoli for the exquisite contrast: the satisfying crunch of the shell giving way to a velvety-smooth, sweet ricotta cream, often studded with chocolate chips or candied fruit. Our recipe for Classic Cannoli Squares maintains this beloved textural and flavor profile, delivering that unmistakable taste sensation in a convenient, sliceable form. I truly believe you’ll fall in love with how effortlessly these squares bring the joy of authentic Italian baking into your home, perfect for sharing or savoring yourself. Prepare to impress your guests and your palate with this brilliant culinary shortcut!

Ingredients:
-
For the Crispy Cannoli Pastry Squares:
- 2 cups (240g) all-purpose flour, plus more for dusting
- 2 tablespoons granulated sugar
- 1 teaspoon unsweetened cocoa powder (optional, but adds a lovely depth and color)
- ½ teaspoon ground cinnamon (for that authentic aroma)
- ¼ teaspoon salt
- 2 tablespoons unsalted butter, very cold and cut into small pieces
- 1 large egg yolk
- ½ cup (120ml) dry white wine or apple cider vinegar (the secret to crispy bubbles!)
- 1 teaspoon vanilla extract
- Vegetable oil or canola oil, for frying (approximately 4-6 cups, depending on your pot)
-
For the Silky Smooth Ricotta Filling:
- 32 ounces (approximately 900g) whole milk ricotta cheese
- 1 cup (120g) confectioners’ sugar (powdered sugar), sifted
- ½ teaspoon vanilla extract
- ¼ teaspoon almond extract (optional, but truly elevates the flavor)
- Pinch of salt
- ½ cup mini chocolate chips, or finely chopped dark chocolate
- ¼ cup candied orange peel, finely diced (optional, for traditionalists!)
- Zest of 1 small orange or lemon (optional, for brightness)
-
For Assembly & Garnish:
- Additional confectioners’ sugar, for dusting
- Optional: finely chopped pistachios, additional chocolate chips, or candied cherries for decoration
Instructions:
Preparing the Classic Cannoli Pastry Dough
-
Gather Your Tools and Ingredients:
Before you even begin mixing, make sure all your ingredients are measured out and ready. This will make the process much smoother. For the pastry, we’re aiming for a dough that is firm, yet pliable, and will fry up beautifully crisp.
-
Combine Dry Ingredients:
In a large mixing bowl, whisk together the 2 cups of all-purpose flour, 2 tablespoons of granulated sugar, the optional 1 teaspoon of cocoa powder, ½ teaspoon of ground cinnamon, and ¼ teaspoon of salt. Make sure everything is well combined. The cocoa powder, while subtle, adds a wonderful hint of complexity and a beautiful, slightly deeper hue to our Classic Cannoli Squares pastry.
-
Incorporate the Butter:
Add the 2 tablespoons of very cold, diced unsalted butter to the dry ingredients. Using your fingertips or a pastry blender, cut the butter into the flour mixture until it resembles coarse crumbs. You want the butter to be evenly distributed, creating tiny pockets that will contribute to the pastry’s flakiness and crispness. Avoid overworking the butter at this stage, as warmth from your hands can melt it too quickly.
-
Add Wet Ingredients and Form the Dough:
In a separate small bowl, whisk together the 1 large egg yolk, ½ cup of dry white wine (or apple cider vinegar), and 1 teaspoon of vanilla extract. Gradually add this liquid mixture to the flour and butter mixture, mixing with a wooden spoon or your hands until a shaggy dough begins to form.
-
Knead the Dough:
Turn the dough out onto a lightly floured surface. Knead for about 8-10 minutes. This might seem like a long time, but it’s crucial for developing the gluten in the flour, which will give our cannoli pastry its characteristic texture and strength, preventing it from crumbling too easily when fried. The dough should become smooth, elastic, and no longer sticky. If it’s too sticky, add a tiny bit more flour, a teaspoon at a time. If it’s too dry, a splash more wine/vinegar. You’ll know it’s ready when it springs back slightly when poked.
-
Rest the Dough:
Shape the dough into a disk, wrap it tightly in plastic wrap, and refrigerate for at least 1 hour, or preferably overnight. This resting period is absolutely essential. It allows the gluten to relax, making the dough much easier to roll out very thinly, and it also helps the flavors meld. A well-rested dough yields a superior, crispier Classic Cannoli Squares pastry.
Crafting the Luxurious Ricotta Filling
-
Drain the Ricotta – This is Crucial!
This step is perhaps the most important for a truly authentic and firm cannoli filling. Place the 32 ounces of whole milk ricotta cheese into a fine-mesh sieve lined with cheesecloth or a clean kitchen towel. Set the sieve over a bowl to catch the excess liquid. Refrigerate and let it drain for at least 4 hours, or ideally overnight. The longer it drains, the thicker and creamier your filling will be, preventing soggy pastry and ensuring a rich, concentrated flavor. You’ll be surprised how much liquid comes out! A firm, dry ricotta is the foundation of perfect Classic Cannoli Squares.
-
Prepare for Whipping:
Once drained, transfer the ricotta to a large mixing bowl. It should be thick and somewhat crumbly now. Break it up a bit with a spoon.
-
Sweeten and Flavor the Ricotta:
Add the 1 cup of sifted confectioners’ sugar, ½ teaspoon of vanilla extract, ¼ teaspoon of optional almond extract, and a pinch of salt to the drained ricotta.
-
Whip Until Silky Smooth:
Using an electric mixer (handheld or stand mixer with a paddle attachment), beat the ricotta mixture on medium-high speed for 3-5 minutes, or until it is incredibly smooth, light, and fluffy. Scrape down the sides of the bowl periodically to ensure everything is evenly incorporated. This aeration creates that characteristic luscious texture that defines Classic Cannoli Squares.
-
Fold in Your Favorite Inclusions:
Gently fold in the ½ cup of mini chocolate chips, the optional ¼ cup of finely diced candied orange peel, and the zest of 1 orange or lemon. Stir just until combined. Be careful not to overmix at this stage, as you want to maintain the airy texture you just achieved. Cover the bowl with plastic wrap and refrigerate the filling for at least 30 minutes to allow the flavors to meld and for it to firm up slightly. This chilling time is also important for easier piping later.
Rolling and Frying the Classic Cannoli Squares Pastry
-
Prepare Your Workspace and Frying Station:
Remove the dough from the refrigerator. Lightly flour a clean work surface and a rolling pin. Have a baking sheet lined with paper towels ready to drain the fried pastry squares. Heat your vegetable or canola oil in a deep, heavy-bottomed pot or a deep fryer to 350-360°F (175-180°C). Use a candy/fry thermometer to monitor the temperature; maintaining a consistent oil temperature is key to perfectly crispy, evenly cooked Classic Cannoli Squares pastry.
-
Roll the Dough Thinly:
Cut the rested dough into 3-4 manageable portions. Re-wrap any dough you’re not working with to prevent it from drying out. On your lightly floured surface, roll one portion of dough out as thinly as possible – we’re talking about 1/16th of an inch (1.5mm) thick. The thinner the dough, the crisper and more delicate your Classic Cannoli Squares will be. If the dough resists, cover it with a towel for a few minutes to let the gluten relax, then continue rolling.
-
Cut into Squares:
Using a sharp knife or a pizza cutter, trim the edges of your rolled-out dough to form a rectangle. Then, cut the dough into approximately 3×3-inch (7.5×7.5cm) squares. You can make them slightly larger or smaller depending on your preference, but this size is ideal for the “square” format of our Classic Cannoli Squares. Gather any dough scraps, re-roll them, and cut more squares.
-
Fry the Pastry Squares:
Carefully slide 3-4 pastry squares into the hot oil, making sure not to overcrowd the pot. Fry for about 1-2 minutes per side, or until they are golden brown and bubbling beautifully. They will puff up significantly, forming those characteristic cannoli blisters. Use tongs or a slotted spoon to flip them gently.
-
Drain and Cool:
Once golden and crisp, remove the fried pastry squares from the oil and immediately transfer them to the prepared paper towel-lined baking sheet to drain any excess oil. Repeat with the remaining dough squares, adjusting the oil temperature as needed between batches. Allow the pastry squares to cool completely before filling. This is crucial; warm pastry will cause the ricotta filling to melt and make your Classic Cannoli Squares soggy.
Assembling Your Classic Cannoli Squares
-
Prepare for Filling:
Transfer the chilled ricotta filling into a piping bag fitted with a large round or star tip. If you don’t have a piping bag, you can simply use a resealable plastic bag with one corner snipped off.
-
Layer the Squares with Filling:
Take one of your completely cooled, crispy cannoli pastry squares. Pipe a generous dollop or swirl of the creamy ricotta filling onto the center of the square. You want enough to be substantial but not so much that it spills over the sides.
-
Stack for Height:
Gently place another pastry square directly on top of the first, pressing down very lightly to adhere it to the filling. You can stop here for a single-layer square, or continue to add a third pastry square with another layer of filling in between, creating a delightful stack of Classic Cannoli Squares. The stacked presentation makes them especially appealing and provides more surface area for that delicious filling.
-
Garnish and Serve:
Once assembled, lightly dust the top of each Classic Cannoli Square with additional confectioners’ sugar using a small sieve. For an extra touch of elegance and flavor, you can sprinkle a few finely chopped pistachios, extra mini chocolate chips, or a small candied cherry on top of the dusted sugar.
-
Serve Immediately for Best Results:
Classic Cannoli Squares are best enjoyed fresh, shortly after assembly, to ensure the pastry remains at its peak crispness. While the filling can be made ahead, assemble these delightful treats just before serving to fully appreciate the textural contrast between the crunchy pastry and the smooth, sweet ricotta.
Tips for Perfect Classic Cannoli Squares
-
On Draining Ricotta:
Seriously, don’t skimp on this step! If your ricotta is too watery, your filling will be runny and will quickly soften the pastry. For an even firmer ricotta, you can place a plate with a heavy can on top of the ricotta in the sieve to press out more liquid.
-
Oil Temperature is Key:
A consistent oil temperature is critical for perfect pastry. If the oil is too cool, the pastry will absorb too much oil and become greasy. If it’s too hot, the pastry will brown too quickly on the outside before cooking through and developing its characteristic bubbles. Invest in a good thermometer!
-
Flavor Variations for the Filling:
Feel free to experiment with the ricotta filling. Besides chocolate chips and candied orange, consider adding chopped toasted nuts (like pecans or walnuts), a pinch of espresso powder for a coffee flavor, or even a splash of liqueur like Marsala or a citrus liqueur (but use sparingly to avoid thinning the filling).
-
Make-Ahead Strategy:
The cannoli pastry dough can be made up to 2 days in advance and stored in the refrigerator, or even frozen for up to a month (thaw overnight in the fridge). The ricotta filling can also be prepared a day or two ahead and kept chilled in the refrigerator. However, for the ultimate experience, fry the pastry squares and assemble your Classic Cannoli Squares just before serving.
-
Storing Leftovers:
If you have any leftover assembled Classic Cannoli Squares (though I doubt you will!), they are best stored in an airtight container in the refrigerator for no more than a day. The pastry will inevitably soften over time, but the flavors will still be delicious. Store unfried pastry squares in an airtight container at room temperature if you plan to fry them later the same day, or refrigerate for longer storage. Unfilled fried shells can be stored in an airtight container at room temperature for up to 2-3 days.
-
Why “Squares”?
The traditional cannoli shell is wrapped around a metal tube and fried, creating a hollow cylinder. However, for home bakers, preparing individual cannoli shells can be time-consuming and requires specialized equipment. Our Classic Cannoli Squares offer all the incredible flavor and texture of a traditional cannoli but in a much more accessible, no-special-equipment-needed format. You get that same satisfying crunch and rich, creamy filling without the fuss. It’s a wonderful way to enjoy this beloved Italian dessert!

Conclusion:
If there’s one thing I hope you take away from this recipe, it’s that truly exceptional desserts don’t have to be complicated. These Classic Cannoli Squares are the epitome of that philosophy, offering all the vibrant, rich, and utterly irresistible flavors of traditional cannoli without the fuss and mess of frying individual shells. I’ve poured my heart into perfecting this recipe to ensure that every single bite delivers that iconic crunch, followed by the heavenly creaminess of a perfectly sweetened ricotta filling, subtly infused with just the right amount of zest and warmth. It’s an authentic Italian dessert experience, simplified for the joy of home baking.
I know many of us adore cannoli but often shy away from making them ourselves due to the perceived complexity. That’s precisely why I developed this square format – it’s a game-changer! Imagine the golden, crisp, almost pastry-like base, creating the perfect foundation for that luscious, airy filling. It’s truly a celebration of textures and flavors, from the delicate hint of citrus dancing on your palate to the satisfying crunch that gives way to pure bliss. This recipe is designed to be approachable for bakers of all skill levels, meaning you can achieve bakery-quality results right in your own kitchen. It’s the ultimate crowd-pleaser, delivering a sophisticated yet comforting treat that’s guaranteed to impress your family and friends, all while saving you significant time and effort compared to the traditional method. Trust me, the “wow” factor these squares possess is immense, and you’ll love the convenience of serving a dessert that looks and tastes so spectacularly impressive.
Now, let’s talk about how to truly make these squares shine or how to adapt them to your heart’s desire. While they are absolutely divine exactly as the recipe dictates, a delicate dusting of powdered sugar is always a timeless and elegant finish. For an extra touch of sophistication, consider a fine drizzle of melted dark chocolate – perhaps a high-quality semi-sweet or even a bittersweet chocolate – which adds a beautiful contrast and a lovely depth of flavor. A sprinkle of finely chopped pistachios, toasted almonds, or even candied orange peel can elevate the texture and visual appeal even further, adding little bursts of color and nutty goodness. Imagine serving these alongside a robust, freshly brewed espresso after a delicious meal, or with a delicate cup of Earl Grey tea for an afternoon treat. They also pair wonderfully with a sweet dessert wine, creating a truly luxurious end to any gathering. For a festive touch during the holidays, you could incorporate a tiny amount of finely chopped candied cherries or citron into the ricotta mixture.
Endless Possibilities for Flavor:
Feeling adventurous? The beauty of these Classic Cannoli Squares lies in their versatility. You could experiment with the ricotta filling by folding in mini chocolate chips for that classic cannoli experience. For a mocha-inspired twist, add a teaspoon of espresso powder to the filling. A hint of almond extract instead of vanilla can introduce a beautiful, subtle nuttiness, while a touch of rosewater could add an exotic, fragrant note. Don’t be afraid to play with different citrus zests – lemon, lime, or even a touch of grapefruit zest can offer unique bright notes. For a truly decadent experience, layer a thin spread of melted dark chocolate directly onto the baked crust before adding the ricotta filling. You could even create a “deconstructed” experience for a party by offering separate bowls of mini chocolate chips, various chopped nuts, and different citrus zests, allowing your guests to customize their own squares. These squares are also incredibly convenient for portion control at larger gatherings; simply cut them into smaller, bite-sized pieces for effortless serving and mingling.
I genuinely hope this recipe ignites a spark of culinary excitement in you. There’s a profound joy in creating something delicious with your own hands, and I promise you, these squares deliver on that promise. Don’t hesitate – dive in, have fun with the process, and let your kitchen fill with the delightful aroma of Italian baking. Once you’ve had the chance to make these incredible Classic Cannoli Squares, I would absolutely love to hear all about your experience! Did you stick to the classic preparation? Did you try a fun variation or one of my serving suggestions? What did your family and friends think? Your feedback is incredibly valuable to me and to the entire community of bakers who visit this site.
Share Your Culinary Triumphs!
Please do take a moment to leave a comment below and share your thoughts. Even better, snap a photo of your beautiful creations and share them with us! I thrive on seeing your culinary successes, and your insights not only help me immensely in developing more recipes but also inspire fellow bakers. Your journey in the kitchen is important to me, and I’m always eager to be a part of it. So go on, give these an enthusiastic try. I can almost guarantee they’ll become a treasured recipe in your repertoire, bringing a little piece of Italian sunshine and a lot of sweet satisfaction to your table, time and time again!
Best Classic Cannoli Squares – Creamy Italian Dessert Bars
Classic Cannoli Squares offer a delightful twist on a beloved Italian pastry, making the iconic flavors and textures more accessible. This recipe transforms the intricate process into something simple, capturing the magic of crisp pastry and velvety-smooth, sweet ricotta cream in a convenient, sliceable form. Perfect for sharing or savoring, this culinary shortcut brings authentic Italian baking home without the fuss.
Ingredients
-
2 cups whole milk Ricotta Cheese
-
1 cup Powdered Sugar
-
1 teaspoon Vanilla Extract
-
1/2 teaspoon Cinnamon
-
1/2 cup Mini Chocolate Chips
-
2 pre-made pie crusts
-
1 large Egg
-
Sugar, for sprinkling
-
1/4 cup Chopped Pistachios
-
3 pieces Maraschino Cherries
-
1/4 cup Extra Chocolate Chips
Instructions
-
Step 1
Place 2 cups whole milk ricotta in a fine-mesh sieve lined with cheesecloth over a bowl. Refrigerate and drain for at least 4 hours, or preferably overnight, to remove excess liquid. This is crucial for a thick, firm filling. -
Step 2
Transfer drained ricotta to a large mixing bowl. Add 1 cup powdered sugar, 1 tsp vanilla extract, and 1/2 tsp cinnamon. Beat with an electric mixer until incredibly smooth, light, and fluffy (3-5 minutes). Gently fold in 1/2 cup mini chocolate chips. Cover and refrigerate for at least 30 minutes to allow flavors to meld and firm up. -
Step 3
Preheat oven to 375°F (190°C). Unroll 2 pre-made pie crusts onto a lightly floured surface. Cut each crust into approximately 3×3-inch squares. Whisk 1 large egg for an egg wash. Brush pastry squares with egg wash and sprinkle generously with sugar. Arrange on a parchment-lined baking sheet and bake for 10-15 minutes, or until golden brown and crisp. Let cool completely on a wire rack. -
Step 4
Transfer the chilled ricotta filling into a piping bag fitted with a large round or star tip. Take one cooled, crispy pastry square and pipe a generous dollop or swirl of filling onto its center. Gently place another pastry square directly on top, pressing lightly to adhere. For taller squares, add another layer of filling and a third pastry square. -
Step 5
Lightly dust the top of each assembled Classic Cannoli Square with additional powdered sugar using a small sieve. For decoration, sprinkle with 1/4 cup chopped pistachios, 1/4 cup extra chocolate chips, or top with a maraschino cherry. Serve immediately to ensure the pastry remains at its peak crispness.
Important Information
Nutrition Facts (Per Serving)
It is important to consider this information as approximate and not to use it as definitive health advice.
Allergy Information
Please check ingredients for potential allergens and consult a health professional if in doubt.


Leave a Comment