
Roast Beef Cheddar Melt Sandwich An Incredible Ultimate Recipe – just reading those words conjures images of pure, unadulterated comfort. I’m thrilled to share with you what I believe is the definitive guide to crafting this masterpiece right in your own kitchen. There’s something undeniably magical about the combination of tender, thinly sliced roast beef, generously piled onto toasted bread, and then lovingly blanketed with sharp, melty cheddar cheese. It’s a sandwich that transcends mere ingredients, evolving into an experience. While the exact origins of the melt sandwich are somewhat debated, its lineage is firmly rooted in classic American diner fare, a true testament to simple, hearty satisfaction.
Why This Sandwich is a Timeless Favorite
What truly elevates this dish, making it a beloved staple for countless individuals, is its perfect symphony of textures and flavors. The robust, savory notes of the beef are beautifully complemented by the tangy, creamy cheddar, all embraced by the satisfying crunch of perfectly grilled or toasted bread. It’s quick enough for a weeknight, yet feels indulgent enough for a special treat, offering a deeply satisfying meal that hits all the right notes. Preparing this Roast Beef Cheddar Melt Sandwich An Incredible Ultimate Recipe isn’t just about assembling ingredients; it’s about creating a moment of pure culinary bliss. Get ready to transform humble components into an extraordinary meal that will undoubtedly earn rave reviews.

Ingredients:
- For the Ultimate Roast Beef Cheddar Melt:
- 8 slices of your favorite hearty bread (I love a good sourdough or a thick-cut artisanal white bread for its sturdy texture and subtle tang, but brioche or rye can also be delightful).
- 1 to 1.5 pounds high-quality, thinly sliced deli roast beef. Look for a lean, flavorful cut.
- 12-16 slices of sharp or extra-sharp cheddar cheese, or about 2 cups freshly shredded (shredded melts beautifully!).
- 4-6 tablespoons unsalted butter, softened (for grilling the bread and caramelizing onions).
- 1 tablespoon olive oil (for caramelizing onions).
- Salt and freshly ground black pepper, to taste.
- For the Irresistible Caramelized Onions:
- 2 large yellow or Vidalia onions, peeled and thinly sliced.
- 2 tablespoons unsalted butter.
- 1 tablespoon olive oil.
- 1/2 teaspoon salt.
- 1/4 teaspoon sugar (optional, helps with browning and sweetness).
- A splash of water or beef broth (for deglazing, if needed).
- Optional Condiments and Enhancements:
- Prepared horseradish sauce (a classic pairing with roast beef!).
- Dijon mustard.
- Barbecue sauce (for a smoky twist).
- A sprinkle of fresh chives or parsley, for garnish.
Preparing the Irresistible Caramelized Onions
My friends, let’s kick things off with arguably the most crucial component for elevating our Roast Beef Cheddar Melt Sandwich An Incredible Ultimate Recipe: the caramelized onions. This step, while requiring a bit of patience, is absolutely worth every minute. The deep, sweet, savory notes these onions bring to the sandwich are simply unparalleled and will transform your ordinary melt into an extraordinary culinary experience.
First, grab your two large onions. Peel them carefully and then slice them very thinly. I aim for slices about 1/8 to 1/4 inch thick. You can use a mandoline for perfectly uniform slices, but a sharp knife works just as well with a steady hand. The thinner the slices, the more evenly and quickly they’ll caramelize. Once sliced, separate the rings as much as you can; this ensures every piece gets direct contact with the heat.
Next, choose a heavy-bottomed skillet or a Dutch oven for this task. A wider pan is better as it allows more surface area for the onions to spread out and brown. Place your pan over medium-low heat. Add 2 tablespoons of unsalted butter and 1 tablespoon of olive oil. The butter contributes rich flavor, while the olive oil helps prevent the butter from burning at higher temperatures and also aids in even cooking. Once the butter has melted and the oil is shimmering, add all your sliced onions to the pan.
Now, this is where the magic (and the patience) begins. Sprinkle the onions with 1/2 teaspoon of salt. The salt helps draw out moisture from the onions, which is essential for them to soften and eventually brown. If you’re using it, add a pinch of sugar now too; this isn’t strictly necessary but can help deepen the caramelization and enhance their natural sweetness. Stir the onions well to coat them evenly with the butter, oil, and seasonings.
Reduce the heat to low or medium-low. This is key! We are not trying to fry these onions; we are coaxing their natural sugars to caramelize slowly. Cover the pan for the first 10-15 minutes, stirring occasionally. This initial period allows the onions to soften considerably and release their moisture without browning too quickly. You’ll notice them becoming translucent and shrinking in volume.
After this initial softening phase, remove the lid. Continue cooking the onions, stirring every 5-10 minutes. At this point, you’ll start to see a very gradual color change. The onions will transition from pale white to a light golden, then to a rich, deep amber. This process can take anywhere from 30 to 45 minutes, sometimes even longer, depending on your stove and the moisture content of the onions. Don’t rush it! If you notice the onions sticking to the bottom of the pan or browning too quickly, add a splash of water or beef broth (about a tablespoon) and scrape up any browned bits from the bottom of the pan – this is called deglazing, and those browned bits are pure flavor! Reduce the heat even further if necessary.
What we’re looking for is a uniformly deep brown color, a super soft, jammy texture, and an incredibly sweet, savory aroma that will fill your kitchen. There should be no harsh raw onion flavor left. Once they’ve reached this beautiful state of caramelized perfection, remove them from the heat and set them aside. They can even be made a day in advance and gently reheated, making your sandwich assembly much quicker on a busy day. Trust me, these onions are the secret weapon for an truly ultimate roast beef cheddar melt!
Assembling the Sandwich Components
With our wonderfully aromatic caramelized onions ready and waiting, it’s time to gather and prepare the rest of our ingredients for this incredible Roast Beef Cheddar Melt Sandwich An Incredible Ultimate Recipe. A little mise en place here goes a long way in ensuring a smooth and enjoyable cooking process.
First, let’s talk about the roast beef. If you purchased pre-sliced deli roast beef, make sure the slices are thin. Thin slices are crucial because they allow for better layering and ensure that the beef warms through evenly without becoming tough. I like to gently separate the slices and create small, manageable piles or folds; this makes it easier to layer them generously onto our bread later. If your roast beef is cold from the fridge, you might consider gently warming it slightly before assembling the sandwiches. You can do this by spreading it out on a microwave-safe plate and heating for 15-20 seconds, or by briefly tossing it in a warm skillet for about 30 seconds. This step isn’t strictly necessary, but it helps prevent a cold spot in the center of your hot melt and encourages the cheese to melt around it more effectively.
Next up, the cheese! If you opted for block cheddar, now is the time to shred it. Freshly shredded cheese always melts better than pre-shredded varieties, which often contain anti-caking agents that can hinder a smooth, gooey melt. If you’re using slices, ensure they are ready to be laid out. I find that a combination of shredded and sliced can be fantastic – a base of shredded for maximum melt-coverage, and a slice on top to hold everything together. For this recipe, I’m recommending a generous amount of cheese because, well, it’s a cheddar melt! You want that glorious, stretchy, savory goodness in every bite.
Now, let’s prepare our bread. For an ultimate grilled cheese or melt, the bread choice is paramount. As I mentioned in the ingredients, a sturdy sourdough or artisanal white bread holds up wonderfully to the fillings and butter, providing a perfect crispy exterior. Take your 8 slices of bread and spread a thin, even layer of softened unsalted butter on one side of each slice. This buttered side will be the exterior of your sandwich, creating that golden-brown, crispy crust we all crave. You can also use mayonnaise instead of butter for grilling; it produces an even crispier, more uniformly golden crust and adds a subtle tang. Whichever you choose, ensure an even coating for maximum deliciousness.
Finally, consider your optional condiments. If you’re a fan of horseradish with roast beef, have your prepared horseradish sauce ready. A dab of Dijon mustard can also add a delightful piquant kick, cutting through the richness of the beef and cheese. Maybe you’re feeling adventurous and want a smoky BBQ flavor? Have that bottle handy too! It’s about personalizing your Roast Beef Cheddar Melt Sandwich An Incredible Ultimate Recipe to your exact taste preferences. Having these ready means you won’t be scrambling once the sandwich comes off the griddle.
At this stage, you should have your caramelized onions cooled slightly, your roast beef ready, your cheese prepared, your bread buttered on one side, and any desired condiments within reach. Everything is poised for the grand assembly and grilling!
Building and Grilling the Perfect Melt
Alright, my fellow food lovers, the moment of truth has arrived! We have all our glorious components prepped, and now we’re ready to construct and grill what I promise will be the most satisfying Roast Beef Cheddar Melt Sandwich An Incredible Ultimate Recipe you’ve ever tasted. This stage is all about technique and a keen eye for that perfect golden crust and gooey, melted interior.
First things first, grab your largest skillet or a flat griddle and place it over medium-low heat. The key here is medium-low. We want the cheese to melt slowly and the bread to toast evenly to a beautiful golden brown, not to scorch the bread before the center is warm and melty. A heavy-bottomed cast iron skillet or a non-stick griddle works exceptionally well for achieving that desirable crust.
While your pan is gently preheating, let’s start building our sandwiches. Take four of your buttered bread slices and place them butter-side down on a clean surface or cutting board. These will be the bottom halves of your sandwiches.
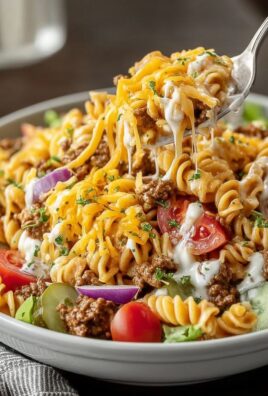
Now, for the layering! On each of these four slices, generously spread about half of your cheddar cheese. I like to start with cheese directly on the bread; this acts as a delicious barrier, preventing the bread from getting soggy from the fillings, and it also contributes to that all-important gooey factor. Next, pile on a substantial amount of your thinly sliced roast beef. Don’t be shy here; this is a roast beef melt after all! Distribute it evenly across the cheese layer.
Following the roast beef, add a generous spoonful or two of our spectacular caramelized onions onto each sandwich. Spread them out gently over the beef. The sweetness and depth of these onions are truly the soul of this sandwich, so make sure every bite gets some of that goodness. Finally, top the onions and beef with the remaining cheddar cheese. This top layer of cheese will act like a delicious glue, holding everything together once melted and creating an incredible cheese pull.
Carefully place the remaining four buttered bread slices on top of each stack, butter-side up. Gently press down on each sandwich with your hand to compact the layers slightly. This ensures good contact between the fillings and the bread, which helps with even melting and grilling.
By now, your skillet or griddle should be perfectly preheated. It should be warm enough that if you sprinkle a few drops of water, they sizzle and evaporate, but not smoking hot. Carefully transfer your assembled sandwiches to the hot pan. If your pan isn’t large enough for all four, work in batches to avoid overcrowding, which can lower the pan temperature and lead to uneven cooking.
Cook the sandwiches for about 4-6 minutes on the first side. This is where you need to be observant. Look for a deep golden-brown crust and listen for that satisfying sizzle. You can gently lift a corner with a spatula to peek at the color. While the bottom is browning, the heat will also start to penetrate the sandwich, beginning to melt that glorious cheddar cheese. If the bread seems to be browning too quickly, lower the heat slightly. Patience is a virtue when grilling a perfect melt!
Once the first side is beautifully golden, carefully flip each sandwich over using a wide spatula. If the sandwich feels a little wobbly, you can use two spatulas for support. Cook on the second side for another 4-6 minutes, or until that side is also a deep golden-brown and, most importantly, the cheese inside is completely melted and gooey. You should be able to see the cheese oozing out slightly from the sides, and the bread should feel crisp to the touch. For an extra flat and even melt, you can gently press down on the sandwiches with your spatula during the last minute of cooking, or even place another heavy pan on top of them for a moment.
Once both sides are perfectly golden and the cheese is gloriously molten, carefully remove the Roast Beef Cheddar Melt Sandwich An Incredible Ultimate Recipe from the pan.
Serving Your Incredible Ultimate Roast Beef Cheddar Melt
Congratulations, you’ve just crafted an absolute masterpiece! The aroma filling your kitchen right now must be intoxicating. Transfer your perfectly grilled melts to a cutting board. For the best presentation and ease of eating, I always recommend slicing them diagonally in half. This reveals all the beautiful layers of roast beef, caramelized onions, and that irresistible melted cheddar.
Serve your ultimate roast beef cheddar melt immediately while it’s still hot and the cheese is at its peak gooeyness. This sandwich is hearty enough to be a meal on its own, but it also pairs wonderfully with a simple side. My personal go-to is a handful of crispy potato chips and a dill pickle spear – the salty crunch and tangy pickle are the perfect counterpoints to the rich, savory sandwich. A bowl of warm tomato soup or a crisp green salad would also be excellent companions, offering a comforting or refreshing balance.
For those who love a bit of extra flavor, now is the time to add any of those optional condiments we discussed. A dollop of horseradish sauce on the side or even spread lightly inside before grilling can truly amplify the roast beef flavor. A little Dijon mustard offers a bright, sharp contrast, and if you’re feeling adventurous, a touch of barbecue sauce can introduce a delightful smoky-sweet dimension. A sprinkle of fresh chives or parsley not only adds a pop of color but also a fresh herbaceous note that can elevate the experience further.
Take a moment to admire your handiwork, inhale that amazing aroma, and then dive into this incredible creation. The combination of the crispy, buttery bread, the savory roast beef, the sweet, jammy caramelized onions, and the sharp, gooey cheddar cheese is a symphony of textures and flavors that will undoubtedly satisfy your deepest sandwich cravings. Enjoy every single bite of your truly ultimate Roast Beef Cheddar Melt Sandwich An Incredible Ultimate Recipe!

Conclusion:
And so, we arrive at the grand finale, the moment where I truly hope I’ve convinced you that what you’ve just read isn’t merely a set of instructions, but an invitation to culinary bliss. This isn’t just another sandwich; it’s an experience, a symphony of textures and flavors designed to satisfy your deepest comfort food cravings. I can confidently say that creating this masterpiece in your own kitchen is not just a cooking project, but an act of self-care, a delicious reward waiting at the end of a little effort. The combination of succulent, thinly sliced roast beef, lovingly piled high, meeting its match with a generous layer of perfectly melted, gooey cheddar cheese, all embraced by crisp, buttered bread, creates something truly extraordinary. It’s the kind of meal that makes you close your eyes in pure enjoyment, a moment of pure, unadulterated pleasure that lingers on your palate long after the last bite.
I’ve poured my heart into perfecting this particular rendition, ensuring every element contributes to an unparalleled taste sensation. From the golden-brown crispness of the bread, which gives way to a soft interior, to the robust, savory notes of the roast beef, beautifully complemented by the sharp yet creamy cheddar, every component plays a vital role. This isn’t just about combining ingredients; it’s about crafting a harmonious balance, where each flavor elevates the next. It’s about that satisfying crunch followed by the melt-in-your-mouth tenderness, that perfect equilibrium between savory, cheesy, and utterly comforting. Trust me when I say, once you taste the fruit of your labor, you’ll understand precisely why I’m so passionate about this particular creation. It truly stands out.
Elevate Your Experience: Serving Suggestions & Creative Variations
Now, while this incredible sandwich is perfectly capable of standing alone as a culinary star, there are countless ways to elevate your dining experience and customize it to your heart’s desire. For a classic, diner-style pairing, nothing beats a generous pile of crispy, golden french fries or a side of sweet potato fries. The salty crunch perfectly contrasts the rich, savory sandwich. If you’re looking for something to cut through the richness, a vibrant, fresh green salad with a zesty vinaigrette would be an excellent choice, providing a welcome lightness and a touch of freshness. Or, imagine dipping a corner of your sandwich into a warm bowl of creamy tomato soup – a truly iconic and comforting duo that evokes nostalgic feelings and adds another layer of warmth to your meal. A side of tangy coleslaw or a few crisp dill pickle spears also offers a delightful counterpoint, cleansing the palate and adding a refreshing crunch.
When it comes to beverages, consider pairing your creation with a robust craft beer, a crisp hard cider, or even a dry, unoaked Chardonnay if you’re feeling sophisticated. For a non-alcoholic option, a classic iced tea or a creamy malt milkshake would transport you straight to a retro diner setting. But don’t stop there! The beauty of this recipe lies in its versatility. Consider experimenting with different cheeses: a smoky Gouda, a sharp provolone, or even a spicy pepper jack can introduce exciting new dimensions. You could also try different types of bread – a hearty sourdough, a rustic ciabatta, or a tender brioche bun would all offer unique textures and flavors. Imagine adding a layer of caramelized onions for a touch of sweetness, or some sautéed mushrooms for an earthy depth. A smear of horseradish sauce or a dollop of spicy brown mustard can provide a delightful kick, while a few slices of crispy bacon or a fried egg could transform it into an even more indulgent breakfast-for-dinner treat. For those who love a bit of heat, pickled jalapeños or a dash of hot sauce would be fantastic additions. This isn’t just a recipe; it’s a foundation for your own culinary creativity.
This is where the magic truly happens, where the foundation of our
Roast Beef Cheddar Melt Sandwich An Incredible Ultimate Recipe
truly shines as a canvas for your personal touch. Think about the potential for different occasions too! It’s perfect for a cozy night in, an impressive yet effortless lunch to serve to friends, or even as the star of your next game day gathering. Its hearty nature makes it wonderfully satisfying, yet its elegant simplicity means you won’t be spending all day in the kitchen. It’s a dish that evokes warmth, satisfaction, and pure enjoyment, regardless of when or where you choose to savor it. The possibilities are genuinely endless, and I encourage you to explore them all, making this ultimate recipe truly your own.
Your Culinary Journey Awaits!
So, what are you waiting for? I urge you, don’t just read about this incredible sandwich; go forth and create it! Experience the joy of assembling, the anticipation of the first bite, and the sheer delight of its irresistible flavors. This is more than just a meal; it’s an invitation to treat yourself, to bring a little extra warmth and deliciousness into your life. Once you’ve embarked on this delicious adventure, I would absolutely love to hear about your experience! Did you stick to the original recipe, or did you put your own unique spin on it? What were your favorite variations? Share your thoughts, your successes, and perhaps even your brilliant new ideas in the comments below. Snap a photo and share it with us – let’s build a community of sandwich enthusiasts who appreciate the finer things in life, starting with this absolutely phenomenal recipe. Your feedback and creativity inspire us all, and I can’t wait to see the deliciousness you bring to life. Happy cooking, and even happier eating!

Amazing Roast Beef Cheddar Melt Sandwich – Your New Favorite!
Discover the ultimate Roast Beef Cheddar Melt Sandwich recipe. This guide helps you craft a masterpiece featuring tender, thinly sliced roast beef, generous sharp cheddar, and sweet caramelized onions on perfectly toasted bread. A timeless favorite rooted in classic American diner fare, offering pure comfort and hearty satisfaction.
Ingredients
-
8 slices hearty bread (sourdough or artisanal white)
-
1 to 1.5 lbs thinly sliced deli roast beef
-
12-16 slices or 2 cups shredded sharp or extra-sharp cheddar cheese
-
6-8 tbsp unsalted butter, softened (divided for onions & grilling)
-
2 tbsp olive oil (divided for onions & grilling)
-
Salt, to taste
-
Freshly ground black pepper, to taste
-
2 large yellow or Vidalia onions, thinly sliced
-
1/2 tsp salt (for onions)
-
1/4 tsp sugar (optional, for onions)
-
Splash of water or beef broth (optional, for deglazing)
-
Prepared horseradish sauce (optional)
-
Dijon mustard (optional)
-
Barbecue sauce (optional)
-
Fresh chives or parsley, for garnish (optional)
Instructions
-
Step 1
Thinly slice onions. Heat 2 tbsp unsalted butter and 1 tbsp olive oil in a heavy-bottomed skillet over medium-low heat. Add sliced onions, 1/2 tsp salt, and optional 1/4 tsp sugar. Stir to coat. Cover and cook for 10-15 minutes, stirring occasionally, until softened. Uncover and continue cooking, stirring every 5-10 minutes, for 30-45+ minutes until deep brown, super soft, and jammy. Deglaze with a splash of water or beef broth if onions start sticking. Remove from heat and set aside. -
Step 2
Ensure roast beef is thinly sliced and separated. Shred cheddar cheese if using a block. Spread a thin, even layer of softened unsalted butter on one side of each of the 8 bread slices. Prepare any desired optional condiments like horseradish or Dijon mustard. -
Step 3
Preheat a large skillet or griddle over medium-low heat. Lay 4 buttered bread slices (butter-side down) on a clean surface. On each slice, layer half of the cheddar cheese, a generous amount of roast beef, 1-2 spoonfuls of caramelized onions, and the remaining cheddar cheese. Top with the remaining 4 buttered bread slices (butter-side up) and gently press down to compact. Carefully transfer assembled sandwiches to the preheated pan (cook in batches if needed). Grill for 4-6 minutes per side until each side is deep golden-brown and the cheese inside is completely melted and gooey. Adjust heat as necessary to prevent scorching. -
Step 4
Remove grilled melts from the pan. Transfer to a cutting board and slice diagonally. Serve immediately while hot. Garnish with optional fresh chives or parsley. Offer with optional prepared horseradish sauce, Dijon mustard, or barbecue sauce on the side.
Important Information
Nutrition Facts (Per Serving)
It is important to consider this information as approximate and not to use it as definitive health advice.
Allergy Information
Please check ingredients for potential allergens and consult a health professional if in doubt.


Leave a Comment