
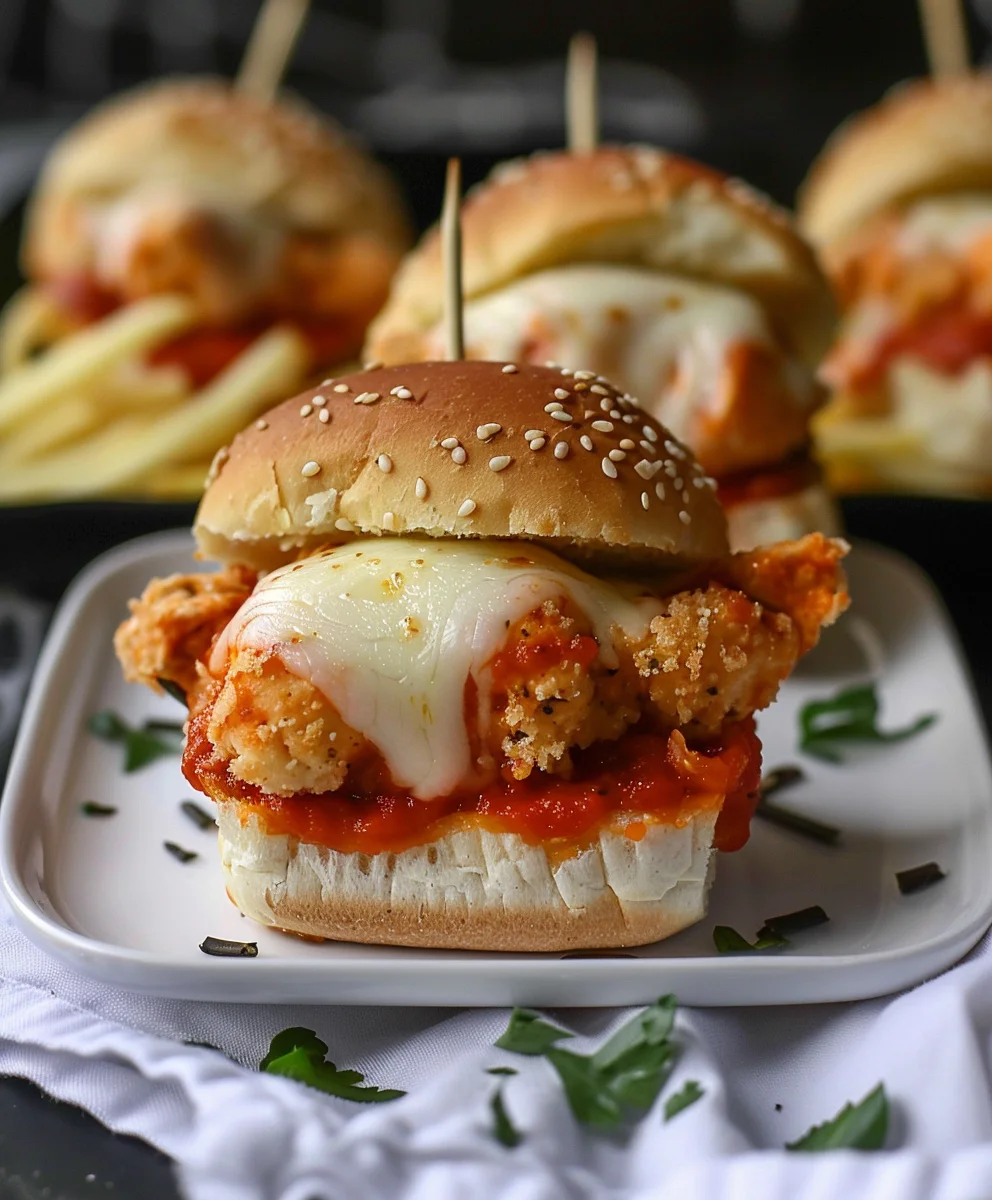
Halloween Chicken Parm Sliders are here to cast a delicious spell over your autumn gatherings! Forget about complicated entrees and say hello to the ultimate spooky season snack that will have everyone clamoring for more. Imagine the classic, comforting flavors of golden-fried chicken, rich marinara sauce, and gooey melted mozzarella, all nestled between soft slider buns. It’s a culinary treat that perfectly blends the warmth of traditional Italian-American comfort food with the playful spirit of Halloween, making it an irresistible addition to any festive table.
While chicken parmesan has well-established roots in Italian-American kitchens, evolving from eggplant parmigiana into the beloved chicken dish we know today, the slider format brings a modern, party-friendly twist. And when you infuse it with the whimsical charm of October 31st, you get something truly special. People adore these sliders not just for their undeniably fantastic taste – that perfect crunch, the savory sauce, the irresistible cheese pull – but also for their incredible convenience and festive appeal. They’re miniature masterpieces, easy to serve and even easier to devour, making them ideal for any ghoulish gathering or a fun family dinner. My Halloween Chicken Parm Sliders are designed to be a frightfully good crowd-pleaser, ensuring your celebration is both delicious and memorable.

Ingredients:
- 1.5 pounds boneless, skinless chicken breasts, about 3-4 medium breasts
- 1 cup all-purpose flour
- 2 large eggs, lightly beaten
- 2 cups panko breadcrumbs (I find these give the best crispiness!)
- 1 teaspoon salt, plus more for seasoning
- 1/2 teaspoon black pepper, plus more for seasoning
- 1 teaspoon garlic powder
- 1/2 teaspoon onion powder
- 1/2 teaspoon dried Italian seasoning
- 1/4 cup finely grated Parmesan cheese (optional, but I love the extra flavor in the breading)
- 4-6 cups vegetable oil or canola oil, for shallow frying
- 24 King’s Hawaiian sweet slider rolls (two 12-count packages are perfect)
- 2 cups marinara sauce, your favorite brand or homemade
- 8 ounces fresh mozzarella cheese, thinly sliced or shredded
- 4 ounces provolone cheese, thinly sliced (for extra gooeyness and flavor)
- Optional: Small Halloween-themed cookie cutters (ghost, bat, pumpkin) for cheese decoration
- 2 tablespoons unsalted butter, melted
- 1 tablespoon dried parsley flakes (for topping)
- Fresh basil leaves, for garnish (optional)
Preparing the Chicken:
- Butterfly and Pound the Chicken: First, let’s get our chicken ready. I like to start by taking each chicken breast and carefully butterflying it lengthwise if it’s very thick. This helps create more surface area and allows for more even cooking. Then, place each chicken piece between two sheets of plastic wrap. Using a meat mallet or a heavy rolling pin, pound the chicken to an even thickness of about 1/4 to 1/2 inch. This is a crucial step because it ensures the chicken cooks quickly and uniformly, and fits perfectly onto our slider rolls without being overly bulky. We’re aiming for pieces that are roughly the size of your slider rolls, so you might need to cut some of the larger pounded pieces in half or thirds horizontally to create individual “chicken patties” for each slider. Don’t worry if they’re not perfectly shaped; they’ll be covered in delicious sauce and cheese!
-
Set Up the Breading Station: Now, let’s get our dredging station organized. I always find that having everything in its place makes the process so much smoother and less messy. You’ll need three shallow dishes or pie plates.
- In the first dish, combine the all-purpose flour with 1 teaspoon of salt, 1/2 teaspoon of black pepper, 1 teaspoon of garlic powder, 1/2 teaspoon of onion powder, and 1/2 teaspoon of dried Italian seasoning. Whisk these together until everything is well combined. This seasoned flour will give our chicken its initial layer of flavor.
- In the second dish, crack the two large eggs and lightly beat them with a fork until the yolks and whites are fully incorporated. This egg wash acts as our “glue” for the breadcrumbs.
- In the third dish, pour the panko breadcrumbs. If you’re using the optional grated Parmesan cheese for extra flavor in the breading, now is the time to mix it in with the panko. I just love how that little bit of Parmesan adds a savory depth and helps achieve an even crispier crust.
- Breading the Chicken: This is where we create that beautiful, crispy coating. Take one pounded chicken piece at a time and first dredge it thoroughly in the seasoned flour, making sure it’s completely coated on all sides. Gently shake off any excess flour; we want a thin, even layer. Next, dip the floured chicken into the beaten egg, allowing any extra egg to drip off. Finally, press the chicken firmly into the panko breadcrumbs, ensuring every inch is covered. Really press down to help the breadcrumbs adhere well. Transfer the breaded chicken to a clean plate or a baking sheet lined with parchment paper. Repeat this process with all the remaining chicken pieces. It’s a bit of an assembly line, but totally worth it for that golden crust!
- Preheat Oil for Frying: In a large, heavy-bottomed skillet or a Dutch oven, pour in enough vegetable or canola oil to come up about 1 inch (or about 2-3 cm) the sides. We’re aiming for shallow frying here, not deep frying. Place the skillet over medium-high heat. To test if the oil is hot enough – which is crucial for crispy, non-greasy chicken – you can drop a tiny pinch of breadcrumbs into the oil. If they sizzle immediately and turn golden within a few seconds, your oil is ready. Aim for a temperature around 350-375°F (175-190°C) if you have a kitchen thermometer. Don’t let it get too smoky or it’s too hot, and if it’s not hot enough, your chicken will absorb too much oil and be soggy.
- Fry the Chicken Cutlets: Carefully place 2-3 breaded chicken pieces into the hot oil, making sure not to overcrowd the pan. Overcrowding will drop the oil temperature and prevent the chicken from browning properly. Fry the chicken for about 3-4 minutes per side, or until it’s a beautiful golden brown and cooked through. You’ll know it’s done when the internal temperature reaches 165°F (74°C). The crust should be wonderfully crisp. Once cooked, use tongs to transfer the fried chicken cutlets to a wire rack set over a baking sheet lined with paper towels. This allows any excess oil to drain off, keeping our chicken perfectly crisp. Continue frying the remaining chicken in batches, adding more oil if needed, until all pieces are cooked. I usually season them lightly with a pinch of salt immediately after they come out of the oil.
Assembling the Sliders:
- Prepare the Slider Buns: While your chicken is cooling slightly, preheat your oven to 375°F (190°C). Take your two packages of King’s Hawaiian sweet slider rolls. Without separating them, use a large serrated knife to carefully slice the entire block of rolls horizontally, creating a top half and a bottom half. It’s like slicing a giant bun! Place the bottom halves of the rolls into a 9×13 inch baking dish or on a large, parchment-lined baking sheet. I prefer a baking dish because it helps contain all the delicious saucy goodness.
- Layer the Sauce and Chicken: Now for the delicious layering! Spoon about half of your marinara sauce directly over the bottom halves of the slider rolls. Spread it out evenly, reaching all the way to the edges. This sauce layer is essential for moisture and flavor. Next, arrange your fried chicken cutlets over the sauce. You might need to overlap them slightly or cut them to fit perfectly, covering as much of the roll surface as possible. I try to ensure each slider will get a good piece of chicken.
- Add More Sauce and Cheese: Spoon the remaining marinara sauce over the chicken pieces, making sure each piece gets a generous coating. This not only adds flavor but also helps to keep the chicken moist during baking. Now, for the cheese! Lay slices of provolone cheese evenly over the sauced chicken. Provolone adds a wonderful savory depth and melts incredibly well. Then, distribute the fresh mozzarella cheese slices or shredded mozzarella over the provolone. I like a mix of both for varied texture and flavor.
- The Halloween Touch (Optional but Fun!): This is where we get spooky! If you’re going for the “Halloween Chicken Parm Sliders” theme, take some additional slices of provolone or a firm white cheese and use your small Halloween-themed cookie cutters (ghosts, bats, pumpkins) to cut out festive shapes. Carefully place these adorable (or eerie!) cheese cutouts on top of the mozzarella layer. They’ll melt slightly and create a super fun, themed look that everyone will love, especially the kids! It’s a simple detail that really elevates the holiday spirit of the dish.
- Complete the Sliders: Carefully place the top halves of the slider rolls over the cheese-layered chicken. They should fit snugly back into place, creating a complete slider sandwich. In a small bowl, melt 2 tablespoons of unsalted butter. Using a pastry brush, generously brush the tops of the slider buns with the melted butter. This not only gives them a beautiful golden-brown finish but also adds a lovely rich flavor. Finally, sprinkle the dried parsley flakes evenly over the buttered tops. This adds a touch of color and a subtle herby aroma.
Baking and Finishing:
- Bake the Sliders: Cover the baking dish or sheet loosely with aluminum foil. This helps to steam the rolls and melt the cheese without burning the tops. Place the dish in your preheated oven at 375°F (190°C) and bake for 15 minutes. After 15 minutes, remove the foil and continue baking for another 5-10 minutes, or until the cheese is completely melted, bubbly, and the tops of the buns are beautifully golden brown. The aroma filling your kitchen at this point will be absolutely intoxicating – a blend of sweet bread, savory chicken, and bubbling marinara!
- Rest and Garnish: Once they’re out of the oven, I recommend letting the sliders rest for about 5 minutes before slicing and serving. This short resting period allows the cheese to set slightly, making them easier to pull apart without everything sliding out. If you’re using fresh basil, tear or chop a few leaves and sprinkle them over the hot sliders just before serving. The heat will release their fragrant oils, adding a fresh, aromatic finish that really brightens up the dish.
- Serve: You can serve these Halloween Chicken Parm Sliders right from the baking dish. Using a large knife, cut along the natural lines of the rolls to separate them into individual sliders, or serve them as a pull-apart tray for a more casual, fun presentation. They are best served warm, allowing that incredible melted cheese and crispy chicken to truly shine. These are perfect for a festive Halloween gathering, a cozy family dinner, or simply when you’re craving some comforting, cheesy goodness with a spooky twist. Enjoy every single bite of this delightfully ghoulish and incredibly delicious treat!
Conclusion:
And there you have it, my friends! We’ve journeyed through the simple steps to creating what I genuinely believe will be the star of your next autumnal gathering, particularly as we approach that spooky season. These aren’t just any sliders; they are a delightful fusion of comforting Italian-American flavors with a playful, festive twist that makes them utterly irresistible. I’m talking about a dish that effortlessly marries convenience with an explosion of taste, ensuring that you spend less time fussing in the kitchen and more time enjoying the company of your loved ones. The ease with which these come together belies their incredible flavor profile, making them a fantastic option for both seasoned home cooks and those just beginning their culinary adventures.
I truly hope you’re as excited as I am about these incredible Halloween Chicken Parm Sliders. They are, without a doubt, a must-try because they perfectly encapsulate everything you want in a party appetizer: they’re utterly delicious, remarkably easy to prepare, visually appealing, and universally loved. Imagine the golden-brown chicken, slathered in rich marinara, blanketed under a melty, gooey layer of cheese, all nestled within a soft, toasted slider bun. It’s comfort food elevated for a special occasion, but still approachable enough for a casual weeknight dinner. The magic truly happens when you pull that tray from the oven, the aroma filling your home, and everyone gravitates towards the kitchen, eager to grab one (or two, or three!).
Serving Suggestions to Elevate Your Slider Experience:
When it comes to serving these glorious sliders, the possibilities are delightfully abundant. For a casual gathering, simply arrange them on a large platter with some fresh basil leaves scattered over for a pop of color and freshness. They pair beautifully with a crisp, simple green salad tossed in a light vinaigrette, offering a refreshing counterpoint to the rich flavors of the chicken parm. Another fantastic companion would be a bowl of classic garlic bread or even some pasta salad on the side, creating a more substantial meal for your guests. Don’t forget the dipping sauces! While they’re perfect on their own, a small bowl of extra marinara or even a creamy pesto dip can add another layer of enjoyment. For drinks, think about a chilled iced tea, sparkling cider, or for the adults, a light Italian lager or a crisp Pinot Grigio would complement the flavors wonderfully. During Halloween, consider serving them on a themed platter with some spooky decorations, perhaps alongside a “bloody” punch (cranberry juice with ginger ale) to really lean into the festive spirit.
Unleash Your Creativity with These Variations:
One of the aspects I adore most about this recipe is its incredible versatility. While the core recipe for Halloween Chicken Parm Sliders is a winner, don’t be afraid to experiment and make it truly your own! Want to add a little more kick? Sprinkle some red pepper flakes into your marinara sauce or directly onto the chicken before baking. For a different cheese experience, swap out some of the mozzarella for smoked provolone, sharp cheddar, or even a creamy fontina – each will offer a unique flavor dimension. You could also experiment with different types of buns; brioche buns will add a touch of sweetness and richness, while pretzel buns would introduce a savory, salty crunch. For a vegetarian twist, consider using breaded eggplant slices or even thick grilled portobello mushrooms in place of the chicken. If you’re feeling adventurous, try adding a thin slice of roasted red pepper or a few caramelized onions on top of the chicken before the cheese goes on for an extra layer of gourmet flavor. You could even drizzle a little balsamic glaze over them right before serving for a sophisticated finish. For kids, you might use mild cheddar and cut the chicken into fun Halloween shapes before baking, ensuring they’re just as excited about these sliders as the adults!
So, my dear food enthusiasts, now it’s your turn! I genuinely hope that I’ve inspired you to give these fantastic Halloween Chicken Parm Sliders a try. They are truly a testament to how simple ingredients can come together to create something spectacular and memorable. I am so confident that you and your loved ones will absolutely adore them. Don’t just take my word for it – gather your ingredients, set aside a little time, and embark on this delicious culinary adventure. Once you’ve whipped up your batch, I would absolutely love to hear about your experience! Did you stick to the recipe, or did you put your own creative spin on it with a unique variation? Please, share your stories, your photos, and any brilliant ideas you come up with. Connecting with you and seeing your culinary successes is one of the greatest joys of sharing my recipes. Happy cooking, and may your gatherings be filled with delicious food and wonderful memories!
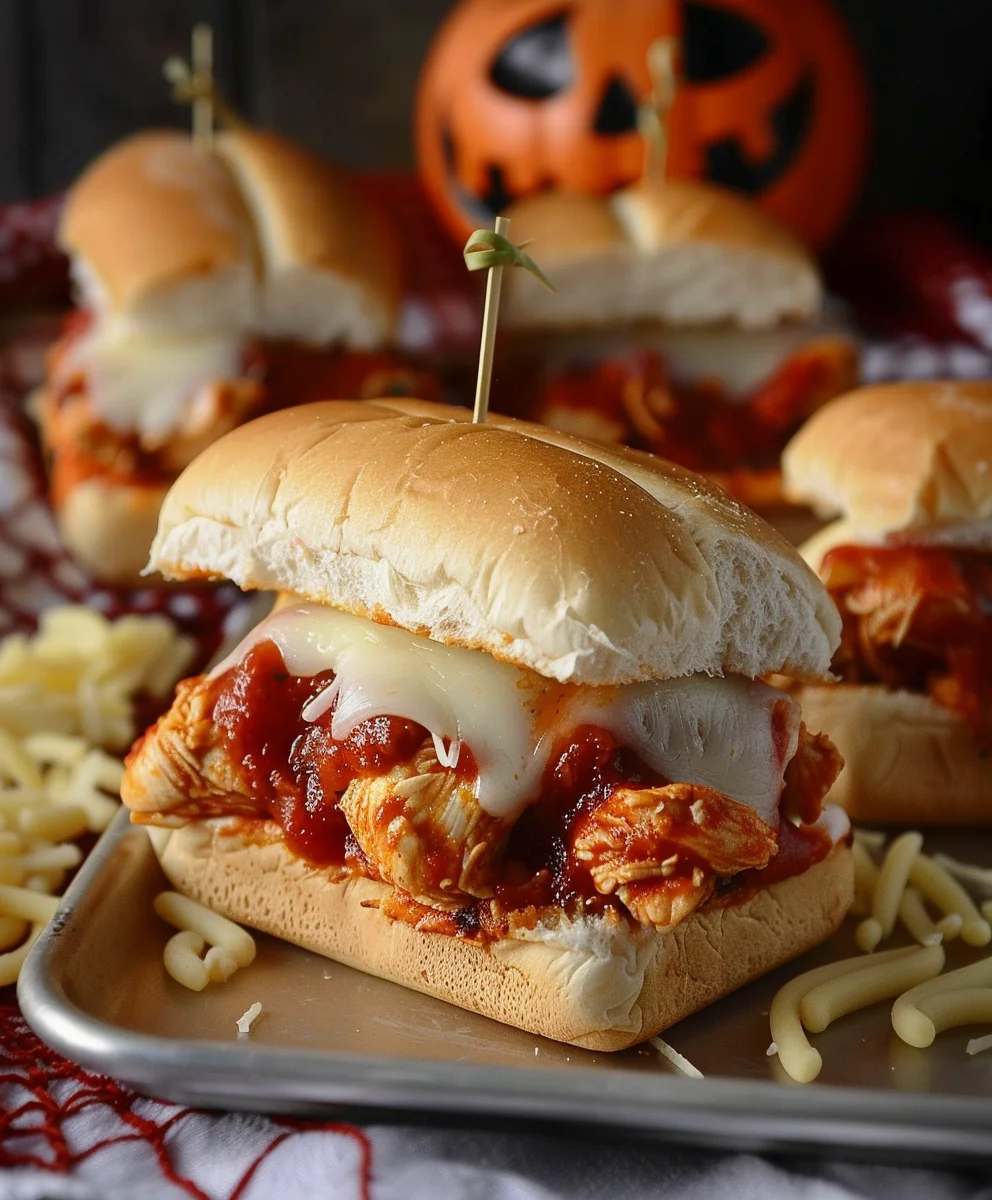
Halloween Chicken Parm Sliders
Cast a delicious spell this autumn with Halloween Chicken Parm Sliders! These spooky season snacks feature crispy chicken tenders, rich marinara, and gooey melted mozzarella on soft slider buns, complete with fun olive ‘eyes’. Perfect for festive gatherings or a fun family dinner.
Ingredients
-
8 frozen chicken tenders
-
8 slider buns
-
8 slices Mozzarella cheese
-
¾ cup Marinara sauce
-
16 green olives stuffed with pimento
Instructions
-
Step 1
Preheat oven to 375°F (190°C). Arrange 8 frozen chicken tenders on a baking sheet and bake according to package directions until golden and cooked through, typically 15-20 minutes. -
Step 2
While chicken bakes, slice 8 slider buns horizontally, keeping them connected. Place the bottom halves in a baking dish. Spread ¾ cup marinara sauce evenly over the bottom buns. -
Step 3
Once chicken tenders are cooked, arrange them over the marinara-sauced buns. Top each tender with a slice of Mozzarella cheese. -
Step 4
Halve the 16 green olives and place two halves on each Mozzarella slice to create fun ‘eyes’ for a Halloween touch. -
Step 5
Carefully place the top halves of the slider buns over the cheese and olive layers. Bake, uncovered, for 10-15 minutes, or until the cheese is melted and bubbly and the buns are lightly golden. -
Step 6
Let rest for 5 minutes before slicing and serving warm. Enjoy your delightfully ghoulish treat!
Important Information
Nutrition Facts (Per Serving)
It is important to consider this information as approximate and not to use it as definitive health advice.
Allergy Information
Please check ingredients for potential allergens and consult a health professional if in doubt.

Leave a Comment