
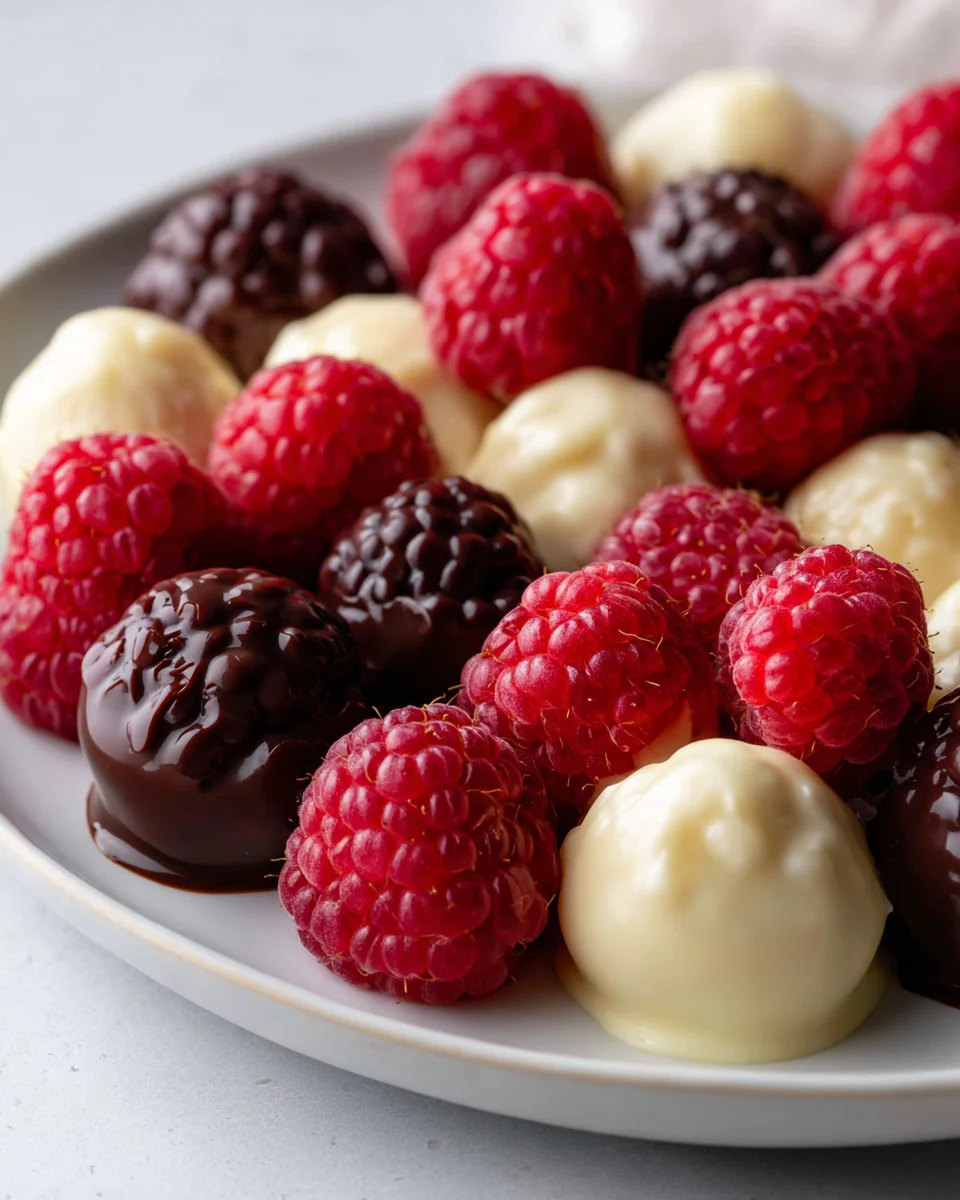
Chocolate Covered Raspberries
Oh, my goodness, if there’s one simple treat that always makes me swoon, it’s these little beauties! What makes Chocolate Covered Raspberries so incredibly special, you ask? It’s that magical dance between the bright, slightly tart burst of a fresh raspberry and the luxurious, melt-in-your-mouth sweetness of rich chocolate. Seriously, it’s a match made in heaven that just can’t be beaten. You’re going to absolutely adore how easy it is to create something that feels so incredibly gourmet and indulgent, yet requires hardly any effort at all. Imagine biting into that crisp chocolate shell, then feeling the juicy pop of a perfectly ripe raspberry – it’s an explosion of flavor and texture that truly brightens any day. This isn’t just a dessert; it’s a delightful experience, a perfect little pick-me-up, and honestly, one of the prettiest treats you can whip up for guests or simply to spoil yourself. We’re talking about fresh, vibrant raspberries, simply dipped into glorious melted chocolate, allowed to set, and then devoured. Pure bliss!

Ingredient Notes
Creating delicious chocolate covered raspberries starts with selecting the right ingredients. While the list is short, quality truly makes a difference in the final outcome of these delightful treats.
Raspberries
- Fresh Raspberries: For the best results, I always recommend using fresh, firm raspberries. They hold their shape beautifully and offer that perfect burst of sweet-tart flavor when you bite into them. Look for berries that are bright in color and free from mold or mushiness.
- Preparation is Key: Ensure your raspberries are thoroughly washed and, most importantly, completely dry before dipping. Any moisture will cause your chocolate to seize and become grainy, making it impossible to coat the berries smoothly. I typically lay them out on paper towels or a clean kitchen towel to air dry for at least 30 minutes, or even longer, gently patting them if needed.
- Frozen Raspberries (Substitution): While fresh are preferred, you can use frozen raspberries in a pinch. However, they will release more moisture as they thaw, which can make them harder to work with and potentially impact the texture of the chocolate. If using frozen, thaw them completely, then spread them out on paper towels to drain and dry for several hours, or even overnight, changing the paper towels as they become saturated.
Chocolate
- High-Quality Chocolate: This is where the magic happens! I always advise using good quality chocolate chips, baking bars, or wafers. They melt more smoothly and have a richer flavor compared to lower-quality options.
- Dark Chocolate: My personal favorite for chocolate covered raspberries is a good quality dark chocolate, typically in the 60-75% cacao range. Its slight bitterness beautifully complements the sweetness and tartness of the raspberries, creating a balanced and sophisticated flavor profile.
- Milk Chocolate (Substitution): If you prefer a sweeter treat, milk chocolate works wonderfully too. It will yield a creamier, milder coating that many find utterly irresistible.
- White Chocolate (Substitution): For a different aesthetic and a sweet, creamy flavor, white chocolate is a lovely alternative. You can even use it for decorative drizzles over dark or milk chocolate-dipped raspberries.
- Coconut Oil (Optional Addition): A small amount of refined coconut oil (about ½ to 1 teaspoon per cup of chocolate) can be added to your melted chocolate. It helps to thin the chocolate slightly, making it smoother and easier to dip the raspberries, and contributes to a glossier finish once set. This is particularly helpful if your chocolate seems a bit thick.
Step-by-Step Instructions
Making chocolate covered raspberries is a surprisingly simple process, but following these steps carefully will ensure a professional-looking and absolutely delicious result every time. I find this method to be the most reliable for perfect coatings.
- Prepare Your Raspberries: First things first, get those raspberries ready! Gently wash your fresh raspberries under cool running water. Carefully spread them out in a single layer on a clean kitchen towel or several layers of paper towels. It is absolutely crucial that they are completely dry before you even think about melting the chocolate. Any moisture will cause your chocolate to seize and become clumpy. I usually let mine air dry for at least 30 minutes, or even an hour, gently patting them with another towel if needed to ensure every speck of moisture is gone.
- Set Up Your Workspace: While the raspberries are drying, prepare your dipping station. Line a baking sheet or a large platter with parchment paper or a silicone baking mat. This will prevent your chocolate-covered raspberries from sticking once they are set.
- Melt the Chocolate: Now for the chocolate! There are a couple of reliable ways to melt it:
- Double Boiler Method: This is my preferred method for even melting. Fill a saucepan with about an inch or two of water and bring it to a gentle simmer. Place a heatproof bowl (glass or stainless steel) over the saucepan, ensuring the bottom of the bowl doesn’t touch the water. Add your chocolate chips or chopped chocolate to the bowl. Stir occasionally with a clean, dry spatula until the chocolate is completely melted and smooth. Remove the bowl from the heat once melted.
- Microwave Method: If you’re short on time, the microwave works well. Place your chocolate in a microwave-safe bowl. Heat in 30-second intervals, stirring thoroughly after each interval. Continue until the chocolate is mostly melted, then stir continuously until it’s completely smooth. Be careful not to overheat, as chocolate can burn easily in the microwave.
If you’re using coconut oil, stir it into the melted chocolate now until fully incorporated and smooth.
- Dip the Raspberries: This is the fun part! Gently pick up a dry raspberry, preferably by the top where the stem used to be, or using a toothpick inserted into the top. Dip it into the melted chocolate, rotating it to coat about two-thirds to three-quarters of the berry. I don’t usually fully submerge them; leaving a little bit of the berry peeking through adds visual appeal and helps prevent the raspberry from getting too messy.
- Remove Excess Chocolate: Lift the raspberry out of the chocolate and gently tap off any excess against the rim of the bowl. You can also use a small spoon to scrape away any drips. The goal is a smooth, even coating, not a thick, clumpy one.
- Place and Repeat: Carefully place the chocolate-covered raspberry onto the prepared parchment-lined baking sheet. Repeat the dipping process with the remaining raspberries, working quickly but carefully.
- Chill to Set: Once all your raspberries are dipped, transfer the baking sheet to the refrigerator. Chill for about 15-30 minutes, or until the chocolate is completely set and firm. Resist the urge to peek too often!
Tips & Suggestions
To elevate your chocolate covered raspberries from simple to sensational, I’ve gathered some of my favorite tips and suggestions. These small details can make a big difference in both the appearance and enjoyment of your treats!
- Embrace Dryness: I cannot stress this enough – the absolute most important tip for perfect chocolate covered raspberries is to ensure your raspberries are bone-dry. Any water will cause the chocolate to seize and become unworkable, leading to a frustrating experience and gritty chocolate. Take your time drying them!
- Maintain Chocolate Temperature: Keep your melted chocolate at a good dipping consistency. If it starts to thicken too much, gently warm it again over the double boiler or in short bursts in the microwave, stirring constantly. If it’s too hot, it will be too thin and run off the raspberries, creating a very thin and uneven coating.
- Use the Right Tools: For dipping, a regular fork can work, but a small, two-pronged dipping fork or even a sturdy toothpick inserted into the top of the raspberry (where the stem was) makes the process much cleaner and easier. This minimizes chocolate on your fingers and allows for a more even coating.
- Tempering Chocolate (For Advanced Dippers): If you want a truly professional finish – shiny, snappy, and resistant to bloom (that grayish streaks that can appear on chocolate) – consider tempering your chocolate. This involves specific heating and cooling cycles. It’s an extra step but results in a superior product. If you’re new to tempering, start with simpler methods first.
- Creative Toppings and Drizzles: Don’t stop at just plain chocolate! Once the chocolate-covered raspberries are dipped but before they set, you can sprinkle them with a variety of delightful additions:
- A tiny pinch of flaky sea salt for a gourmet touch.
- Finely chopped nuts like pistachios or almonds.
- Colorful sprinkles for a festive look.
- A drizzle of contrasting melted chocolate (white chocolate over dark, or vice versa) for visual appeal.
- A dusting of cocoa powder or powdered sugar after they’ve set.
Apply these immediately after dipping, before the chocolate hardens.
- Flavor Variations for Chocolate: Infuse your chocolate with other flavors. Stir in a few drops of pure vanilla extract, a hint of almond extract, or even a tiny amount of a non-alcohol peppermint extract into your melted chocolate for a different taste sensation.
- Serving Suggestions: Chocolate covered raspberries are perfect on their own as a simple dessert or elegant snack. They also make a fantastic garnish for cheesecakes, tarts, ice cream sundaes, or even as a sophisticated edible decoration on a platter of fresh fruit.
- Work Quickly: While you don’t want to rush and be messy, chocolate sets relatively fast, especially on cool raspberries. Try to work at a steady pace to ensure all your berries are dipped before the chocolate becomes too firm to work with.
Storage
Once you’ve gone through the effort of creating these delightful chocolate covered raspberries, you’ll want to store them properly to maintain their freshness, texture, and beautiful appearance. Here’s how I keep mine perfect for as long as possible.
- Refrigeration is Best: Chocolate covered raspberries are best stored in the refrigerator. The cool temperature helps the chocolate stay firm and prevents the raspberries from spoiling too quickly.
- Airtight Container: Place the set raspberries in an airtight container. This is crucial for two reasons: it prevents them from absorbing any odors from other foods in your fridge, and it helps to minimize condensation, which can make the chocolate surface appear dull or develop streaks.
- Layer with Parchment Paper: If you need to stack the raspberries, place a layer of parchment paper between them to prevent them from sticking together. While they should be firm once chilled, some transfer of chocolate can still occur if they are pressed directly against each other.
- How Long Do They Last?: When stored correctly in the refrigerator, chocolate covered raspberries are best enjoyed within 2-3 days. While they might still be edible beyond that, the raspberries can start to soften and release more moisture, which can affect the chocolate’s texture and overall appeal.
- Serving Temperature: For the best flavor and texture experience, I like to take them out of the refrigerator about 10-15 minutes before serving. This allows the chocolate to soften just slightly and the raspberry to lose some of its chill, intensifying its sweet-tart taste.
- Freezing (Not Recommended): While you technically could freeze chocolate covered raspberries, I generally don’t recommend it. Freezing and thawing can significantly alter the texture of the raspberries, making them very mushy once defrosted. The chocolate might also develop condensation and lose some of its shine. These treats are definitely at their peak when fresh and refrigerated.
Final Thoughts
There’s something truly magical about the combination of flavors in Chocolate Covered Raspberries, and I hope you’re as excited as I am to make them. This isn’t just another dessert; it’s a little bite of pure joy, perfectly balancing the rich sweetness of chocolate with the bright, tangy burst of fresh raspberries. It’s the kind of treat that looks incredibly impressive but is delightfully simple to create.
Whether you’re looking for an elegant ending to a meal, a delightful afternoon snack, or a thoughtful homemade gift, these Chocolate Covered Raspberries hit all the right notes. They’re a testament to how incredible simple, high-quality ingredients can be when brought together. Trust me, once you experience that delightful crunch of chocolate giving way to the juicy, tart fruit, you’ll understand why I consider this recipe an absolute must-try. Enjoy every single delicious moment!

Easy Chocolate Covered Raspberries – Sweet & Simple Treat
- Total Time: 45 minutes
- Yield: 4 servings
Description
Indulge in the delightful combination of fresh raspberries and rich chocolate with these easy chocolate covered raspberries. Perfect for any occasion, they offer a gourmet experience with minimal effort.
Ingredients
- Fresh Raspberries
- High-Quality Chocolate (chocolate chips, baking bars, or wafers)
- Dark Chocolate (60-75% cacao)
- Milk Chocolate (optional substitution)
- White Chocolate (optional substitution)
- Coconut Oil (optional addition, about ½ to 1 teaspoon per cup of chocolate)
Instructions
- Prepare Your Raspberries: Gently wash your fresh raspberries under cool running water. Spread them out in a single layer on a clean kitchen towel or several layers of paper towels. Allow them to air dry for at least 30 minutes, ensuring they are completely dry.
- Set Up Your Workspace: Line a baking sheet or a large platter with parchment paper or a silicone baking mat to prevent sticking.
- Melt the Chocolate: Use either the double boiler method or the microwave method to melt the chocolate until smooth. If using coconut oil, stir it into the melted chocolate now.
- Dip the Raspberries: Pick up a dry raspberry and dip it into the melted chocolate, rotating it to coat about two-thirds to three-quarters of the berry.
- Remove Excess Chocolate: Lift the raspberry out of the chocolate and gently tap off any excess against the rim of the bowl.
- Place and Repeat: Carefully place the chocolate-covered raspberry onto the prepared baking sheet. Repeat the dipping process with the remaining raspberries.
- Chill to Set: Transfer the baking sheet to the refrigerator and chill for about 15-30 minutes, or until the chocolate is completely set.
- Prep Time: 30 mins
- Cook Time: 15 mins
- Category: Dessert
- Method: No-bake
- Cuisine: American
Nutrition
- Serving Size: 1 raspberry
- Calories: 50
- Sugar: 5 g
- Sodium: 1 mg
- Fat: 3 g
- Saturated Fat: 2 g
- Unsaturated Fat: 1 g
- Trans Fat: 0 g
- Carbohydrates: 6 g
- Fiber: 1 g
- Protein: 1 g
- Cholesterol: 0 mg
Keywords: Ensure raspberries are completely dry before dipping to prevent chocolate from seizing. Use high-quality chocolate for the best flavor and texture. Consider adding toppings like sea salt, chopped nuts, or sprinkles immediately after dipping.


Leave a Comment