
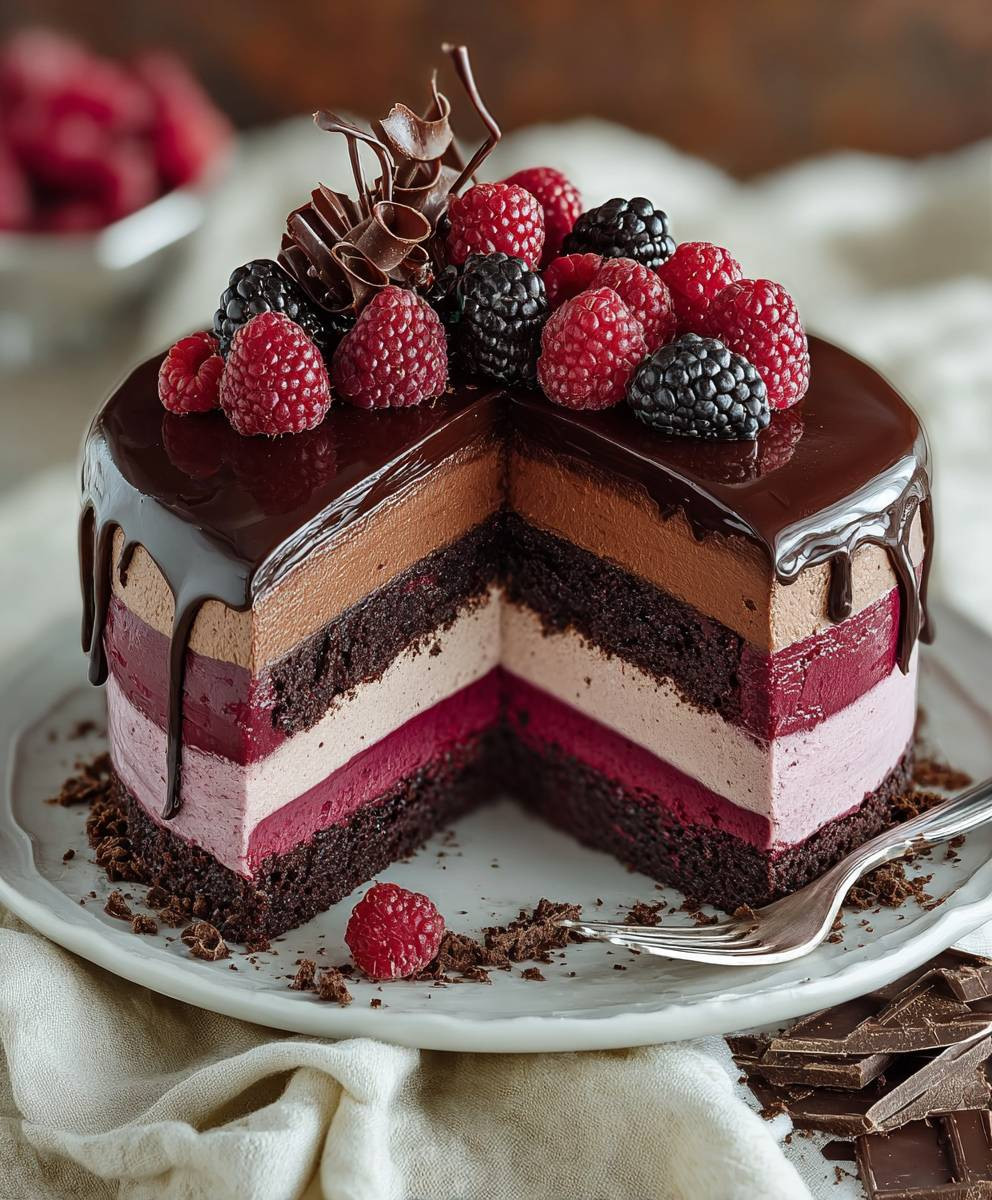
Chocolate Raspberry Mousse Cake: just the name alone conjures images of decadent indulgence, doesn’t it? Imagine sinking your fork into layers of rich, dark chocolate mousse, punctuated by the bright, tangy burst of fresh raspberries, all nestled atop a delicate, melt-in-your-mouth cake base. This isn’t just dessert; it’s an experience!
While the exact origins of mousse cakes are debated, the concept of layering creamy textures with cake has been a culinary pursuit for centuries. The French, of course, have perfected the art of mousse, and their influence is undeniable in this sophisticated treat. The combination of chocolate and raspberry, however, is a timeless pairing that transcends cultures, offering a harmonious balance of sweet and tart that tantalizes the taste buds.
What makes this Chocolate Raspberry Mousse Cake so irresistible? It’s the symphony of textures – the airy lightness of the mousse, the slight chew of the cake, and the juicy pop of the raspberries. It’s also surprisingly versatile. Perfect for a romantic Valentine’s Day dinner, a celebratory birthday bash, or simply a well-deserved treat after a long week, this cake is guaranteed to impress. Plus, while it looks incredibly elegant, with a little patience and this recipe, you’ll find it’s easier to create than you might think. Get ready to wow your friends and family with this stunning dessert!

Ingredients:
- For the Chocolate Cake:
- 2 cups all-purpose flour
- 2 cups granulated sugar
- ¾ cup unsweetened cocoa powder
- 1 ½ teaspoons baking powder
- 1 ½ teaspoons baking soda
- 1 teaspoon salt
- 1 cup buttermilk
- ½ cup vegetable oil
- 2 large eggs
- 2 teaspoons vanilla extract
- 1 cup boiling water
- For the Raspberry Mousse:
- 12 ounces fresh raspberries
- ½ cup granulated sugar
- 1 tablespoon lemon juice
- 2 teaspoons unflavored gelatin powder
- 2 tablespoons cold water
- 1 ½ cups heavy cream, cold
- For the Chocolate Ganache:
- 8 ounces semi-sweet chocolate, finely chopped
- 1 cup heavy cream
- 2 tablespoons unsalted butter, softened
- For Decoration (Optional):
- Fresh raspberries
- Chocolate shavings
- Powdered sugar
Preparing the Chocolate Cake Layers
- Preheat and Prepare: First things first, preheat your oven to 350°F (175°C). Grease and flour two 9-inch round cake pans. This will prevent the cakes from sticking and ensure they release easily after baking. I like to use baking spray with flour already in it for extra insurance!
- Combine Dry Ingredients: In a large bowl, whisk together the flour, sugar, cocoa powder, baking powder, baking soda, and salt. Make sure everything is evenly distributed. This step is crucial for a consistent cake texture.
- Combine Wet Ingredients: In a separate bowl, whisk together the buttermilk, oil, eggs, and vanilla extract. Whisk until well combined.
- Combine Wet and Dry: Gradually add the wet ingredients to the dry ingredients, mixing on low speed until just combined. Be careful not to overmix! Overmixing can lead to a tough cake.
- Add Boiling Water: Slowly pour in the boiling water while mixing on low speed. The batter will be thin, but don’t worry, that’s normal! The hot water helps to bloom the cocoa powder and create a moist cake.
- Divide and Bake: Divide the batter evenly between the prepared cake pans. Bake for 30-35 minutes, or until a wooden skewer inserted into the center comes out clean.
- Cool Completely: Let the cakes cool in the pans for 10 minutes before inverting them onto a wire rack to cool completely. This prevents them from sticking and allows them to cool evenly. Make sure they are completely cool before frosting!
Making the Raspberry Mousse
- Prepare Raspberry Puree: In a saucepan, combine the raspberries, sugar, and lemon juice. Cook over medium heat, stirring occasionally, until the raspberries have broken down and the mixture has thickened slightly, about 10-15 minutes.
- Strain the Puree: Press the raspberry mixture through a fine-mesh sieve to remove the seeds. This will give you a smooth and silky mousse. Discard the seeds.
- Bloom the Gelatin: In a small bowl, sprinkle the gelatin powder over the cold water. Let it stand for 5-10 minutes to soften. This process is called blooming and is essential for the gelatin to work properly.
- Dissolve the Gelatin: Heat the raspberry puree in the saucepan over low heat. Add the bloomed gelatin and stir until completely dissolved. Remove from heat and let cool slightly.
- Whip the Cream: In a large bowl, whip the heavy cream until stiff peaks form. Be careful not to overwhip, or you’ll end up with butter!
- Combine and Chill: Gently fold the cooled raspberry puree into the whipped cream until just combined. Be careful not to deflate the whipped cream. Pour the mousse into a bowl, cover with plastic wrap, and refrigerate for at least 4 hours, or preferably overnight, to set completely.
Preparing the Chocolate Ganache
- Heat the Cream: In a saucepan, heat the heavy cream over medium heat until it just begins to simmer. Do not boil!
- Pour over Chocolate: Place the chopped chocolate in a heatproof bowl. Pour the hot cream over the chocolate and let it sit for 1 minute to soften the chocolate.
- Stir Until Smooth: Gently stir the mixture until the chocolate is completely melted and the ganache is smooth and glossy.
- Add Butter: Stir in the softened butter until it is fully incorporated. This will add richness and shine to the ganache.
- Cool Slightly: Let the ganache cool slightly before using it to frost the cake. This will make it easier to spread. If it gets too thick, you can gently warm it in the microwave for a few seconds.
Assembling the Chocolate Raspberry Mousse Cake
- Level the Cakes: If the cake layers are uneven, use a serrated knife to level them. This will ensure a flat and even cake.
- Place First Layer: Place one cake layer on a serving plate or cake stand.
- Add Mousse: Spread the raspberry mousse evenly over the first cake layer.
- Place Second Layer: Carefully place the second cake layer on top of the mousse.
- Frost with Ganache: Pour the cooled chocolate ganache over the top of the cake, allowing it to drip down the sides. Use an offset spatula to spread the ganache evenly over the top and sides of the cake.
- Decorate (Optional): Decorate the cake with fresh raspberries, chocolate shavings, and a dusting of powdered sugar, if desired. Get creative!
- Chill and Serve: Refrigerate the cake for at least 30 minutes to allow the ganache to set before serving. This will make it easier to slice and serve.
Tips for Success
- Use High-Quality Ingredients: The better the ingredients, the better the cake will taste! Especially for the chocolate and raspberries.
- Don’t Overmix the Cake Batter: Overmixing can lead to a tough cake. Mix until just combined.
- Cool the Cakes Completely: Make sure the cakes are completely cool before frosting to prevent the ganache from melting.
- Chill the Mousse: The mousse needs to be fully set before assembling the cake.
- Adjust Sweetness to Taste: Feel free to adjust the amount of sugar in the raspberry puree and ganache to your liking.
Variations
- Add Chocolate Chips: Add chocolate chips to the cake batter for extra chocolate flavor.
- Use Different Berries: Substitute other berries, such as strawberries or blueberries, for the raspberries.
- Add Liqueur: Add a tablespoon of raspberry liqueur to the raspberry puree for a boozy kick.
- Make it Gluten-Free: Use a gluten-free flour blend to make the cake gluten-free.
Conclusion:
This Chocolate Raspberry Mousse Cake isn’t just a dessert; it’s an experience. The rich, decadent chocolate mousse, perfectly balanced by the tartness of fresh raspberries, creates a symphony of flavors that will leave you and your guests utterly speechless. It’s the kind of cake that elevates any occasion, transforming a simple dinner into a memorable celebration. Trust me, the effort involved is absolutely worth the reward – a slice of pure, unadulterated bliss.
But why is this recipe a must-try? Beyond the incredible taste, it’s surprisingly adaptable. While the recipe as written is a showstopper, feel free to experiment and make it your own. For a more intense chocolate flavor, use dark chocolate with a higher cocoa percentage. Craving something a little different? Substitute the raspberries with blackberries or strawberries for a unique twist. You could even add a layer of crushed Oreos to the base for a delightful textural contrast.
Serving Suggestions and Variations:
* Serve chilled, straight from the refrigerator, for the best mousse consistency.
* Garnish with extra fresh raspberries, a dusting of cocoa powder, or a drizzle of melted chocolate.
* For a more elegant presentation, pipe whipped cream rosettes around the edge of the cake.
* Pair it with a scoop of vanilla ice cream or a dollop of crème fraîche for an extra touch of indulgence.
* Consider serving it with a glass of dessert wine, such as a late-harvest Zinfandel or a port, to complement the rich flavors.
* For a lighter version, use a sugar substitute in the mousse and a reduced-fat cream cheese.
* If you’re short on time, you can use a store-bought chocolate cake as the base.
I truly believe that this Chocolate Raspberry Mousse Cake will become a new favorite in your household. It’s perfect for birthdays, anniversaries, holidays, or simply a special treat for yourself. The combination of textures and flavors is simply irresistible, and the presentation is guaranteed to impress.
Don’t be intimidated by the multiple layers; the recipe is broken down into easy-to-follow steps, and I’m confident that you’ll be able to create a masterpiece. The most important thing is to have fun and enjoy the process. Baking should be a joyful experience, and I hope this recipe brings you just that.
So, what are you waiting for? Gather your ingredients, preheat your oven, and get ready to embark on a culinary adventure. I can’t wait to hear about your experience with this recipe! Please, try this recipe and share your creations with me! Post pictures of your finished cake on social media and tag me. Let me know what variations you tried and how they turned out. I’m always eager to learn from your experiences and see your creative interpretations of my recipes. Happy baking!
Chocolate Raspberry Mousse Cake: A Decadent Delight You'll Love
Decadent chocolate cake layered with a tangy raspberry mousse and topped with a rich chocolate ganache. A perfect dessert for any special occasion!
Ingredients
Instructions
Recipe Notes
- Use high-quality ingredients for the best flavor.
- Don’t overmix the cake batter.
- Cool the cakes completely before frosting.
- Chill the mousse until fully set.
- Adjust sweetness to taste.


Leave a Comment