
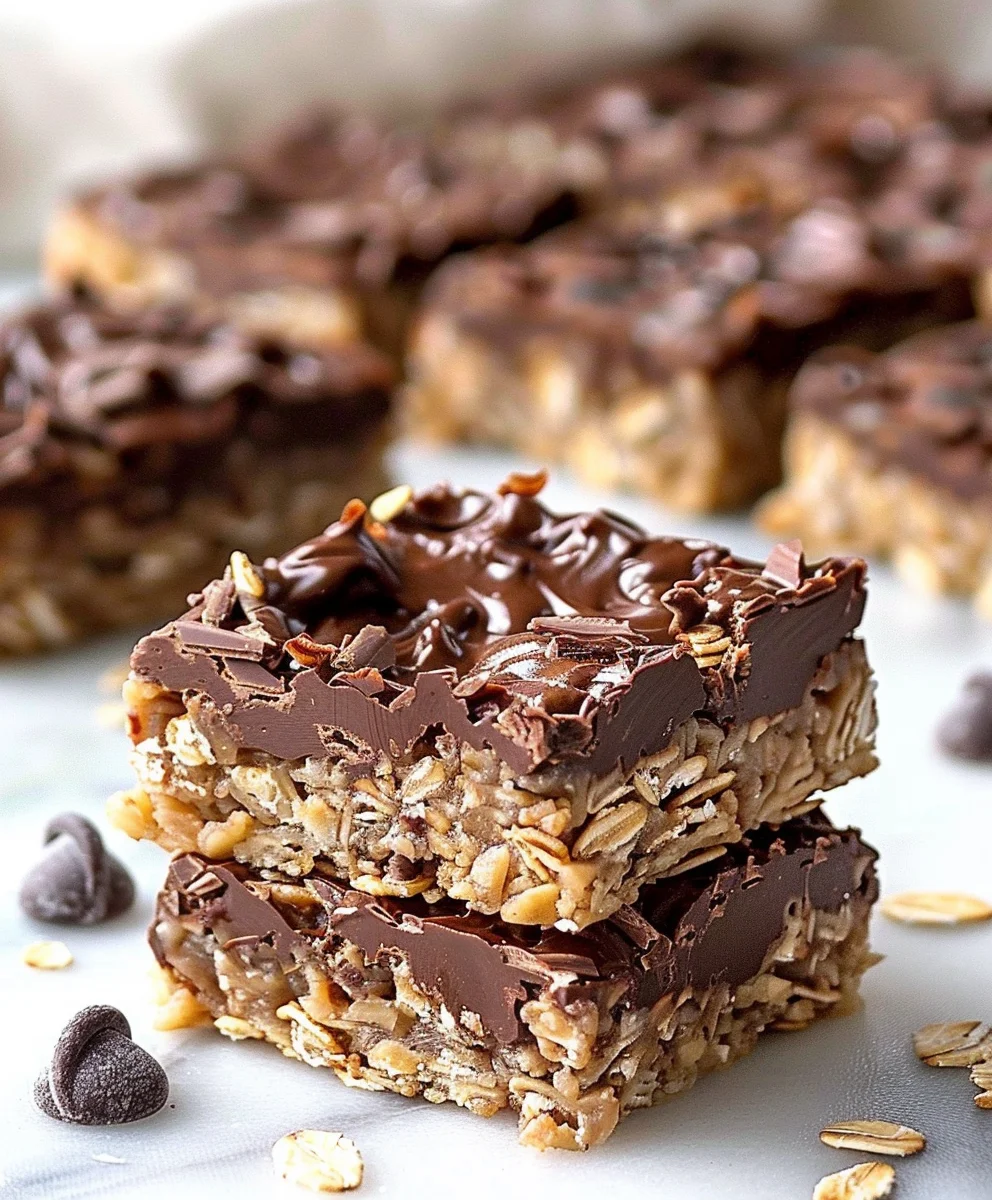
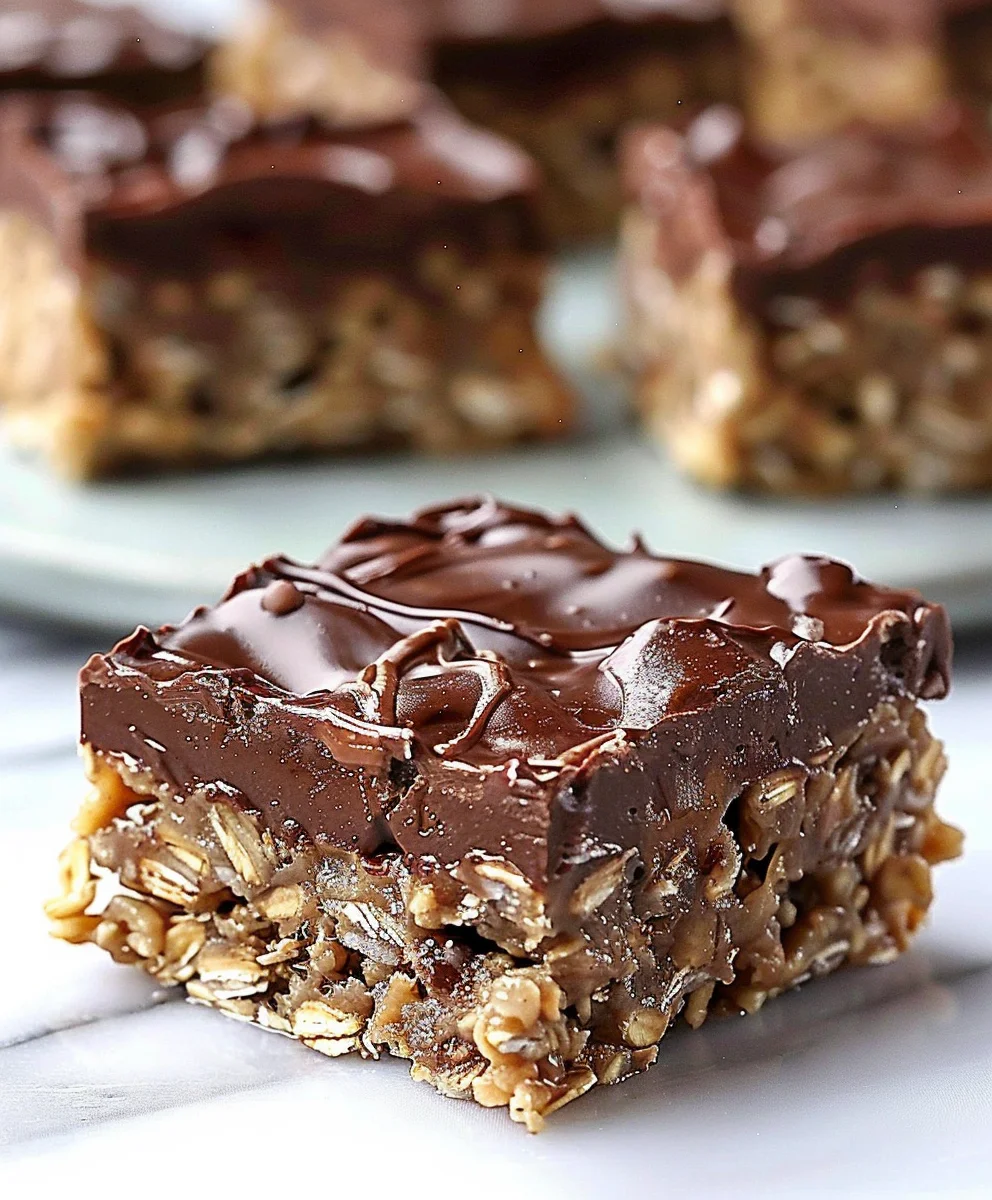
No Bake Chocolate Oatmeal Bars are a true culinary marvel, offering an irresistible blend of rich, fudgy chocolate and wholesome, chewy oats, all without the need to even preheat your oven. I’m genuinely thrilled to share a recipe for these incredibly popular treats that promise both ease and indulgence. Imagine biting into a square that delivers deep chocolatey satisfaction alongside a comforting, tender texture – it’s a delightful experience that has captivated taste buds for generations.
These magnificent bars have earned their place as a cherished dessert in countless households, particularly for their remarkable convenience and universally loved flavor profile. Originating from the genius idea of crafting deliciousness without heating up the kitchen, especially during warmer months or busy schedules, they epitomize effortless entertaining and delightful snacking. People absolutely adore this dish because of its perfect balance of sweetness, the satisfying chewiness of the oats, and the melt-in-your-mouth chocolate – a combination that is simply irresistible.
I find immense joy in how simple yet profoundly satisfying these treats are to make. Whether you’re a novice in the kitchen or a seasoned pro seeking a quick win, mastering these No Bake Chocolate Oatmeal Bars is incredibly rewarding. Get ready to create a batch of these delectable, fuss-free squares that are guaranteed to become a go-to favorite for any occasion.

Ingredients:
- For the Chocolate Oatmeal Base:
- 1 cup (2 sticks or 226g) unsalted butter, cut into 8-10 pieces for easier melting
- 2 cups (400g) granulated sugar
- ½ cup (45g) unsweetened cocoa powder, preferably natural cocoa for rich flavor
- ½ cup (120ml) milk (any kind: whole, 2%, skim, or even non-dairy alternatives like almond or soy milk work beautifully)
- 1 teaspoon pure vanilla extract, a good quality one makes all the difference
- ¼ teaspoon salt, to balance the sweetness and enhance the chocolate flavor
- 3 cups (240g) quick-cooking rolled oats (not instant, not old-fashioned, but quick-cooking for the best texture in these No Bake Chocolate Oatmeal Bars)
- ½ cup (128g) creamy peanut butter (optional, but highly recommended for an extra layer of flavor and chewiness; feel free to omit if you have allergies or prefer a pure chocolate experience)
- Optional Topping (if desired for extra indulgence):
- 1 cup (170g) semi-sweet chocolate chips or chopped chocolate
- 1 tablespoon (14g) unsalted butter
Preparation: Setting Up for Success
- Prepare Your Pan: First things first, let’s get our pan ready. I always reach for a 9×13-inch baking pan for these delightful No Bake Chocolate Oatmeal Bars. Lining your pan is a crucial step that will save you a lot of hassle later. I like to use parchment paper, letting it hang over the sides by a few inches. This creates a convenient “sling” that allows you to easily lift the entire slab of cooled bars right out of the pan. If you don’t have parchment paper, you can lightly grease the pan with butter or cooking spray, but trust me, parchment is the way to go for effortless removal and clean cuts. A well-lined pan ensures your hard work doesn’t stick!
- Measure Your Oats: Before you even think about turning on the stove, measure out your 3 cups of quick-cooking oats into a large, heat-proof mixing bowl. Having them ready to go means you won’t be scrambling once the chocolate mixture is piping hot. This preparation ensures a smooth and efficient process when making your No Bake Chocolate Oatmeal Bars. Having everything pre-measured and ready is a golden rule in no-bake recipes! If you’re using peanut butter, have that measured out and ready in a separate small bowl or directly next to the oats.
Cooking the Rich Chocolate Base
- Combine Wet Ingredients and Sugar: In a large, heavy-bottomed saucepan (I prefer a 3-quart or 4-quart size to prevent overflow when boiling), combine the 1 cup of butter, 2 cups of granulated sugar, ½ cup of unsweetened cocoa powder, ½ cup of milk, and ¼ teaspoon of salt. The heavy bottom helps distribute heat more evenly and reduces the risk of scorching.
- Melt and Stir: Place the saucepan over medium-low heat. Stir constantly with a whisk or a sturdy spoon. Your goal here is to melt the butter completely and dissolve the sugar. Keep stirring until the mixture is smooth and all the ingredients are well incorporated. This step takes a few minutes, so be patient. You’ll see the mixture transform from lumpy and separate to a glossy, unified chocolate liquid. Don’t rush this part; consistent stirring prevents anything from sticking to the bottom of the pan and burning.
- Bring to a Rolling Boil: Once the butter is fully melted and the sugar seems dissolved, increase the heat slightly to medium. Continue stirring frequently. You’re looking for the mixture to come to a full, rolling boil. What exactly is a “rolling boil”? It’s when the bubbles are vigorous and don’t disappear even when you stir them. It’s not just a few gentle bubbles around the edges; it’s a full-on, enthusiastic boil across the entire surface.
- Boil for the Perfect Set: As soon as you achieve that rolling boil, set a timer for precisely 1 minute. You absolutely must continue to boil the mixture for this full minute, stirring constantly to prevent it from scorching. This minute of vigorous boiling is the most critical step for ensuring your No Bake Chocolate Oatmeal Bars set up properly! It allows the sugar to fully dissolve and a bit of moisture to evaporate, creating the perfect consistency for the bars. If you under-boil, your bars might be too soft or crumbly; if you over-boil significantly, they might become too hard or dry. One minute is the sweet spot.
- Remove from Heat and Flavor Boost: Immediately after the 1 minute of boiling is up, remove the saucepan from the heat source. Stir in the 1 teaspoon of pure vanilla extract. The warm chocolate mixture will absorb the vanilla’s aroma beautifully. If you’re using peanut butter, now is the time to add the ½ cup of creamy peanut butter as well. Stir vigorously until the peanut butter is completely melted and smoothly incorporated into the chocolate mixture. The residual heat from the chocolate will melt the peanut butter quickly. This combination creates an irresistible depth of flavor for your No Bake Chocolate Oatmeal Bars.
Combining and Forming the No Bake Chocolate Oatmeal Bars
- Add the Oats: Now for the star of the show! Pour the hot chocolate mixture directly over the 3 cups of quick-cooking oats you pre-measured in the large mixing bowl. Using a sturdy spoon or spatula, fold the oats into the chocolate mixture. You need to work relatively quickly here, as the mixture will start to cool and thicken. Your goal is to coat every single oat flake evenly with the luscious chocolate. Continue mixing until there are no dry spots left and the oats are fully integrated. The mixture will be very thick and sticky, but that’s exactly what you want for perfectly chewy No Bake Chocolate Oatmeal Bars.
- Transfer to the Prepared Pan: Immediately scrape the entire mixture into your prepared 9×13-inch baking pan.
- Press Firmly and Evenly: This is where you put some muscle in! Using the back of a spoon, a spatula, or even your clean, buttered hands (the butter helps prevent sticking), press the oat mixture down into an even layer across the bottom of the pan. You want to pack it down as firmly as possible. The firmer you press, the more cohesive and less crumbly your No Bake Chocolate Oatmeal Bars will be. Pay special attention to the corners and edges to ensure an even thickness throughout. Some people find it helpful to place a piece of parchment or wax paper over the top of the mixture before pressing to prevent sticking to their hands or tools. Smooth the top as much as you can for a neat finish.
Optional Topping (for Extra Indulgence)
- Prepare the Chocolate Topping (if using): If you’re opting for an extra layer of chocolatey goodness, grab a microwave-safe bowl. Add your 1 cup of semi-sweet chocolate chips (or chopped chocolate) and 1 tablespoon of unsalted butter. Microwave on high in 30-second intervals, stirring well after each, until the chocolate is fully melted and smooth. Be careful not to overheat, as chocolate can seize up. Alternatively, you can melt this over a double boiler on the stovetop.
- Spread the Topping: Pour the melted chocolate topping evenly over the pressed oat mixture in the pan. Use an offset spatula or the back of a spoon to gently spread it all the way to the edges. This creates a beautiful, glossy finish and adds another layer of decadent flavor to your No Bake Chocolate Oatmeal Bars.
Chilling, Cutting, and Serving
- Chill for Firmness: This is a crucial waiting period, but it’s worth every minute! Place the pan with your No Bake Chocolate Oatmeal Bars into the refrigerator. Let them chill for at least 2 hours, or ideally, 3-4 hours, until they are completely firm and set. If you’re in a hurry, you can place them in the freezer for about 45-60 minutes, but keep a close eye on them to prevent over-freezing. Proper chilling is what gives these bars their signature chewiness and allows for clean cuts. Patience truly is a virtue for perfectly set No Bake Chocolate Oatmeal Bars!
- Lift and Cut: Once fully chilled and firm, use the parchment paper overhang as handles to gently lift the entire slab of No Bake Chocolate Oatmeal Bars out of the pan and onto a cutting board. This is where that parchment paper lining really shines!
- Slice into Bars: Using a large, sharp knife, cut the slab into individual bars. You can make them as large or as small as you like. I typically cut them into about 24 squares (6 rows by 4 rows) for a good serving size. For really clean cuts, especially if you added a chocolate topping, you can run your knife under hot water for a few seconds and wipe it dry between each cut. This helps melt through the chocolate and prevents cracking.
- Serve and Enjoy: Arrange your beautiful No Bake Chocolate Oatmeal Bars on a serving platter. They’re ready to be devoured! These are wonderful as a quick snack, a lunchbox treat, or a simple dessert. Their rich, fudgy texture and satisfying chewiness make them incredibly popular.
- Storage: Store any leftover No Bake Chocolate Oatmeal Bars in an airtight container at room temperature for up to 3-4 days, or in the refrigerator for up to a week. If you store them in the fridge, I recommend letting them sit out for 10-15 minutes before serving to soften slightly and enhance their texture and flavor. They also freeze beautifully for up to 2-3 months; just thaw at room temperature before enjoying.
Conclusion:
And there you have it, my friends! We’ve journeyed through the incredibly simple, yet profoundly satisfying, process of creating a treat that’s destined to become a staple in your kitchen. If there’s one recipe I genuinely urge you to add to your repertoire this week, it’s this one. Why, you ask? Because these aren’t just any ordinary sweet treats; they represent the perfect convergence of convenience, wholesome ingredients, and undeniable deliciousness. Imagine a world where you can whip up a batch of decadent, chewy, and utterly chocolatey bars without ever having to preheat your oven. That’s the magic we’ve just uncovered!
This recipe is a true game-changer for anyone with a busy schedule but a persistent craving for something homemade and comforting. Forget the endless baking sheets, the precise temperature checks, and the anxiety of potential burning. Our focus today has been on pure, unadulterated ease. These bars are rich, deeply flavorful, and boast a wonderfully satisfying texture that strikes the perfect balance between soft and chewy. The natural sweetness of the oats paired with the indulgent cocoa creates a symphony of flavors that appeals to almost everyone, from the pickiest eaters to the most discerning dessert connoisseurs. They’re perfect for those impromptu sweet cravings, an ideal make-ahead snack for lunchboxes, or a delightful little pick-me-up with your afternoon coffee or tea. Truly, the simplicity of preparation belies the sophisticated taste experience you’re about to enjoy, proving that sometimes, the best things in life are indeed the simplest.
Now, let’s talk about making these delightful bars truly yours. While the core recipe is fantastic as is, part of the joy of home cooking is the freedom to experiment and customize. Consider these just a starting point for your culinary adventures!
Unleash Your Creativity: Serving Suggestions & Variations
For a touch of elegance, try dusting your cooled bars lightly with a sprinkle of cocoa powder or a fine sift of powdered sugar before serving. They also pair wonderfully with a scoop of vanilla bean ice cream for a warm-weather dessert, offering a delightful contrast in temperature and texture. If you’re feeling a bit more adventurous, consider drizzling a thin ribbon of melted white chocolate over the top once the bars have set, adding another layer of visual appeal and a complementary sweetness. These bars also make a fantastic addition to a dessert platter, their rustic charm contrasting beautifully with more elaborate confections.
When it comes to variations within the recipe itself, the possibilities are virtually endless. Think about adding a handful of chopped nuts – toasted pecans, walnuts, or even slivered almonds would introduce a fantastic crunch and an earthy counterpoint to the sweetness. Or, if you prefer dried fruit, a quarter cup of dried cranberries or golden raisins folded into the mixture can add a lovely tang and chewiness. For those who adore coconut, toasted shredded coconut is an absolute dream in these bars, enhancing their tropical notes and adding a delightful texture.
Want to play with flavor extracts? A teaspoon of almond extract can provide a sophisticated depth, while a hint of peppermint extract could transform these into a festive holiday treat, evoking memories of candy canes and winter wonderlands. Even a tiny pinch of sea salt sprinkled on top of the melted chocolate layer before it sets can elevate all the flavors, creating a gourmet touch that really makes them sing and balances the sweetness perfectly. For an extra chocolatey punch, consider stirring in a quarter cup of mini chocolate chips or roughly chopped dark chocolate during the final mixing stage, ensuring every bite is loaded with rich cocoa goodness. You could even swap out a portion of the regular cocoa powder for a Dutch-processed variety for an even darker, richer chocolate flavor that’s almost brownie-like. Don’t be afraid to experiment with different nut butters as well; while peanut butter offers a classic combination, almond butter or cashew butter can create a slightly different, equally delicious profile, catering to various tastes and dietary needs. The beauty of the No Bake Chocolate Oatmeal Bars is their inherent versatility, making them a fantastic canvas for your unique taste preferences and creative whims.
So, what are you waiting for? I wholeheartedly encourage you to dive into your kitchen, gather these simple ingredients, and experience the sheer delight of creating these incredible bars for yourself. They’re quick, they’re easy, and most importantly, they are undeniably delicious. They are the perfect solution for satisfying that sweet tooth without any fuss, proving that you don’t need a lot of time or specialized equipment to create something truly wonderful.
Once you’ve made them, I would absolutely love to hear about your experience! Did you stick to the original recipe, or did you venture into some exciting variations? What did your family and friends think? Please, don’t hesitate to share your thoughts, your successes, and even your creative tweaks in the comments below. Your feedback and personal stories are what truly enrich this culinary community, inspiring us all to try new things and find joy in the process of cooking and baking – even when no baking is involved! Every comment, every shared photo, and every story adds to the vibrant tapestry of our collective love for delicious food. Happy no-baking, everyone! I can’t wait to see your wonderful creations and hear all about your delicious adventures.
No-Bake Chocolate Oatmeal Bars
These No-Bake Chocolate Oatmeal Bars offer a quick, fudgy, and simple treat. Enjoy an irresistible blend of rich chocolate and wholesome, chewy oats without turning on your oven. Perfect for effortless entertaining and delightful snacking, these bars are a beloved classic.
Ingredients
-
1 cup butter
-
1/2 cup brown sugar, packed
-
1 teaspoon vanilla extract
-
3 cups rolled oats
-
1 cup semi-sweet or dark chocolate chips
-
1/2 cup peanut butter
Instructions
-
Step 1
Line a 9×13-inch baking pan with parchment paper, leaving an overhang. Measure 3 cups rolled oats into a large, heat-proof mixing bowl. -
Step 2
In a heavy-bottomed saucepan, combine 1 cup butter, 1/2 cup packed brown sugar, and 1/2 cup peanut butter. Melt over medium-low heat, stirring until smooth and well combined. -
Step 3
Increase heat to medium and bring the mixture to a full, rolling boil. Boil vigorously for exactly 1 minute, stirring constantly to prevent scorching. Immediately remove from heat. -
Step 4
Stir in 1 teaspoon vanilla extract. Pour the hot mixture over the measured oats and 1 cup chocolate chips in the large bowl. Stir quickly until the oats are fully coated and the chocolate chips are melted and smoothly incorporated. -
Step 5
Immediately scrape the mixture into the prepared pan. Press down firmly and evenly across the pan with a spatula or buttered hands to form cohesive bars. -
Step 6
Chill in the refrigerator for at least 2-4 hours, until completely firm. Use the parchment paper overhang to lift the slab onto a cutting board. Cut into 24 squares (or desired size) with a sharp knife. -
Step 7
Serve. Store leftovers in an airtight container at room temperature for 3-4 days, or refrigerated for up to a week. For best texture, let refrigerated bars sit out for 10-15 minutes before serving.
Important Information
Nutrition Facts (Per Serving)
It is important to consider this information as approximate and not to use it as definitive health advice.
Allergy Information
Please check ingredients for potential allergens and consult a health professional if in doubt.

Leave a Comment