
Strawberry Pop Tart Sugar Cookies – what an exciting combination, isn’t it? As someone who cherishes both the simple joy of a perfectly baked sugar cookie and the nostalgic comfort of a classic breakfast pastry, I am absolutely thrilled to share this recipe with you. Imagine taking the beloved, iconic treat from your childhood mornings and transforming it into a tender, buttery sugar cookie, complete with that signature fruity filling and a sweet, glistening glaze. It’s a concept that promises to delight your taste buds and transport you straight back to simpler times.
A Deliciously Nostalgic Twist on a Classic
The Pop Tart, with its distinct fruity center and frosted top, holds a special place in many hearts, a quintessential symbol of American comfort food and a quick, delicious start to the day. By marrying this well-loved sensation with the timeless appeal of a soft sugar cookie, we create something truly magical. People adore this dish not just for its undeniable deliciousness – the harmonious blend of a delicate cookie texture, the gooey strawberry jam, and the satisfying sweetness of the frosting – but also for the sheer inventiveness and the warm, fuzzy feeling of nostalgia it evokes. Every bite of these Strawberry Pop Tart Sugar Cookies is a journey through flavor and memory, offering a unique and incredibly satisfying dessert experience that’s perfect for sharing, or simply savoring all by yourself. Get ready to bake a batch of pure happiness!

Ingredients:
- For the Sugar Cookie Dough:
- 2 ½ cups (300g) all-purpose flour, plus more for dusting
- 1 teaspoon baking powder
- ½ teaspoon salt
- 1 cup (226g) unsalted butter, softened to room temperature
- 1 cup (200g) granulated sugar
- 1 large egg, at room temperature
- 1 teaspoon pure vanilla extract
- For the Strawberry Filling:
- 2 cups (about 300g) fresh strawberries, hulled and finely diced
- ¼ cup (50g) granulated sugar (adjust to your strawberries’ sweetness)
- 1 tablespoon fresh lemon juice
- 1 tablespoon cornstarch
- 2 tablespoons water
- For the Glaze and Decoration:
- 2 cups (240g) powdered sugar, sifted
- 3-4 tablespoons milk (whole milk or cream for a richer glaze)
- ½ teaspoon pure vanilla extract
- Optional: 2-3 drops red food coloring (to achieve that classic Pop Tart pink hue)
- Optional: Rainbow sprinkles, for garnish
Preparing the Perfect Sugar Cookie Dough for Your Strawberry Pop Tart Sugar Cookies
Creating the foundation for these delightful Strawberry Pop Tart Sugar Cookies starts with a sturdy yet tender sugar cookie dough. I always find that taking a little extra time here makes all the difference in the final texture.
- First things first, let’s get our dry ingredients ready. In a medium bowl, I like to whisk together the 2 ½ cups of all-purpose flour, 1 teaspoon of baking powder, and ½ teaspoon of salt. Make sure these are thoroughly combined; this ensures that the leavening agent is evenly distributed, leading to a consistent rise in your cookies. Set this aside for now.
- Now, in a large mixing bowl, either with a stand mixer fitted with the paddle attachment or using a hand mixer, cream together the 1 cup of softened unsalted butter and 1 cup of granulated sugar. I usually do this on medium speed for about 3 to 5 minutes. You’re looking for a mixture that’s light, fluffy, and pale in color. This creaming process is crucial as it incorporates air into the butter and sugar, which contributes to the cookies’ light texture.
- Once the butter and sugar mixture is beautifully light, crack in the large egg. I always make sure my egg is at room temperature because it emulsifies better with the other ingredients, leading to a smoother dough. Add in the 1 teaspoon of pure vanilla extract at this stage too. Continue to beat on medium speed until everything is well combined, scraping down the sides of the bowl as needed to ensure no pockets of unmixed ingredients remain.
- With the wet ingredients perfectly blended, it’s time to gradually add the dry ingredients to the wet mixture. I typically add about a third of the flour mixture at a time, mixing on low speed just until it’s incorporated before adding the next portion. Be careful not to overmix the dough at this stage! Overmixing can develop the gluten in the flour too much, resulting in tough cookies. You want to stop mixing just as the last streaks of flour disappear and a cohesive dough forms.
- Once the dough comes together, gently gather it into a ball and divide it into two equal portions. Flatten each portion into a disk, wrap them tightly in plastic wrap, and place them in the refrigerator. I recommend chilling the dough for at least 1 hour, but honestly, 2 hours or even overnight is even better. Chilling the dough solidifies the butter, which prevents the cookies from spreading too much in the oven, and it also allows the flavors to meld beautifully. This step is non-negotiable for perfectly shaped Strawberry Pop Tart Sugar Cookies!
Crafting the Luscious Strawberry Filling
The heart of our Strawberry Pop Tart Sugar Cookies is, of course, the vibrant strawberry filling. I love to make mine from scratch because you can control the sweetness and achieve that authentic fruity flavor.
- Start by preparing your strawberries. Hull and finely dice 2 cups of fresh strawberries. The smaller the dice, the smoother your filling will be, which is ideal for spreading evenly within the cookie “pop tarts.”
- In a small saucepan, combine the diced strawberries, ¼ cup of granulated sugar, and 1 tablespoon of fresh lemon juice. The lemon juice is key; it brightens the strawberry flavor and helps balance the sweetness. Place the saucepan over medium heat.
- Bring the mixture to a gentle simmer, stirring occasionally. As the strawberries cook, they will release their juices and soften. I usually let this simmer for about 5 to 7 minutes, or until the strawberries are very soft and the liquid has thickened slightly. If you prefer a smoother filling, you can use a potato masher or the back of a spoon to gently mash some of the strawberries as they cook. For a very smooth filling, an immersion blender can be used briefly, but I personally enjoy a few small chunks of fruit.
- While the strawberries are simmering, in a small separate bowl, whisk together 1 tablespoon of cornstarch with 2 tablespoons of cold water to create a slurry. This cornstarch slurry is our secret weapon for thickening the filling without making it gummy.
- Once the strawberries are cooked to your desired consistency, slowly pour the cornstarch slurry into the simmering strawberry mixture, stirring constantly. Continue to cook for another 1 to 2 minutes, stirring, until the filling visibly thickens. It should coat the back of a spoon and resemble a thick jam.
- Remove the saucepan from the heat and transfer the strawberry filling to a shallow bowl or plate. It is absolutely crucial to allow the filling to cool completely before using it. If the filling is still warm, it will make your cookie dough soft and difficult to work with, and it can cause your cookies to spread excessively in the oven. I often make the filling an hour or two in advance or even the day before and let it chill in the refrigerator.
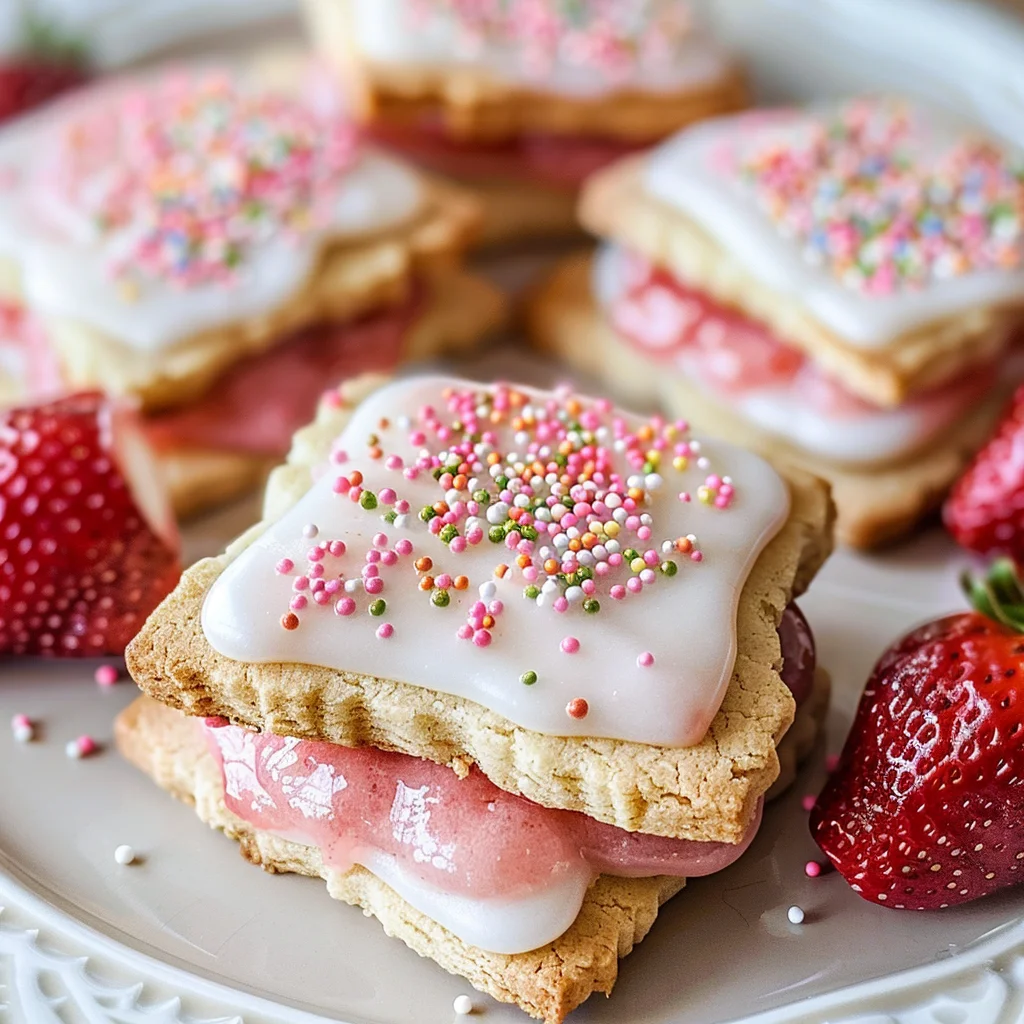
Assembling the Adorable Strawberry Pop Tart Sugar Cookies
This is where the magic happens! Turning our dough and filling into recognizable Strawberry Pop Tart Sugar Cookies. This step requires a bit of patience and precision, but the result is incredibly rewarding.
- Preheat your oven to 375°F (190°C). Line two baking sheets with parchment paper or silicone baking mats. This prevents sticking and ensures even baking.
- Retrieve one disk of chilled sugar cookie dough from the refrigerator. On a lightly floured surface, roll out the dough to about ¼ inch thickness. I find that rolling between two pieces of parchment paper can make this process cleaner and prevent the dough from sticking too much.
- Using a sharp knife, a pastry wheel, or a rectangular cookie cutter (approximately 2×3 inches or similar dimensions, mimicking a small Pop Tart), cut out as many rectangles as you can from the rolled dough. I usually aim for a specific size, but feel free to adjust to your preference. Remember, you’ll need two rectangles per cookie: one for the bottom and one for the top. Gather the dough scraps, gently re-roll them, and cut out more rectangles until all the dough is used from that first disk.
- Carefully transfer half of your cut-out dough rectangles to the prepared baking sheets. These will be the bottom layers of your Strawberry Pop Tart Sugar Cookies. Space them about 1 to 2 inches apart.
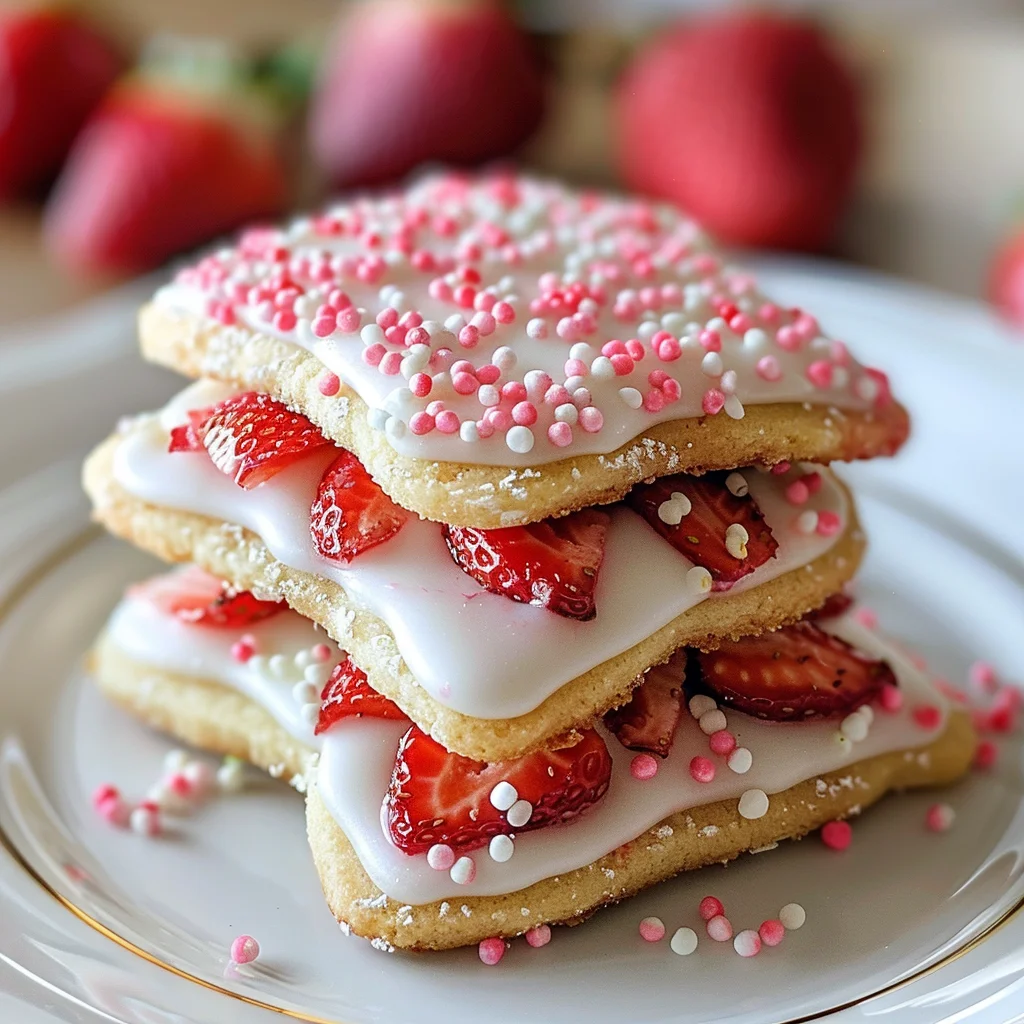
- Now, take your completely cooled strawberry filling. Place a small spoonful (about ½ to 1 teaspoon, depending on the size of your rectangles) of filling onto the center of each bottom cookie rectangle. Be careful not to overfill, and leave a clear border of about ¼ inch around the edges. This border is essential for sealing the cookies.
- Take the remaining half of your dough rectangles. Using a small sharp knife or a skewer, gently cut three small slits or prick three small holes in the center of each top cookie rectangle. This serves two purposes: it allows steam to escape during baking, preventing the cookies from puffing up unevenly, and it gives them that classic Pop Tart vent look.
- Carefully place a top cookie rectangle over each filled bottom rectangle, aligning the edges as best as you can. Using a fork, gently press down around all four edges of each cookie. This crimping action seals the filling inside and creates that iconic Pop Tart rim. Be firm enough to seal but not so firm that you tear the dough.
- Repeat the rolling, cutting, filling, and sealing process with the second disk of chilled dough.
- Bake the Strawberry Pop Tart Sugar Cookies for 10 to 12 minutes, or until the edges are lightly golden and the centers are set. Baking times can vary depending on your oven and the thickness of your cookies, so keep a close eye on them.
- Once baked, remove the cookies from the oven and let them cool on the baking sheets for about 5 minutes before carefully transferring them to a wire rack to cool completely. It’s very important that the cookies are completely cool before glazing. If they’re warm, the glaze will melt right off.
Decorating Your Strawberry Pop Tart Sugar Cookies with a Sweet Glaze
The final touch that makes these cookies irresistible is a simple, sweet glaze. This step truly elevates our Strawberry Pop Tart Sugar Cookies to iconic status.
- While your cookies are cooling, let’s prepare the glaze. In a medium bowl, combine 2 cups of sifted powdered sugar, 3 to 4 tablespoons of milk, and ½ teaspoon of pure vanilla extract. I always start with 3 tablespoons of milk and add more if needed, one teaspoon at a time, until I reach the perfect consistency.
- Whisk these ingredients together until the glaze is smooth and free of lumps. You’re looking for a consistency that is thick enough to coat the back of a spoon but still pourable. If it’s too thick, add a tiny bit more milk; if it’s too thin, add a bit more sifted powdered sugar.
- If you want to achieve that classic Pop Tart pink, now is the time to add 2-3 drops of red food coloring. Mix it in until you get your desired shade of pink. I find a light, delicate pink works beautifully with the strawberry theme.
- Once your Strawberry Pop Tart Sugar Cookies are completely cool, it’s time to glaze them. You have a couple of options:
- Dipping Method: My preferred method for a full, even coating. Hold a cooled cookie by its edges and gently dip the top surface into the glaze. Lift it out, let any excess drip off, and then place it back on the wire rack.
- Drizzling Method: If you prefer a lighter touch, you can use a spoon or a small offset spatula to drizzle or spread the glaze over the tops of the cookies.
- Immediately after glazing each cookie (while the glaze is still wet!), if you’re using them, sprinkle a generous amount of rainbow sprinkles over the top. This gives them that festive, playful Pop Tart look that everyone loves.
- Allow the glazed Strawberry Pop Tart Sugar Cookies to sit at room temperature for at least 30 minutes, or until the glaze has fully set and hardened. This ensures a beautiful, non-sticky finish.
- Once the glaze is set, your homemade Strawberry Pop Tart Sugar Cookies are ready to be enjoyed! They are wonderful with a cup of coffee or as a special treat for any occasion.
Conclusion:
I truly hope that by now, you’re feeling as excited as I am about giving this incredible recipe a try! We’ve journeyed through the simple steps to create a treat that is undeniably unique, irresistibly delicious, and surprisingly straightforward to master. Ultimately, what makes these Strawberry Pop Tart Sugar Cookies truly special is their ingenious blend of classic comfort and whimsical innovation. It’s the kind of dessert that stops conversations, sparks joy, and becomes an instant favorite for anyone who tastes it. Imagine the delighted expressions when friends and family discover that familiar, nostalgic Pop Tart flavor nestled within a soft, chewy sugar cookie – it’s a delightful surprise that truly sets this recipe apart from your everyday bake.
There’s a magical alchemy that happens when the crisp, sugary crust of a Pop Tart meets the tender chewiness of a perfect sugar cookie. It’s a symphony of textures and flavors that dances on your palate, bringing back cherished childhood memories while simultaneously creating new, delicious ones. The sweet, fruity burst from the strawberry filling, perfectly complemented by the subtle vanilla of the cookie base, and then topped with that iconic, slightly crunchy glaze – it’s simply irresistible. This isn’t just a cookie; it’s an experience, a little slice of joy that proves two good things can indeed be better together. It’s a guaranteed crowd-pleaser and a conversation starter, making it an absolute must-try for your next baking adventure.
Serving Them Up: More Than Just a Cookie!
While these delightful creations are perfect for simply grabbing and munching straight off the cooling rack, there are so many wonderful ways to enjoy and serve your freshly baked cookies. Picture them alongside a steaming mug of coffee or tea for an elevated afternoon treat, or perhaps as the perfect accompaniment to a tall glass of cold milk for that classic, comforting experience. They make a fantastic addition to any dessert platter for parties, potlucks, or family gatherings, and I can tell you from experience, they always disappear first! If you’re feeling extra indulgent, try warming them slightly in the microwave for a few seconds to bring out the gooey center, then serve them with a scoop of vanilla bean ice cream. The contrast of warm cookie and cold ice cream is absolutely divine. For a lovely homemade gift, package a few up in a pretty box or bag with a ribbon – they’re sure to bring a smile to anyone’s face.
Unleash Your Inner Baker: Creative Variations to Explore
Part of the fun of baking is making a recipe your own, and these cookies are wonderfully adaptable! Don’t feel limited to strawberry; consider experimenting with other Pop Tart flavors. Imagine the delightful twist of using Blueberry Pop Tarts for a fruity blue hue and tangy burst, or even Brown Sugar Cinnamon Pop Tarts for a more spiced, comforting version. If you want to make them even more celebratory, a sprinkle of edible glitter or some colorful sprinkles on top of the glaze right after application can add a festive touch. For those who love a chocolatey kick, you could try using chocolate sugar cookie dough as the base, or even drizzling melted chocolate over the top after the glaze has set. Another fun idea is to make mini versions using smaller cookie cutters and mini Pop Tarts for bite-sized delights that are perfect for snacking or tiny hands. You could even turn them into sandwich cookies by spreading a thin layer of cream cheese frosting between two Pop Tart cookie halves for an extra decadent treat. The possibilities are truly endless, so feel free to get creative and put your own unique spin on this already fantastic recipe.
Your Turn to Bake and Share!
Now, it’s your moment to shine in the kitchen! I genuinely hope you’re inspired to roll up your sleeves and give these fantastic cookies a try. I promise you, the joy of creating something so unique and utterly delicious is incredibly rewarding. Don’t hesitate to dive in; you truly won’t regret it! Once you’ve baked your batch of these magnificent cookies, I would absolutely love to hear about your experience. Did you try a fun variation? What did your family and friends think? Share your successes, your learning moments, and any creative twists you came up with. Your feedback and stories inspire me and our entire baking community. Happy baking, my friends!
Strawberry Pop Tart Sugar Cookies
Imagine taking the beloved, iconic Pop Tart from your childhood mornings and transforming it into a tender, buttery sugar cookie, complete with a signature fruity filling and a sweet, glistening glaze. These Strawberry Pop Tart Sugar Cookies offer a delicious blend of delicate cookie texture, gooey strawberry jam, and satisfying sweetness, evoking warmth and nostalgia with every bite.
Ingredients
-
2 ¾ cups all-purpose flour
-
1 teaspoon baking soda
-
½ teaspoon baking powder
-
½ teaspoon salt
-
1 cup unsalted butter, softened
-
1 cup granulated sugar
-
2 large eggs
-
1 teaspoon vanilla extract
-
½ teaspoon almond extract (optional)
-
¾ cup strawberry jam or preserves
-
1 cup powdered sugar
-
2-3 tablespoons milk
-
Sprinkles (for decoration)
-
Optional: Red food coloring
Instructions
-
Step 1
Whisk together flour, baking soda, baking powder, and salt. In a separate bowl, cream softened butter and granulated sugar until light and fluffy (3-5 mins). Beat in eggs, then vanilla extract and optional almond extract until well combined. Gradually add dry ingredients to wet mixture, mixing on low speed until just combined. Do not overmix. -
Step 2
Gather dough into a ball, divide in half, and flatten each into a disk. Wrap tightly in plastic wrap and refrigerate for at least 1 hour, preferably 2 hours or overnight. Chilling is crucial for perfectly shaped cookies. -
Step 3
Preheat oven to 375°F (190°C) and line baking sheets with parchment. On a lightly floured surface, roll out one disk of chilled dough to ¼ inch thickness. Cut into 2×3-inch rectangles. Transfer half of the rectangles to baking sheets for bottom layers. Place ½ to 1 teaspoon of strawberry jam in the center of each, leaving a ¼ inch border. Cut three small slits in the remaining dough rectangles (these will be top layers). Place top rectangles over jam-filled bottoms, aligning edges. Crimp all four edges with a fork to seal. -
Step 4
Bake for 10-12 minutes, or until edges are lightly golden and centers are set. Let cool on baking sheets for 5 minutes, then transfer to a wire rack to cool completely before glazing. -
Step 5
In a medium bowl, whisk 1 cup sifted powdered sugar, 2-3 tablespoons milk, and ½ teaspoon vanilla extract until smooth. Add optional red food coloring for a pink hue. Dip cooled cookies into glaze or spread with a spoon. Immediately top with sprinkles while glaze is wet. Allow glaze to set at room temperature for at least 30 minutes before serving.
Important Information
Nutrition Facts (Per Serving)
It is important to consider this information as approximate and not to use it as definitive health advice.
Allergy Information
Please check ingredients for potential allergens and consult a health professional if in doubt.


Leave a Comment