
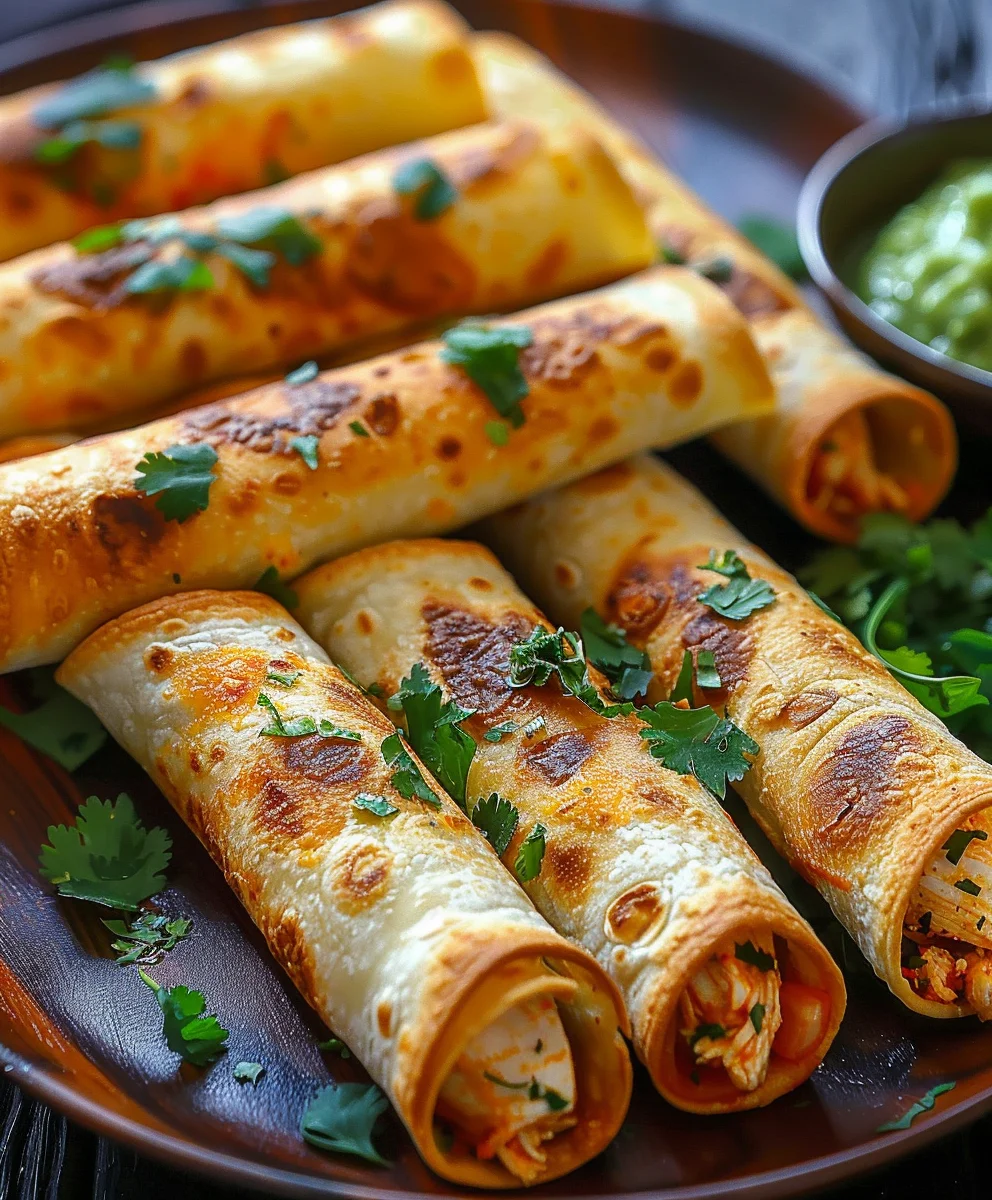
Crunchy Oven Baked Chicken Taquitos Recipe is more than just a dish; it’s an invitation to experience a symphony of textures and flavors right in your own kitchen. I vividly remember the first time I perfected these golden, crisp delights – the sheer satisfaction of biting into a perfectly rolled, oven-baked tortilla, revealing a savory, seasoned chicken filling. This beloved dish, deeply rooted in Mexican culinary traditions, offers a fantastic blend of convenience and authentic taste, making it a staple for family dinners and casual gatherings alike.
The Genius of Taquitos: Simplicity Meets Culinary Delight
While taquitos are traditionally deep-fried, our focus on an oven-baked method ensures that irresistible crunch without the extra oil, making them a healthier, mess-free alternative that truly shines. Everyone loves the harmonious combination of a shatteringly crisp exterior with a tender, flavorful interior, and I’m confident that this Crunchy Oven Baked Chicken Taquitos Recipe will quickly become a cherished favorite in your recipe repertoire. Get ready to transform simple ingredients into something truly extraordinary that your family and friends will rave about!

Ingredients:
- For the Chicken Filling:
- 1.5 pounds (about 680g) boneless, skinless chicken breasts or thighs (I often prefer thighs for a bit more moisture and flavor, but breasts work beautifully too!)
- 1 tablespoon olive oil or avocado oil
- 1 medium yellow onion, finely diced
- 3 cloves garlic, minced (fresh garlic really makes a difference here!)
- 1 teaspoon ground cumin
- 1 teaspoon chili powder
- ½ teaspoon smoked paprika (for that lovely smoky depth!)
- ½ teaspoon dried oregano
- ¼ teaspoon cayenne pepper (optional, for a little kick!)
- ½ teaspoon salt, or to taste
- ¼ teaspoon black pepper, or to taste
- ½ cup chicken broth or the reserved cooking liquid from the chicken
- 1 cup shredded Monterey Jack cheese (or a Mexican blend, cheddar also works if that’s what you have on hand)
- 2 tablespoons fresh cilantro, chopped (optional, for a burst of freshness)
- For the Taquitos:
- 24-30 corn tortillas (I find white or yellow corn tortillas equally delicious for this recipe, just ensure they are pliable!)
- 2-3 tablespoons olive oil or avocado oil, for brushing (this is our secret to that amazing crunch!)
- Optional Garnishes:
- Sour cream or Greek yogurt
- Salsa (your favorite kind!)
- Guacamole or sliced avocado
- Fresh cilantro, chopped
- Lime wedges
- Pico de Gallo
Preparing the Flavorful Chicken Filling
Creating a truly delicious filling is the heart of any great taquito. For our Crunchy Oven Baked Chicken Taquitos Recipe, we want a filling that’s rich in flavor, perfectly seasoned, and moist enough to prevent dry taquitos, but not so wet that it makes our tortillas soggy. This process starts with perfectly cooked chicken.
- Cook the Chicken: Place your boneless, skinless chicken breasts or thighs in a medium pot. Cover the chicken with water or chicken broth. Add a pinch of salt and any aromatics you like, such as a bay leaf or half an onion, for extra flavor. Bring the liquid to a gentle simmer over medium heat, then reduce the heat to low, cover, and let it poach for about 15-20 minutes, or until the chicken is cooked through and easily shreds. The internal temperature should reach 165°F (74°C). Once cooked, remove the chicken from the pot and let it cool slightly on a cutting board, reserving about ½ cup of the cooking liquid – this liquid is a hidden gem for adding moisture and flavor back into our filling!
- Shred the Chicken: Once the chicken is cool enough to handle, it’s time to shred it. You have a couple of options here. You can use two forks to pull the chicken apart, which is a classic method. Simply hold one fork steady on the chicken and use the other to pull the meat into small, even strands. For a quicker, more efficient method, especially if you’re making a larger batch, you can use a stand mixer with the paddle attachment. Place the slightly cooled chicken in the mixer bowl and run it on low speed for about 30-60 seconds until all the chicken is beautifully shredded. We’re aiming for small, manageable pieces that will be easy to roll into our taquitos.
- Sauté Aromatics: In a large skillet or Dutch oven, heat 1 tablespoon of olive oil over medium heat. Add the finely diced yellow onion and cook, stirring occasionally, for 5-7 minutes until it becomes soft and translucent. We want to gently coax out the sweetness from the onion, which forms a fantastic base for our other flavors.
- Bloom the Spices and Add Garlic: Once the onion is tender, add the minced garlic, ground cumin, chili powder, smoked paprika, dried oregano, and cayenne pepper (if using). Stir constantly for about 1 minute until the spices are incredibly fragrant. This step, known as “blooming” the spices, dramatically enhances their flavor by lightly toasting them in the hot oil. Be careful not to burn the garlic!
- Combine and Simmer: Add the shredded chicken to the skillet with the sautéed aromatics and spices. Pour in ½ cup of the reserved chicken cooking liquid or fresh chicken broth. Stir everything together until the chicken is thoroughly coated in the spice mixture. Bring the mixture to a gentle simmer and let it cook for about 5 minutes, stirring occasionally. This allows all the beautiful flavors to meld together and ensures the chicken absorbs all that deliciousness. Season with salt and black pepper to taste. Remember, it’s easier to add more seasoning later than to remove it!
- Stir in Cheese and Cilantro: Remove the skillet from the heat. Stir in the shredded Monterey Jack cheese until it’s just melted and incorporated into the chicken mixture. If you’re using fresh cilantro, stir that in now too. The residual heat from the chicken will perfectly melt the cheese, creating a wonderfully cohesive and gooey filling. It’s important to let the filling cool slightly before assembling the taquitos. A warm but not piping hot filling is much easier to work with and helps prevent the tortillas from tearing.
Preparing the Tortillas for Rolling
The key to perfect, crack-free taquitos is properly prepared tortillas. Corn tortillas can be notoriously brittle when cold, so we need to soften them to make them pliable enough to roll without tearing. This simple step is absolutely critical for the success of your Crunchy Oven Baked Chicken Taquitos Recipe.
- Soften the Corn Tortillas: Take about 5-6 corn tortillas at a time and wrap them in a damp paper towel. Place the wrapped tortillas on a microwave-safe plate. Microwave on high for 30-45 seconds, or until they are warm and flexible. You want them to be soft and bendy, not crispy or brittle. If you try to roll a cold, dry corn tortilla, it will almost certainly crack, making assembly frustrating. Alternatively, you can lightly brush each tortilla with oil and quickly warm them in a hot skillet for about 15-20 seconds per side until pliable. I personally prefer the microwave method for baked taquitos as it’s less messy and ensures even softness without adding extra oil before assembly. Keep the tortillas wrapped in the damp towel as you work to prevent them from drying out.
- Keep Them Warm and Pliable: As you work through your batch of taquitos, you’ll find that the tortillas start to cool and stiffen. It’s a good practice to only warm a few at a time, or if you’re working quickly, you can re-warm a stack for 15-20 seconds in the microwave if they start to feel stiff again. Maintaining their warmth and flexibility is paramount for preventing tears and ensuring a smooth rolling process.
Assembling the Crunchy Oven Baked Chicken Taquitos
Now for the fun part – bringing all our delicious components together! This is where our Crunchy Oven Baked Chicken Taquitos Recipe really starts to take shape. Precision and a gentle touch will result in beautifully rolled, crispy taquitos.
- Preheat Oven and Prepare Baking Sheet: Preheat your oven to 400°F (200°C). Line one or two large baking sheets with parchment paper or silicone baking mats. This is important to prevent sticking and makes clean-up a breeze. If you don’t have parchment paper, you can lightly grease the baking sheet, but I highly recommend parchment for the best non-stick surface and even browning.
- Fill Each Tortilla: Lay one softened corn tortilla flat on your clean work surface. Spoon about 1.5 to 2 tablespoons of the cooled chicken filling in a line just below the center of the tortilla. Do not overfill! Overfilling makes it difficult to roll tightly and can cause the taquito to burst during baking. The goal is a modest, even line of filling that allows for a snug roll.
- Roll Tightly: Carefully roll the tortilla tightly, starting from the side closest to the filling, working your way up. The key here is tightness. A tight roll helps the taquito hold its shape and contributes significantly to the crispiness we’re aiming for. Ensure the ends of the filling are tucked in as you roll to prevent any escapees during baking.
- Place Seam-Side Down: As you roll each taquito, immediately place it seam-side down on your prepared baking sheet. Placing them seam-side down helps to keep them from unrolling during the baking process. Arrange them in a single layer, leaving a little space between each one to ensure even cooking and airflow. If they are too close, they might steam instead of crisping up.
- Repeat and Arrange: Continue this process with the remaining tortillas and chicken filling until all your taquitos are assembled and neatly arranged on the baking sheets. If you have a lot, you might need two baking sheets, or bake in batches.
- Brush with Oil: This step is absolutely crucial for achieving that signature “crunchy” texture in our Crunchy Oven Baked Chicken Taquitos Recipe. Lightly brush the tops and sides of each assembled taquito with olive oil or avocado oil. You can use a pastry brush or even a clean paper towel dipped in oil. Ensure an even, thin coating over all surfaces. The oil helps them to get beautifully golden brown and incredibly crisp, mimicking the effect of deep-frying without all the extra fat. Don’t skip this step!
Baking the Taquitos to Golden Perfection
The baking process is where the magic truly happens, transforming our soft, filled tortillas into gloriously Crunchy Oven Baked Chicken Taquitos. Proper temperature and timing are essential for achieving that irresistible crispness.
- Initial Bake: Place the baking sheets with your assembled and oiled taquitos into the preheated 400°F (200°C) oven. Bake for 12-15 minutes. During this initial bake, the tortillas will start to dry out, firm up, and begin to turn a light golden color. Keep an eye on them, as oven temperatures can vary.
- Flip and Continue Baking: After 12-15 minutes, carefully remove the baking sheets from the oven. Using tongs, gently flip each taquito over to ensure even crisping on both sides. Return the baking sheets to the oven and continue baking for another 10-15 minutes, or until the taquitos are beautifully golden brown, firm to the touch, and wonderfully crisp all over. You’ll hear a satisfying crunch when you gently tap them! This second bake is key to ensuring both sides are equally crunchy and delicious.
- Achieving Ultimate Crispness: If you find your taquitos aren’t quite as crispy as you’d like, you can bake them for an additional 2-5 minutes, keeping a very close watch to prevent burning. Sometimes, a little extra time makes all the difference. Remember, ovens can vary, so trust your eyes and nose!
- Rest Before Serving: Once baked to perfection, remove the taquitos from the oven. Allow them to cool on the baking sheet for just 2-3 minutes before transferring them to a serving platter. This brief resting period allows them to firm up even further and makes them easier to handle.
Serving Suggestions and Tips for the Best Crunchy Oven Baked Chicken Taquitos
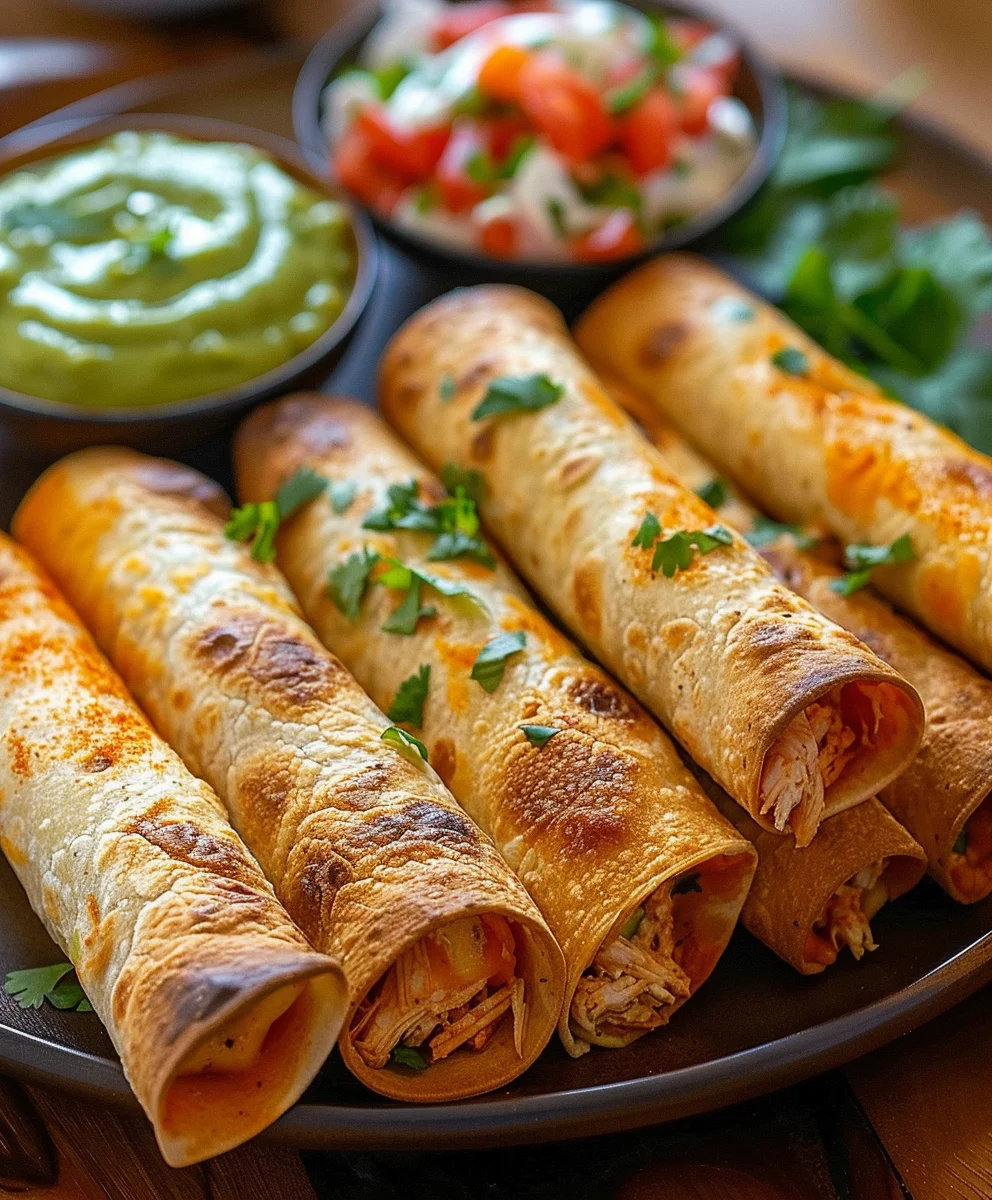
Now that your Crunchy Oven Baked Chicken Taquitos Recipe has come to fruition, it’s time to enjoy them! A fantastic taquito is only made better by the perfect accompaniments, and a few clever tips can elevate your taquito game even further.
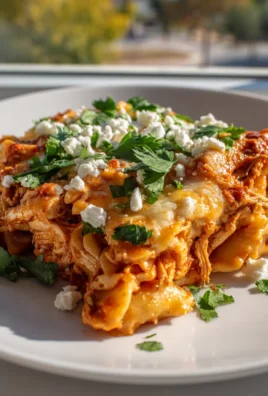
- Classic Toppings: Serve your hot, crispy taquitos immediately with a selection of your favorite toppings. Classic choices include cool sour cream or a lighter Greek yogurt, vibrant salsa (whether it’s a chunky mild or a fiery hot one!), creamy guacamole or simple sliced avocado, and a sprinkle of fresh chopped cilantro. A squeeze of fresh lime juice over the top adds a bright, zesty counterpoint that really wakes up all the flavors.
- Pair with Sides: For a more substantial meal, consider pairing your taquitos with a simple side of Mexican rice, black beans, or a fresh corn and black bean salad. They also make an excellent appetizer for parties!
- For Extra Crispiness:
- Don’t Overcrowd the Pan: Ensure there’s space between each taquito on the baking sheet. If they’re too close, they’ll steam rather than bake, hindering that coveted crunch.
- Even Oil Coating: Be generous but even with your oil brush. Every bit of tortilla needs a thin layer of oil to crisp up properly.
- Hot Oven is Key: Make sure your oven is fully preheated to 400°F (200°C). A hot oven ensures quick, efficient browning and crisping.
- Make-Ahead Tips:
- Chicken Filling: The chicken filling can be prepared up to 2-3 days in advance and stored in an airtight container in the refrigerator. This makes assembly on a busy weeknight a breeze!
- Assembled Taquitos (Refrigerated): You can assemble the taquitos up to 12 hours in advance. Arrange them on a baking sheet, cover loosely with plastic wrap, and refrigerate. When ready to bake, brush with oil and bake as directed, adding a few extra minutes to account for them being chilled.
- Assembled Taquitos (Frozen): For longer storage, assemble the taquitos but do not brush with oil. Place them in a single layer on a baking sheet and freeze until solid (about 1-2 hours). Once frozen, transfer them to a freezer-safe bag or container, separating layers with parchment paper. They can be stored for up to 1 month. To bake from frozen, arrange on a prepared baking sheet, brush with oil, and bake at 400°F (200°C) for 20-25 minutes, flipping halfway through, until golden brown and crispy.
- Reheating Leftovers: The best way to reheat leftover Crunchy Oven Baked Chicken Taquitos and restore their crispiness is in the oven or an air fryer. Pop them into a 350°F (175°C) oven for 8-10 minutes, or air fry at 350°F (175°C) for 5-7 minutes, until heated through and crisp. Microwaving will make them soggy, which we definitely want to avoid!
- Flavor Variations for the Filling: Feel free to customize your chicken filling. Add a small can of drained black beans, some corn kernels, finely diced bell peppers, or even a splash of lime juice to the cooked filling for extra zest. Different cheeses like Oaxaca cheese or a sharp cheddar can also be fantastic.
Conclusion:
So, my fellow food enthusiasts, we’ve reached the delicious conclusion of our culinary journey for today. I truly hope you’re feeling as excited as I am about what we’ve just explored! This isn’t just another dinner idea; it’s a game-changer, a weeknight savior, and a guaranteed crowd-pleaser that you’ll find yourself turning to again and again. Why is this recipe an absolute must-try? Well, first and foremost, it delivers on its promise: incredible flavor packed into a delightfully crunchy shell. We’re talking about that satisfying snap with every bite, followed by a warm, savory, and perfectly seasoned chicken filling that hits all the right notes. Unlike traditional fried versions, opting for the oven makes this a lighter, healthier alternative without sacrificing any of the texture or taste that makes taquitos so beloved. It’s the perfect harmony of indulgence and convenience, allowing you to whip up a fantastic meal without the mess or guilt associated with deep-frying.
I find immense joy in sharing recipes that simplify life without compromising on deliciousness, and this one truly embodies that philosophy. Imagine coming home after a long day and knowing that a batch of these golden, crispy delights can be on your table with minimal fuss. The simple ingredients and straightforward steps mean even novice cooks can achieve stellar results, building confidence in the kitchen while creating something truly memorable. Plus, the sheer versatility of these taquitos makes them adaptable to almost any palate or pantry. Whether you’re looking for a quick appetizer for an impromptu gathering, a fun and interactive family dinner, or a hearty snack for game day, these taquitos fit the bill beautifully. It’s not just a recipe; it’s an experience, a chance to gather around the table and enjoy truly comforting food.
Elevate Your Taquito Experience: Serving Suggestions & Creative Variations
Now that you’ve mastered the art of crafting these magnificent taquitos, let’s talk about how to truly make them shine on your plate. While they are undeniably fantastic on their own, a few simple additions can transform them into a full-fledged feast. My absolute go-to serving suggestion is to pair them with a trio of classic dips: a vibrant, chunky homemade salsa, creamy guacamole bursting with fresh lime and cilantro, and a dollop of cool, tangy sour cream (or Greek yogurt for a lighter option). These condiments provide the perfect counterpoint to the rich chicken filling and crispy exterior.
But why stop there? Let your culinary imagination run wild with these delightful variations! For an extra layer of freshness, try topping your taquitos with finely shredded crisp lettuce, a sprinkle of cotija cheese, or a zesty pico de gallo. Want to amp up the heat? A drizzle of your favorite hot sauce or a sprinkle of pickled jalapeños will do the trick. If you’re feeling adventurous with the filling, consider swapping out some of the chicken for black beans and corn, or adding a touch of smoky chipotle pepper to the chicken mixture for a deeper, more complex flavor profile. You could even experiment with different cheeses; a blend of Monterey Jack and a touch of cheddar adds a lovely melt. For a heartier meal, serve them alongside a simple side of cilantro-lime rice or a refreshing black bean salad. The possibilities are truly endless, allowing you to customize each batch to your specific tastes or to utilize whatever fresh ingredients you have on hand. Don’t be afraid to experiment; that’s where some of the best kitchen discoveries are made!
Your Turn: Try This Crunchy Oven Baked Chicken Taquitos Recipe!
So, there you have it, my friends. I’ve poured my heart into creating and sharing this wonderful recipe, and now it’s your turn to bring it to life in your own kitchen. I genuinely believe that this particular Crunchy Oven Baked Chicken Taquitos Recipe will become a beloved staple in your culinary repertoire. It’s simple, it’s satisfying, and it truly delivers on that irresistible crunch we all crave. There’s something so incredibly gratifying about pulling a tray of perfectly golden, crispy taquitos from the oven, knowing you’ve created something delicious and relatively fuss-free for yourself and your loved ones.
I’m genuinely excited for you to try this one out. Please, don’t keep your culinary triumphs to yourself! I’d absolutely love to hear how your taquitos turned out. Did you try a new dip? Experiment with a different cheese in the filling? Perhaps you discovered a fantastic side dish that pairs perfectly? Your insights and creativity are what make our cooking community so vibrant and inspiring. Head to your kitchen, gather those ingredients, and get ready to create some magic. Once you’ve taken that first glorious bite, please come back and share your experience with me in the comments below. Let’s celebrate the joy of home cooking together!
Crunchy Oven Baked Chicken Taquitos Recipe
Experience a symphony of textures and flavors with these Crunchy Oven Baked Chicken Taquitos. This recipe offers an irresistible crunch without deep-frying, blending convenience and authentic Mexican taste for family dinners or gatherings.
Ingredients
-
1.5 lbs boneless, skinless chicken breasts or thighs
-
1 tbsp olive or avocado oil
-
1 medium yellow onion, finely diced
-
3 cloves garlic, minced
-
1 tsp ground cumin
-
1 tsp chili powder
-
½ tsp smoked paprika
-
½ tsp dried oregano
-
¼ tsp cayenne pepper (optional)
-
½ tsp salt, to taste
-
¼ tsp black pepper, to taste
-
½ cup chicken broth or reserved cooking liquid
-
1 cup shredded Monterey Jack cheese
-
2 tbsp fresh cilantro, chopped (optional)
-
24-30 corn tortillas
-
2-3 tbsp olive or avocado oil, for brushing
Instructions
-
Step 1
Poach 1.5 lbs chicken in water or broth with salt for 15-20 minutes until cooked (165°F/74°C). Reserve ½ cup cooking liquid. Shred chicken using forks or a stand mixer. -
Step 2
Heat 1 tbsp oil in a large skillet. Sauté diced onion for 5-7 minutes until translucent. Add minced garlic, cumin, chili powder, smoked paprika, oregano, and cayenne (optional); cook for 1 minute until fragrant. -
Step 3
Add shredded chicken and ½ cup reserved cooking liquid/broth to the skillet. Simmer for 5 minutes, stirring, until flavors meld. Season with salt and pepper to taste. -
Step 4
Remove from heat. Stir in 1 cup shredded Monterey Jack cheese and 2 tbsp chopped cilantro (optional) until melted. Let filling cool slightly before assembly. -
Step 5
Microwave 5-6 corn tortillas wrapped in a damp paper towel for 30-45 seconds until warm and pliable. Keep tortillas warm and covered as you work to prevent drying. -
Step 6
Preheat oven to 400°F (200°C). Line one or two large baking sheets with parchment paper. -
Step 7
Lay a softened tortilla flat. Spoon 1.5-2 tbsp of cooled chicken filling in a line just below the center. Roll tightly, starting from the side closest to the filling. -
Step 8
Place rolled taquitos seam-side down on the prepared baking sheet, leaving space between each. Lightly brush the tops and sides of all taquitos with 2-3 tbsp olive or avocado oil. -
Step 9
Bake for 12-15 minutes, until the tortillas start to dry and turn light golden. -
Step 10
Carefully flip each taquito. Bake for another 10-15 minutes, or until golden brown, firm, and wonderfully crispy. For extra crispness, bake an additional 2-5 minutes, watching closely. -
Step 11
Remove from oven and let rest on the baking sheet for 2-3 minutes before transferring to a serving platter. Serve hot with optional garnishes like sour cream/Greek yogurt, salsa, guacamole, fresh cilantro, and lime wedges.
Important Information
Nutrition Facts (Per Serving)
It is important to consider this information as approximate and not to use it as definitive health advice.
Allergy Information
Please check ingredients for potential allergens and consult a health professional if in doubt.
Leave a Comment