
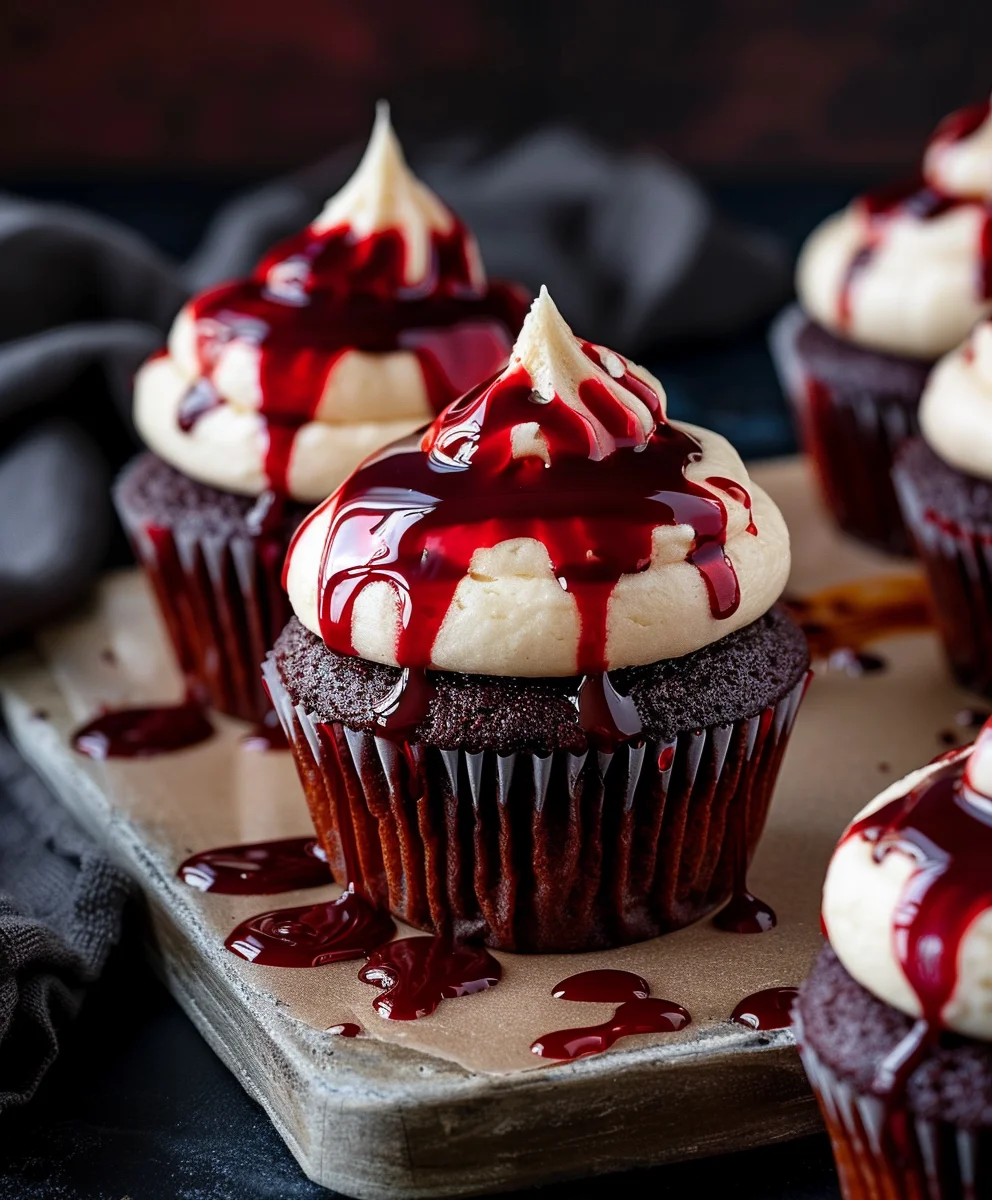
Vampire Bite Halloween Cupcakes are the ultimate spooky treat to sink your teeth into this festive season! As the crisp autumn air heralds the arrival of October, our thoughts inevitably turn to ghoulish delights and deliciously eerie culinary creations. There’s truly nothing quite like a homemade dessert that perfectly captures the playful yet chilling spirit of Halloween, promising both visual spectacle and mouth-watering flavor.
Halloween, with its ancient origins rooted in harvest festivals and traditions of warding off spirits, has beautifully evolved into a beloved time for imaginative costumes, festive decorations, and, of course, wonderfully themed treats. While the concept of a “vampire bite” is a modern, playful take on the holiday, it taps into centuries of captivating folklore surrounding these mysterious creatures of the night, adding a thrilling narrative and a touch of dramatic flair to our dessert tables. It’s a celebration of fantasy that brings joy to all ages.
The Irresistible Allure of Spooky Sweetness
I find that people absolutely adore these cupcakes not just for their strikingly gruesome yet charming appearance, but for the incredible flavor experience they offer. Imagine a perfectly moist vanilla or chocolate cake, crowned with a swirl of rich, creamy frosting, and then – the pièce de résistance – a vibrant, sweet “blood” filling that oozes tantalizingly with every bite. It’s a truly interactive and delicious experience, making these Vampire Bite Halloween Cupcakes an unforgettable centerpiece for any Halloween party. They’re simple enough for bakers of all levels to create, yet impressive enough to wow your guests, combining spooky fun with gourmet taste and a touch of delightful fright.

Ingredients:
For the Vanilla Cupcakes:
- 2 ½ cups (300g) all-purpose flour, sifted
- 1 ½ cups (300g) granulated sugar
- 1 tablespoon baking powder
- ½ teaspoon salt
- 1 cup (226g) unsalted butter, softened to room temperature
- 4 large eggs, at room temperature
- 1 cup (240ml) whole milk, at room temperature
- 2 teaspoons pure vanilla extract
For the Raspberry “Blood” Filling:
- 1 ½ cups (225g) fresh or frozen raspberries
- ¼ cup (50g) granulated sugar (adjust to taste based on raspberry sweetness)
- 2 tablespoons fresh lemon juice
- 1 teaspoon cornstarch dissolved in 1 tablespoon cold water (cornstarch slurry)
- Red food coloring, gel or liquid (optional, for intensified color)
For the Vanilla Buttercream Frosting:
- 1 cup (226g) unsalted butter, softened to room temperature
- 4-5 cups (480-600g) powdered sugar, sifted
- ¼ cup (60ml) heavy cream or whole milk, at room temperature (plus more if needed)
- 2 teaspoons pure vanilla extract
- Pinch of salt
For Decoration:
- White chocolate chips or white candy melts (for fangs)
- Black food coloring gel (for drawing pupil onto eyes if desired)
- Red food coloring gel (for blood drips on frosting, if desired, or use extra raspberry filling)
Before we dive into creating these incredibly spooky and delicious Vampire Bite Halloween Cupcakes, let’s make sure all our ingredients are prepped and ready to go. Having everything at room temperature for the cupcakes and frosting is truly a game-changer for consistency!
Preparing the Vanilla Cupcakes
- Preheat Oven and Prep Pans: First things first, let’s get that oven ready! Preheat your oven to 350°F (175°C). Line two 12-cup muffin tins with paper cupcake liners. I find that using good quality liners really helps prevent sticking and keeps your finished cupcakes looking neat and tidy.
- Whisk Dry Ingredients: In a medium bowl, sift together the all-purpose flour, granulated sugar, baking powder, and salt. Sifting the flour isn’t just for old-school bakers; it genuinely helps prevent lumps and ensures a lighter, fluffier cupcake texture, which is exactly what we want for our Vampire Bite Halloween Cupcakes. Give it a good whisk to ensure everything is evenly combined.
- Cream Butter and Sugar: In a large mixing bowl, using an electric mixer (either a stand mixer with the paddle attachment or a hand-held mixer), cream together the softened unsalted butter and granulated sugar on medium-high speed. Beat them for about 3-5 minutes until the mixture is light in color and fluffy in texture. This step is crucial because it incorporates air into the butter, which contributes to the cupcakes’ tender crumb. Don’t rush this step!
- Add Eggs Gradually: Reduce the mixer speed to medium. Add the eggs one at a time, beating well after each addition. Make sure each egg is fully incorporated into the butter mixture before adding the next. If you add them all at once, the mixture might curdle. Scrape down the sides of the bowl as needed to ensure everything is mixed evenly.
- Alternate Wet and Dry: Now, we’ll alternate adding the dry ingredients and the wet ingredients. With the mixer on low speed, add about one-third of the flour mixture to the butter mixture, and mix until just combined. Then, pour in half of the whole milk and mix until combined. Repeat this process, adding another third of the flour, then the remaining milk, and finally the last third of the flour mixture. After the last addition of flour, mix only until just combined. It’s very important not to overmix the batter at this stage, as overmixing can develop the gluten in the flour too much, leading to tough cupcakes. A few small lumps are perfectly fine!
- Stir in Vanilla: Gently fold in the pure vanilla extract. You can do this by hand with a spatula to avoid overmixing. The aroma alone will start getting you excited for these treats!
- Fill Cupcake Liners: Divide the cupcake batter evenly among the prepared cupcake liners. I usually fill them about two-thirds full. An ice cream scoop works wonders for this, making the process much less messy and helping to ensure uniformly sized cupcakes.
- Bake the Cupcakes: Bake for 18-22 minutes, or until a wooden skewer or toothpick inserted into the center of a cupcake comes out clean. The tops should be lightly golden and spring back when gently touched. Every oven is a little different, so keep an eye on them!
- Cool Completely: Once baked, remove the muffin tins from the oven and let the cupcakes cool in the tins for about 5-10 minutes before transferring them to a wire rack to cool completely. This step is non-negotiable! Attempting to frost or fill warm cupcakes will lead to melted frosting and a messy situation. Patience is a virtue here, especially when creating stunning Vampire Bite Halloween Cupcakes.
Making the Raspberry “Blood” Filling
- Combine Ingredients: In a small saucepan, combine the fresh or frozen raspberries, granulated sugar, and fresh lemon juice. The lemon juice helps to brighten the flavor and provides a lovely counterpoint to the sweetness.
- Simmer and Reduce: Place the saucepan over medium heat and bring the mixture to a gentle simmer. Cook for about 5-7 minutes, stirring occasionally, until the raspberries break down and release their juices. If using fresh raspberries, this might happen a little faster. If you’re using frozen, it will take a bit longer as they thaw and then cook.
- Thicken the “Blood”: Stir in the cornstarch slurry (cornstarch dissolved in cold water). Continue to simmer and stir for another 1-2 minutes, until the mixture thickens to a consistency resembling thick syrup or a thin jam. It should coat the back of a spoon.
- Strain for Smoothness (Optional but Recommended): For a truly realistic “blood” effect that’s smooth and pulp-free, press the raspberry mixture through a fine-mesh sieve into a clean bowl. Use the back of a spoon to push through as much of the liquid as possible, leaving behind the seeds and pulp. This creates a beautifully vibrant and smooth “blood” filling.
- Intensify Color (Optional): If you desire a deeper, more dramatic blood-red color, stir in a tiny amount of red food coloring gel at this stage. Start with just a drop and add more if needed until you achieve your desired shade. Remember, a little goes a long way with gel food coloring!
- Cool the Filling: Allow the raspberry “blood” filling to cool completely to room temperature, and then chill it in the refrigerator for at least 30 minutes. A cold, slightly thickened filling is much easier to work with and less likely to soak into your cupcakes prematurely.
Crafting the Vanilla Buttercream Frosting
- Cream Butter: In a large mixing bowl, using an electric mixer, beat the softened unsalted butter on medium-high speed for 3-5 minutes until it’s light and fluffy. This aeration makes for a wonderfully light and creamy frosting.
- Gradually Add Powdered Sugar: With the mixer on low speed, gradually add the sifted powdered sugar, one cup at a time, mixing until fully incorporated after each addition. Sifting the sugar is crucial here to prevent lumps in your frosting. Once all the sugar is added, increase the speed to medium-high and beat for another 2-3 minutes.
- Add Liquid and Flavor: Pour in the heavy cream (or whole milk) and vanilla extract, and add a pinch of salt. Beat on medium-high speed for an additional 3-5 minutes, until the frosting is light, fluffy, and smooth. The salt helps to balance the sweetness of the sugar.
- Adjust Consistency: If your frosting is too thick, add more heavy cream or milk, one teaspoon at a time, until you reach your desired piping consistency. If it’s too thin, you can add a little more sifted powdered sugar. We want a frosting that holds its shape well for piping but is still smooth and easy to spread for our Vampire Bite Halloween Cupcakes.
- Prepare for Piping: Transfer the vanilla buttercream frosting to a piping bag fitted with your desired tip (a large round tip or a star tip works beautifully for cupcakes).
Assembling Your Vampire Bite Halloween Cupcakes
- Core the Cupcakes: Once your cupcakes are completely cool, it’s time to make room for the blood! Using a cupcake corer, a small sharp knife, or even the back of a wide piping tip, carefully remove the center from each cupcake. You want to create a small well in the middle, deep enough to hold a good amount of filling but not so deep that you go through the bottom. You can either discard the removed cake piece or save it for a little baker’s snack!
- Fill with “Blood”: Spoon or carefully pipe the chilled raspberry “blood” filling into each cored cupcake. Fill them generously, but leave a little room at the top so the frosting can sit nicely. This hidden surprise is what makes these Vampire Bite Halloween Cupcakes so much fun!
- Frost the Cupcakes: Pipe a generous swirl of vanilla buttercream frosting over each cupcake, covering the filled center. You can go for a classic domed swirl or a more rustic look; either way, make sure the frosting is the star of the show.
- Create the “Bite Marks”: This is where the magic happens! Using a small, clean spoon (like a demitasse spoon) or a small, sharp knife, carefully create two small indentations on the side of the frosting swirl, resembling two fang marks. You’re aiming for distinct, slightly deep dents.
- Add the “Bleeding” Effect: Now for the gory part! Carefully spoon a tiny amount of the raspberry “blood” filling (or use red food coloring gel) into and around the “bite marks,” letting it naturally drip down the side of the frosting. You can use a toothpick to gently guide the drips for a more authentic, creepy effect. The key is to make it look a little messy and organic, just like a real vampire bite!
- Prepare the Vampire Fangs: Melt the white chocolate chips or white candy melts according to package directions. You can do this in a microwave-safe bowl in 30-second intervals, stirring well after each, or using a double boiler. Once melted and smooth, transfer the chocolate to a small piping bag or a ziplock bag with a tiny corner snipped off. On a piece of parchment paper, pipe small, triangular fang shapes. Make sure to pipe two fangs for each cupcake. Let them set completely at room temperature or in the refrigerator until firm.
- Attach the Fangs: Once the chocolate fangs are set, carefully peel them off the parchment paper. Gently insert two fangs into the frosting on each side of your “bite marks,” making them protrude outwards, as if a vampire has just taken a chomp. This truly brings the Vampire Bite Halloween Cupcakes to life!
- Final Touches (Optional): For an extra ghoulish touch, you can add tiny chocolate “eyes” or small sprinkles to the top of your cupcakes, or even a little black food coloring dot for pupils on the white fangs themselves to give them a bit more character.
And there you have it! Your spectacular Vampire Bite Halloween Cupcakes are complete, ready to be devoured by all your spooky season guests. These aren’t just desserts; they’re a centerpiece, a conversation starter, and an absolute delight for anyone looking for a fun and festive treat. Enjoy watching everyone’s reaction as they discover the “bloody” center!
Conclusion:
And there you have it, my fellow ghoulish gourmands! We’ve journeyed through the creation of what I truly believe are the most delightful, deliciously spooky treats you could possibly whip up this Halloween season. These aren’t just ordinary cupcakes; they are little masterpieces of macabre fun, guaranteed to be the star of any eerie gathering or a fantastic surprise for a family night in. From their moist, tender crumb to the creamy, decadent frosting, and that unmistakable, dramatic “blood” drip, every element comes together to create a truly unforgettable experience.
I am genuinely so excited for you to try this recipe because it encapsulates everything wonderful about baking for Halloween: it’s visually stunning, incredibly fun to make (especially with little helpers!), and, most importantly, absolutely scrumptious. The joy of seeing people’s reactions when they first lay eyes on these chillingly beautiful desserts, then their delight after the first bite, is truly unparalleled. It’s that perfect blend of playful horror and gourmet taste that makes these particular treats stand out from the crowd. Believe me when I say, once you’ve made these, they’ll become a cherished part of your annual Halloween traditions, year after year. They are surprisingly simple to execute, yet the payoff in terms of visual impact and flavor is off the charts, making you look like a seasoned patissier with minimal effort.
Serving Suggestions & Creative Variations:
Now that you’ve mastered the art of these spooktacular creations, let’s talk about how to make them even more special. For serving, imagine a platter of these incredible cupcakes alongside a steaming cauldron of witch’s brew (perhaps a non-alcoholic punch with dry ice for a smoky effect!). They pair wonderfully with a robust coffee for the adults or a glass of cold milk for the kids. Consider presenting them on a tiered cake stand adorned with fake spiderwebs and plastic spiders to truly enhance the eerie ambiance. For a Halloween dessert buffet, they’d be spectacular alongside chocolate-covered pretzel “witches’ fingers” or ghostly meringue cookies.
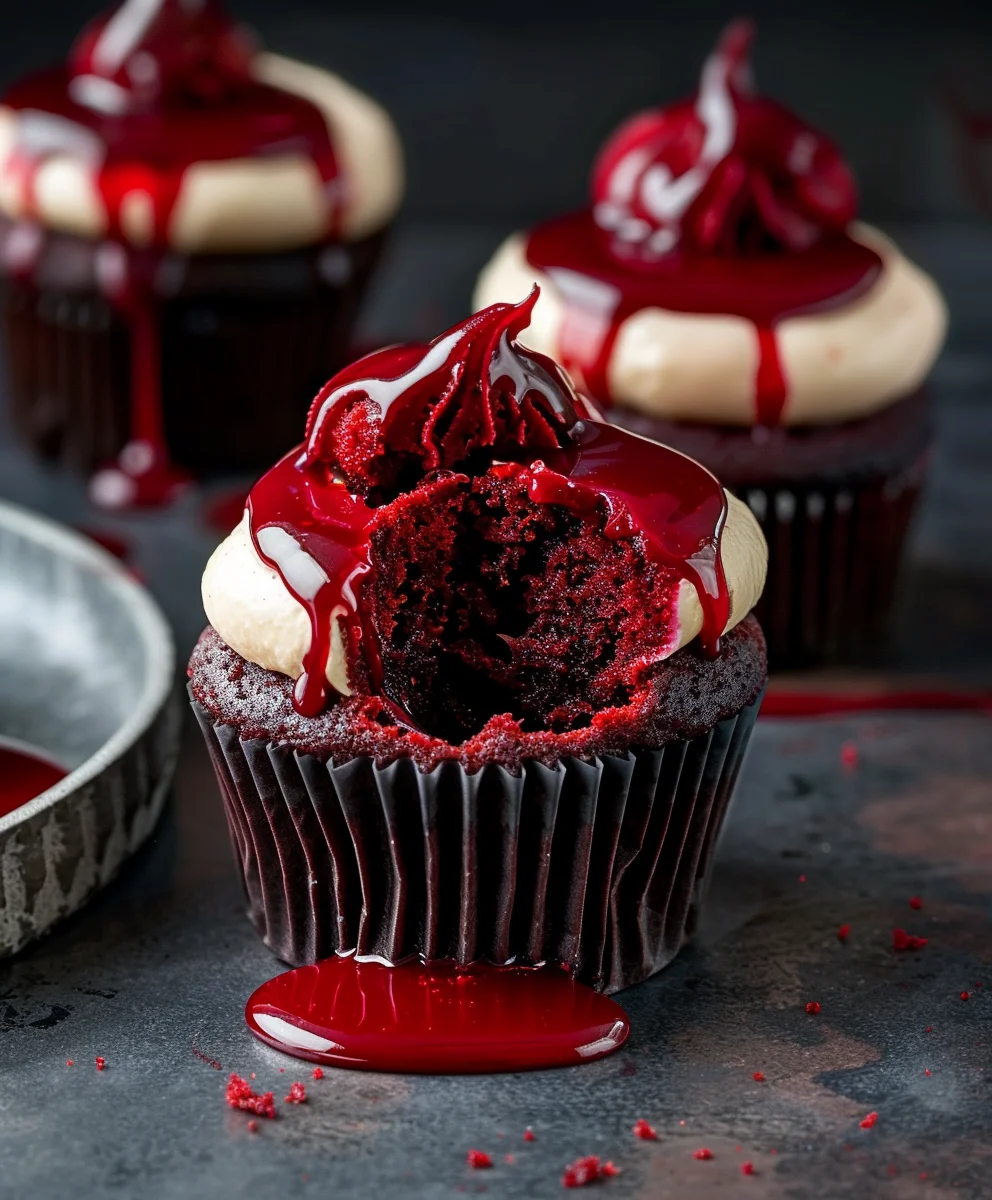
But don’t stop there! The beauty of this recipe lies in its versatility. While the classic presentation is undeniably effective, I encourage you to let your creativity run wild with variations. For a different cake base, consider using a rich red velvet recipe for an even more dramatic “blood” effect, or a deep, dark chocolate cake mix to enhance the gothic vampire theme. Pumpkin spice cake would also be a fantastic seasonal twist, adding warm autumn flavors that beautifully complement the sweet frosting.
When it comes to the “blood” element, while raspberry sauce is fantastic, you could experiment with a cherry pie filling, slightly warmed and thinned with a touch of water, or even a simple strawberry coulis for a different flavor profile. For an adult-only version, a splash of kirsch or a raspberry liqueur stirred into your “blood” sauce would add a delightful boozy kick. As for the fangs, white chocolate shards are elegant, but slivered almonds can also make fantastic, realistic-looking fangs if you’re short on time. For an extra touch of ghastly glamour, sprinkle a little edible glitter (silver or red) over the “blood” for a shimmering, sinister effect. You could also tint your buttercream frosting with different colors – think deep purple, lime green, or even black – to create an entirely new monstrous look. And if you’re baking for those with dietary restrictions, remember that many gluten-free flour blends and dairy-free butter/milk alternatives work beautifully in cupcake recipes, allowing everyone to enjoy these magnificent treats. Don’t be afraid to add other spooky elements like edible sugar eyes, tiny candy bats, or even a dusting of cocoa powder through a spiderweb stencil before adding your “blood” drip.
So, my friends, I implore you: don’t let this Halloween pass without experiencing the joy of creating these show-stopping Vampire Bite Halloween Cupcakes. They are simple to make, incredibly delicious, and offer endless possibilities for customization, ensuring they fit perfectly into your unique celebration. I am absolutely confident that you, your family, and your guests will be utterly enchanted by them.
Please, please, please, once you’ve made them, don’t keep the magic to yourself! I would absolutely love to see your incredible creations. Take photos, share your experiences, tell me about your favorite variations, and let me know how they were received. Your feedback and shared joy are what truly make this whole baking adventure worthwhile for me. Happy baking, and have a wonderfully wicked Halloween!
Vampire Bite Halloween Cupcakes
Vampire Bite Halloween Cupcakes are the ultimate spooky and delicious treat for Halloween! These moist red velvet cupcakes feature a rich vanilla buttercream frosting and a vibrant, sweet red velvet filling that oozes with every bite, creating an unforgettable centerpiece for any Halloween party.
Ingredients
-
1 1/2 cups all-purpose flour
-
1 cup granulated sugar
-
1/2 cup unsalted butter, softened
-
2 large eggs
-
1/2 cup buttermilk
-
2 tbsp cocoa powder
-
1 tbsp red food coloring (gel-based)
-
1 tsp vanilla extract
-
1/2 tsp baking soda
-
1 tsp white vinegar
-
1/4 tsp salt
-
1/2 cup red velvet cake crumbs (from cored cupcakes)
-
1/3 cup sweetened condensed milk
-
1 cup (226g) unsalted butter, softened (for frosting)
-
4-5 cups (480-600g) powdered sugar, sifted
-
1/4 cup (60ml) heavy cream or whole milk
-
2 tsp pure vanilla extract (for frosting)
-
Pinch of salt (for frosting)
-
White chocolate chips or white candy melts (for fangs)
-
Black food coloring gel (optional, for pupil)
-
Red food coloring gel (optional, for blood drips)
Instructions
-
Step 1
Preheat oven to 350°F (175°C). Line two 12-cup muffin tins with paper cupcake liners. -
Step 2
In a medium bowl, whisk together 1 1/2 cups all-purpose flour, 2 tbsp cocoa powder, and 1/4 tsp salt. -
Step 3
In a large mixing bowl, cream 1/2 cup softened unsalted butter and 1 cup granulated sugar until light and fluffy (3-5 minutes). Beat in 2 large eggs one at a time. Stir in 1 tbsp red food coloring gel and 1 tsp vanilla extract. -
Step 4
In a separate small bowl, combine 1/2 cup buttermilk, 1/2 tsp baking soda, and 1 tsp white vinegar. -
Step 5
With the mixer on low speed, gradually add the dry mixture to the butter mixture, alternating with the buttermilk mixture, mixing until just combined after each addition. Do not overmix. -
Step 6
Divide batter evenly among prepared liners, filling about two-thirds full. Bake for 18-22 minutes, or until a toothpick inserted into the center comes out clean. -
Step 7
Cool cupcakes in tins for 5-10 minutes, then transfer to a wire rack to cool completely. -
Step 8
Once cupcakes are completely cool, core them and save the removed cake pieces to create 1/2 cup red velvet cake crumbs. In a small bowl, combine 1/2 cup red velvet cake crumbs and 1/3 cup sweetened condensed milk. Mix well until a thick, spreadable filling forms. Chill filling for at least 30 minutes. -
Step 9
For the frosting: Beat 1 cup (226g) softened unsalted butter until light and fluffy (3-5 minutes). Gradually add 4-5 cups (480-600g) sifted powdered sugar on low speed until incorporated. Increase speed to medium-high and beat for 2-3 minutes. Add 1/4 cup (60ml) heavy cream (or milk), 2 tsp pure vanilla extract, and a pinch of salt. Beat on medium-high speed for 3-5 minutes until light and fluffy. Adjust consistency with more cream or sugar if needed. Transfer to a piping bag. -
Step 10
Spoon or pipe the chilled Red Velvet Filling into each cored cupcake, filling generously. -
Step 11
Pipe a generous swirl of vanilla buttercream frosting over each cupcake, covering the filled center. -
Step 12
Create two small indentations on the side of the frosting swirl using a small spoon or knife, resembling fang marks. Carefully spoon a tiny amount of the Red Velvet Filling (or red food coloring gel) into and around the ‘bite marks,’ letting it naturally drip down the side of the frosting for a bleeding effect. -
Step 13
Melt white chocolate chips or white candy melts. Pipe small, triangular fang shapes onto parchment paper (two fangs per cupcake). Let set completely until firm. Carefully peel fangs off parchment and gently insert two fangs into the frosting on each side of the bite marks, protruding outwards. -
Step 14
Optionally, add tiny chocolate ‘eyes’ or use black food coloring for pupils on the fangs for extra character.
Important Information
Nutrition Facts (Per Serving)
It is important to consider this information as approximate and not to use it as definitive health advice.
Allergy Information
Please check ingredients for potential allergens and consult a health professional if in doubt.

Leave a Comment