
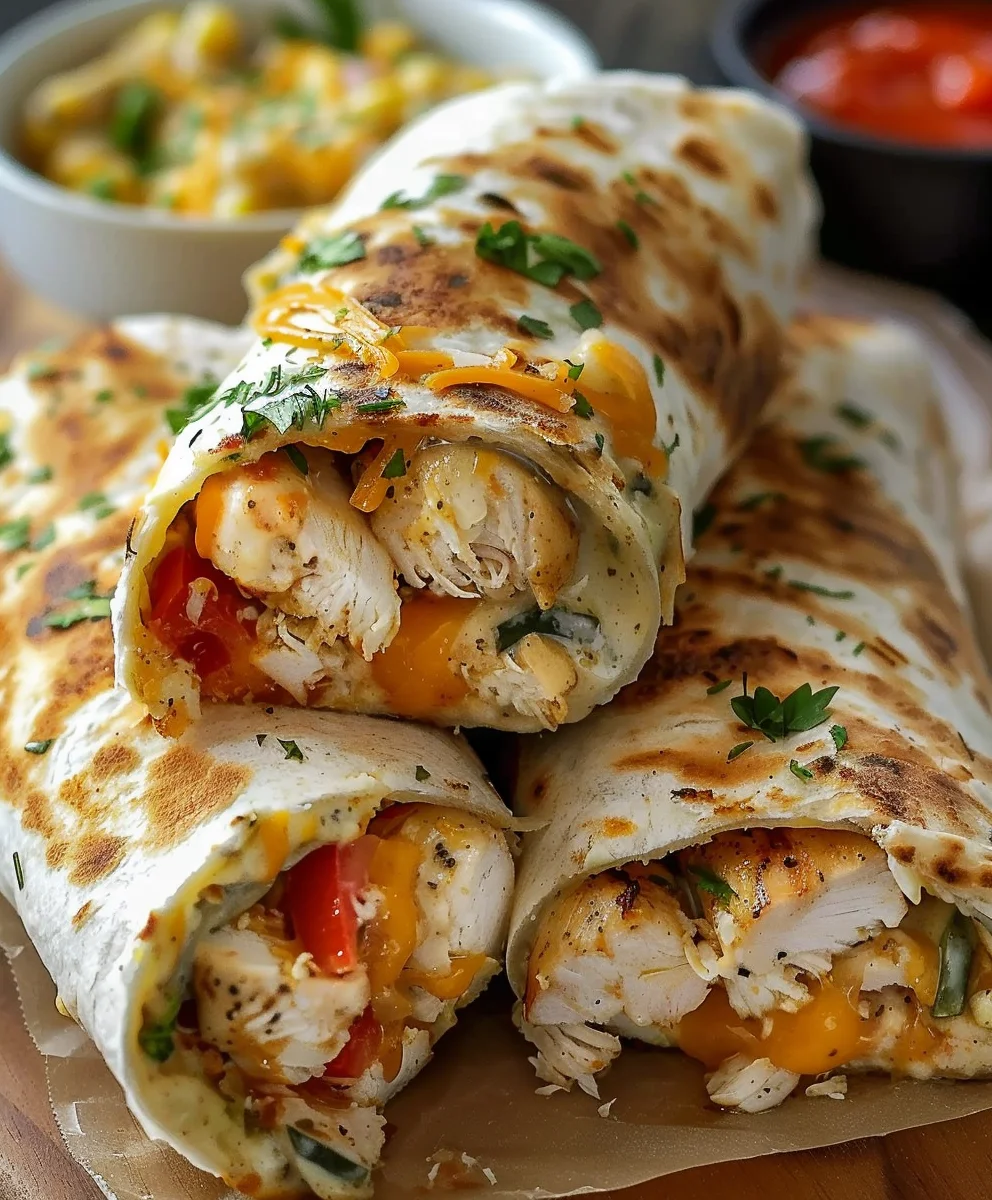
Cheesy Garlic Chicken Wraps are more than just a meal; they are a delightful culinary experience waiting to transform your perception of quick, satisfying dinners. Imagine biting into a warm, soft tortilla, generously filled with succulent, tender chicken enveloped in a rich, melted blanket of cheese, all infused with the irresistible aroma and flavor of fresh garlic. It’s a symphony of textures and tastes that truly elevates a simple wrap into something extraordinary.
A Global Comfort, Reimagined
The concept of wrapping delicious fillings in a thin bread has been a staple across countless cultures for centuries, from the ancient flatbreads of the Middle East to the beloved tortillas of Latin America. This modern iteration, the Cheesy Garlic Chicken Wraps, pays homage to that universal appeal of portable, comforting food, bringing together familiar, cherished flavors in a convenient and utterly crave-worthy package. It’s a dish that resonates with anyone seeking robust flavors without the fuss.
People absolutely adore this dish for myriad reasons. Beyond its incredible taste—the savory chicken, the pungent garlic, and the gooey cheese creating an addictive combination—it offers unparalleled convenience. Perfect for a busy weeknight, a quick lunch, or even an impressive yet effortless gathering, these wraps promise both ease of preparation and immense enjoyment. Get ready to discover your new favorite go-to recipe!

Ingredients:
- For the Garlic Chicken:
- 2 large (about 1.5 lbs) boneless, skinless chicken breasts, or 4 chicken thighs, trimmed
- 2 tablespoons olive oil, plus extra for cooking
- 4 cloves garlic, minced very finely
- 1 teaspoon smoked paprika
- 1/2 teaspoon dried oregano
- 1/2 teaspoon salt
- 1/4 teaspoon black pepper
- For the Ultra-Creamy Cheesy Garlic Sauce:
- 4 tablespoons unsalted butter
- 6 cloves garlic, minced
- 2 tablespoons all-purpose flour
- 1.5 cups whole milk, warmed slightly
- 4 oz cream cheese, softened
- 1 cup shredded sharp cheddar cheese
- 1/2 cup shredded mozzarella cheese
- 1/4 cup finely chopped fresh parsley or chives (or a mix of both)
- 1/4 teaspoon salt (or to taste)
- 1/8 teaspoon black pepper (or to taste)
- A pinch of red pepper flakes (optional, for a subtle kick)
- For the Wraps and Fresh Fillings:
- 8-10 large flour tortillas (10-inch diameter is ideal)
- 2 cups shredded iceberg or romaine lettuce
- 1 large ripe tomato, diced
- 1/4 red onion, thinly sliced or finely diced
- Optional additions: sliced jalapeños, pickles, or extra fresh herbs
Preparation: Marinating and Cooking the Chicken
- Prepare the Chicken: If using chicken breasts, carefully slice each breast horizontally into two thinner cutlets. This helps them cook more evenly and quickly, and makes them easier to slice for the wraps. If using chicken thighs, simply trim any excess fat. Pat the chicken pieces very dry with paper towels; this is a crucial step for achieving a nice sear.
- Marinate the Chicken: In a medium bowl, combine the 2 tablespoons of olive oil, 4 cloves of minced garlic, smoked paprika, dried oregano, 1/2 teaspoon of salt, and 1/4 teaspoon of black pepper. Add the prepared chicken pieces to the bowl, ensuring each piece is thoroughly coated with the marinade. Use your hands to really work the spices into the chicken. Cover the bowl and let it marinate at room temperature for at least 15-20 minutes while you prepare other components, or for up to 2 hours in the refrigerator for deeper flavor. For the absolute best results, I often let it sit in the fridge overnight.
- Cook the Chicken: Heat a large, heavy-bottomed skillet (cast iron or stainless steel works wonderfully) over medium-high heat. Add a tablespoon of olive oil to the hot pan. Once the oil is shimmering, carefully place the marinated chicken pieces into the skillet, ensuring not to overcrowd the pan. You might need to cook the chicken in batches.
- Sear for Flavor: Cook the chicken for about 4-6 minutes per side, depending on thickness, until it’s beautifully golden brown, caramelized, and cooked through. The internal temperature should reach 165°F (74°C). Do not rush this step; a good sear adds immense flavor and texture to your Cheesy Garlic Chicken Wraps. Remove the cooked chicken from the skillet and transfer it to a clean cutting board.
- Rest and Slice: Tent the chicken loosely with aluminum foil and let it rest for at least 5-10 minutes. This resting period is vital, allowing the juices to redistribute throughout the meat, ensuring tender and succulent chicken. After resting, slice the chicken against the grain into thin strips or small bite-sized cubes, whatever your preference for wrapping. Set aside.
Crafting the Cheesy Garlic Sauce
- Melt the Butter and Sauté Garlic: In the same skillet used for the chicken (no need to clean it, those browned bits add flavor!), reduce the heat to medium-low. Add the 4 tablespoons of unsalted butter. Once the butter is melted, add the 6 cloves of minced garlic. Sauté the garlic for about 1-2 minutes, stirring constantly, until it becomes fragrant but not browned. Be careful not to burn the garlic, as burnt garlic can taste bitter.
- Create the Roux: Sprinkle the 2 tablespoons of all-purpose flour over the melted butter and garlic. Whisk continuously for about 1 minute, creating a smooth paste known as a roux. This roux will thicken our sauce beautifully. The goal here is to cook out the raw flour taste.
- Whisk in Milk: Gradually whisk in the slightly warmed whole milk, a little at a time, incorporating each addition fully before adding more. Continue whisking until the sauce is smooth and no lumps remain. The warmth of the milk helps prevent lumps from forming.
- Thicken the Sauce: Increase the heat slightly to medium and continue to whisk frequently. Bring the sauce to a gentle simmer. Let it simmer for 3-5 minutes, or until it visibly thickens to a consistency that coats the back of a spoon. It should be thick enough to cling to ingredients but still pourable.
- Incorporate the Cheeses: Reduce the heat to low. Add the softened cream cheese to the thickened sauce, whisking until it’s completely melted and smooth. Then, gradually add the shredded sharp cheddar cheese and shredded mozzarella cheese, a handful at a time, whisking constantly until each addition is fully melted and incorporated. Keep the heat low during this step to prevent the cheese from seizing or the sauce from breaking. You want a beautifully smooth, velvety cheese sauce.
- Season and Finish: Stir in the chopped fresh parsley or chives, 1/4 teaspoon of salt, 1/8 teaspoon of black pepper, and the optional pinch of red pepper flakes. Taste the sauce and adjust seasonings as needed. If it’s too thick, you can add a tiny splash more milk; if it’s too thin, let it simmer gently for another minute or two. The sauce should be incredibly creamy, garlicky, and rich. Remove from heat and keep warm.
Preparing the Fresh Toppings
- Shred the Lettuce: Wash and thoroughly dry the lettuce. Shred it finely or chop it into bite-sized pieces, whichever you prefer for easy wrapping. Set aside.
- Dice the Tomato: Wash the tomato and dice it into small, uniform pieces.
- Prepare the Red Onion: Peel the red onion and either slice it very thinly into half-moons or finely dice it. If you find raw red onion too strong, you can soak the slices in ice water for 10-15 minutes, then drain and pat dry; this mellows its flavor significantly.
- Gather Optional Toppings: If you’re using any additional toppings like sliced jalapeños or pickles, have them ready and drained.
Assembling Your Cheesy Garlic Chicken Wraps
-
Warm the Tortillas: This is a key step that makes tortillas more pliable and prevents them from cracking when rolled. You can warm them in several ways:
- Microwave: Stack a few tortillas together, wrap them in a damp paper towel, and microwave for 20-30 seconds until warm and steamy.
- Dry Skillet: Heat a dry skillet over medium heat. Place one tortilla at a time in the hot pan for 15-20 seconds per side, until soft and pliable with a few browned spots.
- Oven: Wrap a stack of tortillas in aluminum foil and warm them in a preheated oven at 300°F (150°C) for 10-15 minutes.
Keep the warmed tortillas covered (perhaps in a tortilla warmer or wrapped in a clean kitchen towel) to maintain their warmth and flexibility while you assemble the wraps.
- Layer the Sauce: Lay a warm tortilla flat on a clean surface. Spoon a generous amount of the warm, cheesy garlic sauce down the center of the tortilla, leaving about an inch or two free around the edges. Don’t be shy with the sauce! This is the heart of our “Cheesy Garlic Chicken Wraps.”
- Add the Chicken: Arrange a portion of the sliced or diced cooked garlic chicken over the sauce. Make sure it’s evenly distributed along the length of where you’ll be rolling.
- Pile on the Freshness: Next, add a layer of shredded lettuce, followed by diced tomato and thinly sliced red onion. This provides a crucial textural contrast and a burst of freshness against the rich chicken and sauce. If you have any other desired fillings, now is the time to add them.
- The Art of Rolling: To roll a perfect wrap that won’t fall apart, start by folding in the two opposite sides of the tortilla (the left and right edges) inward over the fillings, by about 1-2 inches. This creates a secure base. Then, tightly fold up the bottom edge of the tortilla over the fillings, pulling it back towards you slightly to compact the contents. Continue to roll tightly upwards, away from you, until you reach the top edge of the tortilla. The goal is a compact, cylindrical wrap. A tight roll is essential to ensure all the delicious fillings stay inside.
- Serve Immediately: Repeat the assembly process for the remaining tortillas. These wraps are best served immediately while the sauce is warm and gooey and the chicken is still tender.
Expert Tips for Perfect Wraps
-
Don’t Skip the Chicken Resting Time:
Seriously, I cannot emphasize this enough. Allowing the chicken to rest for 5-10 minutes after cooking allows the juices to redistribute, resulting in incredibly tender and moist chicken. If you slice it immediately, all those delicious juices will run out onto your cutting board, leaving you with dry meat.
-
Warm Your Tortillas Properly:
Cold or dry tortillas will crack and tear when you try to roll them, leading to a frustrating and messy experience. Warming them makes them pliable and soft, perfect for holding all those delectable fillings. A quick stint in the microwave with a damp paper towel is my go-to method for speed and efficiency.
-
Balance of Flavors and Textures:
The magic of these Cheesy Garlic Chicken Wraps lies in the combination of creamy, savory chicken and sauce with crisp, fresh vegetables. Don’t underestimate the importance of the lettuce, tomato, and onion. They provide a much-needed textural crunch and a refreshing counterpoint to the richness.
-
Control Your Sauce Consistency:
When making the cheesy garlic sauce, ensure it’s thick enough to cling to the chicken and fillings without being overly gloopy. If it’s too thin, it will make the wraps soggy; too thick, and it won’t spread well. Adjust with a little more milk or a bit more simmering time as needed.
-
The Tight Roll Technique:
Practice makes perfect when it comes to rolling wraps. The key is to fold in the sides first, then pull the bottom edge up and over the fillings tightly before rolling upwards. This creates a neat, secure packet that holds everything in.
-
Garlic, Glorious Garlic!
This recipe is called “Cheesy Garlic Chicken Wraps” for a reason! Don’t be afraid to use fresh garlic generously. It’s used in the chicken marinade and the sauce, providing deep, aromatic flavor throughout the dish.
-
Pre-Prep is Your Friend:
To make assembly a breeze, have all your components ready before you start wrapping. Slice the chicken, make the sauce, and chop all your vegetables beforehand. This creates an efficient assembly line for quick, delicious wraps.
Storage and Reheating Advice
While these Cheesy Garlic Chicken Wraps are undoubtedly best enjoyed freshly made, you can certainly prepare components ahead of time or store leftovers, with a few considerations.
-
Storing Individual Components:
- Cooked Chicken: Store cooked and sliced chicken in an airtight container in the refrigerator for up to 3-4 days.
- Cheesy Garlic Sauce: The sauce can be stored in an airtight container in the refrigerator for up to 3-4 days. It will thicken considerably upon chilling.
- Fresh Fillings: Keep shredded lettuce, diced tomatoes, and sliced onions in separate airtight containers in the refrigerator. They are best used within 1-2 days of preparation.
I highly recommend storing the components separately and assembling the wraps just before serving. This prevents the tortillas from becoming soggy and the vegetables from losing their crispness.
-
Reheating the Chicken and Sauce:
- Chicken: Reheat the sliced chicken gently in a skillet over medium-low heat with a tiny splash of water or chicken broth, or in the microwave until just warmed through. Be careful not to overcook, as it can dry out.
- Sauce: Reheat the cheesy garlic sauce gently in a saucepan over low heat, stirring frequently. You will likely need to add a splash of milk or even a tiny bit of water to thin it back to its desired consistency as it warms. Whisk continuously to ensure it remains smooth.
-
Storing Assembled Wraps (Not Recommended for Long-Term):
If you must store assembled wraps, wrap each tightly in plastic wrap or aluminum foil and refrigerate for no more than 1 day. The tortillas will inevitably absorb moisture from the sauce and fillings, becoming softer. The vegetables may also lose some of their crunch. -
Reheating Assembled Wraps (If Stored):
Reheating assembled wraps can be tricky. You can gently warm them in a microwave for 30-60 seconds, being careful not to overheat which can make the tortilla tough. Another option is to warm them in a dry skillet over low heat for a few minutes per side, but this may cause the fresh fillings to wilt. For the best experience, reassemble fresh.
Variations to Customize Your Wraps
The beauty of Cheesy Garlic Chicken Wraps is their versatility! Once you’ve mastered the basic recipe, feel free to get creative and adapt it to your taste preferences or what you have on hand. Here are some ideas:
-
Protein Swaps:
- Turkey: Use ground turkey or sliced turkey breast for a leaner option.
- Beef: Thinly sliced steak (like flank or skirt steak) seasoned with the same garlic and paprika marinade would be incredible.
- Pork: Leftover pulled pork or thinly sliced pork loin can also be a fantastic base.
- Vegetarian Option: For a meatless version, consider using grilled halloumi cheese, roasted chickpeas, or a hearty blend of sautéed mushrooms and spinach seasoned with garlic.
-
Cheese Adventures:
- Spicier Cheeses: Introduce some Monterey Jack, pepper jack, or a sharp provolone into your sauce for a different flavor profile.
- Smoky Notes: A touch of smoked gouda or smoked cheddar can add wonderful depth to the cheesy garlic sauce.
- Creamier Textures: A little fontina or even some Boursin cheese (especially the garlic & herb variety) could elevate the creaminess and flavor.
-
Spice it Up:
- Heat Boost: Add a pinch more red pepper flakes to the sauce, or incorporate a dash of your favorite hot sauce into the chicken marinade. Sliced fresh or pickled jalapeños are also excellent additions inside the wrap.
- Chipotle Flavor: A teaspoon of chipotle powder in the chicken marinade or a tablespoon of adobo sauce from canned chipotles in the cheesy sauce would provide a lovely smoky heat.
-
Veggie Variety:
- Sautéed Veggies: Instead of or in addition to fresh raw vegetables, you could sauté bell peppers, onions, or zucchini until tender-crisp.
- Spinach or Kale: Wilted spinach or finely chopped kale can be folded into the cheesy garlic sauce or added fresh to the wrap for extra greens.
- Avocado: Sliced or mashed avocado adds a rich, creamy texture and healthy fats.
- Corn and Black Beans: A simple mix of canned corn and black beans (rinsed and drained) can give a Southwestern flair.
-
Herb and Seasoning Enhancements:
- Dill: A touch of fresh dill could bring a brighter, fresher note to the sauce.
- Cajun/Creole Seasoning: Swap out the paprika and oregano for a good quality Cajun or Creole seasoning in the chicken marinade for a different kick.
- Lemon Zest: A tiny bit of fresh lemon zest added to the cheesy sauce at the very end can brighten all the flavors.
-
Different Wraps:
- Whole Wheat Tortillas: For a slightly healthier option.
- Lettuce Wraps: For a low-carb alternative, use large, crisp lettuce leaves (like butter lettuce or iceberg) instead of tortillas.
- Pita Bread: Warm pita bread can also be stuffed with the delicious chicken and sauce.
No matter how you customize them, these Cheesy Garlic Chicken Wraps are sure to be a hit!

Conclusion:
This recipe for Cheesy Garlic Chicken Wraps isn’t just another dish; it’s a culinary revelation that I genuinely believe everyone needs in their life. It perfectly marries the comforting richness of melted cheese and fragrant garlic with succulent, tender chicken, all wrapped up in a convenient, portable package. I’ve found it to be an absolute game-changer for busy weeknights, offering maximum flavor with minimal fuss. It’s truly a must-try because it delivers on every front: taste, ease, and pure satisfaction. This isn’t just food; it’s an experience that brightens any mealtime, making it feel special without demanding hours in the kitchen. The sheer simplicity combined with the unbelievably delicious outcome makes these wraps a standout recipe that I turn to again and again, proving that truly great food doesn’t have to be complicated or time-consuming. It’s the kind of meal that makes you feel like a gourmet chef without any of the stress.
What truly sets these wraps apart is the exquisite balance of flavors that dance on your palate. The sharp, aromatic kick of garlic, deeply infused into the perfectly cooked, juicy chicken, is brilliantly complemented by the gooey, stretchy goodness of melted cheese. Every single bite is designed to be deeply satisfying, a warm hug for your taste buds that will leave you craving more. The combination of crispy edges and the soft, yielding texture of the wrap adds another layer of perfection, ensuring a delightful mouthfeel from start to finish. I often find myself craving these precisely because they hit that sweet spot of comforting, hearty, and incredibly flavorful, making them far more than just a simple meal. They become a craving, a go-to when you need something truly delicious and deeply satisfying, providing a unique blend of convenience and gourmet taste that is hard to beat.
While these wraps are undeniably fantastic on their own, I love experimenting with accompaniments to elevate the experience even further, proving just how versatile they can be. For a lighter, more refreshing meal, consider serving them alongside a crisp, fresh garden salad dressed with a light vinaigrette, or perhaps a simple bowl of warm tomato soup for a truly cozy and comforting combination. If you’re hosting a casual get-together, a side of crunchy tortilla chips with a vibrant, homemade salsa or a dollop of cool, creamy sour cream makes for a fantastic and crowd-pleasing pairing. They are also incredibly adaptable for various occasions; think game day snacks that outshine any store-bought option, a hearty and satisfying lunch that will be the envy of your office, or a delightfully easy dinner after a long, demanding day. Their inherent portability also makes them an excellent choice for picnics, road trips, or packed lunches, holding up beautifully and tasting just as good hours later, maintaining their deliciousness and structural integrity.
One of the things I adore most about this recipe is its incredible adaptability, allowing you to truly make it your own. Don’t be afraid to get creative and customize it to suit your unique tastes! You can easily swap out the traditional cheddar for mozzarella, provolone, a sharper aged white cheddar, or even a spicier Monterey Jack for a completely different cheesy profile that brings new dimensions to the dish. Feel free to load up on extra veggies too – sautéed bell peppers, sweet caramelized onions, fresh spinach, or earthy mushrooms can add wonderful texture, vital nutrients, and an extra layer of flavor. For those who enjoy a little heat, a dash of cayenne pepper or smoked paprika in the chicken seasoning, or a generous drizzle of sriracha mayo before wrapping, would be absolutely phenomenal. I’ve even experimented with adding a touch of dried herbs like oregano or thyme for a deeper, more aromatic flavor, and the results were always a huge hit. The possibilities for personalization are truly endless, allowing you to tailor this delicious base to perfectly suit your personal preferences, dietary needs, or whatever ingredients you happen to have on hand, ensuring it’s always a fresh and exciting meal.
So, what are you waiting for? I wholeheartedly encourage you to roll up your sleeves and give these wonderful wraps a try in your own kitchen. I promise you won’t be disappointed; in fact, I’m confident you’ll be utterly delighted. They are deceptively simple to prepare, requiring minimal culinary expertise, yet they yield results that taste like you’ve spent hours slaving away over a gourmet meal. Once you experience the irresistible combination of flavors and textures, the ease of preparation, and the sheer joy of eating something so delicious, I have a strong feeling they’ll quickly become a regular fixture in your meal rotation, just as they have in mine. And when you do make them, please, please, please share your experience! I’d absolutely love to hear about your culinary adventures, your favorite variations, or any clever serving suggestions you come up with in the comments section below. Your feedback, creative ideas, and shared stories truly inspire me and our entire community of food lovers. Happy cooking, and get ready to enjoy some seriously delicious wraps that will quickly become a beloved staple!
Ultimate Cheesy Garlic Chicken Wraps – Quick Family Meal
Cheesy Garlic Chicken Wraps are more than just a meal; they are a delightful culinary experience waiting to transform your perception of quick, satisfying dinners. Imagine biting into a warm, soft tortilla, generously filled with succulent, tender chicken enveloped in a rich, melted blanket of cheese, all infused with the irresistible aroma and flavor of fresh garlic. It’s a symphony of textures and tastes that truly elevates a simple wrap into something extraordinary.
Ingredients
-
2 large (about 1.5 lbs) boneless, skinless chicken breasts, or 4 chicken thighs, trimmed
-
2 tablespoons olive oil, plus extra for cooking
-
4 cloves garlic, minced very finely
-
1 teaspoon smoked paprika
-
1/2 teaspoon dried oregano
-
1/2 teaspoon salt
-
1/4 teaspoon black pepper
-
4 tablespoons unsalted butter
-
6 cloves garlic, minced
-
2 tablespoons all-purpose flour
-
1.5 cups whole milk, warmed slightly
-
4 oz cream cheese, softened
-
1 cup shredded sharp cheddar cheese
-
1/2 cup shredded mozzarella cheese
-
1/4 cup finely chopped fresh parsley or chives
-
1/4 teaspoon salt (or to taste)
-
1/8 teaspoon black pepper (or to taste)
-
A pinch of red pepper flakes (optional)
-
8-10 large flour tortillas (10-inch diameter)
-
2 cups shredded iceberg or romaine lettuce
-
1 large ripe tomato, diced
-
1/4 red onion, thinly sliced or finely diced
-
Optional additions: sliced jalapeños, pickles, or extra fresh herbs
Instructions
-
Step 1
Slice chicken breasts horizontally into thinner cutlets, or trim chicken thighs. Pat dry. In a bowl, combine 2 tbsp olive oil, 4 minced garlic cloves, 1 tsp smoked paprika, 1/2 tsp oregano, 1/2 tsp salt, 1/4 tsp pepper. Coat chicken. Marinate for at least 15-20 minutes at room temperature, or up to 2 hours in the refrigerator (overnight for best flavor). -
Step 2
Heat 1 tbsp olive oil in a large skillet over medium-high. Sear chicken 4-6 minutes per side until golden brown and cooked through (165°F/74°C). Cook in batches if needed. Transfer chicken to a cutting board, tent with foil, and rest 5-10 minutes. Slice against the grain into thin strips or cubes. Set aside. -
Step 3
In the same skillet, melt 4 tbsp butter over medium-low heat. Add 6 minced garlic cloves; sauté 1-2 minutes until fragrant. Sprinkle in 2 tbsp flour, whisk for 1 minute to form a roux. -
Step 4
Gradually whisk in 1.5 cups warmed whole milk until smooth. Increase heat to medium, bring to a gentle simmer, whisking frequently, until sauce visibly thickens (3-5 minutes). -
Step 5
Reduce heat to low. Whisk in 4 oz softened cream cheese until smooth. Gradually add 1 cup shredded cheddar and 1/2 cup shredded mozzarella, whisking until melted and smooth. Stir in 1/4 cup fresh parsley/chives, 1/4 tsp salt, 1/8 tsp pepper, and optional red pepper flakes. Taste and adjust seasoning. Keep warm. -
Step 6
Wash and shred 2 cups lettuce. Dice 1 large tomato. Thinly slice or finely dice 1/4 red onion. Have any optional toppings (jalapeños, pickles) ready. -
Step 7
Warm 8-10 large flour tortillas using microwave, dry skillet, or oven until pliable. Keep warm and covered. -
Step 8
Lay a warm tortilla flat. Spoon generous cheesy garlic sauce down the center. Add sliced garlic chicken, shredded lettuce, diced tomato, sliced red onion, and any optional fillings. Fold in the two opposite sides of the tortilla (1-2 inches). Tightly fold up the bottom edge over the fillings, then roll tightly upwards to create a compact, cylindrical wrap. -
Step 9
Repeat assembly for remaining tortillas and serve immediately while warm.
Important Information
Nutrition Facts (Per Serving)
It is important to consider this information as approximate and not to use it as definitive health advice.
Allergy Information
Please check ingredients for potential allergens and consult a health professional if in doubt.

Leave a Comment