
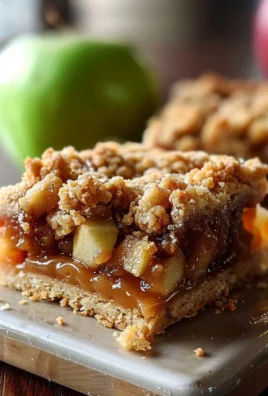
Caramel Apple Cheesecake Dip Recipe is more than just a delightful dessert; it’s a celebration of autumnal flavors and effortless entertaining, all rolled into one irresistible dish. Imagine a spoonful of velvety smooth cheesecake, generously swirled with rich, buttery caramel and the crisp sweetness of fresh apples, ready to be scooped up by your favorite dippers. I truly believe this ingenious creation has become a beloved staple for gatherings because it perfectly captures the nostalgic essence of caramel apples from childhood fairgrounds and combines it with the luxurious creaminess of a classic cheesecake, but without any of the baking fuss.
While the exact origins of this particular dip might be a modern culinary innovation, it stands on the shoulders of two giants: the time-honored tradition of caramel apples, a quintessential fall treat enjoyed for generations during harvest festivals, and the universally adored cheesecake, a dessert with a rich history dating back to ancient Greece. This recipe brilliantly marries those comforting, familiar flavors into a convenient, shareable format that truly shines at any casual get-together or festive occasion.
Why This Dish Is a Fan Favorite
People adore this Caramel Apple Cheesecake Dip Recipe not just for its incredible taste—a symphony of sweet, tangy, and creamy notes that dance on the palate—but also for its delightful textures and unparalleled convenience. It’s incredibly simple to prepare, requiring minimal effort and no baking, making it an ideal choice for last-minute potlucks, cozy family nights, or any occasion where you want to impress without the stress. From the very first bite, you’ll understand why this dip is so incredibly popular; it’s pure, unadulterated joy in every scoop, promising to become a new favorite in your recipe repertoire.

Ingredients:
- For the Creamy Cheesecake Dip Base:
- 2 (8-ounce) packages full-fat cream cheese, softened to room temperature. This is crucial for a smooth, lump-free dip. I always recommend full-fat for the best texture and flavor, ensuring a rich and decadent experience in every scoop of our Caramel Apple Cheesecake Dip.
- 1/2 cup granulated sugar. Adjust this to your sweetness preference, but this amount creates a lovely balance with the slight tang of the cream cheese, making the dip perfectly sweet without being cloying.
- 1/4 cup light brown sugar, packed. The molasses in brown sugar adds a delightful depth of flavor and a subtle warmth that beautifully complements the caramel and apple components.
- 1 teaspoon pure vanilla extract. Don’t skimp on the vanilla; it truly elevates the classic cheesecake flavor and adds a fragrant aroma. I always opt for pure vanilla for the best results.
- 1/4 teaspoon ground cinnamon. A touch of cinnamon enhances the autumnal vibes and adds a hint of spice that pairs wonderfully with both apples and caramel, without overpowering the primary flavors.
- 1/4 cup milk or heavy cream. Milk will lighten the dip slightly, giving it a somewhat thinner consistency. Heavy cream, on the other hand, will make it richer and even more luxurious. My personal preference is heavy cream for that extra indulgent feel.
- For the Caramel Layer:
- 1 (12-ounce) jar high-quality caramel sauce. While store-bought is perfectly fine for convenience and yields fantastic results, I’ll also share how to make your own if you’re feeling ambitious and want to customize the flavor!
- Optional: 1/4 teaspoon sea salt flakes, for sprinkling over the caramel. This touch of saltiness beautifully cuts through the sweetness of the caramel, creating an irresistible sweet and salty combination that truly enhances the Caramel Apple Cheesecake Dip.
- For the Fresh Apples:
- 3-4 medium-sized firm, crisp apples. Granny Smith, Honeycrisp, Gala, or Fuji are excellent choices. I often use a mix for variety in flavor and texture; for instance, a Granny Smith adds a lovely tartness that brilliantly balances the sweet dip.
- 1 tablespoon lemon juice (optional). This helps prevent the apples from browning too quickly after they’re cut, keeping them fresh and visually appealing until serving.
- For Dippers and Garnish:
- Graham crackers, broken into pieces. A classic pairing that complements the cheesecake flavor perfectly.
- Vanilla wafers or shortbread cookies. These offer a buttery, sweet contrast.
- Pretzel crisps or small pretzel twists. The sweet and salty combination is always a hit and provides a satisfying crunch.
- Extra apple slices (if desired). For those who can’t get enough fresh apple goodness.
- Ginger snaps or cinnamon sugar pita chips. These add an extra layer of spiced flavor that works beautifully with the overall theme.
- Chopped pecans or walnuts (optional), for garnish. Adds a lovely nutty crunch and sophisticated finish.
- Extra drizzle of caramel sauce or chocolate syrup (optional), for serving. For an even more indulgent presentation.
Crafting the Creamy Cheesecake Dip Base:
- Begin with Softened Cream Cheese: The very first and arguably most critical step for our Caramel Apple Cheesecake Dip Recipe is to ensure your cream cheese is at true room temperature. I can’t stress this enough! If your cream cheese is cold, you’ll end up with a lumpy dip, no matter how much you beat it. To achieve perfect softness, I usually take the cream cheese out of the fridge at least an hour or two before I plan to start mixing. If you’re in a bit of a hurry, you can unwrap it and microwave it on a very low power setting (like 10-20% power) for 10-15 second intervals, flipping it each time, until it’s just softened and pliable, but definitely not melted or warm. You want it soft enough to yield to a gentle press.
- Creaming the Cream Cheese: In a large mixing bowl, using either a hand mixer or a stand mixer fitted with the paddle attachment, beat the softened cream cheese on medium speed for about 2-3 minutes. My goal here is to get it incredibly light, fluffy, and completely smooth before adding anything else. This initial beating breaks down the cream cheese structure and incorporates air, resulting in a wonderfully airy and lump-free base. Make sure to stop and scrape down the sides and bottom of the bowl frequently with a rubber spatula. This ensures that every bit of cream cheese gets thoroughly incorporated and no unmixed pockets are left behind.
- Adding the Sugars and Flavorings: Once your cream cheese is wonderfully smooth and cloud-like, it’s time to introduce the sugars and primary flavorings. Add the granulated sugar, the packed light brown sugar, the pure vanilla extract, and the ground cinnamon to the bowl. I typically like to add them all at once at this stage, positioning them directly onto the cream cheese.
- Beat Until Fluffy and Combined: Continue beating the mixture on medium-low speed. It’s a good idea to start slow to avoid a ‘sugar cloud’ from the dry ingredients, then gradually increase the speed to medium. Beat for another 2-3 minutes, or until the sugars are completely dissolved, and the mixture is noticeably lighter, fluffier, and looks uniform in color and texture. Again, it’s paramount to scrape down the sides of the bowl several times during this process to catch any sugar or cream cheese that might be clinging to the bowl. You’re looking for a velvety, homogenous consistency – no graininess from the sugar should be apparent when you rub a small amount between your fingers. This thorough mixing is absolutely key to a truly decadent and smooth Caramel Apple Cheesecake Dip.
- Achieving the Perfect Consistency: Finally, pour in the milk or heavy cream. I recommend starting with about half the amount, mixing it in thoroughly, and then adding the rest gradually until you reach your desired consistency. If you prefer a thicker dip that holds its shape more firmly, use less liquid; for a slightly looser, more dippable texture that’s easier to scoop, use the full amount or even a tiny bit more. Beat on low speed until just combined. Be careful not to overmix at this stage, as it can sometimes deflate the lovely air you’ve incorporated, which we want to keep for that light texture. My personal preference is usually heavy cream as it adds an undeniable richness and a luscious mouthfeel that really makes the cheesecake flavor pop and provides a delightful contrast to the apples.
- Chill for Flavor Development: Once the cheesecake base is perfectly smooth, creamy, and at your desired consistency, cover the bowl tightly with plastic wrap and refrigerate it for at least 30 minutes. An hour is even better! This chilling time is essential, as it allows all the beautiful flavors to meld and deepen harmoniously, and it helps the dip firm up slightly, making it even more delightful and easier to scoop and enjoy. While the base chills in the refrigerator, you can efficiently move on to preparing your caramel (if making it homemade) and the fresh apples.
Preparing Your Own Delicious Caramel Sauce (Optional but Recommended!):
-
Gather Your Tools and Ingredients: If you’re opting for the deeply satisfying experience of homemade caramel, you’ll need a few specific tools and ingredients to ensure success. Firstly, a heavy-bottomed saucepan is critical (this is important to prevent scorching the sugar). You’ll also need a heat-proof rubber spatula or wooden spoon for initial stirring, and a whisk for incorporating the dairy. For ingredients, you’ll need:
- 1 cup granulated sugar
- 1/4 cup water
- 6 tablespoons unsalted butter, cut into 1-tablespoon pieces (make sure it’s cold or at room temp)
- 1/2 cup heavy cream, warmed slightly (I usually pop it in the microwave for 30-45 seconds until it’s warm but not boiling)
- 1/2 teaspoon sea salt (or to taste, I often go for a generous pinch)
- 1 teaspoon pure vanilla extract
- Melting the Sugar (The Key Step): In your heavy-bottomed saucepan, combine the granulated sugar and water. Turn the heat to medium-low. My preferred method is what’s known as a “wet caramel,” as the water helps dissolve the sugar crystals evenly and significantly reduces the risk of burning, making it more forgiving for beginners. Stir gently with your rubber spatula until the sugar dissolves completely into the water. Once all the sugar crystals are dissolved and the mixture is clear, stop stirring. You can swirl the pan occasionally to ensure even cooking, but resist the urge to stir once it starts to bubble and boil, as this can cause crystallization.
- Watch for Color Transformation: The mixture will come to a boil, and then the water will gradually evaporate, leaving behind bubbling sugar syrup. The sugar will start to change color around the edges first, gradually turning a light amber. This is where you need to pay very close attention! Continue cooking without stirring until the sugar turns a deep, rich amber color. Do not, under any circumstances, walk away from the stove during this process. Caramel can go from perfect to burnt in a matter of seconds, and burnt caramel is irredeemable. I’m looking for a color similar to a shiny copper penny or dark honey – a beautiful, translucent, deep golden-brown. This color transformation usually takes about 8-12 minutes from the start of boiling, depending on your stovetop.
- Adding the Butter (Carefully!): Once you’ve reached that beautiful deep amber color, immediately remove the pan from the heat. This stops the cooking process instantly. Carefully, yet quickly, add the pieces of butter, one by one, whisking constantly. Be extremely cautious as the mixture will bubble up violently and steam quite a bit when the butter hits the hot sugar. Stand back a little to avoid any splatters. Continue whisking vigorously until all the butter has melted and is fully integrated into the caramel, making it smooth and wonderfully glossy.
- Incorporating the Warm Cream: Once all the butter is whisked in, slowly pour in the warmed heavy cream, whisking continuously and vigorously. Again, the mixture will bubble up and seize slightly (become very stiff) due to the temperature difference, but keep whisking! The warmth of the cream helps prevent the caramel from seizing too much and helps it re-dissolve smoothly. Continue whisking until the caramel is completely smooth, uniform, and free of any lumps.
- Finishing Touches: Finally, stir in the sea salt and the pure vanilla extract. Whisk thoroughly to combine these last crucial flavor elements. Pour your gorgeous homemade caramel into a heat-proof jar or bowl. Allow it to cool slightly before using. As it cools, it will thicken significantly to a rich, luscious consistency. If it becomes too thick to pour easily for your Caramel Apple Cheesecake Dip Recipe, you can gently reheat it over very low heat or in the microwave for a few seconds, stirring, until it reaches your desired drizzly consistency. This homemade caramel adds an unparalleled depth of flavor that is truly worth the effort!
Preparing the Fresh Apples:
- Choose Your Apples Wisely: For this Caramel Apple Cheesecake Dip Recipe, the type of apple you choose truly matters and can significantly impact the final texture and flavor balance. I always recommend selecting firm, crisp apples that hold their shape well and offer a good textural contrast to the creamy dip. My personal favorites are Honeycrisp, Granny Smith (for a lovely tart balance that cuts through the sweetness), Fuji, or Gala. Using a mix of two different varieties often yields the most interesting and complex flavor profile. It’s best to avoid overly soft or mealy apple varieties, as they won’t stand up well in the dip and can become mushy.
- Wash, Peel, and Core: Thoroughly wash your chosen apples under cool running water to remove any dirt or residue. Then, using a sharp vegetable peeler, carefully peel all the skin from the apples. While you certainly can leave the skin on for extra fiber and a pop of color, I find that a peeled apple creates a more luxurious and consistent texture for the dip, preventing any tough bits of skin from interfering with the creamy experience. After peeling, use an apple corer to efficiently remove the core, or simply cut around the core with a sharp knife to separate the edible flesh.
- Dice into Bite-Sized Pieces: Once your apples are perfectly peeled and cored, it’s time to dice them into small, uniform, bite-sized pieces. I aim for roughly 1/4 to 1/2 inch cubes. You want them small enough to be easily scooped onto a dipper without falling off, but large enough to provide a satisfying crunch. I always strive for consistency in size here, as it ensures that each piece offers a similar delightful crunch and visual appeal within the dip.
- Prevent Browning (Optional but Recommended): Apples, once cut and exposed to air, are notoriously prone to browning quickly due to oxidation. If you’re not planning to serve the Caramel Apple Cheesecake Dip immediately, or if you simply want to maintain the pristine, fresh look of your apples, I highly recommend tossing them with a tablespoon of fresh lemon juice. Place the diced apples in a medium bowl, drizzle them with the lemon juice, and gently toss to coat all the pieces thoroughly. The acidity of the lemon juice acts as a natural antioxidant, effectively preventing the enzymatic browning and keeping your apples looking bright, crisp, and appealing for a longer period. This simple step ensures your dip looks just as good as it tastes when it’s time to serve!
Assembling and Serving Your Caramel Apple Cheesecake Dip:
- Prepare Your Serving Dish: Now comes the fun part – assembling this magnificent Caramel Apple Cheesecake Dip Recipe! Choose a shallow, wide serving dish or pie plate. The wider the dish, the more surface area you have for easily scooping up all the delightful layers, ensuring everyone gets a bit of each component. I often use a beautiful clear glass pie plate or a decorative ceramic platter so that everyone can admire the distinct, delicious layers from all angles.
- Spread the Cheesecake Base: Retrieve your chilled cheesecake dip base from the refrigerator. It might have firmed up a bit, so give it a quick stir with a spoon or spatula to loosen it slightly if needed, making it easier to spread. Spoon the entire creamy cheesecake mixture into your chosen serving dish. Use an offset spatula or the back of a spoon to gently spread it out evenly across the bottom, creating a smooth, inviting, and consistent layer. You want a nice, thick, and sturdy base for all the other deliciousness we’re about to add on top.
- Layer on the Caramel: Next, generously pour your caramel sauce over the perfectly smooth cheesecake layer. If your caramel has thickened too much from chilling (this is especially common if you made it homemade), you can gently warm it in the microwave for 15-30 seconds, stirring every few seconds until it reaches a beautiful, pourable, and drizzly consistency. Spread the caramel evenly over the cheesecake, using the back of a spoon to gently push it towards the edges. I sometimes like to leave a tiny border around the very edge of the dish to allow the cheesecake layer to peek through, adding to the visual appeal. If you’re using sea salt flakes, now is the absolutely perfect time to sprinkle them lightly and evenly over the caramel layer for that irresistible sweet and salty kick that makes this dip so addictive.
- Add the Diced Apples: Finally, scatter your prepared diced apples evenly over the luscious caramel layer. Arrange them aesthetically, ensuring a good, even distribution so that every single scoop of your Caramel Apple Cheesecake Dip gets a delightful taste and crunch of fresh, crisp apple. If you’re adding any optional chopped nuts like pecans or walnuts, you can sprinkle them generously over the apples at this point. They add an extra layer of crunch, flavor, and visual appeal, making the dip even more inviting.
- Garnish and Serve Immediately: Your glorious Caramel Apple Cheesecake Dip is now completely assembled and ready to be devoured! For an extra special touch and a more indulgent presentation, I sometimes like to drizzle a little more caramel sauce or even a tiny bit of chocolate syrup artfully over the top right before serving. Arrange your chosen dippers – such as graham crackers, vanilla wafers, pretzel crisps, extra fresh apple slices, or warm cinnamon sugar pita chips – artfully around the dip on a large platter. This creates an inviting spread that’s perfect for sharing.
- Storage Tips: If by some miracle you happen to have any leftovers of this incredibly popular dip (which is a rare occurrence in my house!), cover the dish tightly with plastic wrap or transfer the dip to an airtight container and refrigerate it promptly. The dip is best enjoyed within 2-3 days for optimal freshness. The apples may soften slightly over time and release a bit of juice, but the overall flavors will remain absolutely delicious and wonderful. While I truly doubt it will last that long, it’s always good to know how to keep it fresh for as long as possible!

Conclusion:
If there’s one recipe you absolutely have to try this season, it’s this incredible concoction. I’ve shared countless desserts over the years, but few capture the essence of cozy gatherings and autumnal joy quite like this one. It’s truly more than just a dip; it’s an experience, a symphony of flavors that dance on your palate. Imagine the creamy, tangy embrace of cheesecake perfectly complementing the sweet, gooey richness of caramel, all punctuated by the crisp, refreshing bite of fresh apples. This isn’t just a simple treat; it’s a celebration in a bowl, incredibly easy to whip up, and guaranteed to be the star of any spread. Its universal appeal lies in its simplicity yet sophisticated flavor profile, making it an instant classic in any home. That’s why I wholeheartedly believe this Caramel Apple Cheesecake Dip Recipe is a total game-changer for anyone looking to impress with minimal effort. It embodies everything wonderful about a fall dessert – comforting, familiar, yet exciting and utterly irresistible.
Now, let’s talk about how to truly make this dip shine! While it’s utterly divine served straight from the bowl with a platter of crisp apple slices – I particularly love Granny Smith for that tart contrast, but Honeycrisp or Fuji work beautifully too – don’t stop there.
Think Beyond the Apple Slice!
Consider offering a diverse array of dippers to cater to every taste bud. Salty pretzel rods provide a fantastic textural and flavor contrast to the sweet dip, creating that irresistible sweet and salty combination we all crave. Graham cracker sticks or even your favorite shortbread cookies can transform this into an even more decadent dessert experience. For a fun twist, I sometimes toast up some brioche bread or pita chips with a sprinkle of cinnamon sugar, offering a unique, warm companion to the cool, creamy dip. And for those who love to experiment, how about a sprinkle of chopped toasted pecans or walnuts right over the top just before serving? A light drizzle of dark chocolate or even white chocolate can elevate its visual appeal and add another layer of indulgence. You could even swap out the apples in the dip itself for pears for a slightly different, equally delightful autumnal flavor profile, or sprinkle a pinch of cinnamon or nutmeg into the cheesecake layer for an added layer of warmth. Don’t be afraid to make it your own; a sprinkle of flaky sea salt on top really makes the caramel pop, too!
I genuinely hope you’re feeling inspired to give this recipe a go. Trust me when I say, the joy of creating something so utterly delicious and seeing the smiles it brings to your loved ones’ faces is truly priceless. It’s the perfect excuse to gather friends and family, or simply to treat yourself after a long week.
Your Culinary Adventure Awaits!
Don’t be shy – dive into your kitchen, gather your ingredients, and let the magic happen. This dip is incredibly forgiving and truly hard to mess up, making it ideal for both seasoned bakers and beginners alike. And when you do, please, please, please share your experience! I absolutely adore hearing about your successes, your personal tweaks, and the fun you had making and sharing this delightful treat. Your stories inspire me and our entire community of food lovers. This isn’t just about following a recipe; it’s about making memories, one delicious bite at a time, and discovering new favorites that you’ll want to make again and again. So go on, embrace the sweet life, and let this incredible dip become a cherished part of your culinary repertoire. Happy dipping, my friends!
Caramel Apple Cheesecake Dip
This Caramel Apple Cheesecake Dip is a delightful and effortless dessert, combining velvety smooth cheesecake with rich caramel and crisp apples. It’s a no-bake treat perfect for any gathering, capturing the nostalgic essence of caramel apples with the luxury of cheesecake.
Ingredients
Instructions
Important Information
Nutrition Facts (Per Serving)
It is important to consider this information as approximate and not to use it as definitive health advice.
Allergy Information
Please check ingredients for potential allergens and consult a health professional if in doubt.
Leave a Comment