
Pioneer Woman Apple Crisp Recipe – a phrase that immediately conjures images of rustic charm, heartwarming flavors, and the undeniable comfort of a homemade dessert. If you’ve ever yearned for that perfect autumn aroma wafting through your kitchen, or a dessert that tastes like a cozy hug on a crisp evening, then you’ve found your next culinary adventure. This isn’t just any apple crisp; it’s a testament to simple, wholesome ingredients transforming into something truly extraordinary, embodying the spirit of classic American home cooking.
The Enduring Charm of Apple Crisp
The apple crisp, a beloved American classic, holds a special place in our hearts as a quintessential comfort food. It speaks of harvest seasons, family gatherings, and the joy of sharing. My personal experience with this dish has always been one of pure delight – the sweet, tender apples mingling with hints of cinnamon and nutmeg, all crowned by a gloriously crunchy, buttery oat topping. It’s that irresistible textural contrast between the soft fruit and the crisp crumble that makes it universally adored. This particular Pioneer Woman Apple Crisp Recipe elevates the humble apple crisp, ensuring a rich depth of flavor and a topping that’s perfectly golden and satisfyingly crisp. Prepare to fall in love with its irresistible taste and the effortless joy it brings to your table.

Ingredients:
- For the Apple Filling:
- 6-8 medium-sized baking apples (about 3 pounds), such as Granny Smith, Honeycrisp, Fuji, or Braeburn. I love a mix for complex flavor and texture!
- ½ cup granulated sugar (or a little more if your apples are very tart)
- ¼ cup all-purpose flour (this helps thicken the juices beautifully)
- 1 teaspoon ground cinnamon
- ½ teaspoon ground nutmeg (freshly grated is always best!)
- ¼ teaspoon ground cloves (just a hint for warmth)
- 1 tablespoon fresh lemon juice (brightens everything up and prevents browning)
- 1 teaspoon pure vanilla extract
- 2 tablespoons unsalted butter, cut into small pieces
- For the Crisp Topping:
- 1 ½ cups old-fashioned rolled oats (not instant!)
- 1 cup all-purpose flour
- ¾ cup packed light brown sugar
- ¼ cup granulated sugar
- 1 teaspoon ground cinnamon
- ½ teaspoon ground nutmeg
- ¼ teaspoon salt (a crucial balancer of sweetness)
- 1 ½ sticks (12 tablespoons) unsalted butter, very cold and cut into small cubes
Preparing the Apple Filling
- Preheat Your Oven and Prepare Your Baking Dish: First things first, my friends! Let’s get that oven roaring. Preheat your oven to a comforting 375°F (190°C). While it’s warming up, grab a 9×13-inch baking dish. I usually give it a quick spray with a non-stick cooking spray, just to be on the safe side, though with all those lovely apple juices bubbling, it rarely sticks. This generously sized dish is perfect for a crowd-pleasing Pioneer Woman Apple Crisp Recipe, ensuring everyone gets a hearty serving.
- Peel, Core, and Slice the Apples: This is where the real work begins, but it’s a labor of love! Take your chosen apples – remember, a mix adds depth – and carefully peel them. After peeling, core each apple thoroughly. I like using an apple corer for speed, but a small paring knife works just as well. Once cored, slice the apples into roughly ½-inch thick pieces. Try to keep them fairly uniform in size so they cook evenly. If some are too thin, they’ll turn to mush, and if some are too thick, they’ll remain stubbornly firm. We’re aiming for tender-crisp, not apple sauce! This part takes a little time, but it’s essential for the texture of our fabulous apple crisp.
- Combine Dry Filling Ingredients: In a very large mixing bowl – you’ll need the space for all those apples – combine the ½ cup granulated sugar, ¼ cup all-purpose flour, 1 teaspoon ground cinnamon, ½ teaspoon ground nutmeg, and ¼ teaspoon ground cloves. Give these dry ingredients a good whisk with a fork or a small whisk until they are thoroughly combined. This ensures that the spices and flour are evenly distributed throughout the apples, creating that perfectly spiced and slightly thickened filling we all adore. Don’t skip this step, as clumps of flour are no fun!
- Add Apples and Wet Ingredients to the Bowl: Now, add your beautifully sliced apples to the bowl with the dry mixture. Pour in the 1 tablespoon of fresh lemon juice – this not only brightens the flavor but also helps prevent the apples from turning brown while you work on the topping. Follow with the 1 teaspoon of pure vanilla extract; oh, that lovely aroma! Using a large spoon or, even better, your clean hands, gently toss the apples until every single slice is coated with the sugar and spice mixture. You want them glistening and fragrant. This ensures every bite of our Pioneer Woman Apple Crisp is bursting with flavor.
- Transfer to Baking Dish: Once the apples are perfectly coated, pour them into your prepared 9×13-inch baking dish. Spread them out evenly, making sure there aren’t any huge gaps. They might pile up a bit, which is perfectly fine; they’ll cook down. Dot the top of the apple mixture with the 2 tablespoons of unsalted butter, cut into small pieces. These little pats of butter will melt into the apples, adding richness and a beautiful sheen to the cooked fruit. Set this aside while we prepare the star of the show – that irresistible crispy topping!
Crafting the Crispy Topping
- Combine Dry Topping Ingredients: In a separate, medium-sized mixing bowl, combine all of your dry topping ingredients: the 1 ½ cups old-fashioned rolled oats, 1 cup all-purpose flour, ¾ cup packed light brown sugar, ¼ cup granulated sugar, 1 teaspoon ground cinnamon, ½ teaspoon ground nutmeg, and ¼ teaspoon salt. Give these a really good stir with a fork or whisk to ensure everything is evenly distributed. The salt, by the way, is a game-changer; it balances the sweetness and makes all the other flavors pop! This dry mix forms the base for our signature Pioneer Woman Apple Crisp topping.
-
Cut in the Cold Butter: This is arguably the most crucial step for achieving that perfectly crumbly, crispy topping. Add your 1 ½ sticks (12 tablespoons) of very cold unsalted butter, which you’ve previously cut into small cubes, to the dry ingredient mixture. Now, you have a few options for cutting it in:
- Using a Pastry Blender: This is my preferred method. Work the butter into the dry ingredients until the mixture resembles coarse crumbs, with some pieces of butter still visible, ranging from pea-sized to small lentil-sized. This takes a bit of elbow grease but yields fantastic results.
- Using Your Fingertips: If you don’t have a pastry blender, your fingertips are an excellent tool! Work quickly, rubbing the butter into the flour mixture between your thumb and fingers. The key is to work fast so the butter doesn’t get too warm from the heat of your hands. You want that crumbly texture.
- Using a Food Processor (Carefully!): For a super speedy approach, you can pulse the ingredients in a food processor. Add the dry ingredients first, then add the cold butter cubes. Pulse in short bursts, just until the mixture forms coarse crumbs. Be very careful not to over-process, or you’ll end up with a doughy mess instead of a crumbly topping.
The Goal: No matter which method you choose, the aim is to have a mixture that looks like lumpy, sandy crumbs. The small bits of butter are essential because they create steam during baking, which results in that wonderfully crisp texture we’re after.
Assembling and Baking Our Pioneer Woman Apple Crisp
- Generously Top the Apples: Now for the grand assembly! Take your prepared apple filling in the baking dish and evenly sprinkle the entire crispy topping mixture over the apples. Don’t be shy here – pile it on! We want a thick, crunchy layer to complement the soft, spiced apples underneath. Ensure the topping covers the apples from edge to edge, as this provides a protective layer and contributes to that beautiful golden-brown crust. This generous topping is a hallmark of the Pioneer Woman style!
-
Bake to Golden Perfection: Carefully transfer your baking dish to the preheated 375°F (190°C) oven. Place it on a baking sheet lined with foil if you’re worried about any delicious apple juices bubbling over – a wise precaution, as this crisp can get quite bubbly! Bake for 45 to 60 minutes.
- Monitor Progress: Keep an eye on it! After about 30-40 minutes, if you notice the topping is browning too quickly, you can loosely tent the dish with aluminum foil. This protects the topping while allowing the apples underneath to continue softening.
- Check for Doneness: You’ll know it’s ready when the topping is a deep golden brown, fragrant, and gloriously crisp. More importantly, the apple filling underneath should be bubbling vigorously around the edges, indicating that the apples are tender and hot. To be absolutely sure, you can carefully insert a thin, sharp knife into the center of the crisp (through the topping and into the apples); if it glides in easily, your apples are perfectly cooked.
- Rest Before Serving: Once baked to perfection, carefully remove the Pioneer Woman Apple Crisp from the oven. This step is crucial, and often overlooked! Place the hot dish on a wire rack and allow it to rest for at least 15 to 20 minutes before serving. This resting period allows the filling to set up slightly, preventing it from being too runny, and also helps to further develop the flavors. The topping will also become even crispier as it cools slightly. It will be incredibly tempting to dig in immediately, but trust me, the wait is worth it for a perfectly structured and cooled crisp!
Serving and Enjoying Your Apple Crisp
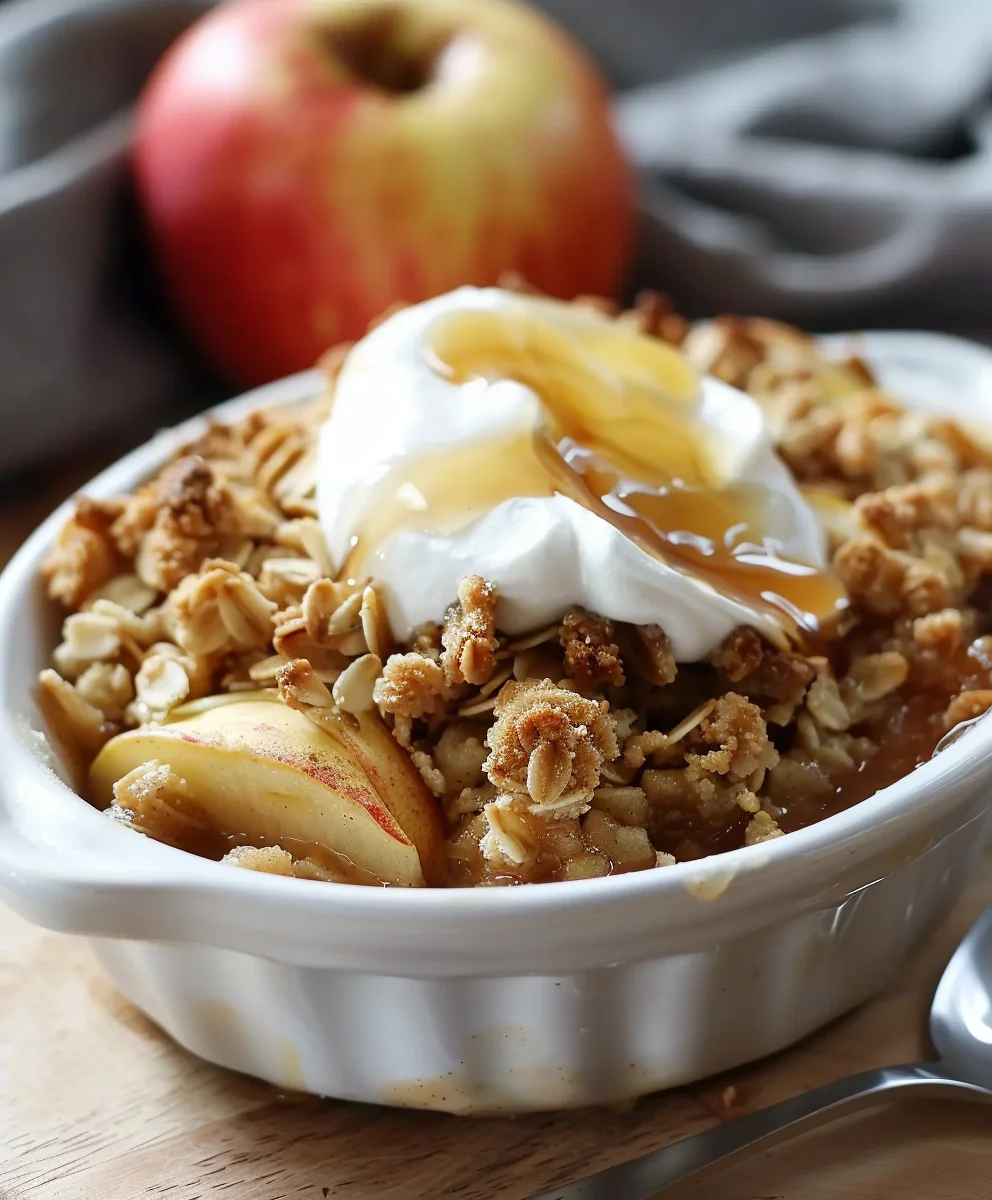
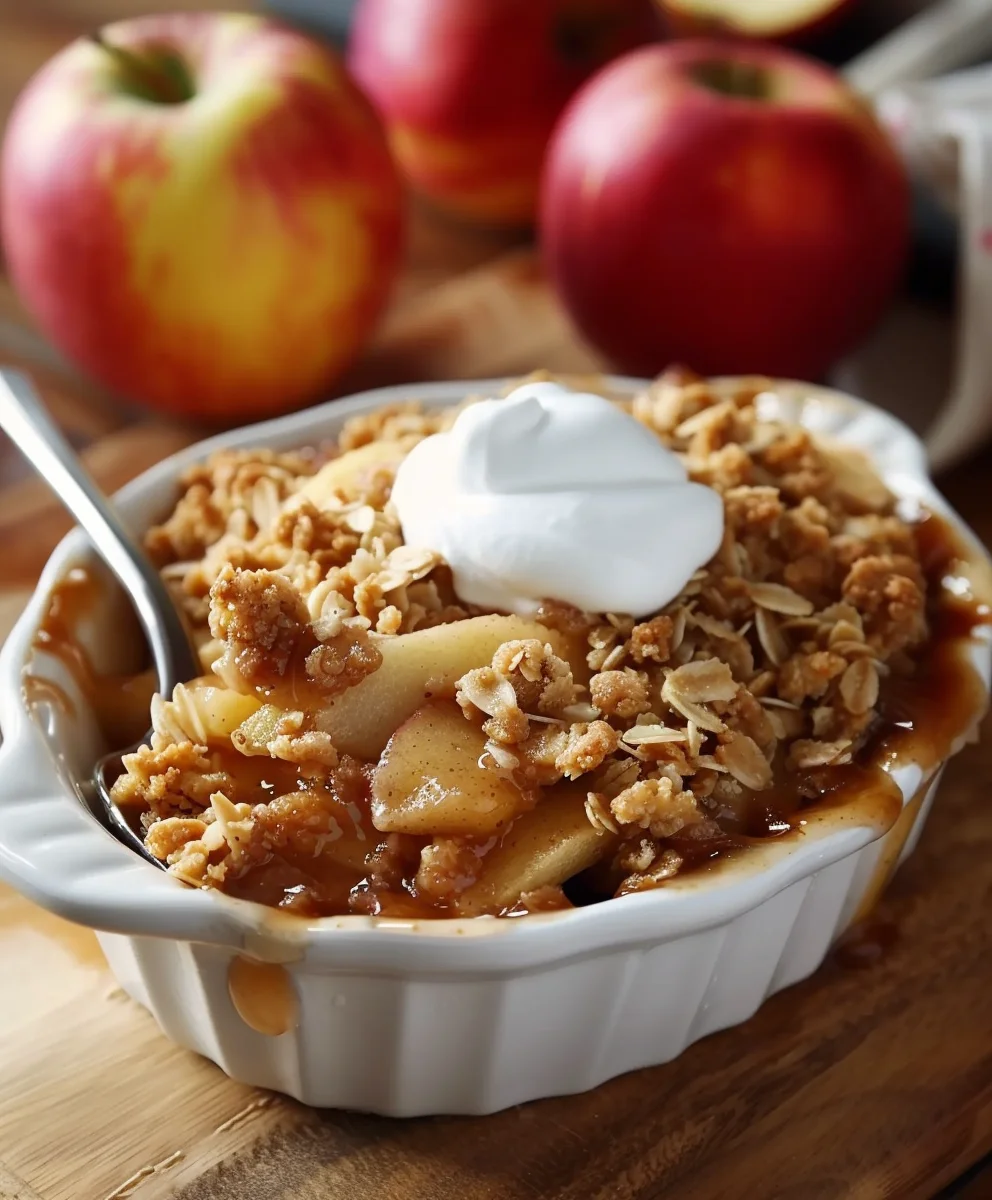
- Serve Warm, with All the Fixings: Your incredible Pioneer Woman Apple Crisp is now ready to be devoured! Serve it warm, straight from the dish. While it’s utterly delicious on its own, it truly shines when accompanied by a scoop (or two!) of creamy vanilla bean ice cream. The cold, melting ice cream against the warm, spiced apples and crunchy topping is a symphony of textures and temperatures that is simply heavenly. For those who prefer a different topping, a dollop of freshly whipped cream or a drizzle of warm caramel sauce would also be absolutely delightful. This dessert is the epitome of comfort food, perfect for family gatherings, holidays, or just a cozy night in.
- Storage Tips: If, by some miracle, you happen to have any leftovers – which is rare in my house! – you can store the apple crisp. Allow it to cool completely to room temperature. Then, cover the baking dish tightly with plastic wrap or aluminum foil. It will keep well in the refrigerator for up to 3-4 days. When you’re ready to enjoy it again, you can reheat individual portions in the microwave for a quick warm-up, or for a crispier topping, place the entire dish (uncovered) in a 300°F (150°C) oven for about 15-20 minutes, or until warmed through and the topping has re-crisped slightly. Enjoy every comforting bite! This Pioneer Woman Apple Crisp Recipe is sure to become a cherished favorite in your home.
Conclusion:
And there you have it, my friends! We’ve reached the sweet finale of our culinary journey, and I genuinely hope you’re feeling as inspired as I am to whip up this incredible dessert. This isn’t just another apple crisp; it’s an absolute triumph of comforting flavors and textures that truly stands apart. What makes this recipe an undeniable must-try is its perfect harmony: the tender, perfectly spiced apples beneath a gloriously golden, crunchy oat topping. It’s a dish that evokes warmth, nostalgia, and pure contentment with every single spoonful. The simplicity of its preparation belies the depth of flavor it delivers, making it an accessible yet impressive treat for any occasion, from a cozy weeknight dessert to a show-stopping finish for your holiday meal.
I find this crisp to be incredibly versatile, and half the fun is personalizing it to your own taste or the season. While it’s absolutely divine on its own, a warm scoop of premium vanilla bean ice cream melting into the hot apples and crisp topping is, for me, the quintessential serving suggestion. The contrast of hot and cold, creamy and crunchy, is simply magical. Alternatively, a dollop of freshly whipped cream, perhaps infused with a hint of cinnamon or maple syrup, adds a touch of elegance without overwhelming the star flavors. For an extra decadent twist, a drizzle of homemade caramel sauce or even a sprinkle of toasted pecans or walnuts over the top just before serving elevates it to another level. If you’re feeling adventurous, consider folding in a handful of fresh cranberries with your apples for a delightful tartness, especially around the autumn months, or experiment with a mix of apples and pears for a nuanced fruit base. For those with dietary considerations, swapping out regular butter for a plant-based alternative and ensuring your oats are certified gluten-free makes this delicious dessert accessible to even more friends and family, proving its adaptability and inclusive appeal.
This recipe isn’t merely about following steps; it’s about creating memories, sharing joy, and savoring the simple pleasures in life. I truly encourage you to carve out some time in your kitchen and give this a try. Experience for yourself the enchanting aroma that fills your home as it bakes and the smiles that spread across faces when you present this masterpiece. It’s a recipe that I believe everyone should have in their repertoire, a true testament to classic, wholesome baking. Whether you’re a seasoned baker or just dipping your toes into the world of homemade desserts, I promise you, the results will be incredibly rewarding. This isn’t just any apple crisp; it’s a celebration of warmth and comfort, much like what you’d expect from a classic like the Pioneer Woman Apple Crisp Recipe. Once you’ve baked and savored it, please, please come back and share your experience with me! I absolutely adore hearing about your kitchen adventures. Did you add a secret ingredient? Did you serve it with a unique topping? Your stories, photos, and personal twists inspire me and our wonderful community of food lovers. So, preheat your oven, gather your ingredients, and prepare to embark on a deliciously memorable baking journey. Happy baking, everyone!
The Best Pioneer Woman Apple Crisp Recipe – Easy & Delicious
Pioneer Woman Apple Crisp Recipe is a delightful treat that combines tender, cinnamon-spiced apples with a crunchy, buttery oat topping. It’s the kind of dessert that fills your kitchen with the warm, cozy smell of baked apples and spices, making everyone feel right at home. This crisp is perfect when you want something sweet but not too fussy to make.
Ingredients
-
6-8 medium-sized baking apples (e.g., Granny Smith, Honeycrisp, Fuji, Braeburn)
-
½ cup granulated sugar
-
¼ cup all-purpose flour
-
1 teaspoon ground cinnamon
-
½ teaspoon ground nutmeg
-
¼ teaspoon ground cloves
-
1 tablespoon fresh lemon juice
-
1 teaspoon pure vanilla extract
-
2 tablespoons unsalted butter, cut into small pieces
-
1 ½ cups old-fashioned rolled oats
-
1 cup all-purpose flour
-
¾ cup packed light brown sugar
-
¼ cup granulated sugar
-
1 teaspoon ground cinnamon
-
½ teaspoon ground nutmeg
-
¼ teaspoon salt
-
1 ½ sticks (12 tablespoons) unsalted butter, very cold and cut into small cubes
Instructions
-
Step 1
Preheat oven to 375°F (190°C). Lightly grease a 9×13-inch baking dish. -
Step 2
Peel, core, and slice 6-8 apples into ½-inch pieces. -
Step 3
In a large bowl, combine ½ cup granulated sugar, ¼ cup flour, 1 tsp cinnamon, ½ tsp nutmeg, and ¼ tsp cloves. Add sliced apples, 1 tbsp lemon juice, and 1 tsp vanilla extract; toss to coat. -
Step 4
Transfer apple mixture to the baking dish. Dot with 2 tbsp unsalted butter. -
Step 5
In a separate medium bowl, combine 1 ½ cups oats, 1 cup flour, ¾ cup brown sugar, ¼ cup granulated sugar, 1 tsp cinnamon, ½ tsp nutmeg, and ¼ tsp salt. Cut in 1 ½ sticks (12 tbsp) very cold unsalted butter until mixture resembles coarse crumbs. -
Step 6
Evenly sprinkle the crisp topping over the apples. Bake for 45-60 minutes, or until topping is golden brown and apples are tender and bubbling. If topping browns too quickly, loosely tent with foil. -
Step 7
Remove from oven and let rest for 15-20 minutes before serving warm with vanilla ice cream or whipped cream. Store leftovers covered in the refrigerator for 3-4 days.
Important Information
Nutrition Facts (Per Serving)
It is important to consider this information as approximate and not to use it as definitive health advice.
Allergy Information
Please check ingredients for potential allergens and consult a health professional if in doubt.


Leave a Comment