
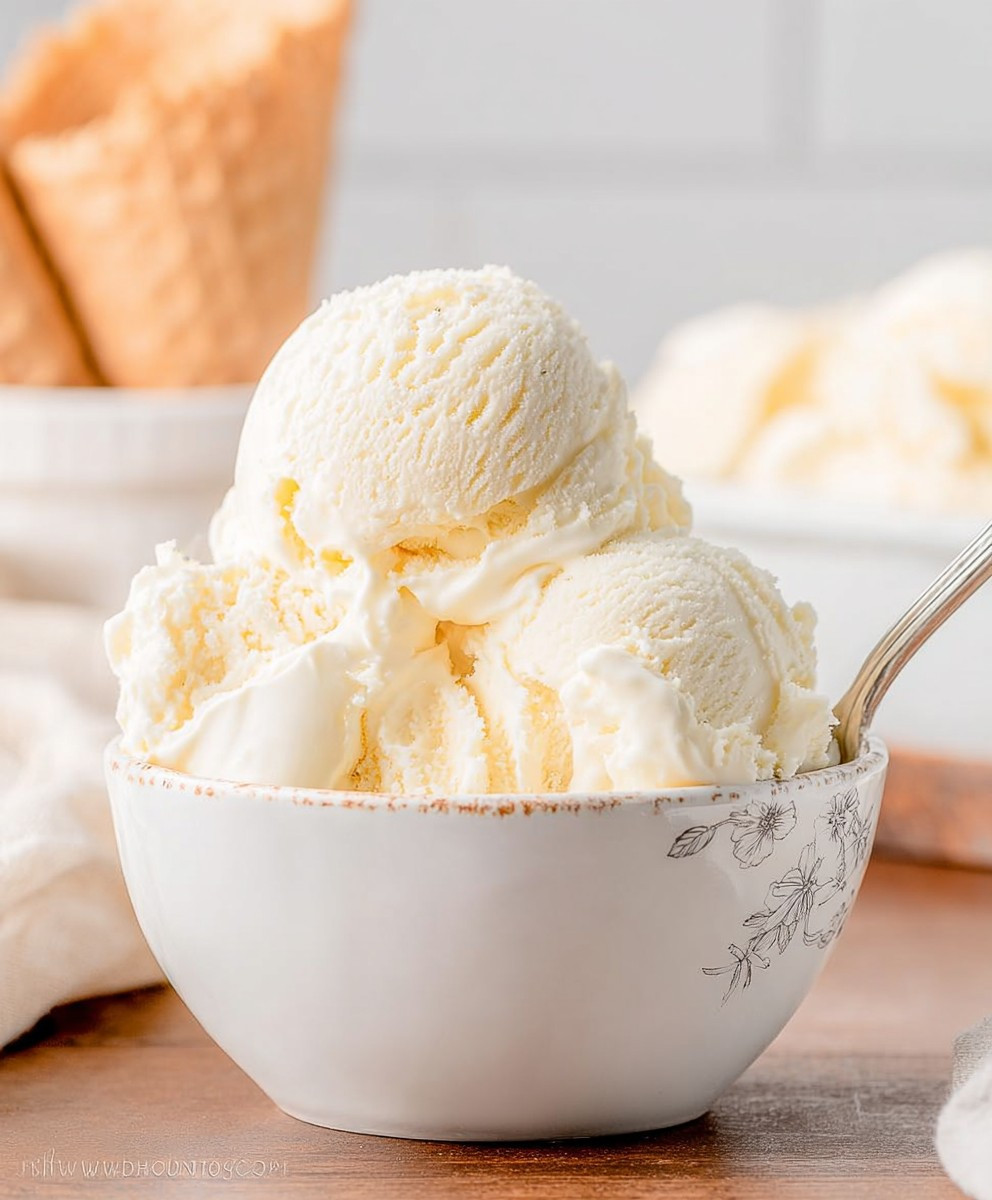
Sugar Free Vanilla Ice Cream, a seemingly impossible dream for those watching their sugar intake, is now deliciously within reach! Imagine scooping into a creamy, decadent bowl of vanilla ice cream, knowing you’re indulging without the guilt. Forget those icy, flavorless imitations you might have tried before. This recipe delivers the real deal: a smooth, rich, and intensely vanilla-flavored ice cream that just happens to be completely sugar-free.
While the history of ice cream stretches back centuries, the quest for a truly satisfying sugar-free version is a relatively modern pursuit. As awareness of the impact of sugar on our health has grown, so has the demand for delicious alternatives. Vanilla, with its comforting and universally loved flavor profile, has always been a cornerstone of the ice cream world. Now, we can enjoy this classic treat without compromising our well-being.
People adore vanilla ice cream for its simplicity and versatility. It’s the perfect blank canvas for adding toppings, pairing with desserts, or enjoying all on its own. The creamy texture and soothing flavor are undeniably comforting. And now, with this Sugar Free Vanilla Ice Cream recipe, everyone can partake in this timeless pleasure. Get ready to experience the joy of homemade ice cream, reimagined for a healthier lifestyle!

Ingredients:
- 2 cups heavy cream
- 1 cup unsweetened almond milk (or other milk alternative)
- 1 cup erythritol (or your preferred sugar-free sweetener, adjust to taste)
- 1 tablespoon vanilla extract
- 1/4 teaspoon sea salt
- Optional: 1/4 teaspoon xanthan gum (for a smoother texture)
Preparing the Ice Cream Base:
- Combine the Cream and Milk: In a medium-sized saucepan, pour in the 2 cups of heavy cream and 1 cup of unsweetened almond milk. I like to use a heavy-bottomed saucepan to prevent scorching, but any medium saucepan will do.
- Add Sweetener and Salt: Next, add the 1 cup of erythritol (or your chosen sugar-free sweetener) and the 1/4 teaspoon of sea salt to the saucepan. The salt helps to enhance the sweetness and balance the flavors. If you’re using a different sweetener, adjust the amount to your liking. Some sweeteners are sweeter than others, so start with a smaller amount and taste as you go.
- Heat and Dissolve: Place the saucepan over medium heat. Stir constantly with a whisk until the erythritol is completely dissolved. You’ll know it’s dissolved when you can no longer feel any granules at the bottom of the pan. Be careful not to let the mixture boil! We just want to warm it enough to dissolve the sweetener. This usually takes about 5-7 minutes.
- Incorporate Vanilla Extract: Once the sweetener is dissolved, remove the saucepan from the heat and stir in the 1 tablespoon of vanilla extract. The vanilla extract adds a lovely aroma and flavor to the ice cream. You can use a high-quality vanilla extract for the best results.
- Add Xanthan Gum (Optional): If you’re using xanthan gum, now is the time to add it. Xanthan gum helps to create a smoother, less icy texture in sugar-free ice cream. It’s especially helpful because sugar naturally contributes to a smooth texture, and we’re replacing that with a sugar-free alternative. Whisk it in thoroughly until it’s completely dissolved. Be careful not to add too much, as it can make the ice cream gummy. A little goes a long way!
- Chill the Mixture: This is a crucial step! Pour the ice cream base into a container with a lid. I prefer to use a glass container, but any airtight container will work. Let the mixture cool to room temperature, then cover and refrigerate for at least 4 hours, or preferably overnight. Chilling the mixture allows the flavors to meld together and helps the ice cream churn more effectively. The colder the base, the better the final texture will be.
Churning the Ice Cream:
- Prepare Your Ice Cream Maker: Make sure your ice cream maker bowl is properly frozen according to the manufacturer’s instructions. This usually involves freezing it for at least 15-24 hours. A properly frozen bowl is essential for making good ice cream. If the bowl isn’t cold enough, the ice cream won’t freeze properly.
- Pour the Chilled Base into the Ice Cream Maker: Remove the chilled ice cream base from the refrigerator and give it a good stir. Pour it into the frozen ice cream maker bowl.
- Churn According to Manufacturer’s Instructions: Turn on your ice cream maker and churn the mixture according to the manufacturer’s instructions. This usually takes about 20-30 minutes. The ice cream will gradually thicken and become a soft-serve consistency. Keep an eye on it, as churning times can vary depending on your ice cream maker and the ambient temperature.
- Check for Soft-Serve Consistency: The ice cream is ready when it has a soft-serve consistency. It should be thick and creamy, but still soft enough to scoop. If it’s too soft, you can freeze it for a longer period of time.
Freezing and Storing:
- Transfer to a Freezer-Safe Container: Once the ice cream has reached a soft-serve consistency, transfer it to a freezer-safe container. I like to use a container with a tight-fitting lid to prevent freezer burn. You can also line the container with plastic wrap for extra protection.
- Firm Up in the Freezer: Place the container in the freezer and let the ice cream firm up for at least 2-3 hours, or longer for a firmer consistency. This step is important for achieving a scoopable texture.
- Serving and Storage: When you’re ready to serve, let the ice cream sit at room temperature for a few minutes to soften slightly. This will make it easier to scoop. Store any leftover ice cream in the freezer for up to 2 weeks. Keep in mind that sugar-free ice cream tends to get icier than regular ice cream, so it’s best to consume it within a week for the best texture.
Tips and Variations:
- Sweetener Adjustments: Feel free to adjust the amount of sweetener to your liking. Different sugar-free sweeteners have different levels of sweetness, so you may need to experiment to find the perfect amount for your taste. I recommend starting with a smaller amount and adding more as needed.
- Flavor Variations: Get creative with your flavorings! You can add a variety of extracts, spices, and mix-ins to customize your ice cream. Some popular options include:
- Chocolate: Add 1/4 cup of unsweetened cocoa powder to the ice cream base before churning.
- Mint Chocolate Chip: Add 1/2 teaspoon of peppermint extract and 1/4 cup of sugar-free chocolate chips to the ice cream base before churning.
- Coffee: Add 1 tablespoon of instant coffee granules to the ice cream base before heating.
- Strawberry: Add 1 cup of pureed strawberries to the ice cream base after churning.
- Lemon: Add 1 tablespoon of lemon zest and 2 tablespoons of lemon juice to the ice cream base before churning.
- Adding Mix-Ins: You can add mix-ins like sugar-free chocolate chips, chopped nuts, or berries to the ice cream after it has been churned. Gently fold them in before transferring the ice cream to the freezer.
- Using Different Milk Alternatives: You can use different milk alternatives in this recipe, such as coconut milk, soy milk, or oat milk. Keep in mind that the flavor and texture of the ice cream will vary depending on the type of milk alternative you use. Coconut milk will result in a richer, creamier ice cream, while soy milk and oat milk will be lighter.
- Preventing Icy Texture: Sugar-free ice cream can sometimes become icy due to the lack of sugar. To minimize ice crystals, make sure to chill the ice cream base thoroughly before churning, and use xanthan gum to help create a smoother texture. Also, store the ice cream in an airtight container to prevent freezer burn.
- Serving Suggestions: Enjoy your sugar-free vanilla ice cream on its own, or serve it with your favorite sugar-free toppings, such as berries, nuts, or sugar-free chocolate sauce. It’s also delicious in sugar-free milkshakes or as a topping for sugar-free desserts.
Troubleshooting:
- Ice Cream is Too Icy: This is a common problem with sugar-free ice cream. Make sure you’ve chilled the base thoroughly and used xanthan gum. Also, avoid temperature fluctuations in the freezer.
- Ice Cream is Too Soft: Your ice cream maker bowl may not have been cold enough, or the churning time may have been too short. Make sure the bowl is frozen solid before churning, and churn for the recommended time. You can also freeze the ice cream for a longer period of time to firm it up.
- Ice Cream is Too Hard: Let the ice cream sit at room temperature for a few minutes before serving to soften it slightly.
- Sweetener is Not Dissolving: Make sure you’re heating the mixture over medium heat and stirring constantly until the sweetener is completely dissolved. If the sweetener is still not dissolving, you can try using a different sweetener or grinding the sweetener into a finer powder.
Enjoy your homemade sugar-free vanilla ice cream! I hope you find this recipe helpful and delicious. Remember to experiment with different flavors and mix-ins to create your own unique variations.
Conclusion:
And there you have it! This Sugar Free Vanilla Ice Cream recipe is more than just a dessert; it’s a guilt-free indulgence that doesn’t compromise on flavor or texture. I truly believe this recipe is a must-try for anyone looking to reduce their sugar intake without sacrificing the joy of a creamy, classic treat. It’s simple enough for a weeknight dessert, yet elegant enough to serve at a dinner party.
Why is it a must-try? Because it’s incredibly versatile! The vanilla base is a blank canvas for your culinary creativity. Think of it as your personal ice cream laboratory! You can easily customize it to suit your preferences and dietary needs. Are you a chocolate lover? Add a tablespoon or two of unsweetened cocoa powder for a decadent chocolate version. Craving something fruity? Swirl in some fresh berries or a sugar-free fruit compote. The possibilities are endless!
Beyond the flavor, the texture is what truly sets this recipe apart. It’s smooth, creamy, and melts in your mouth, just like traditional ice cream. You won’t believe it’s sugar-free! This is thanks to the combination of ingredients and the churning process, which creates a light and airy texture that’s simply irresistible.
Now, let’s talk serving suggestions. Of course, you can enjoy this Sugar Free Vanilla Ice Cream straight from the bowl (and trust me, I won’t judge!). But if you’re looking to elevate your dessert game, here are a few ideas:
* Classic Sundae: Top a scoop or two with sugar-free chocolate syrup, chopped nuts, and a dollop of whipped cream (also sugar-free, of course!).
* Ice Cream Float: Pour some sugar-free root beer or cola over a scoop for a refreshing and nostalgic treat.
* Affogato: Drown a scoop in a shot of hot espresso for a sophisticated and caffeinated dessert.
* Baked Alaska: Use this ice cream as the base for a stunning Baked Alaska. The contrast between the cold ice cream and the warm meringue is simply divine.
* Ice Cream Sandwiches: Sandwich a scoop between two sugar-free cookies or brownies for a fun and portable treat.
And don’t forget about variations! If you’re feeling adventurous, try adding a pinch of sea salt for a salted caramel flavor. Or, infuse the cream with vanilla bean for an even more intense vanilla flavor. You could also experiment with different extracts, such as almond, peppermint, or lemon.
I’m so excited for you to try this recipe and experience the joy of sugar-free ice cream that actually tastes amazing. I’ve poured my heart into perfecting this recipe, and I truly believe you’ll love it as much as I do.
So, what are you waiting for? Grab your ingredients, dust off your ice cream maker, and get ready to create a truly unforgettable dessert. And most importantly, don’t forget to share your experience with me! I’d love to hear your feedback, see your creations, and learn about any variations you come up with. Tag me in your photos on social media, or leave a comment below. I can’t wait to see what you create! Happy ice cream making!
Sugar Free Vanilla Ice Cream: The Ultimate Guilt-Free Treat
Creamy, delicious, and sugar-free vanilla ice cream made with simple ingredients and your favorite sugar-free sweetener for a guilt-free treat.
Ingredients
Instructions
Recipe Notes
- Sweetener Adjustments: Adjust the amount of sweetener to your liking, as different sweeteners have varying sweetness levels.
- Flavor Variations: Get creative with flavorings! Consider adding cocoa powder (chocolate), peppermint extract and sugar-free chocolate chips (mint chocolate chip), instant coffee granules (coffee), pureed strawberries (strawberry), or lemon zest and juice (lemon).
- Adding Mix-Ins: Fold in sugar-free chocolate chips, chopped nuts, or berries after churning.
- Using Different Milk Alternatives: Coconut milk will result in a richer, creamier ice cream, while soy milk and oat milk will be lighter.
- Preventing Icy Texture: Chill the ice cream base thoroughly before churning, and use xanthan gum to help create a smoother texture. Also, store the ice cream in an airtight container to prevent freezer burn.
- Serving Suggestions: Enjoy your sugar-free vanilla ice cream on its own, or serve it with your favorite sugar-free toppings, such as berries, nuts, or sugar-free chocolate sauce. It’s also delicious in sugar-free milkshakes or as a topping for sugar-free desserts.
- Ice Cream is Too Icy: Make sure you’ve chilled the base thoroughly and used xanthan gum. Also, avoid temperature fluctuations in the freezer.
- Ice Cream is Too Soft: Your ice cream maker bowl may not have been cold enough, or the churning time may have been too short. Make sure the bowl is frozen solid before churning, and churn for the recommended time. You can also freeze the ice cream for a longer period of time to firm it up.
- Ice Cream is Too Hard: Let the ice cream sit at room temperature for a few minutes before serving to soften it slightly.
- Sweetener is Not Dissolving: Make sure you’re heating the mixture over medium heat and stirring constantly until the sweetener is completely dissolved. If the sweetener is still not dissolving, you can try using a different sweetener or grinding the sweetener into a finer powder.


Leave a Comment