
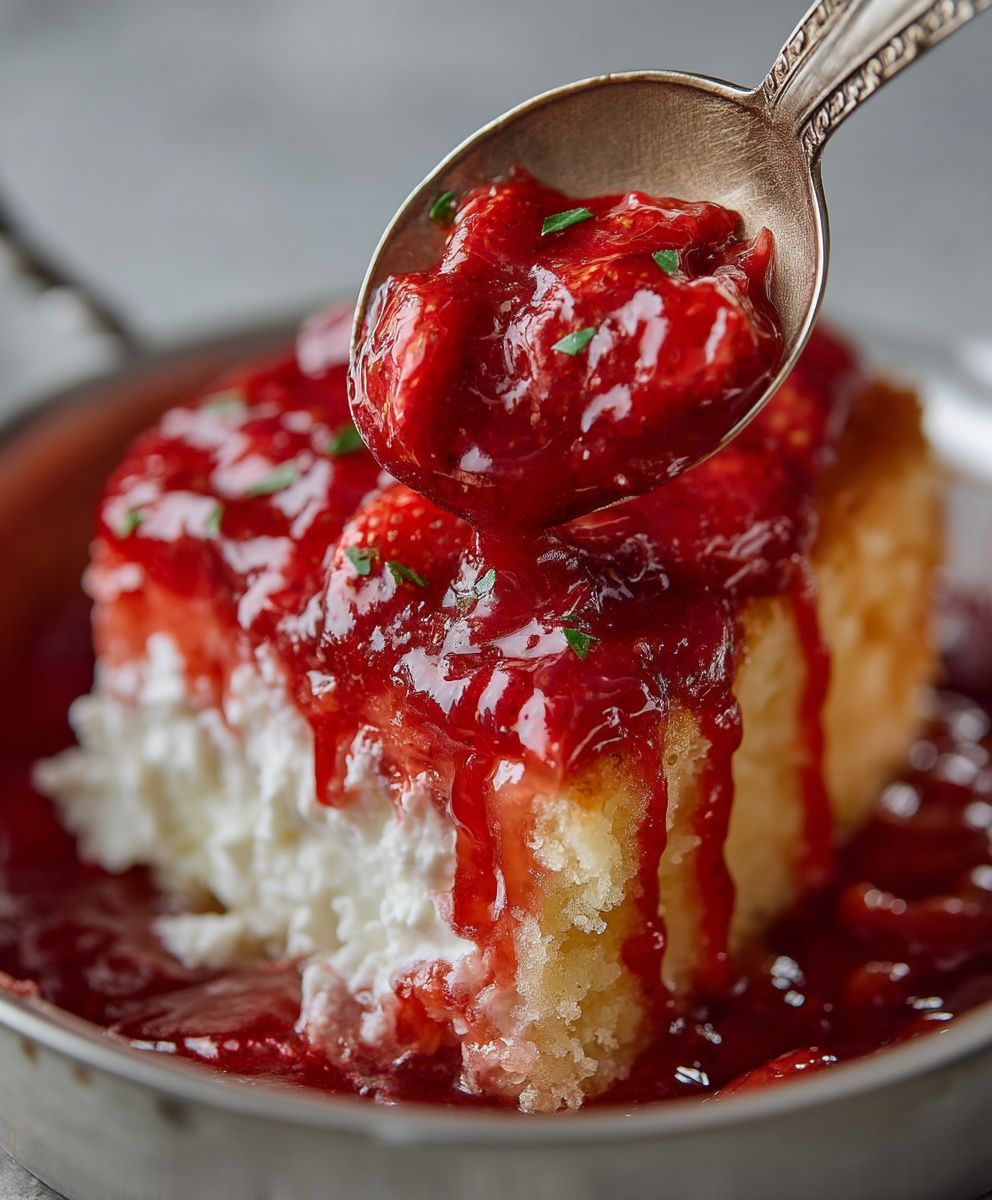
Strawberry cake filling: the secret ingredient that elevates a simple cake into a decadent masterpiece! Have you ever bitten into a slice of cake and been utterly captivated by the burst of fresh, sweet, and slightly tart flavor nestled between the layers? That’s the magic of a truly exceptional strawberry cake filling. I’m going to share my go-to recipe that will transform your baking and have everyone begging for more.
While the exact origins of using fruit fillings in cakes are difficult to pinpoint, the combination of strawberries and cake has a long and beloved history, particularly in European and American baking traditions. Strawberries, with their vibrant color and delicate sweetness, have always been associated with celebrations and summertime indulgence. Think of classic strawberry shortcake – a testament to the perfect pairing of berries and baked goods.
People adore a good strawberry cake filling for several reasons. First, the taste is simply irresistible. The bright, fruity notes of strawberries perfectly complement the richness of the cake, creating a harmonious balance of flavors. Second, the texture is divine. A well-made filling should be smooth, creamy, and bursting with juicy strawberry pieces. Finally, it’s surprisingly versatile! You can use it in layer cakes, cupcakes, even as a topping for waffles or pancakes. So, let’s dive into creating this delightful addition to your baking repertoire!

Ingredients:
- 2 pounds fresh strawberries, hulled and sliced
- 1 cup granulated sugar, divided
- 1/4 cup cornstarch
- 1/4 cup cold water
- 1 tablespoon lemon juice, freshly squeezed
- 1 teaspoon vanilla extract
- Pinch of salt
Preparing the Strawberries:
Okay, let’s get started with the heart of our filling – the strawberries! I like to use fresh, ripe strawberries for the best flavor and texture. Frozen strawberries can work in a pinch, but be sure to thaw them completely and drain off any excess liquid before using them.
- Wash and Hull: First things first, give those beautiful strawberries a good wash under cool running water. Gently rub them to remove any dirt or debris. Then, hull them. You can use a paring knife or a strawberry huller for this. I find a huller to be quicker and easier, but a knife works just fine too. Just be careful not to remove too much of the strawberry flesh.
- Slice the Strawberries: Now, slice the strawberries. The thickness of the slices is really up to you and your preference. I like to slice them about 1/4 inch thick. This gives them a nice texture in the filling without being too chunky. If you’re using smaller strawberries, you can simply halve or quarter them. For larger berries, you might want to slice them into thirds or even smaller pieces. The goal is to have relatively uniform pieces so they cook evenly.
- Macerate with Sugar (Part 1): Place the sliced strawberries in a large bowl. Add 1/2 cup of the granulated sugar (reserving the other 1/2 cup for later). Gently toss the strawberries and sugar together until the strawberries are evenly coated. This process, called maceration, helps to draw out the natural juices from the strawberries, creating a delicious syrup that will enhance the flavor of the filling.
- Let it Sit: Cover the bowl with plastic wrap and let the strawberries sit at room temperature for at least 30 minutes, or even up to an hour. The longer they sit, the more juices they will release. You’ll notice a beautiful, ruby-red syrup forming at the bottom of the bowl. This is exactly what we want!
Making the Strawberry Sauce:
Now that our strawberries have had a chance to macerate and release their delicious juices, it’s time to create the sauce that will bind everything together. This step is crucial for achieving the perfect consistency and preventing the filling from being too watery.
- Combine Cornstarch and Water: In a small bowl, whisk together the cornstarch and cold water until the cornstarch is completely dissolved and there are no lumps. This is important because if you add cornstarch directly to hot liquid, it can clump up and create an unpleasant texture. Using cold water ensures that the cornstarch disperses evenly.
- Cook the Strawberries: Transfer the macerated strawberries and their juices to a medium saucepan. Place the saucepan over medium heat and bring the mixture to a gentle simmer. Be careful not to boil it too vigorously, as this can cause the strawberries to break down too much.
- Add Remaining Sugar: Add the remaining 1/2 cup of granulated sugar to the saucepan. Stir gently to dissolve the sugar completely.
- Thicken the Sauce: Slowly pour the cornstarch slurry into the saucepan, stirring constantly. Continue to stir until the sauce begins to thicken. This usually takes just a minute or two. The sauce should become glossy and slightly translucent. Be careful not to overcook the sauce, as it will continue to thicken as it cools.
- Simmer and Reduce: Reduce the heat to low and let the sauce simmer gently for another 5-7 minutes, stirring occasionally. This will allow the flavors to meld together and the sauce to thicken further. If you prefer a thicker filling, you can simmer it for a longer period of time, but be sure to stir frequently to prevent it from sticking to the bottom of the pan.
- Add Lemon Juice and Vanilla: Remove the saucepan from the heat and stir in the lemon juice, vanilla extract, and pinch of salt. The lemon juice adds a touch of brightness and acidity that balances the sweetness of the strawberries, while the vanilla extract enhances the overall flavor. The pinch of salt helps to bring out the sweetness of the strawberries.
Cooling and Storing the Filling:
Once the strawberry filling is cooked, it’s important to cool it properly before using it in your cake. This will prevent the filling from melting the frosting or making the cake soggy.
- Cool Completely: Transfer the strawberry filling to a clean bowl. Cover the bowl with plastic wrap, pressing the plastic wrap directly onto the surface of the filling. This will prevent a skin from forming on top. Let the filling cool completely to room temperature. This usually takes about 1-2 hours.
- Refrigerate (Optional): Once the filling has cooled to room temperature, you can refrigerate it for several hours or overnight to allow the flavors to develop even further. This is especially helpful if you’re making the filling ahead of time.
- Storage: Store the cooled strawberry filling in an airtight container in the refrigerator for up to 3-4 days. If you want to store it for longer, you can freeze it for up to 2-3 months. To thaw frozen filling, transfer it to the refrigerator and let it thaw overnight.
Tips and Variations:
Here are a few extra tips and variations to help you customize this strawberry filling to your liking:
- Strawberry Variety: Feel free to experiment with different varieties of strawberries. Some varieties are sweeter than others, so you may need to adjust the amount of sugar accordingly.
- Add Other Berries: For a mixed berry filling, you can add other berries such as raspberries, blueberries, or blackberries. Just be sure to adjust the amount of each berry to your liking.
- Thickening Agent: If you prefer a thicker filling, you can use a little more cornstarch. However, be careful not to use too much, as this can make the filling gummy. You can also use tapioca starch as an alternative thickening agent.
- Citrus Zest: For an extra burst of flavor, add a teaspoon of lemon or orange zest to the filling.
- Almond Extract: A few drops of almond extract can also enhance the flavor of the strawberry filling.
- Strawberry Jam: For a richer, more intense strawberry flavor, you can add a tablespoon or two of strawberry jam to the filling.
- Serving Suggestions: This strawberry filling is not only perfect for cakes, but it’s also delicious in pies, tarts, pastries, and even as a topping for ice cream or yogurt.
I hope you enjoy this delicious and versatile strawberry filling! It’s sure to be a hit with your family and friends. Happy baking!
Conclusion:
So there you have it! This strawberry cake filling recipe is more than just a sweet addition; it’s a game-changer for your baking adventures. I truly believe that once you try this, you’ll never go back to store-bought fillings again. The burst of fresh strawberry flavor, the creamy texture, and the overall simplicity of the recipe make it an absolute must-try for any home baker, regardless of skill level.
Why is it a must-try? Well, beyond the incredible taste, it’s the versatility that really shines. Imagine using it not just in cakes, but also in cupcakes, layered desserts, or even as a delightful topping for waffles or pancakes. The possibilities are truly endless! Plus, knowing that you’ve created something so delicious from scratch is incredibly rewarding. It’s a simple way to elevate your desserts and impress your friends and family.
But wait, there’s more! Let’s talk about serving suggestions and variations. While this filling is absolutely divine as is, feel free to experiment and make it your own. For a richer flavor, consider adding a tablespoon of strawberry liqueur or a splash of vanilla extract. If you prefer a smoother texture, you can strain the filling after cooking to remove any seeds. For a tangier twist, a squeeze of lemon juice will brighten the flavors beautifully.
And don’t limit yourself to just strawberry cakes! This filling pairs wonderfully with chocolate cake, vanilla cake, lemon cake, and even almond cake. Think about layering it with whipped cream and fresh berries for a stunning trifle, or using it as a filling for homemade crepes. You could even swirl it into your favorite yogurt or ice cream for a delightful treat.
Serving Suggestions:
- Use as a filling for layer cakes, cupcakes, and pastries.
- Top waffles, pancakes, or French toast.
- Layer in trifles or parfaits with whipped cream and berries.
- Swirl into yogurt or ice cream.
- Spread on toast or bagels for a sweet treat.
Variations:
- Add a tablespoon of strawberry liqueur or vanilla extract for enhanced flavor.
- Strain the filling for a smoother texture.
- Incorporate a squeeze of lemon juice for a tangy twist.
- Mix in chopped nuts or chocolate chips for added texture and flavor.
- Use different types of berries, such as raspberries or blueberries, for a unique flavor profile.
I’m so excited for you to try this recipe and experience the joy of homemade strawberry cake filling. It’s a recipe that I’ve personally perfected over the years, and I’m confident that you’ll love it just as much as I do.
So, what are you waiting for? Gather your ingredients, preheat your oven (if you’re baking a cake to fill!), and get ready to create something truly special. And most importantly, don’t be afraid to have fun in the kitchen! Baking should be an enjoyable experience, so relax, experiment, and let your creativity flow.
Once you’ve tried this recipe, I would absolutely love to hear about your experience. Did you make any variations? What kind of cake did you use it in? What did your friends and family think? Share your photos and stories in the comments below! Your feedback is invaluable, and it helps me to continue creating and sharing delicious recipes that you’ll love. Happy baking! I can’t wait to see what you create with this delightful filling. Let me know how your strawberry cake filling turns out!
Strawberry Cake Filling: The Ultimate Guide to Deliciousness
Vibrant homemade strawberry filling for cakes, pies, and pastries. Made with fresh strawberries, sugar, lemon, and vanilla.
Ingredients
Instructions
Recipe Notes
- For best results, use fresh, ripe strawberries. Frozen strawberries can be used, but thaw completely and drain excess liquid.
- Adjust sugar based on the sweetness of the strawberries.
- Experiment with different strawberry varieties or add other berries like raspberries, blueberries, or blackberries.
- For a thicker filling, use slightly more cornstarch, but be careful not to overdo it. Tapioca starch can also be used.
- Add lemon or orange zest for extra flavor.
- A few drops of almond extract can enhance the flavor.
- Add a tablespoon or two of strawberry jam for a richer flavor.
- This filling is great for cakes, pies, tarts, pastries, ice cream, or yogurt.

Leave a Comment