
A Spooktacular Twist on a Classic: Jack O Lantern Quesadillas
Jack O Lantern Quesadillas are not just a festive treat; they’re a delightful culinary experience that brings smiles and a touch of spooky fun to any table, especially as the autumn leaves begin to fall and Halloween approaches. I am absolutely thrilled to share with you a recipe that perfectly blends simple ingredients with creative presentation, transforming an everyday snack into an edible masterpiece. Imagine the joy of serving a dish that’s both incredibly tasty and visually captivating, making mealtime an exciting event for both children and adults alike.
While the humble quesadilla boasts a rich heritage rooted in traditional Mexican cuisine – a staple of cheese melted between tortillas – our playful twist infuses it with the whimsical spirit of Halloween. The transformation into a Jack-o’-lantern isn’t just about carving a face; it’s about making food an interactive and memorable part of celebrations. People adore these Jack O Lantern Quesadillas not only for their gooey, savory cheese filling and crispy tortilla exterior but also for the sheer convenience and the immense fun factor they bring. They’re quick to prepare, versatile enough for various fillings, and offer that perfect blend of comfort food familiarity with a unique, seasonal charm. They truly are the ideal solution for a quick weeknight dinner, a festive party appetizer, or a creative lunchbox surprise.

Ingredients:
- For the Quesadillas:
- 12 medium (8-inch) or 8 large (10-inch) flour tortillas – I find these are the perfect size for individual servings and great for cutting out faces.
- 2 cups shredded Monterey Jack cheese, cheddar cheese, or a Mexican blend – a good melting cheese is absolutely crucial for that gooey perfection!
- 2 tablespoons olive oil or vegetable oil, plus extra for cooking the quesadillas – we’ll use this for sautéing our filling ingredients and for getting those tortillas perfectly golden.
- For the Savory Chicken and Black Bean Filling:
- 1 pound boneless, skinless chicken breasts or thighs, cut into small ½-inch cubes – for a vegetarian option, you can easily omit the chicken and add another can of black beans or some sautéed mushrooms!
- 1 small yellow onion, finely diced – this adds a wonderful aromatic base to our filling.
- 1 bell pepper (any color, I love red or orange for a pop of color!), finely diced – adds sweetness and crunch.
- 1 (15-ounce) can black beans, rinsed and drained well – make sure they’re thoroughly rinsed to avoid excess starch and sodium.
- 1 cup frozen corn kernels, thawed – brings a lovely sweetness and texture.
- 2 cloves garlic, minced – for that essential savory depth.
- 1 teaspoon chili powder – provides a mild, earthy warmth.
- ½ teaspoon ground cumin – the backbone of many Mexican-inspired dishes, giving that signature smoky flavor.
- ¼ teaspoon smoked paprika (optional, but highly recommended for an extra layer of flavor!) – enhances the smoky notes.
- Salt and freshly ground black pepper to taste – adjust to your preference.
- ¼ cup chopped fresh cilantro (optional, for garnish and flavor in the filling) – adds a fresh, vibrant finish.
- Optional Toppings (for serving):
- Salsa or pico de gallo – for a fresh, zesty kick.
- Sour cream or Greek yogurt – to cool things down and add creaminess.
- Guacamole or sliced avocado – for rich, healthy fats.
- Extra fresh cilantro, chopped – for an extra burst of herbaceousness.
- Hot sauce – for those who like a little extra heat!
Prepping Our Filling: The Heart of the Quesadilla
This is where we build the amazing flavors that will fill our Jack O’ Lanterns. Trust me, a well-seasoned filling makes all the difference!
- Prepare the Chicken: If you’re using chicken, start by ensuring it’s cut into small, even ½-inch cubes. This helps it cook quickly and evenly, and makes sure you get some chicken in every bite without it being too chunky. Season the chicken cubes generously with a pinch of salt and black pepper.
- Sauté Aromatics and Chicken: Heat 2 tablespoons of olive oil in a large skillet or frying pan over medium-high heat. Once the oil is shimmering, add the diced chicken. Cook, stirring occasionally, until the chicken is lightly browned on all sides and cooked through. This usually takes about 5-7 minutes. Don’t worry if it’s not perfectly golden, we’re just ensuring it’s cooked through. Once done, remove the chicken from the pan and set it aside in a bowl.
- Build the Flavor Base: In the same skillet, reduce the heat to medium. Add the finely diced onion and bell pepper. Sauté for about 5-7 minutes, stirring occasionally, until the vegetables have softened and the onion is translucent. We’re looking for a tender, slightly sweet base here, so don’t rush this step.
- Add Garlic and Spices: Now, add the minced garlic to the skillet with the softened vegetables. Cook for just 1 minute more, stirring constantly, until the garlic becomes fragrant. We want to avoid burning the garlic, as that can turn bitter. Immediately stir in the chili powder, ground cumin, and smoked paprika (if using). Cook for another minute, stirring to toast the spices. This crucial step really helps to bloom the flavors of the spices, making them more potent and aromatic. You’ll notice the air in your kitchen filling with wonderful smells!
- Combine All Filling Ingredients: Return the cooked chicken to the skillet. Add the rinsed and drained black beans and the thawed corn kernels. Stir everything together until well combined. Continue to cook for another 3-5 minutes, allowing all the flavors to meld together and for the mixture to heat through completely.
- Taste and Adjust Seasoning: This is a very important step! Carefully taste the filling. At this point, you’ll want to add salt and black pepper to your preference. Remember, the cheese in the quesadillas will add some saltiness, so don’t overdo it. If you’re using fresh cilantro, stir about half of it into the filling now. Remove the skillet from the heat and set the filling aside. We want it to be warm, but not piping hot, when we assemble the quesadillas.
Crafting Our Jack O’ Lantern Faces: The Fun Part!
This is where the magic happens and our quesadillas transform into festive Jack O’ Lanterns! It’s a surprisingly simple step that yields impressive results.
- Gather Your Tools: You’ll need a small, sharp knife (a paring knife works wonderfully for this), a cutting board, and your tortillas. If you have any small cookie cutters shaped like triangles, circles, or even tiny stars, those can be a fun alternative or addition for eyes and noses!
- Prepare Your Tortillas: For each quesadilla, you’ll need two tortillas. One tortilla will be the “bottom” layer, remaining whole, and the other will be the “top” layer, which we will transform into our Jack O’ Lantern face.
- Create the Jack O’ Lantern Face: Lay one tortilla flat on your cutting board. This is your canvas!
- Eyes: Using your small, sharp knife, carefully cut out two triangles or circles for the eyes. You can make them symmetrical or give your Jack O’ Lantern a wonky, mischievous look – it’s entirely up to you! For triangles, I find it easiest to make three small cuts that meet at points.
- Nose: For the nose, a small upside-down triangle is classic. Alternatively, a tiny circle or even a small rectangle can work. Keep it proportionate to your eyes.
- Mouth: This is where you can get really creative! A classic jagged smile with a few “teeth” cut out is always a hit. You can also do a wide, open “O” shape, or even a spooky, crooked grin. Just be mindful not to cut too close to the edge of the tortilla, as it needs to hold together during cooking. I like to make a series of small, V-shaped cuts along a curved line to create the traditional toothy grin.
Important Tip: Take your time with the cuts. It’s much easier to do this before the tortilla gets hot and fragile. Also, don’t press too hard on your knife, just enough to cut through the tortilla cleanly. You want to save those little cut-out pieces of tortilla for a snack later (tortilla chips, anyone?) or discard them.
- Repeat for All Top Tortillas: Continue this process for as many quesadillas as you plan to make. For a batch of 6 quesadillas, you’ll be cutting faces into 6 tortillas. Remember, each face can be unique – some happy, some spooky, some surprised! This variety adds to the charm.
Assembling and Cooking Our Spooky Quesadillas
Now that our filling is ready and our faces are carved, it’s time to bring these festive quesadillas to life in the pan! Getting that perfect golden-brown exterior and gooey interior is key.
- Prepare Your Cooking Surface: Heat a large non-stick skillet or a griddle over medium heat. It’s crucial to get the pan to the right temperature – too low and the tortilla will just dry out, too high and it will burn before the cheese melts. I like to let it preheat for a good 3-5 minutes. Once hot, lightly brush or spray the pan with a little olive oil or vegetable oil. You don’t need much, just enough to prevent sticking and encourage browning.
- First Layer – The Whole Tortilla: Place one whole, uncut tortilla flat into the heated skillet. This will be the sturdy base of our quesadilla.
- Layer the Cheese: Immediately sprinkle about a quarter to a third of a cup of shredded cheese evenly over the entire surface of the tortilla, leaving a small border (about ½ inch) around the edge. The cheese acts as the “glue” that holds the filling and the top tortilla in place, so don’t skimp!
- Add the Filling: Spoon about a quarter to a third of a cup of our savory chicken and black bean filling over half of the cheese-covered tortilla. Try to spread it somewhat evenly, but keep it on one side if you’re planning to fold your quesadilla in half. If you’re making a full round quesadilla, spread it over the entire cheese layer, again leaving a small border. I usually aim for a full round quesadilla for the Jack O’ Lantern effect, but folding it works too.
- More Cheese! (Optional but Recommended): For extra cheesiness and to really ensure the top tortilla sticks, I like to sprinkle another light layer of cheese over the filling. This creates a double layer of cheesy goodness!
- Top with the Jack O’ Lantern Tortilla: Carefully place one of your pre-cut Jack O’ Lantern tortillas directly on top of the filling and cheese, aligning it with the bottom tortilla. Gently press down on the top tortilla with a spatula to ensure good contact.
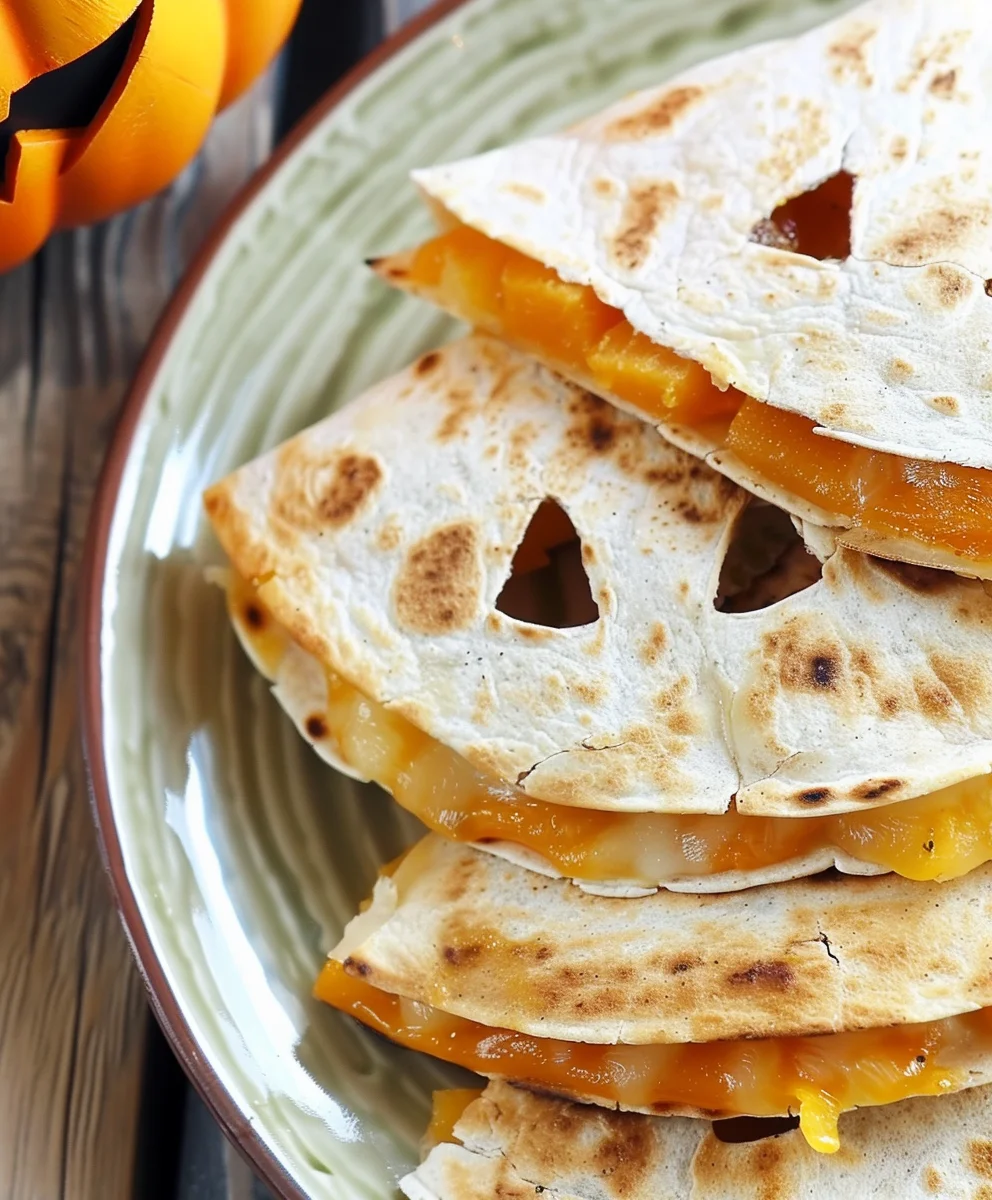
- Cook the First Side: Let the quesadilla cook undisturbed for about 3-5 minutes, or until the bottom tortilla is golden brown and crispy, and the cheese has started to melt and become bubbly around the edges. You can peek underneath with a spatula to check the color. The beautiful part here is that as the cheese melts, it will show through the cut-out face of the Jack O’ Lantern, giving it that glowing, orange effect!
- Flip and Cook the Second Side: This is a delicate step, especially with larger quesadillas. Using a large, wide spatula (or two spatulas if you’re feeling adventurous!), carefully flip the quesadilla over to cook the other side. Cook for another 3-5 minutes, or until the second side is also golden brown and the cheese inside is fully melted and gooey. You’ll know it’s ready when you see that beautiful golden crust on both sides and the filling is piping hot.
- Remove and Rest: Once perfectly cooked, carefully transfer the Jack O’ Lantern quesadilla from the skillet to a cutting board. I recommend letting it rest for about a minute or two before cutting. This allows the cheese to set slightly, preventing the filling from spilling out when you slice it.
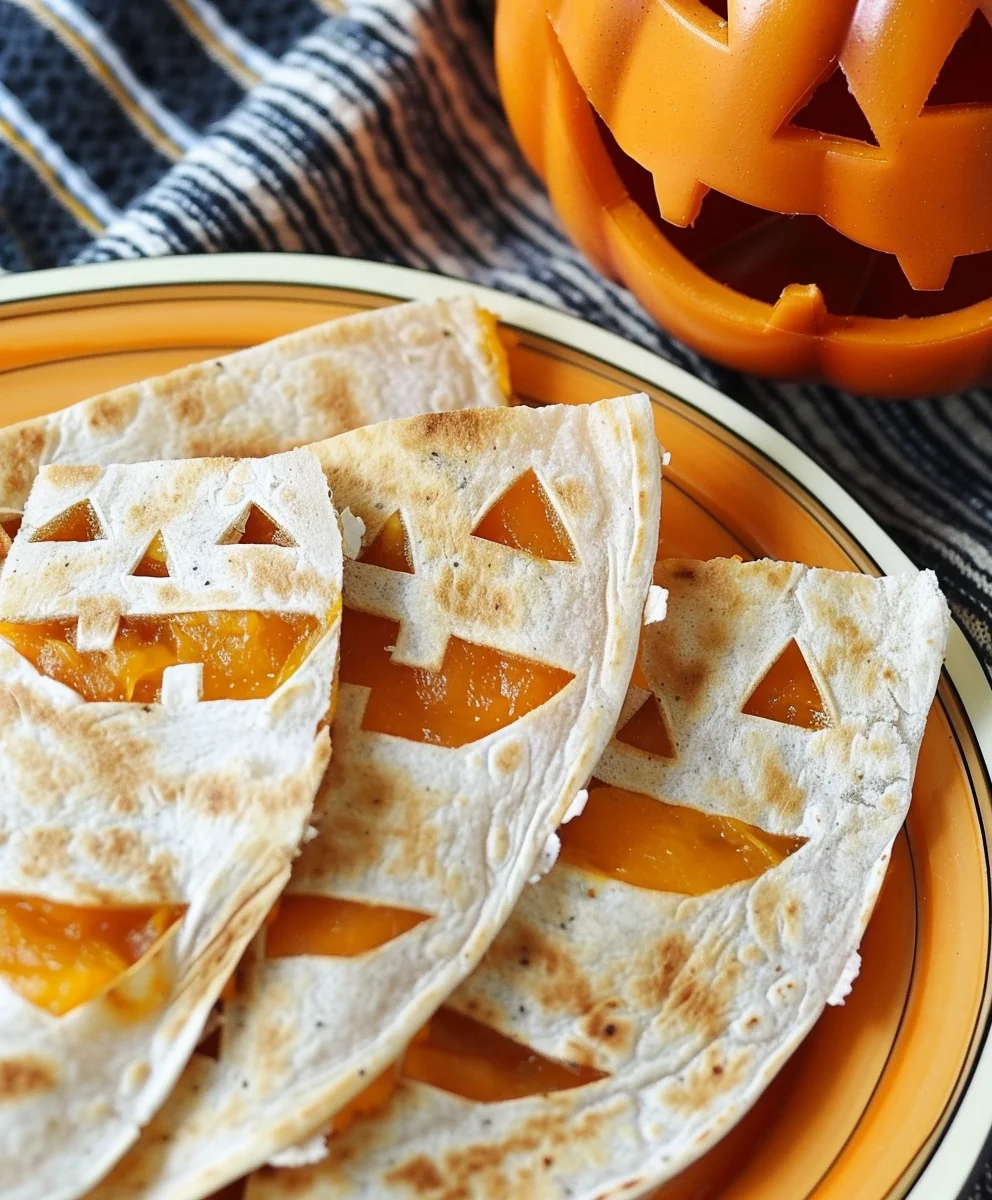
- Slice and Serve: Using a pizza cutter or a sharp knife, cut the quesadilla into wedges or halves. The classic way is to cut it into 2 or 3 wedges, making sure each piece shows off a bit of that spooky face!
- Repeat the Process: Continue assembling and cooking the remaining quesadillas, adding a little more oil to the pan between batches if needed. Don’t overcrowd your pan; cook one or two at a time, depending on the size of your skillet. Patience here will pay off with perfectly cooked quesadillas.
Serving Suggestions and Extra Spooky Fun
Once your adorable (or spooky!) Jack O’ Lantern Quesadillas are ready, it’s time to present them with flair! The presentation is almost as fun as the eating, especially when you have a theme.
- Arrange on a Platter: Stack the warm quesadilla wedges on a serving platter. The vibrant orange of the melted cheese peeking through the cut-out faces will be a delightful sight! I love arranging them in a circular pattern, almost like a pizza, for easy grabbing.
- Offer a Dip Station: Set up a little station with all those delicious optional toppings we talked about.
- Salsa or Pico de Gallo: The fresh, zesty flavors cut through the richness of the cheese and filling beautifully. A bright red salsa looks fantastic next to our orange quesadillas.
- Sour Cream or Greek Yogurt: A dollop of cool, creamy sour cream or a healthier Greek yogurt option adds a lovely tang and balances any spice. You could even put a few drops of green food coloring in the sour cream to make “slime” for extra spooky effect!
- Guacamole or Sliced Avocado: For that rich, buttery, and healthy fat component. The vibrant green of the guacamole also makes for a great color contrast.
- Chopped Fresh Cilantro: A final sprinkle of fresh cilantro not only adds a burst of flavor but also makes everything look more appealing and professional.
- Consider Themed Garnishes: If you’re really leaning into the Jack O’ Lantern theme for a party, think about adding some fun, edible garnishes around your platter. Maybe some black olive “spiders” on a bed of lettuce, or even just some decorative leaves.
- Serve Immediately: Quesadillas are always best served warm, right off the pan, when the cheese is at its gooey peak. Encourage your family or guests to dig in right away to enjoy the full experience.
- Pair with a Drink: A refreshing glass of iced tea, a simple lemonade, or even a sparkling apple cider would be perfect accompaniments, especially for a fall-themed meal.
- Leftovers (if any!): If by some miracle you have any leftovers, they can be stored in an airtight container in the refrigerator for up to 2-3 days. Reheat them gently in a dry skillet over medium heat, or in a toaster oven for best results, to regain some of that crispiness. Microwaving will work but might make them a bit soft.
These Jack O’ Lantern Quesadillas are not just a meal; they’re an experience! They’re perfect for a festive family dinner, a fun Halloween party appetizer, or just to bring a smile to someone’s face. The combination of the flavorful, savory filling, the melted cheese, and the playful design makes them an instant hit every single time. Enjoy making and sharing these delightful creations!
Conclusion:
This recipe truly is a gem, isn’t it? I’m absolutely thrilled with how simple, yet incredibly impactful, these quesadillas are. They’re more than just a meal; they’re an experience, especially for families or anyone looking to add a dash of playful charm to their day. What truly sets them apart is their remarkable blend of convenience and creativity. You get that satisfying, cheesy goodness wrapped in a perfectly crisp tortilla, but with an unexpected twist that brings smiles to every face. It’s the kind of dish that looks elaborate but comes together with surprising speed, making it perfect for busy weeknights or impromptu gatherings. The way the cheese melts and fuses the flavors, coupled with that delightful crunch, creates an irresistible sensation. And let’s be honest, who can resist a meal that winks back at you? It’s a guaranteed crowd-pleaser that delivers on both taste and visual appeal, proving that memorable meals don’t have to be complicated.
Now, while these quesadillas are utterly fantastic on their own, don’t hesitate to elevate them further with some delightful accompaniments. For a classic pairing, a vibrant bowl of homemade salsa, a dollop of cool sour cream, or a generous scoop of creamy guacamole can transform them into a mini fiesta. Imagine dipping a warm, cheesy wedge into fresh, zesty salsa – pure bliss! For something a little heartier, consider serving them alongside a light, crisp side salad tossed with a vinaigrette to cut through the richness. Or, if you’re embracing the cozy vibes, a warm bowl of black bean soup or a spicy tortilla soup makes for an incredible companion, turning your simple meal into a wholesome, comforting spread. These thoughtful additions can take an already great dish and make it truly unforgettable, catering to different preferences and hunger levels.
But the fun doesn’t stop there! This recipe is incredibly adaptable, inviting you to experiment and truly make it your own. Think about the fillings: you could easily swap out the cheddar for a Monterey Jack and colby blend for a different melt, or add some cooked, shredded chicken or seasoned ground beef for a protein boost. For a vegetarian twist, consider sautéed bell peppers, onions, or even some black beans and corn for a more substantial and colorful filling. Want to spice things up? A pinch of cayenne pepper or some finely diced jalapeños mixed into the cheese layer would add a fantastic kick. You could even play with different tortilla types – spinach or whole wheat tortillas would offer a subtle flavor variation and a touch more nutrition. This adaptability means you can make them dozens of times, tweaking them slightly each time, and discover new favorites. Each variation retains that core, comforting quesadilla feel, but with your unique culinary signature, ensuring these never get boring.
So, what are you waiting for? I genuinely encourage you to roll up your sleeves and give these fantastic quesadillas a try. Whether you’re whipping them up for a special occasion or just a fun family dinner, I promise you won’t be disappointed. The sheer joy of seeing these cheerful faces emerge from your kitchen is incredibly rewarding, and the taste is simply unmatched for a quick, fun meal. Once you’ve made your batch of delightful Jack O Lantern Quesadillas, please, please, please come back and share your experience with me! I absolutely adore hearing about your kitchen adventures. Did you try a new filling? Did your kids help with the cutting? What was everyone’s favorite part? Your insights and photos are not just inspiring; they help build a wonderful community of food lovers. Share your triumphs, your clever modifications, or even just a picture of your finished plate. I can’t wait to see what you create and hear all about your delicious journey. Let’s make some magic in the kitchen together!
Jack O’ Lantern Quesadillas
Easy and fun Jack O’ Lantern Quesadillas are a festive Halloween treat, transforming a classic cheesy quesadilla into an edible masterpiece with a savory chicken and black bean filling. Perfect for a quick dinner, party appetizer, or lunchbox surprise.
Ingredients
-
10 (8-inch) flour tortillas
-
2 cups shredded Colby Jack cheese
-
2 tbsp olive or vegetable oil, plus extra for cooking
-
1 lb boneless, skinless chicken breasts or thighs, cut into small ½-inch cubes
-
1 small yellow onion, finely diced
-
1 bell pepper (any color), finely diced
-
1 (15-ounce) can black beans, rinsed and drained
-
1 cup frozen corn kernels, thawed
-
2 cloves garlic, minced
-
1 tsp chili powder
-
½ tsp ground cumin
-
¼ tsp smoked paprika (optional)
-
Salt and freshly ground black pepper, to taste
-
¼ cup chopped fresh cilantro (optional)
-
For cutting faces: small, sharp knife or 4-inch pumpkin cookie cutter
Instructions
-
Step 1
Cut chicken into ½-inch cubes and season with salt and pepper. Heat 2 tbsp oil in a large skillet over medium-high heat. Cook chicken for 5-7 minutes until lightly browned and cooked through. Remove chicken from skillet and set aside. -
Step 2
In the same skillet, reduce heat to medium. Add diced onion and bell pepper. Sauté for 5-7 minutes until softened and translucent. Add minced garlic and cook for 1 minute until fragrant, stirring constantly. -
Step 3
Stir in chili powder, ground cumin, and smoked paprika (if using); cook for 1 minute to toast spices. Return cooked chicken to skillet. Add rinsed black beans and thawed corn kernels. Stir everything together and cook for 3-5 minutes, allowing flavors to meld and heat through. Taste and adjust seasoning. Stir in half of the chopped fresh cilantro (if using). Remove filling from heat. -
Step 4
Lay 5 tortillas flat on a cutting board. Using a small, sharp knife or a 4-inch pumpkin cookie cutter, carefully cut out two eyes, a nose, and a mouth on each tortilla to create unique Jack O’ Lantern faces. These will be your top tortillas. -
Step 5
Heat a large non-stick skillet or griddle over medium heat. Lightly brush or spray the pan with olive or vegetable oil. Place one whole, uncut tortilla (bottom) into the heated skillet. Immediately sprinkle about ¼ to ⅓ cup of shredded Colby Jack cheese evenly over the entire surface, leaving a small border. -
Step 6
Spoon about ¼ to ⅓ cup of the savory chicken and black bean filling over the cheese-covered tortilla. (Optional: sprinkle another light layer of cheese over the filling). Carefully place one of your pre-cut Jack O’ Lantern tortillas (top) directly on top, aligning it with the bottom tortilla. Gently press down with a spatula. -
Step 7
Cook the quesadilla undisturbed for 3-5 minutes, or until the bottom tortilla is golden brown and crispy, and the cheese has started to melt. Carefully flip the quesadilla over using a large spatula. Cook for another 3-5 minutes, or until the second side is golden brown and the cheese inside is fully melted and gooey. -
Step 8
Once perfectly cooked, transfer the Jack O’ Lantern quesadilla from the skillet to a cutting board. Let it rest for 1-2 minutes before cutting into wedges or halves (typically 2-3 wedges per quesadilla). Repeat for the remaining quesadillas, adding more oil to the pan if needed. Serve immediately with optional toppings like salsa, sour cream, guacamole, or extra fresh cilantro.
Important Information
Nutrition Facts (Per Serving)
It is important to consider this information as approximate and not to use it as definitive health advice.
Allergy Information
Please check ingredients for potential allergens and consult a health professional if in doubt.


Leave a Comment