
Halloween Pretzels are not just a treat; they’re an experience waiting to unfold, transforming a simple snack into a canvas of spooky delight. As autumn leaves fall and the air grows crisp, our minds naturally drift towards festive gatherings and the joy of creating memorable moments. What better way to celebrate the season of ghouls and goblins than by crafting an edible masterpiece that’s both fun to make and utterly irresistible to devour?
While pretzels themselves boast a rich history rooted in European, particularly German, traditions dating back centuries, their evolution into a Halloween staple is a testament to culinary creativity. Originally recognized for their distinctive twisted shape, symbolic of arms crossed in prayer, today’s versions invite a playful twist on tradition. We all know and love the classic salty crunch, but when draped in chocolate, adorned with sprinkles, or given eerie edible eyes, they transcend their humble origins.
Why We Adore These Spooktacular Treats
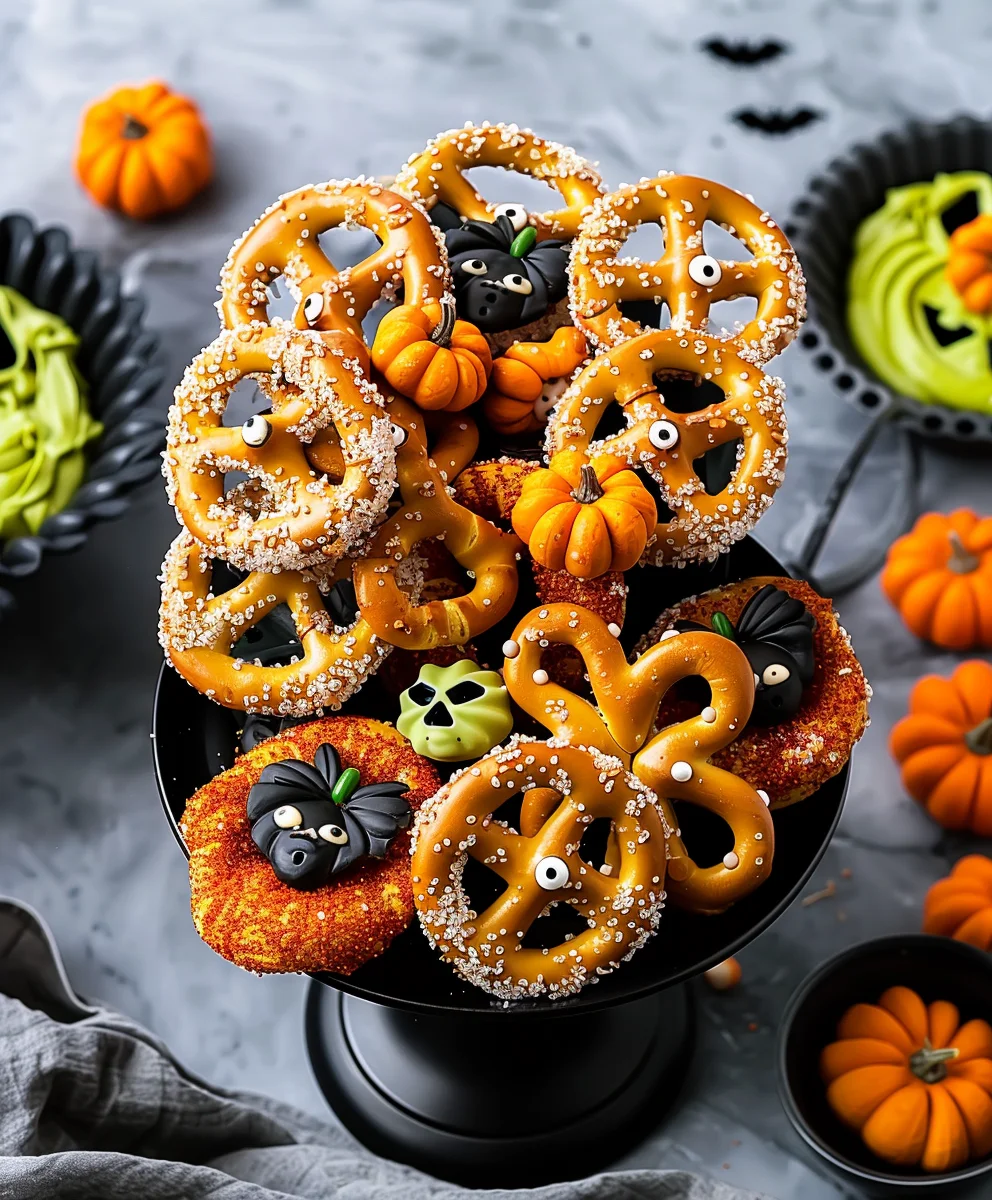
People absolutely adore these creative confections for a multitude of reasons. Firstly, the harmonious blend of salty pretzel and sweet coating is a flavor sensation that perfectly tantalizes the palate. Secondly, their undeniable visual appeal is unmatched; each bite offers not just taste but also a whimsical, spooky aesthetic. Furthermore, the ease and convenience of preparing these Halloween Pretzels make them an ideal project for all ages, fostering wonderful family memories in the kitchen. They are perfect for party platters, lunchbox surprises, or simply a festive snack as you settle in for a scary movie night. Get ready to embrace the spirit of the season with this enchanting recipe!

Ingredients:
- For the Pretzel Dough:
- 1 ½ cups (360ml) warm water (about 105-115°F / 40-46°C)
- 1 tablespoon active dry yeast
- 1 teaspoon granulated sugar
- 1 teaspoon salt (I prefer fine sea salt for dough)
- 4 ½ cups (540g) all-purpose flour, plus extra for dusting
- 2 tablespoons unsalted butter, melted and cooled slightly
- For the Baking Soda Bath:
- 10 cups (2.4 liters) water
- ⅔ cup (100g) baking soda
- For Topping & Decorating Your Halloween Pretzels:
- 1 large egg, whisked with 1 tablespoon water (for egg wash)
- Coarse pretzel salt (optional, for traditional pretzels)
- 12 ounces (340g) white chocolate chips or candy melts
- Food coloring suitable for chocolate (gel or oil-based) in orange, purple, green, black
- Various Halloween sprinkles (e.g., bats, ghosts, nonpareils, jimmies)
- Candy googly eyes (various sizes)
- Small edible sugar decorations (e.g., tiny spiders, pumpkins)
- Dark chocolate chips or candy melts (for details like spider legs or mouths)
- Vegetable shortening or coconut oil (optional, for thinning chocolate if needed)
Making the Pretzel Dough
- Activate the Yeast: In the bowl of your stand mixer (or a large mixing bowl if kneading by hand), combine the warm water, granulated sugar, and active dry yeast. Give it a gentle stir and let it sit for about 5-10 minutes. You’ll know your yeast is alive and well when it becomes foamy and bubbly on top – that’s a beautiful sign it’s ready to work its magic! If it doesn’t foam, your water might have been too hot or too cold, or your yeast might be expired, and you’ll need to start again.
- Combine Dry Ingredients: To the foamy yeast mixture, add the salt and about half of the all-purpose flour. Stir until just combined. Then, pour in the melted and cooled butter. Gradually add the remaining flour, about a cup at a time, mixing on low speed with the dough hook (or by hand with a sturdy spoon) until a shaggy dough forms.
- Knead the Dough: Increase the mixer speed to medium-low and continue to knead with the dough hook for 6-8 minutes. If you’re kneading by hand, turn the dough out onto a lightly floured surface and knead vigorously for 8-10 minutes. The goal is to achieve a smooth, elastic, and slightly tacky dough that springs back when you gently poke it. It shouldn’t be overly sticky, nor should it be dry and crumbly. Adjust with a tiny bit more flour if too sticky, or a teaspoon of water if too dry.
- First Rise (Bulk Fermentation): Lightly grease a large clean bowl with a little vegetable oil. Place the dough ball in the bowl, turning it once to coat all sides. Cover the bowl tightly with plastic wrap or a clean kitchen towel. Let the dough rise in a warm, draft-free place for about 1 hour to 1 hour and 30 minutes, or until it has roughly doubled in size. This step is crucial for developing flavor and texture in your delicious Halloween Pretzels.
Proofing and Shaping Your Spooky Halloween Pretzels
- Prepare Your Workspace: While the dough is rising, preheat your oven to 450°F (230°C). Line two large baking sheets with parchment paper or silicone baking mats. Lightly grease them if you’re not using non-stick liners.
- Punch Down and Divide: Once the dough has doubled, gently punch it down to release the air. Turn the dough out onto a lightly floured surface. Divide the dough into 12 equal pieces. For consistent sizing, I like to use a kitchen scale here, aiming for about 75-80g per piece.
- Shape the Pretzels: This is where the fun begins for our Halloween Pretzels!
- Classic Pretzel Shape: Take one piece of dough and roll it into a long rope, about 20-24 inches (50-60 cm) long, making sure the ends are a bit thinner than the middle. Form a U-shape with the rope, then cross the ends over each other twice to create a twist. Bring the twisted ends down and press them firmly onto the bottom curve of the U-shape. This creates that iconic pretzel look.
- Halloween-Themed Shapes: Get creative! You can shape some dough into ghost outlines, spider bodies (round or oval), or even just sticks that you’ll decorate later. For ghosts, roll a short, thick rope and flatten one end slightly for the head. For spider bodies, simply form small rounds or ovals. Remember, these Halloween Pretzels are all about embracing the spooky spirit!
- Second Rise (Optional, but Recommended): Place the shaped pretzels onto the prepared baking sheets, leaving some space between them. If you have time and want a slightly lighter pretzel, you can let them rest uncovered for 10-15 minutes at room temperature while you prepare the baking soda bath. This short rest helps them hold their shape better after the bath.
The Essential Baking Soda Bath & Baking Process
- Prepare the Baking Soda Bath: In a large, wide pot (a Dutch oven works great), combine 10 cups of water and ⅔ cup of baking soda. Bring this mixture to a rolling boil over high heat. Be cautious as the baking soda can cause the water to bubble up quite a bit. This alkaline bath is what gives pretzels their signature chewy exterior and deep, beautiful golden-brown color during baking. It’s absolutely essential for authentic Halloween Pretzels.
- Bathe the Pretzels: Carefully, using a slotted spoon or spider skimmer, lower one or two pretzels at a time into the boiling baking soda bath. Do not overcrowd the pot. Let them boil for 20-30 seconds per side. You’ll notice them puffing up slightly. Quickly remove them from the bath, letting any excess water drip off, and return them to the parchment-lined baking sheets. The surface will look a bit slick and rubbery – that’s perfectly normal!
- Egg Wash & Salt (Optional): If you’re making some traditional salty pretzels alongside your decorated Halloween Pretzels, brush them with the egg wash (1 egg whisked with 1 tablespoon water) and sprinkle generously with coarse pretzel salt immediately after the bath. For the pretzels you plan to decorate extensively, you can skip the salt or the egg wash, or just use the egg wash to promote browning.
- Bake Your Halloween Pretzels: Transfer the baking sheets to the preheated oven. Bake for 12-18 minutes, rotating the sheets halfway through, until the pretzels are a deep golden brown. Baking time will vary depending on your oven and the size of your pretzels. Keep a close eye on them to prevent over-browning. Once baked, transfer the Halloween Pretzels to a wire rack to cool completely before decorating. Allowing them to cool completely is crucial before decorating with chocolate, otherwise, the chocolate will melt and run off.
Decorating Your Spooky Halloween Pretzels
- Melt the White Chocolate: Place the white chocolate chips or candy melts in a microwave-safe bowl. Microwave on 50% power in 30-second intervals, stirring well after each, until completely smooth. Be careful not to overheat, as white chocolate can seize. If the chocolate is too thick for dipping, stir in a tiny bit of vegetable shortening or coconut oil (about ½ teaspoon at a time) until it reaches a desired consistency.
- Divide and Color Chocolate: Divide the melted white chocolate into several small bowls, one for each color you plan to use (orange, purple, green, black). Add a few drops of gel or oil-based food coloring to each bowl and stir until you achieve your desired vibrant Halloween hues. Remember, a little food coloring goes a long way, especially for dark colors like black.
- Dip and Drizzle for Halloween Pretzels:
- Mummy Pretzels: Dip a pretzel stick or regular pretzel into white chocolate, coating it completely. Lay it on parchment paper. While still wet, use a spoon or piping bag with a small hole cut in the tip to drizzle more white chocolate back and forth across the pretzel, leaving a gap for the “eyes.” Press two candy googly eyes into the gap. Allow to set.
- Spiderweb Pretzels: Dip your pretzel (any shape works, but rounder ones are fun) into a base color like orange or purple. Place it on parchment paper. While still wet, take a small amount of black (or another contrasting color) melted chocolate in a piping bag or a Ziploc bag with the corner snipped. Pipe concentric circles on the pretzel. Then, drag a toothpick from the center out to the edge to create a spiderweb effect.
- Monster/Ghost Pretzels: Dip a ghost-shaped pretzel or even a regular pretzel completely in white chocolate. Add googly eyes immediately. For mouths, use a tiny dot of black chocolate. For a monster, use green chocolate and add colorful sprinkles or more googly eyes for a whimsical touch.
- Colorful Drizzled Pretzels: Dip your cooled Halloween Pretzels into one color (e.g., orange). Let the excess drip off. Place on parchment paper. Once slightly set but still tacky, drizzle with contrasting colors (e.g., purple and black). Add sprinkles before the chocolate fully hardens.
- Spooky Black Pretzels: For a dramatic effect, dip pretzels entirely in black chocolate. You can then add bright orange or green drizzles, or attach small candy spiders and googly eyes for an extra creepy look.
- Add Details and Sprinkles: This is my favorite part! While the chocolate is still wet, carefully place Halloween sprinkles, candy googly eyes, or small edible sugar decorations onto your Halloween Pretzels. If adding more intricate details like spider legs or faces, use a piping bag with a fine tip (or a toothpick for very small details) filled with dark chocolate or another contrasting colored chocolate. Let your imagination run wild!
- Allow to Set: Once decorated, let the Halloween Pretzels sit at room temperature for at least 30-60 minutes, or place them in the refrigerator for 15-20 minutes, until the chocolate is completely set and hardened. This ensures your beautiful decorations don’t smudge!
Serving and Storage Tips
- Serving Your Halloween Pretzels: Once the chocolate is fully set, arrange your magnificent Halloween Pretzels on a platter for a festive party display. They make a fantastic addition to any Halloween celebration, whether it’s a spooky movie night or a big costume bash. I find they’re always a huge hit with both kids and adults because they’re so visually appealing and delicious!
- Storage: Store your decorated Halloween Pretzels in an airtight container at room temperature for up to 3-4 days. If your home is particularly warm, or if you used very delicate chocolate, you might consider storing them in the refrigerator, but be aware that refrigeration can sometimes cause chocolate to “bloom” (a white film appears, though it’s still edible). They are best enjoyed within a few days of being made for optimal freshness and crunch.
- Enjoying Leftovers: If by some miracle you have any leftover Halloween Pretzels, they’re still wonderful the next day! Their unique combination of chewy pretzel and sweet, crisp chocolate makes them a truly delightful treat.
- Gifting: These Halloween Pretzels also make fantastic edible gifts! Package a few in clear cellophane bags tied with festive ribbons, and you have a charming, homemade treat to share with friends, family, or trick-or-treaters (if you’re feeling extra generous!).
Conclusion:
Well, my friends, we’ve reached the sweet end of our culinary journey for today, but truly, this is just the beginning of your delicious adventure! If there’s one recipe you absolutely must add to your festive repertoire this season, it’s these delightful Halloween Pretzels. They are so much more than just a simple snack; they’re an experience, a canvas for creativity, and a guaranteed smile-maker for anyone who tries them. What truly makes this recipe a standout is its incredible simplicity, allowing even the most novice of bakers to create something visually stunning and utterly delicious. We’re talking about minimal effort for maximum impact – a concept I think we can all get behind, especially when juggling the many demands of life. The joy of dipping those salty pretzels into rich, melted chocolate, then adorning them with an array of vibrant sprinkles and eerie edible decorations, is something truly special. It’s a sensory delight, from the satisfying crunch to the perfect balance of sweet and salty, creating a treat that appeals to every palate. This isn’t just a recipe; it’s an invitation to embrace the playful spirit of the season, to gather loved ones, and to create lasting memories around a shared, delectable activity. You’re not just making a snack; you’re crafting a moment.
Elevate Your Halloween Pretzels Game with Creative Serving and Variations:
Now, let’s talk about how you can elevate your Halloween Pretzels game even further! While they are perfectly wonderful just as they are, there are countless ways to customize and serve them to suit any occasion or preference. For a truly impressive dessert spread, arrange your finished pretzels on a large, spooky-themed platter alongside other Halloween goodies like candy corn, mini chocolate bars, and perhaps some ghost-shaped cookies. This creates a vibrant visual feast that guests will adore, making your party table the talk of the neighborhood. Thinking about party favors? Individually wrap a few of your creations in clear cellophane bags, tie them with an orange or black ribbon, and you’ve got charming, homemade gifts that are sure to be a hit. Imagine the delight on a child’s face receiving a handmade treat that’s both delicious and a little bit spooky! These also make fantastic additions to school lunchboxes during October, bringing a little festive cheer to midday meals.
But why stop there? Let your imagination run wild with variations! Instead of just milk chocolate, experiment with white chocolate for a ghostly base, or even vibrant orange and green candy melts to really lean into the Halloween theme. You can swirl different colors together for a marbled effect, or even dye white chocolate with food-safe gel colors to create custom hues that match your specific party decor. Don’t limit yourself to just sprinkles either; think about crushing up some Oreos for a “dirt” effect, or using edible googly eyes for a whimsical, staring touch that will make everyone giggle. Crushed pretzels can also be added back onto the chocolate for extra crunch, or perhaps some finely chopped nuts for those who enjoy a nutty twist. For a more sophisticated touch, a drizzle of contrasting chocolate (dark over white, or vice versa) can add an elegant finish, proving that even spooky treats can be chic. You could even try dipping half the pretzel rod in chocolate and then rolling it in coconut flakes for a “mummy” look, or finely shredded candy for an explosion of flavor and texture. And for those with dietary restrictions, remember that many brands now offer excellent gluten-free pretzels and dairy-free chocolate options, so absolutely everyone can enjoy these spooky delights without missing out on the fun. The beauty of this recipe lies in its adaptability, making it suitable for everyone and every taste, truly embodying the inclusive spirit of shared treats.
I truly hope you feel inspired to dive into your kitchen and whip up a batch (or three!) of these fantastic Halloween Pretzels. Trust me, the smiles you’ll bring to faces – including your own – are absolutely priceless. This isn’t just about following instructions; it’s about making something with love, something that brings joy and a touch of magic to your day. It’s a wonderfully therapeutic process, a chance to unwind and get creative, perhaps even putting on some festive music while you work your culinary magic. Once you’ve dipped, decorated, and devoured your masterpieces, I would absolutely love to hear about your experience! Did you stick to the classic spooky sprinkles, or did you get adventurous with your toppings? What fun variations did you come up with that surprised and delighted you? Please, don’t be shy – share your amazing creations with us! Snap a photo, tell us your favorite part of the process, or let us know who enjoyed them the most. Your stories and photos are truly the best part of sharing these recipes, and I’m always so thrilled to see how you bring them to life in your own unique ways. Don’t hesitate, give these Halloween Pretzels a try! So go ahead, preheat that chocolate, gather your ghoulish goodies, and let the Halloween magic begin. Happy baking, my friends!

Spooky Halloween Pretzels
Transform simple pretzels into spooky delights with this easy and fun Halloween Pretzels recipe. Perfect for parties, lunchbox surprises, or a festive snack as you settle in for a scary movie night.
Ingredients
-
1 ½ cups warm water
-
1 tbsp active dry yeast
-
1 tsp granulated sugar
-
1 tsp salt
-
4 ½ cups all-purpose flour
-
2 tbsp unsalted butter, melted
-
10 cups water (for bath)
-
⅔ cup baking soda
-
1 large egg + 1 tbsp water (for egg wash)
-
Coarse pretzel salt (optional)
-
12 oz white chocolate chips or candy melts
-
Food coloring (gel/oil-based): orange, purple, green, black
-
Various Halloween sprinkles
-
Candy googly eyes (various sizes)
-
Small edible sugar decorations (e.g., tiny spiders, pumpkins)
-
Dark chocolate chips or candy melts
-
Vegetable shortening or coconut oil (optional)
Instructions
-
Step 1
In a stand mixer, combine warm water, sugar, and yeast; let foam 5-10 min. Add salt, half flour, then melted butter. Gradually add remaining flour and knead with a dough hook for 6-8 min (or by hand 8-10 min) until smooth and elastic. -
Step 2
Lightly grease a large bowl, place dough in it, turn to coat. Cover and let rise in a warm, draft-free place for 1-1.5 hours, until doubled. -
Step 3
Preheat oven to 450°F (230°C). Line two baking sheets with parchment. Punch down dough, divide into 12 equal pieces. Roll each piece into a 20-24 inch rope and shape into classic pretzels, ghost outlines, or spider bodies. Optionally, let shaped pretzels rest uncovered for 10-15 minutes on the baking sheets. -
Step 4
In a large pot, bring 10 cups water and ⅔ cup baking soda to a rolling boil. Carefully immerse 1-2 pretzels at a time for 20-30 seconds per side. Remove with a slotted spoon and place back on lined baking sheets. -
Step 5
For traditional pretzels, brush with egg wash and sprinkle with coarse salt. Bake for 12-18 minutes, rotating halfway, until deep golden brown. Transfer to a wire rack to cool completely before decorating. Cooling completely is crucial to prevent chocolate from melting. -
Step 6
Melt white chocolate chips/candy melts in a microwave-safe bowl (30-second intervals, stirring). Divide into small bowls and color with gel or oil-based food coloring (orange, purple, green, black). Thin with vegetable shortening/coconut oil if chocolate is too thick. -
Step 7
Dip cooled pretzels into colored chocolate for base coats (e.g., mummy white, monster green, spooky black). While chocolate is wet, add Halloween sprinkles, candy googly eyes, or small edible sugar decorations. For spiderwebs, pipe concentric circles on a wet base color with contrasting chocolate, then drag a toothpick from the center out. Use dark chocolate for fine details like spider legs or mouths. -
Step 8
Allow decorated pretzels to sit at room temperature for 30-60 minutes, or refrigerate for 15-20 minutes, until the chocolate is completely set and hardened.
Important Information
Nutrition Facts (Per Serving)
It is important to consider this information as approximate and not to use it as definitive health advice.
Allergy Information
Please check ingredients for potential allergens and consult a health professional if in doubt.


Leave a Comment