
Halloween Mini Pizzas are the ultimate culinary treat for your spooky season celebrations, offering a delightful blend of festive fun and irresistible flavor. I’ve always found that the best Halloween parties are those where the food is as entertaining as the costumes. These charming, individual pizzas are not just incredibly tasty, but they also serve as a fantastic canvas for creativity, transforming simple ingredients into edible masterpieces. As the leaves turn and the air grows crisp, we eagerly anticipate the magic of Halloween. While candy often takes center stage, I believe that savory, homemade bites truly elevate the occasion, creating a beloved tradition that moves beyond mere snacks to become a memorable part of the holiday experience.
Why Everyone Loves Halloween Mini Pizzas
Imagine warm, cheesy bites with a spooky twist – perfectly sized for little ghouls and goblins, yet sophisticated enough for adult monsters. They offer a comforting chewiness, a rich tomato base, and gooey melted cheese, all within easy reach. The convenience of preparing them ahead of time, or even turning it into an interactive decorating activity, makes them a stress-free addition to any gathering. Get ready to discover why these Halloween Mini Pizzas are destined to become a staple in your autumn entertaining repertoire, making your holiday festivities even more magical.

Ingredients:
- For the Pizza Dough:
- 1.5 pounds store-bought pizza dough, ideally at room temperature for easy handling (or your favorite homemade recipe if you’re feeling ambitious!).
- 2 tablespoons olive oil, plus extra for brushing.
- All-purpose flour, for dusting.
- For the Spooky Pizza Sauce:
- 1 (28-ounce) can crushed tomatoes, preferably San Marzano for superior flavor.
- 2 cloves garlic, minced very finely.
- 1 tablespoon extra virgin olive oil.
- 1 teaspoon dried oregano.
- 1/2 teaspoon dried basil.
- 1/4 teaspoon red pepper flakes (optional, for a slight kick).
- 1 teaspoon granulated sugar, to balance acidity.
- 1/2 teaspoon salt, or to taste.
- Freshly ground black pepper, to taste.
- For the Cheesy Base:
- 2 cups shredded mozzarella cheese, low-moisture, whole milk for the best melt.
- 1/2 cup grated Parmesan cheese, finely grated for sprinkling.
- For the Frightfully Fun Toppings and Decorations:
- 1/2 cup black olives, pitted and sliced for spider bodies and eyes.
- 1/4 cup green olives, pitted and sliced for monster eyes.
- 1/4 cup pepperoni slices, mini-sized or regular cut into smaller circles for extra flair.
- 1/2 red bell pepper, thinly sliced or cut into bat shapes.
- 1/2 yellow bell pepper, thinly sliced or cut into fun shapes.
- 1 (4-ounce) package small fresh mozzarella balls (ciliegine or bocconcini), drained and patted dry, for ghost eyes.
- Provolone cheese slices or extra mozzarella, for cutting into ghost shapes or mummy bandages.
- Fresh parsley or basil leaves, for garnish (optional).
Equipment You’ll Need:
- Large baking sheets.
- Parchment paper.
- Rolling pin.
- Various cookie cutters (round, small ghost, small bat shapes if desired, though knife-cutting works).
- Pizza cutter or sharp knife.
- Small saucepan.
- Pastry brush.
- Wire cooling rack.
Crafting the Ghastly Good Sauce:
- Sauté the Aromatics: In a small saucepan, heat 1 tablespoon of olive oil over medium heat. Add the minced garlic and sauté gently for about 1 minute until fragrant. Be careful not to burn the garlic, as it can turn bitter very quickly.
- Introduce the Tomatoes: Pour in the crushed tomatoes. Give the can a good rinse with about 1/4 cup of water and add that to the pot as well to ensure you get every last drop of tomato goodness.
- Season and Simmer: Stir in the dried oregano, dried basil, red pepper flakes (if using), granulated sugar, salt, and freshly ground black pepper. Bring the sauce to a gentle simmer.
- Develop Flavors: Reduce the heat to low, cover the saucepan, and let the sauce simmer for at least 20-25 minutes, stirring occasionally. This slow simmer allows the flavors to meld beautifully and thicken the sauce slightly. You’re looking for a rich, vibrant sauce that isn’t too watery, as a thick sauce is key to preventing soggy mini pizzas. Taste and adjust seasoning as needed – perhaps a pinch more sugar if it’s too acidic, or more salt/pepper to your preference. Once done, set aside to cool slightly.
Preparing the Dough for Your Spooky Mini Pizzas:
- Preheat the Oven: Before you even touch the dough, preheat your oven to 425°F (220°C). This ensures your oven is perfectly hot and ready when your mini pizzas are assembled, leading to a perfectly crisp crust. Line two large baking sheets with parchment paper; this will prevent sticking and make cleanup a breeze.
- Prepare Your Workspace: Lightly flour a clean work surface. Turn out your room-temperature pizza dough onto the floured surface. Working with dough at room temperature is crucial as it’s much more pliable and easier to roll.
- Roll Out the Dough: Using a rolling pin, gently roll the dough into a large rectangle, about 1/8 to 1/4 inch thick. Aim for a uniform thickness across the entire sheet of dough for even baking.
- Cut Your Mini Pizza Bases: Now for the fun part of shaping our “Halloween Mini Pizzas”! You can use a 3-inch round cookie cutter, or even the rim of a drinking glass, to cut out individual pizza circles. If you want square mini pizzas, simply use a knife or pizza cutter to slice the dough into desired shapes. Gather any dough scraps, gently re-knead them, and roll them out again to cut out more mini bases until all the dough is used.
- Arrange on Baking Sheets: Carefully transfer the cut-out dough circles or squares to your prepared baking sheets, leaving a little space between each one to allow for expansion.
- Pre-bake (Blind Bake) the Crusts: Brush each mini pizza base lightly with olive oil. This step helps create a lovely golden-brown crust. Using a fork, gently prick the center of each dough circle a few times (this is called “docking” the dough). Docking prevents the crust from puffing up too much during baking and ensures a flatter surface for your toppings. Bake the crusts for 5-7 minutes, or until they are just beginning to look set and lightly golden. This pre-bake is a fantastic trick for preventing soggy bottoms, especially important for mini pizzas that might get loaded with toppings.
- Cool Slightly: Remove the baking sheets from the oven and let the pre-baked crusts cool for a few minutes while you prepare your toppings and decorations. You can turn the oven down slightly to 400°F (200°C) at this point, as we’ll finish baking at a slightly lower temperature to prevent burning the cheese and toppings.
Assembling Your Halloween Mini Pizzas: The Fun Part!
Now that our crusts are pre-baked and our sauce is ready, it’s time to bring these “Halloween Mini Pizzas” to life with some spooky and delicious toppings!
- Sauce the Bases: Spread about 1-2 tablespoons of the spooky pizza sauce evenly over each pre-baked mini pizza crust, leaving a small border for the crust. Don’t overdo the sauce, as too much can make your pizzas soggy.
- Layer with Cheese: Sprinkle a generous amount of shredded mozzarella cheese over the sauce on each mini pizza. This forms the essential cheesy base for our creative decorations.
- Get Creative with Decorations: This is where your inner Halloween artist comes out! We’ll create a variety of spooky designs.
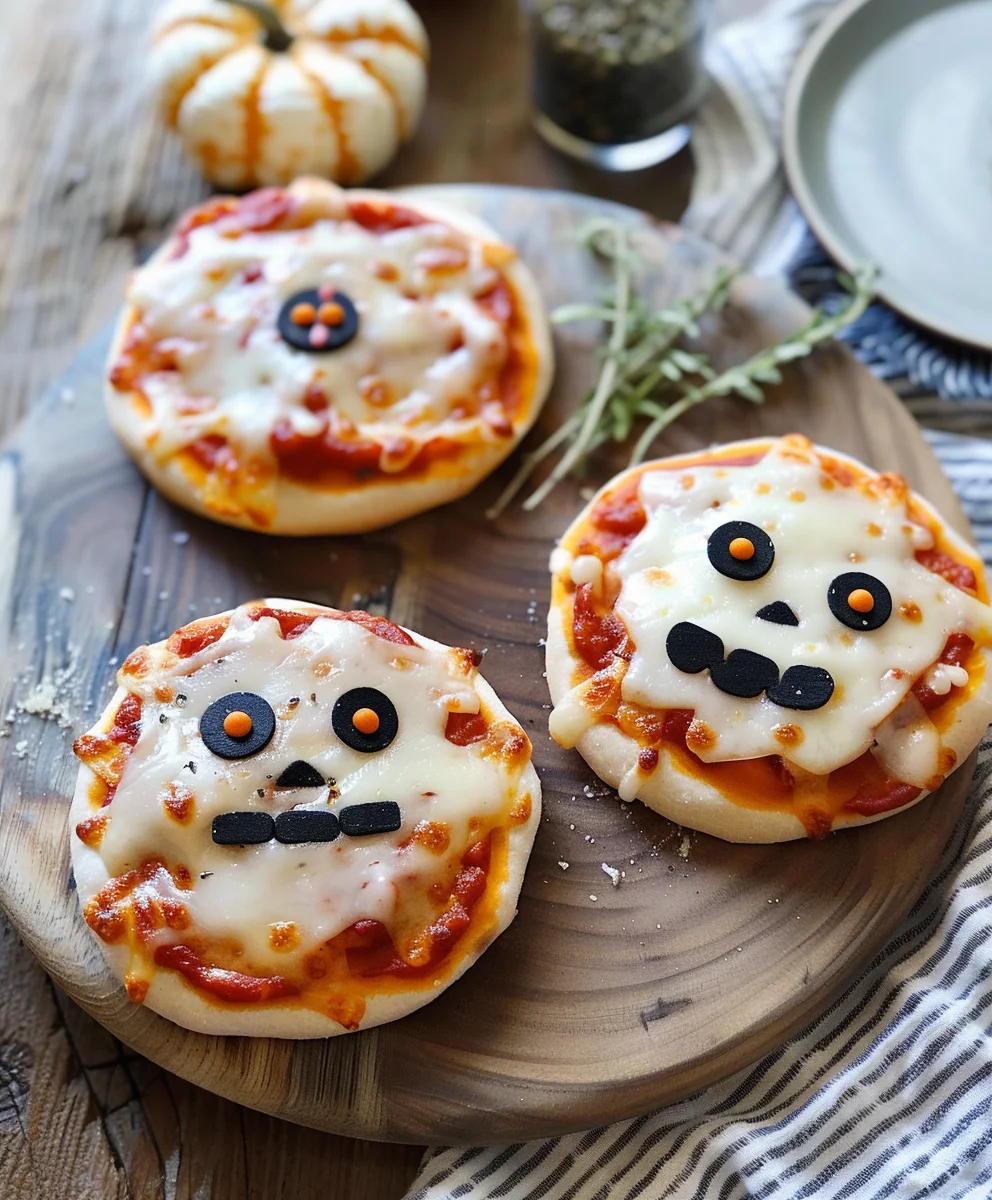
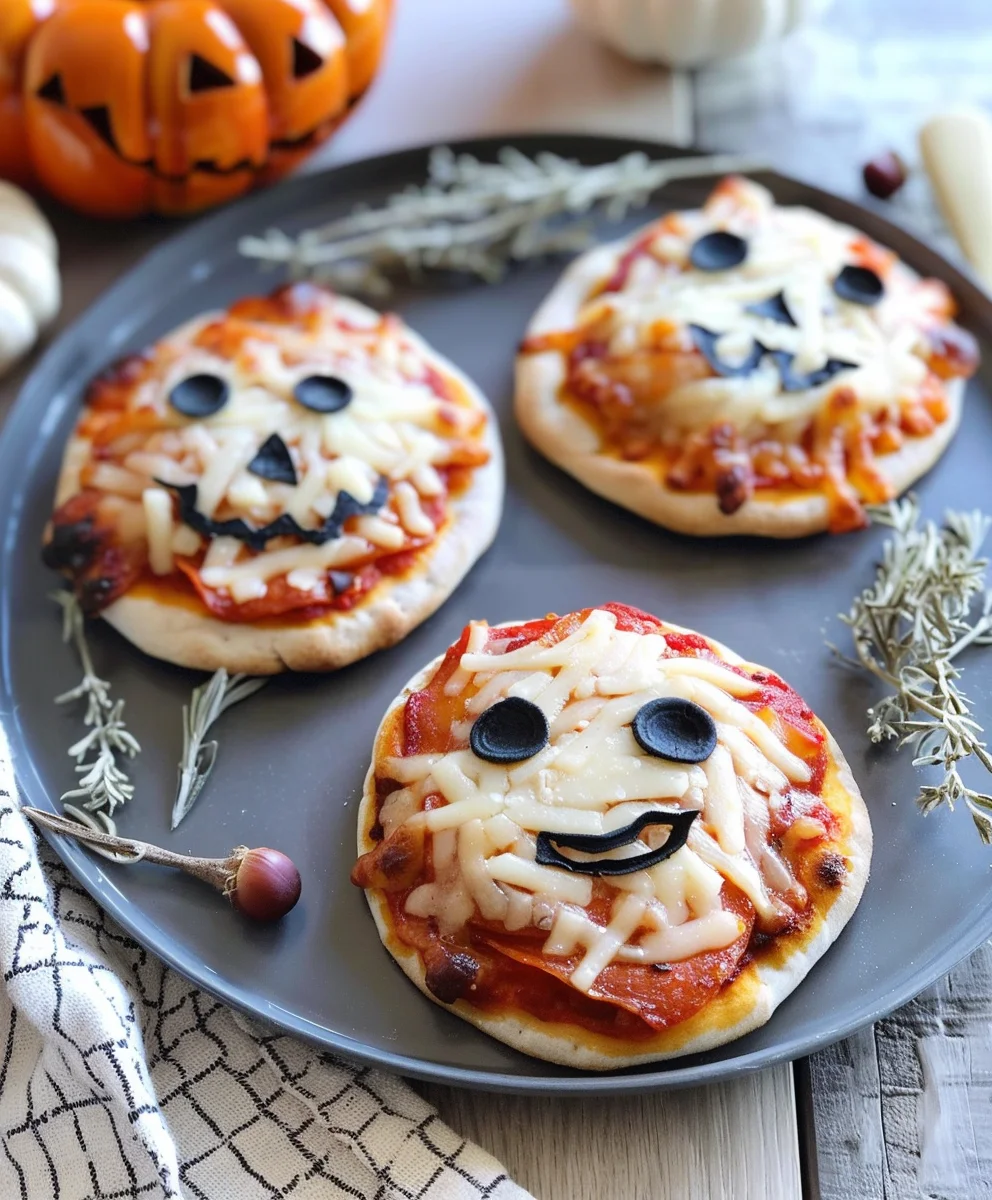
Creating Terrifying Toppings for Your Halloween Mini Pizzas:
-
Mummy Pizzas:
For these adorable and slightly creepy mummies, take slices of provolone or extra mozzarella cheese. Using a sharp knife or even kitchen shears, cut them into thin strips, varying in length and width. Lay these cheese strips haphazardly across the mini pizza, slightly overlapping, to resemble mummy bandages. Leave a small space near the top for the eyes. Once the strips are in place, use two small olive slices (or a cut piece of black olive) for the eyes, placing them in the gap you left. The cheese will melt and fuse together, looking like authentic bandages.
-
Spider Web Pizzas:
These are super simple but incredibly effective. After applying the sauce and mozzarella cheese base, take a small squeeze bottle or a piping bag fitted with a very small round tip (or even just a Ziploc bag with a tiny corner snipped off) filled with a small amount of extra pizza sauce. Starting from the center of the pizza, pipe concentric circles of sauce. Then, using a toothpick, drag lines from the center outwards to create the classic spider web pattern. If you want to add a spider, place a whole black olive in the center and cut thin strips of olive for legs, arranging them around the body.
-
Creepy Crawler Pizzas:
For spider-themed pizzas, you can either create the web as described above or simply place a whole black olive (or half) for the spider’s body. Then, cut thin slivers from another black olive to create eight spindly legs, arranging them carefully around the olive body. For bats, take thin slices of red or yellow bell pepper and use a small bat-shaped cookie cutter if you have one. If not, carefully cut bat shapes with a knife. Place these flying creatures on top of the cheese. You can also use small pieces of pepperoni to represent various bugs or creepy-crawlies.
Don’t be afraid to experiment! Olives are particularly versatile for creating these detailed spooky shapes. -
Ghostly Pizzas:
To make friendly ghosts, take slices of provolone or mozzarella cheese. Use a small ghost-shaped cookie cutter to cut out ghost figures. Place these cheese ghosts on top of the mozzarella base. After they are placed, add two tiny pieces of black olive for the eyes and a small, even tinier piece for a mouth if you desire a truly expressive spirit!
-
Monster Eye Pizzas:
This is where the small fresh mozzarella balls come in handy! Slice each small mozzarella ball in half. Place a mozzarella half cut-side up on the pizza. On top of this, place a thin slice of black olive or green olive for the iris. For a bloodshot effect, you can use a tiny sliver of red bell pepper or even a drop of hot sauce (if appropriate for your audience) for the “veins” around the mozzarella “eyeball.” This creates a truly gruesome and fun effect!
Baking Your Bewitching Bites:
- Final Bake: Once all your “Halloween Mini Pizzas” are assembled and decorated, carefully transfer the baking sheets back into the preheated oven (which should now be at 400°F/200°C).
- Monitor and Rotate: Bake for 8-12 minutes, or until the crusts are golden brown around the edges, the cheese is melted and bubbling, and the toppings are heated through. Keep a close eye on them, as baking times can vary between ovens. If one side of your oven bakes hotter, rotate the baking sheets halfway through the baking time to ensure even cooking and browning.
- Achieving Perfection: You’re looking for that perfect balance – a crisp crust, gooey melted cheese, and tender, vibrant toppings. The aroma filling your kitchen will be a sure sign of success!
Serving Your Frightfully Delicious Halloween Mini Pizzas:
- Cool Slightly: Once baked to perfection, carefully remove the baking sheets from the oven. Let the mini pizzas cool on the baking sheets for a couple of minutes before transferring them to a wire cooling rack. This brief cooling period helps the cheese set slightly and makes them easier to handle without burning your fingers.
- Present with Panache: Arrange your variety of “Halloween Mini Pizzas” on a large platter. You can garnish them with a sprinkle of fresh parsley or basil leaves for a pop of color, making them even more appealing.
- Enjoy the Spooky Feast: These mini pizzas are best served warm, allowing that cheesy goodness to truly shine. They are absolutely perfect for a Halloween party, a family movie night, or simply as a fun and engaging snack for all ages. They disappear quickly, so make sure you grab one for yourself! Leftovers, if any, can be stored in an airtight container in the refrigerator for up to 2-3 days and reheated in a toaster oven for best results.
Conclusion:
So, there you have it, my friends! We’ve journeyed through the simple, joyful process of creating something truly special and utterly irresistible. This recipe isn’t just about making food; it’s about crafting memories, sparking smiles, and adding a dash of magic to your gatherings. I genuinely believe this is a must-try for anyone looking to bring a little extra fun and flavor into their life, especially when the leaves start to turn and the air gets crisp.
Why This Recipe Is an Absolute Game-Changer:
First and foremost, its simplicity is a dream come true. You don’t need to be a culinary wizard to whip up a batch of these beauties. The steps are straightforward, making it perfect for busy weeknights, last-minute party preparations, or even a fun activity to do with kids. Imagine the laughter and the sticky, happy fingers as everyone gets involved in personalizing their own mini masterpieces.
But beyond the ease, it’s the sheer versatility that truly elevates this recipe. It’s a blank canvas for your creativity, allowing you to tailor each bite to individual preferences. Whether you’re catering to picky eaters, adventurous palates, or specific dietary needs, this recipe adapts effortlessly. It’s comforting, it’s satisfying, and it hits all the right notes for a dish that feels both familiar and exciting. The crispy crust, the gooey cheese, the savory toppings – it’s a symphony of textures and flavors that consistently delivers pure deliciousness.
Elevating Your Experience: Serving Suggestions & Creative Variations
While these are absolutely phenomenal on their own, a few additions can transform them into a full meal or an even more spectacular party spread. For a balanced dinner, pair them with a crisp green salad tossed in a light vinaigrette. The freshness of the greens provides a wonderful contrast to the rich, savory flavors of the pizzas. They also make fantastic appetizers for any gathering, big or small. Arrange them on a large platter, perhaps with a dipping sauce like a homemade marinara or a spicy ranch, and watch them disappear in minutes. For lunchboxes, they hold up surprisingly well, making them a much-loved alternative to traditional sandwiches.
Now, let’s talk about getting creative! Don’t feel confined to the suggestions we’ve covered. This is where the real fun begins.
- Topping Adventures: Think beyond pepperoni and bell peppers. Experiment with caramelized onions, sautéed mushrooms, crumbled feta, sun-dried tomatoes, or even a sprinkle of fresh herbs like basil or oregano after baking. For a touch of gourmet, consider adding a drizzle of balsamic glaze or a sprinkle of chili flakes for a subtle kick.
- Cheese Dreams: While mozzarella is classic, don’t hesitate to blend in other cheeses. A mix of cheddar, provolone, or even a sharp aged Parmesan can add incredible depth of flavor. For a creamier texture, a touch of ricotta or goat cheese can be surprisingly delightful.
- Base Sauce Swaps: Not a fan of traditional tomato? Try a pesto base for a vibrant, herbaceous flavor, or a white garlic sauce for something rich and indulgent. A BBQ sauce base with pulled chicken would make for an amazing tangy-sweet variation.
- Shaping & Theme Fun: For a themed event, you can get super creative with cookie cutters. Imagine star-shaped pizzas for a cosmic party or heart-shaped ones for Valentine’s Day. And, of course, for a truly festive and spooky occasion, these are the ultimate Halloween Mini Pizzas. You can cut the cheese into ghost shapes or use olive slices to create spider webs or spooky faces before baking, instantly transforming them into edible works of art that perfectly capture the spirit of the season.
Your Culinary Journey Awaits!
My biggest hope is that you feel inspired to dive into your kitchen and give this recipe a whirl. There’s a unique satisfaction that comes from creating something delicious with your own hands, and I promise, this one delivers that feeling in spades. Whether you follow the recipe exactly or use it as a springboard for your own culinary innovations, I know you’ll be thrilled with the results.
And when you do, please, please share your experience! I absolutely adore hearing from you. What toppings did you choose? Did you try a new sauce? What fun shapes did you make? Did your family or friends love them as much as mine do? Snap a photo, drop a comment, or simply tell me about the joy it brought to your table. Your feedback and creativity are what make this community so vibrant and exciting. Happy cooking, and bon appétit!
Spooky Halloween Mini Pizzas
These delightful Halloween Mini Pizzas combine festive fun and irresistible flavor, perfect for kids and parties. They’re a creative, customizable savory treat that elevates any Halloween celebration, transforming simple ingredients into edible masterpieces.
Ingredients
-
8–10 Mini Pizza Crusts, personal-size bases
-
3/4 cup Pizza Sauce
-
1 cup Mozzarella Cheese, shredded
-
1/4 cup Black Olives, sliced
-
1/4 cup Mini Beef Pepperoni (optional)
-
Orange & Green Bell Peppers, thin strips for jack-o’-lantern designs
-
4 sticks Part-Skim String Cheese, pulled apart
-
2 tbsp Fresh Basil, chiffonade
-
Olive Oil Spray, for misting baking sheet
Instructions
-
Step 1
Preheat your oven to 425°F (220°C). Line two large baking sheets with parchment paper for easy cleanup. -
Step 2
Arrange the mini pizza crusts on the prepared baking sheets. Spread about 1-2 tablespoons of pizza sauce evenly over each crust, leaving a small border. Sprinkle a generous amount of shredded mozzarella cheese over the sauce. -
Step 3
{‘@type’: ‘HowToStep’, ‘name’: ‘Decorate with Spooky Toppings’, ‘itemListElement’: [{‘@type’: ‘HowToDirection’, ‘text’: ‘For Mummy Pizzas: Pull apart string cheese into thin strips. Lay strips haphazardly over the mozzarella to resemble bandages, leaving a space for eyes. Place two small black olive slices in the gap for eyes.’}, {‘@type’: ‘HowToDirection’, ‘text’: ‘For Spider Web Pizzas: Drizzle extra pizza sauce in concentric circles on the mozzarella. Use a toothpick to drag lines from the center outwards to create a web pattern. For spiders, place a black olive slice for the body and cut thin slivers of olive for legs.’}, {‘@type’: ‘HowToDirection’, ‘text’: “For Jack-o’-Lanterns/Bats: Use thin strips of orange or green bell pepper to cut into jack-o’-lantern faces or bat shapes. Arrange them on top of the cheese.”}, {‘@type’: ‘HowToDirection’, ‘text’: ‘For Ghostly Pizzas: Use flattened pieces of string cheese cut into ghost figures. Place on the pizza and add tiny black olive pieces for eyes.’}, {‘@type’: ‘HowToDirection’, ‘text’: ‘For Creepy Crawler Pizzas: Arrange mini beef pepperoni and black olive slices to create various bug or creepy-crawly designs.’}]} -
Step 4
Mist the baking sheets with olive oil spray. Place the decorated mini pizzas into the preheated oven. Bake for 8-12 minutes, or until the crusts are golden brown, and the cheese is melted and bubbling. Rotate baking sheets halfway through if needed for even cooking. -
Step 5
Carefully remove the baking sheets from the oven. Let the mini pizzas cool for a couple of minutes before transferring them to a wire cooling rack. Garnish with fresh basil, chiffonade. Serve warm and enjoy your frightfully delicious Halloween Mini Pizzas!
Important Information
Nutrition Facts (Per Serving)
It is important to consider this information as approximate and not to use it as definitive health advice.
Allergy Information
Please check ingredients for potential allergens and consult a health professional if in doubt.


Leave a Comment