
Halloween Mini Pizzas are the perfect solution for anyone looking to infuse their spooky celebrations with delicious, customizable fun! What if I told you that preparing a delightfully spooky and incredibly tasty Halloween feast could be wonderfully simple and engaging for everyone involved? These charming, bite-sized delights are not just food; they are an invitation to infuse your seasonal celebrations with boundless creativity and warmth. While the ancient origins of pizza itself are deeply rooted in culinary history, evolving from humble flatbreads eaten by various cultures for centuries, our modern, Halloween-themed rendition transforms this beloved staple into something truly special for the holiday. It’s about celebrating the contemporary tradition of themed holiday foods that bring smiles, shared experiences, and a touch of edible artistry to your autumn evenings. People universally adore these mini pizzas for their irresistible combination of familiar comfort and festive fun. Their classic savory taste, with gooey melted cheese and your favorite toppings, makes them an instant hit, appealing to all ages. The individual size is perfect for partygoers, eliminating mess and encouraging personalization. Furthermore, the joy of crafting each one into a unique spooky character – from olive spiders to ghost-shaped mozzarella – makes preparing these Halloween Mini Pizzas as much fun as eating them. I promise, they are the ideal, hassle-free centerpiece for any spirited gathering, guaranteeing both deliciousness and delightful memories.

Ingredients:
- For the Dough:
- 1 pound (approximately 450g) store-bought pizza dough, or your favorite homemade recipe. I find that store-bought dough makes this recipe a breeze, especially when you’re making a big batch for a party.
- 2 tablespoons olive oil, plus extra for brushing. This will give your crust a lovely golden hue and a subtle richness.
- 1 teaspoon garlic powder (optional, for extra flavor in the crust). A little garlic goes a long long way in enhancing the overall pizza experience.
- 1/2 teaspoon Italian seasoning (optional, for aromatic crust). This really makes the base feel more artisanal.
- For the Sauce:
- 1 cup (240ml) pizza sauce or marinara sauce. Make sure it’s a good quality sauce you enjoy, as it forms the flavorful foundation of your Halloween Mini Pizzas.
- 1-2 tablespoons extra pizza sauce for the spiderweb design (optional). A slightly thinner consistency works best for piping.
- For the Cheese:
- 2 cups (about 220g) shredded low-moisture mozzarella cheese. This is your classic pizza cheese, perfect for melting and getting that delightful stretch.
- 1/2 cup (about 55g) sliced provolone cheese or string cheese sticks (for mummy pizzas). These are ideal for cutting into strips to create the bandage effect.
- 1/2 cup (about 55g) shredded sharp cheddar cheese (for jack-o’-lantern pizzas). The orange color of cheddar is perfect for our pumpkin faces.
- For the Spooky Toppings:
- 1/2 cup sliced black olives, drained (for spider bodies and eyes). Canned, pre-sliced olives are a huge time-saver here.
- 1/4 cup whole black olives, drained (for spider heads). These provide a nice contrast and dimension to our eight-legged friends.
- 1/2 cup sliced pepperoni or mini pepperoni (for jack-o’-lantern mouths and optional ghosts/bats). The smaller discs are perfect for detail work.
- 1 small green bell pepper (for jack-o’-lantern stems). A vibrant green really makes the “stem” pop.
- 1 small red or yellow bell pepper (for optional spooky shapes or accents). You can get creative with these!
- Fresh basil or oregano for garnish (optional). A little fresh herb can brighten up the flavors and add a professional touch.
Equipment You’ll Need:
Having the right tools on hand makes the process smoother and more enjoyable. Here’s what I recommend:
- Baking Sheets: You’ll need at least two large baking sheets to accommodate all your Halloween Mini Pizzas. This allows you to bake multiple batches simultaneously or keep one ready while the other is baking.
- Parchment Paper: Absolutely essential for preventing sticking and making cleanup a breeze. Lining your baking sheets ensures your mini pizzas slide right off.
- Rolling Pin: To roll out your pizza dough evenly. A standard rolling pin will do, but if you have a non-stick one, even better!
- Round Cookie Cutters: A 2.5-inch to 3-inch round cookie cutter is perfect for creating uniform mini pizza bases. This size is ideal for individual servings and ensures you get a good number of pizzas from your dough.
- Small Paring Knife or Pizza Cutter: For cutting dough, cheese, and toppings into precise shapes. A sharp paring knife is particularly useful for intricate details like mummy bandages or jack-o’-lantern features.
- Cutting Board: A sturdy surface for preparing your dough and toppings safely.
- Pastry Brush: For brushing olive oil onto your pizza dough. This helps achieve that beautiful golden crust and adds a lovely flavor.
- Small Spoon or Squeeze Bottle: For applying the pizza sauce, especially for the spiderweb design. A squeeze bottle with a fine tip gives you excellent control.
- Toothpicks: Critical for dragging the sauce to create the spiderweb effect. Keep a few handy!
- Spatula or Pizza Peel: For transferring your baked Halloween Mini Pizzas from the baking sheet to a cooling rack or serving platter.
- Wire Cooling Rack: Allowing the pizzas to cool slightly on a rack prevents the bottoms from becoming soggy.
Preparing Our Spooky Mini Pizza Bases:
This is where our Halloween Mini Pizzas truly begin to take shape. A good base is key to a great pizza experience!
- Preheat Your Oven: My first step is always to get the oven ready. Preheat your oven to a blazing 425°F (220°C). A hot oven is crucial for a crispy crust and perfectly melted cheese. While the oven heats, it’s also a good time to ensure your pizza dough is at room temperature. This makes it much easier to roll out and prevents it from snapping back.
- Prepare Your Baking Sheets: Line two large baking sheets with parchment paper. This prevents sticking and makes cleanup incredibly simple. Lightly brush the parchment paper with a little olive oil if you want an extra crispy bottom crust, especially important for our Halloween Mini Pizzas to stand up to all those spooky toppings.
- Roll Out the Dough: On a lightly floured surface (or a surface dusted with a little cornmeal for extra crispiness), roll out your pizza dough to about 1/8 to 1/4 inch thickness. I aim for a consistent thickness across the entire sheet of dough, as this ensures even cooking. If your dough is resisting, let it rest for 5-10 minutes, covered, then try again. Sometimes, the gluten just needs to relax!
- Cut Out Shapes: Now for the fun part! Use your 2.5-inch to 3-inch round cookie cutter to cut out as many circles as possible from your rolled-out dough. Gather the scraps, gently knead them together, let them rest for a few minutes, and then re-roll to cut out more circles until you’ve used all the dough. You should get anywhere from 12 to 18 mini pizza bases, depending on the size of your cutter and the thickness of your dough. These round bases are perfect for all our Halloween designs.
- Arrange and Brush Bases: Carefully transfer your cut-out dough circles to the prepared baking sheets, leaving a little space between each one. In a small bowl, whisk together the 2 tablespoons of olive oil with the garlic powder and Italian seasoning, if using. Lightly brush the tops and edges of each mini pizza base with this fragrant oil mixture. This adds flavor and helps the crust crisp up beautifully.
- Optional Pre-Bake (My Secret for Crispiness): For an extra crispy crust that holds up well to toppings, I like to pre-bake my Halloween Mini Pizzas bases for about 3-5 minutes before adding toppings. This helps them set and prevents a soggy bottom. They should be just slightly firm, not yet browned. Remove from the oven and let them cool for a minute or two before the next step. If you’re short on time, you can skip this, but I highly recommend it for the best texture!
Crafting Our Frightfully Fun Toppings:
The magic of our Halloween Mini Pizzas truly comes alive with the creative preparation of our toppings. Precision here makes all the difference in achieving those iconic spooky designs.
- Shred and Slice the Cheese:
- Mozzarella: If you bought a block of mozzarella, go ahead and shred it. Freshly shredded cheese melts better than pre-shredded.
- Provolone/String Cheese for Mummies: Take your provolone slices or string cheese sticks. If using provolone slices, I like to stack them and cut them into thin strips, about 1/4 inch wide and 2-3 inches long. If using string cheese, simply pull apart the sticks into individual strands, or cut them lengthwise into thinner strips. These will be our “bandages” for the mummy pizzas, so uniform strips look best.
- Cheddar: If not already shredded, shred your cheddar cheese. Its bright orange color is absolutely essential for our jack-o’-lanterns.
- Prepare the Olives:
- Sliced Black Olives: These are primarily for the eyes of our mummy pizzas and the legs of our spiders. If they aren’t pre-sliced, slice them into thin rounds.
- Whole Black Olives for Spider Bodies/Heads: For spider bodies, cut whole black olives in half lengthwise. For spider heads, use slightly smaller halves or even quarters of whole olives, depending on the size of your spider. The contrast between the body and head adds a nice touch of realism to our creepy crawlies.
- Shape the Pepperoni:
- Jack-o’-Lantern Faces: For the jack-o’-lanterns, we’ll need to cut triangles for eyes and noses, and crescent shapes or jagged lines for mouths out of your pepperoni slices. I find that folding a pepperoni slice in half and cutting small triangles is an easy way to get symmetrical eyes. For mouths, use a small paring knife to carefully cut out your desired spooky grin or frown.
- Optional Ghosts/Bats: If you’re feeling extra creative, you can use tiny cookie cutters (like a mini ghost or bat cutter, if you have one) to cut shapes out of pepperoni or even cheese slices. Otherwise, you can use a small knife to freehand cut simple ghost or bat shapes from pepperoni.
- Cut the Bell Peppers:
- Green Bell Pepper Stems: For the jack-o’-lantern pizzas, cut a small, thin strip (about 1/2 inch long) from the green bell pepper to represent the pumpkin’s stem. You can make it slightly tapered for a more natural look.
- Other Shapes (Optional): If you’re adding other decorative elements, now is the time to slice or dice your red or yellow bell peppers into small pieces or shapes.
Assembling Our Halloween Mini Pizzas – The Creative Part!:
Now for the most exciting part – transforming our simple bases into spooky masterpieces! This is where you can let your creativity truly shine, making each of your Halloween Mini Pizzas uniquely frightful.
- The Base Layer for All Pizzas:
- For each mini pizza base, spread a thin layer of your pizza sauce, leaving a small border around the edge for the crust. I usually use about a tablespoon of sauce per mini pizza. This ensures a balanced flavor without making the pizza soggy.
- Crafting the Mummy Pizza:
- Cheese Base: Sprinkle a small amount of shredded mozzarella cheese over the sauce on a few of your mini pizza bases. This acts as a foundation for our mummy “bandages.”
- Apply Bandages: Take your pre-cut strips of provolone or string cheese. Lay them across the mini pizza, overlapping slightly, to resemble bandages wrapped around a mummy. Leave a small gap near the top for the eyes. Don’t worry about perfect straight lines; a slightly uneven look adds to the mummy’s charm!
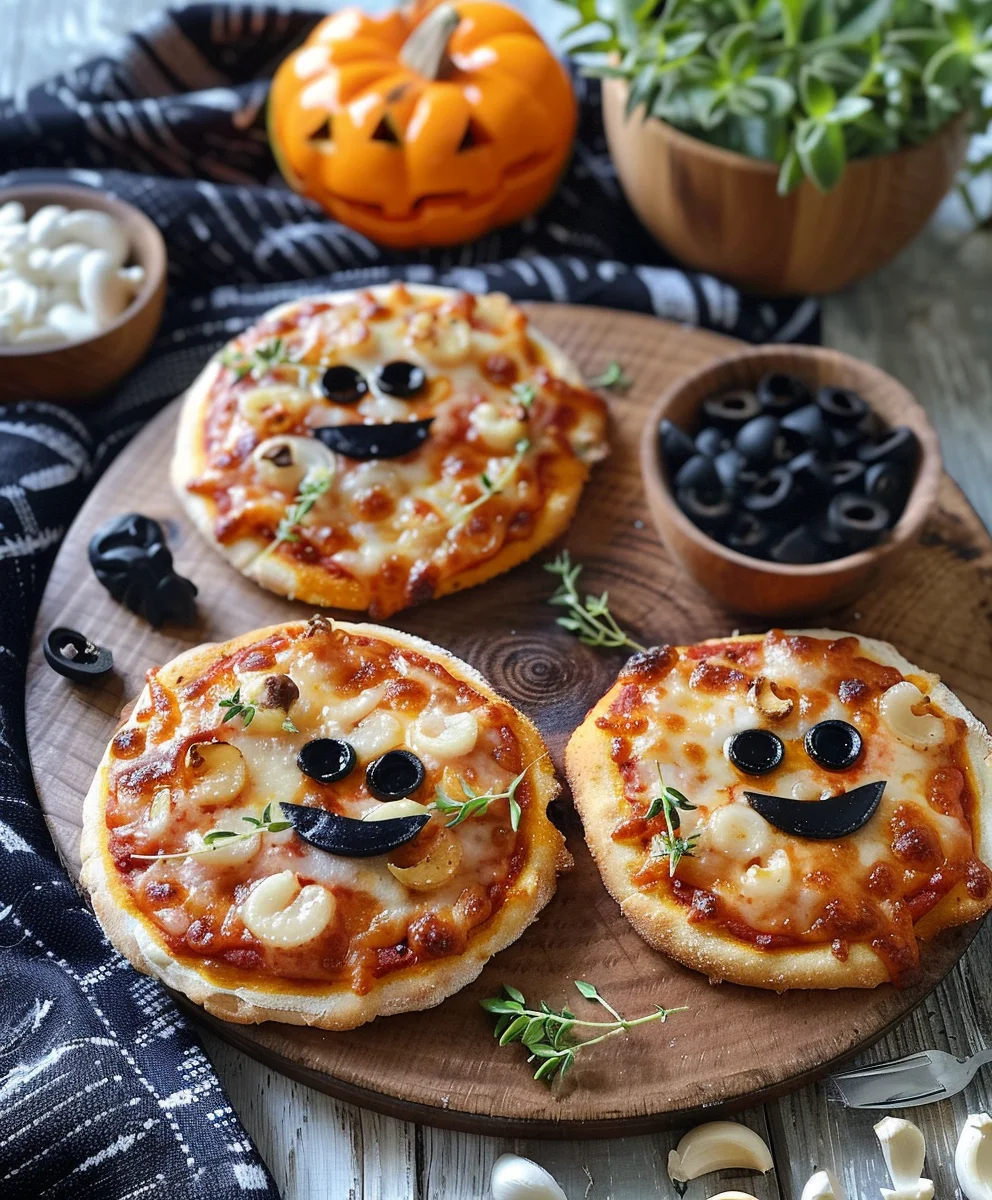
- Add Eyes: Place two sliced black olives in the gap you left for the eyes. You can gently press them into the cheese. These simple black eyes give the mummy its eerie gaze.
- Optional: For extra character, you could add a tiny dot of sauce or a speck of red pepper flake under the eyes for a “bleeding” effect, though I usually keep it classic.
- Creating the Spiderweb Pizza:
- Cheese Layer: Completely cover the sauce base of another set of mini pizzas with a generous layer of shredded mozzarella cheese. This creates the perfect canvas for our web.
- Draw the Web: Now, for the spiderweb. Take a small spoon and drizzle concentric circles of extra pizza sauce (or marinara) over the mozzarella cheese. Start with a small circle in the center and work your way outwards, making 2-3 larger circles. Alternatively, if you have a squeeze bottle with a fine tip, it works wonderfully for drawing precise circles.
- Form the Web Lines: Immediately, while the sauce is still wet, take a toothpick and gently drag it from the center of the innermost circle outwards through all the circles, towards the edge of the pizza. Repeat this several times, evenly spaced around the pizza, to create the classic spiderweb pattern. It’s surprisingly easy and very effective!
- Add the Spider: Place a half black olive (cut side down) near the edge or center of the web for the spider’s body. Then, position a smaller whole black olive (or a quarter of an olive) just in front of it for the head. Use thin slivers of black olive slices to create the spider’s legs, arranging four on each side of the body. Don’t overdo it with the legs; a few well-placed ones are more impactful.
- Designing the Jack-o’-Lantern Pizza:
- Cheddar Base: For these festive Halloween Mini Pizzas, completely cover the sauce base with a good layer of shredded sharp cheddar cheese. The bright orange of the cheddar is absolutely perfect for mimicking a pumpkin.
- Add the Stem: Place one of your pre-cut green bell pepper strips at the top edge of the cheddar cheese, to serve as the pumpkin’s stem.
- Create the Face: Arrange your pre-cut pepperoni pieces (triangles for eyes and nose, jagged shapes for the mouth) onto the cheddar cheese to form a classic jack-o’-lantern face. Feel free to vary the expressions – some can be happy, some spooky, some mischievous! You can also use small pieces of black olive for the face if you prefer a darker contrast.
- Optional Ghost or Bat Pizzas:
- If you have extra dough circles, you can make simpler designs. Spread sauce and shredded mozzarella. Then, use a small ghost or bat cookie cutter on a slice of provolone cheese, or freehand cut a ghost or bat shape from pepperoni. Place the cheese or pepperoni cutout on top of the mozzarella. Use tiny olive pieces for eyes if desired. These add a nice variety to your collection of Halloween Mini Pizzas.
Baking Our Ghastly Goodness:
The final stage before enjoying our delicious Halloween Mini Pizzas is the bake! This is where the cheese gets bubbly, the crust crisps up, and all those flavors meld together.
- Arrange on Baking Sheets: Carefully transfer your assembled Halloween Mini Pizzas back to the baking sheets, if you had them on a separate surface for assembly. Ensure they are spaced out nicely so hot air can circulate around them, promoting even cooking and a crispy crust. If your baking sheets are already warm from the optional pre-bake, that’s great!
- Into the Hot Oven They Go: Place your baking sheets into the preheated 425°F (220°C) oven. I usually place one sheet on the middle rack and another on the rack just below or above it, depending on my oven’s hot spots.
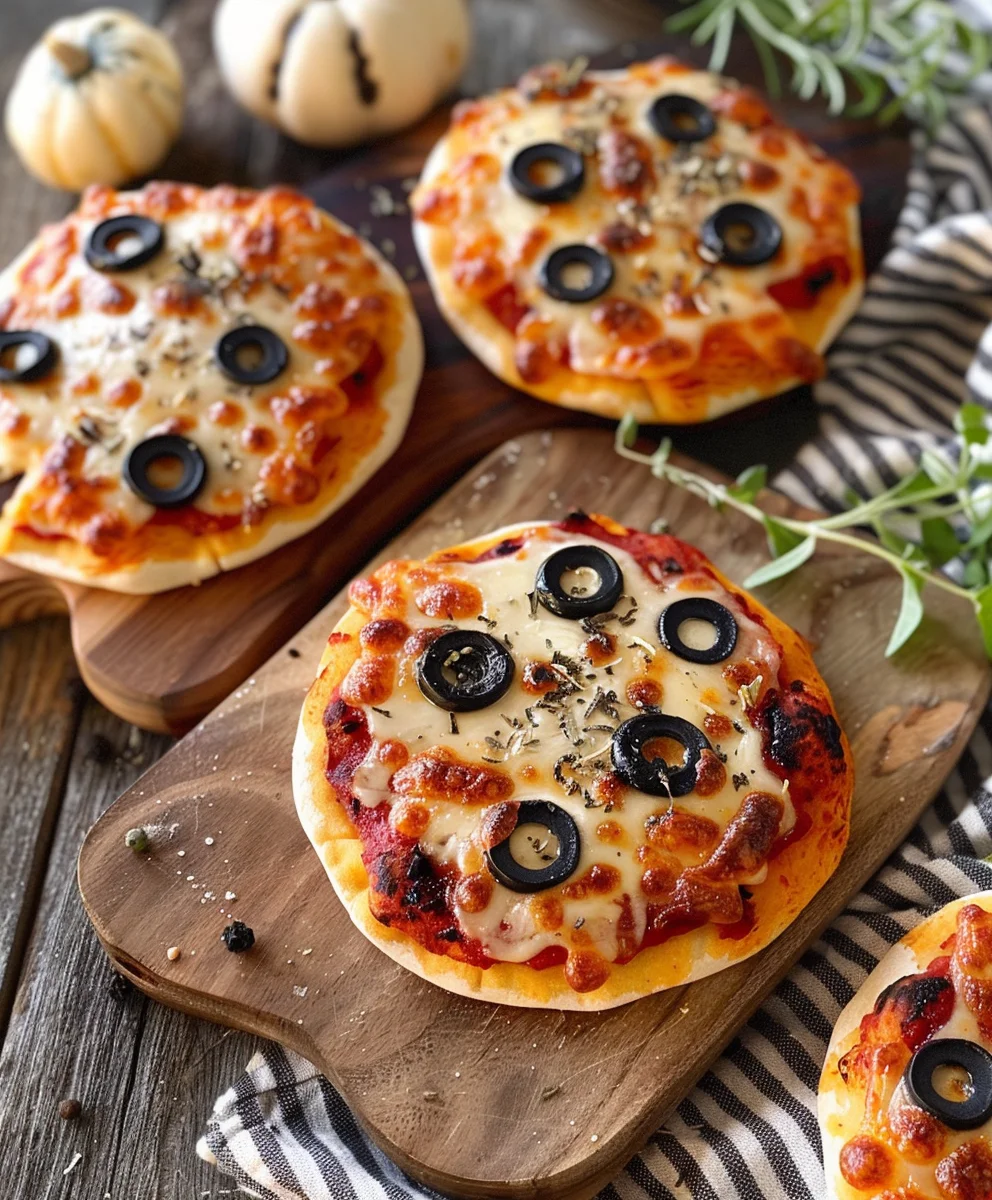
- Bake Until Golden and Bubbly: Bake for 8-12 minutes. The exact timing can vary significantly based on your oven, the thickness of your dough, and how much pre-baking you did. I keep a close eye on them starting around the 8-minute mark. You’re looking for several key indicators:
- The crust should be beautifully golden brown and crispy around the edges.
- The cheese should be completely melted, bubbly, and perhaps even slightly browned in spots – especially the cheddar on the jack-o’-lanterns, which gets a lovely toasted quality.
- For the spiderweb pizzas, the sauce in the web pattern should be set and slightly thickened.
- For the mummy pizzas, the provolone strips should be soft and melted, looking just like bandages.
- Rotate if Necessary: If you notice one side of your Halloween Mini Pizzas is browning faster than the other, rotate the baking sheet halfway through the baking time. This ensures all your spooky creations get evenly cooked and beautifully golden.
Serving Your Spooktacular Creations:
Once baked to perfection, your Halloween Mini Pizzas are ready to be devoured! Proper serving ensures they’re enjoyed at their best.
- Cool Slightly: Carefully remove the baking sheets from the oven. While it’s tempting to dig in immediately, the pizzas will be piping hot, and the cheese will be very fluid. I recommend letting them cool on the baking sheet for about 2-3 minutes. This allows the cheese to set slightly and the crust to firm up, making them easier to handle and preventing burnt tongues!
- Transfer to a Cooling Rack: Using a spatula or pizza peel, carefully transfer your Halloween Mini Pizzas to a wire cooling rack. Cooling them on a rack prevents the bottoms from becoming soggy due to trapped steam. Let them cool here for another 5 minutes or so before serving. This brief cooling period vastly improves their texture and makes them perfectly delicious for little (and big) hands.
- Garnish (Optional): If you have fresh basil or oregano, you can sprinkle a few small leaves over the pizzas just before serving for a burst of fresh flavor and color. This simple touch adds a gourmet feel to your homemade Halloween Mini Pizzas.
- Serve Warm: These Halloween Mini Pizzas are best served warm. Arrange them on a large platter for a party, perhaps alongside some spooky dips or a bowl of “bloody” marinara for dipping. Watching guests discover all the fun, frightful designs is always a highlight!
- Storage: If you happen to have any leftovers (which is unlikely!), store them in an airtight container in the refrigerator for up to 2-3 days. Reheat in a toaster oven or conventional oven for best results, as microwaving might make the crust a bit soft.
And there you have it! A batch of delightfully spooky and utterly delicious Halloween Mini Pizzas, perfect for any ghoulish gathering or a fun family meal. Enjoy watching everyone’s faces light up when they see these festive treats!
Conclusion:
I am absolutely thrilled to share with you the magic of these incredible mini pizzas. If you’ve been searching for the perfect blend of fun, flavor, and festivity, then look no further. These aren’t just any small pizzas; they are an invitation to unleash your inner artist and savor some truly delightful bites. What makes them an undeniable must-try? Well, for starters, they are incredibly simple to make, even for novice cooks, and they offer a fantastic opportunity for everyone in the family, especially the kids, to get involved in the kitchen. Imagine the smiles and laughter as everyone crafts their own personalized masterpiece. They are quick to bake, meaning less time waiting and more time enjoying. The aroma alone will fill your home with a comforting warmth, promising a treat that is both satisfying and spectacularly themed. Whether you’re planning a low-key family dinner or gearing up for a lively gathering, these mini pizzas fit the bill perfectly, transforming ordinary ingredients into something truly special and memorable.
Unleash Your Creativity: Serving Suggestions and Spooky Variations
But the journey with these delightful creations doesn’t end with the basic recipe. Oh no, that’s just the beginning of a world of culinary adventure! These versatile bites can be served in so many exciting ways. Picture them as the star of your next casual get-together, laid out on a large platter for guests to grab and enjoy. They pair wonderfully with a crisp, green salad dressed with a light vinaigrette, offering a refreshing contrast to the cheesy goodness. Or, for a cozier meal, serve them alongside a warm bowl of tomato or minestrone soup. They make an excellent appetizer for a larger meal or can be the main event themselves for a fun and interactive dinner experience. They are perfect for movie nights, game days, or simply as a creative after-school snack.
Now, let’s talk about variations – this is where your creativity can truly shine! Don’t feel limited to classic pepperoni and cheese. Think outside the box and personalize your pizzas to suit any taste, theme, or dietary preference. The beauty of mini pizzas is their adaptability.
Crust Creations:
- Shape Shifters: Instead of simple circles, embrace the festive spirit! Use cookie cutters to create ghostly outlines, adorable pumpkin shapes, or even bat silhouettes from your dough. This instantly elevates the spooky factor and makes each bite an adventure.
- Alternative Bases: While I love the classic pizza crust, feel free to experiment with other convenient options. Pita bread, English muffins, or even large portobello mushroom caps can serve as fantastic bases, offering a quicker prep time or a gluten-free and veggie-packed alternative. Just adjust baking times accordingly!
Sauce Spectacle:
- Beyond Marinara: Swap out the traditional tomato sauce for a vibrant pesto for an herbaceous kick, a creamy Alfredo sauce for a richer flavor profile, or even a tangy BBQ sauce for a smoky twist. Each change opens up a whole new world of taste sensations.
Topping Terrors and Treats:
- Spooky Olives: Black olives are your secret weapon for creating edible creatures! Slice them in half to form the body of a spider, then arrange thin strips of olive as legs. Or use whole olive halves as eerie eyes for your cheesy monsters.
- Mummy Magic: Craft adorable mummy pizzas by layering thin strips of provolone or mozzarella cheese crisscross over a hot dog slice, mini sausage, or other topping, leaving a small space at the top for two olive slices as eyes. They’re irresistibly cute!
- Bell Pepper Jack-o’-Lanterns: Use small cookie cutters or a sharp knife to carefully cut bell pepper slices (orange or yellow work best) into miniature jack-o’-lantern faces before placing them on your pizzas. The vibrant colors and fun shapes are fantastic.
- Ghoulish Garnish: Add finely chopped fresh herbs like basil, oregano, or parsley after baking for a burst of fresh flavor and a pop of color. For an extra creepy touch, a drizzle of ranch or sour cream can be swirled onto the hot sauce base to create a spiderweb effect before adding other toppings.
- Protein Power: Beyond pepperoni, consider crumbled cooked sausage, shredded chicken, flaked tuna, or even plant-based meat crumbles. Each adds substance and unique flavor.
The possibilities are truly endless, allowing you to tailor each batch to your mood, theme, or the ingredients you have on hand. Don’t be afraid to experiment; that’s half the fun and often leads to the most delicious discoveries!
Your Turn! Let’s Get Spooky in the Kitchen!
So, now it’s your turn! I genuinely hope this recipe inspires you to step into your kitchen and experience the joy of making these incredible bites for yourself. Whether you’re gathering ingredients for a festive autumn evening, planning a memorable gathering, or just looking for a fun project with the family, these will undoubtedly be a hit. Embrace the process, have fun with the decorating, and most importantly, savor every delicious bite. I promise you, the effort is minimal, and the reward is immense – not just in terms of flavor, but in the shared experience and the delightful memories you’ll create together. There’s something truly special about a homemade treat, and these deliver on all fronts.
I would absolutely love to see your creations! Once you’ve whipped up your batch of these fantastic Halloween Mini Pizzas, please don’t hesitate to share your experiences. Did you try a unique topping? Did your kids get super creative with their designs? What was your favorite part of making them? Your feedback, photos, and ingenious variations inspire not just me, but our entire community of food lovers. Let’s connect and celebrate the magic of homemade treats together. Get baking, get creative, and most importantly, enjoy every single moment of this delicious adventure. Happy cooking, my friends!
Spooky Halloween Mini Pizzas
Delightfully spooky and incredibly tasty Halloween Mini Pizzas that are easy to make and fun for all ages. Customize these bite-sized treats with creative toppings like mummy bandages, spiderwebs, and jack-o’-lantern faces for a memorable festive feast.
Ingredients
-
8–10 Mini Pizza Crusts
-
3/4 cup Pizza Sauce
-
1 cup shredded Mozzarella Cheese
-
1/4 cup sliced Black Olives
-
1/4 cup Mini Beef Pepperoni (optional)
-
Orange & Green Bell Peppers (thin strips)
-
4 sticks Part-Skim String Cheese
-
2 tbsp Fresh Basil (chiffonade)
-
Olive Oil Spray
Instructions
-
Step 1
Preheat oven to 425°F (220°C). Line two large baking sheets with parchment paper and mist lightly with Olive Oil Spray. Arrange the 8-10 mini pizza crusts on the prepared sheets. -
Step 2
Shred mozzarella cheese. Pull apart string cheese sticks into thin strips for mummy bandages. Prepare olives: slice some for eyes, halve others for spider bodies and heads. Cut Mini Beef Pepperoni and Orange & Green Bell Peppers into small shapes (triangles, crescents, strips) for jack-o’-lantern faces and stems. Chiffonade fresh basil. -
Step 3
Spread a thin layer of pizza sauce on a few mini crusts. Top with a small amount of shredded mozzarella, then crisscross string cheese strips to resemble bandages. Add two sliced black olive pieces for eyes. -
Step 4
Spread pizza sauce on another set of mini crusts and cover with shredded mozzarella. Drizzle concentric circles of pizza sauce on top. Use a toothpick to drag lines from the center outwards to create a web pattern. Place half an olive for a spider body and a smaller olive piece for a head, adding olive slivers for legs. -
Step 5
Spread pizza sauce on remaining mini crusts and cover with shredded mozzarella. Add a thin strip of green bell pepper for a stem. Arrange cut Mini Beef Pepperoni and/or orange bell pepper shapes for eyes, nose, and mouth. -
Step 6
Place assembled mini pizzas on prepared baking sheets. Bake for 8-12 minutes, or until crusts are golden and cheese is melted and bubbly. Rotate sheets halfway through if needed for even cooking. -
Step 7
Remove from oven, let cool on baking sheet for 2-3 minutes, then transfer to a wire rack for another 5 minutes. Garnish with fresh basil. Serve warm. Store leftovers in the refrigerator for up to 3 days.
Important Information
Nutrition Facts (Per Serving)
It is important to consider this information as approximate and not to use it as definitive health advice.
Allergy Information
Please check ingredients for potential allergens and consult a health professional if in doubt.


Leave a Comment