
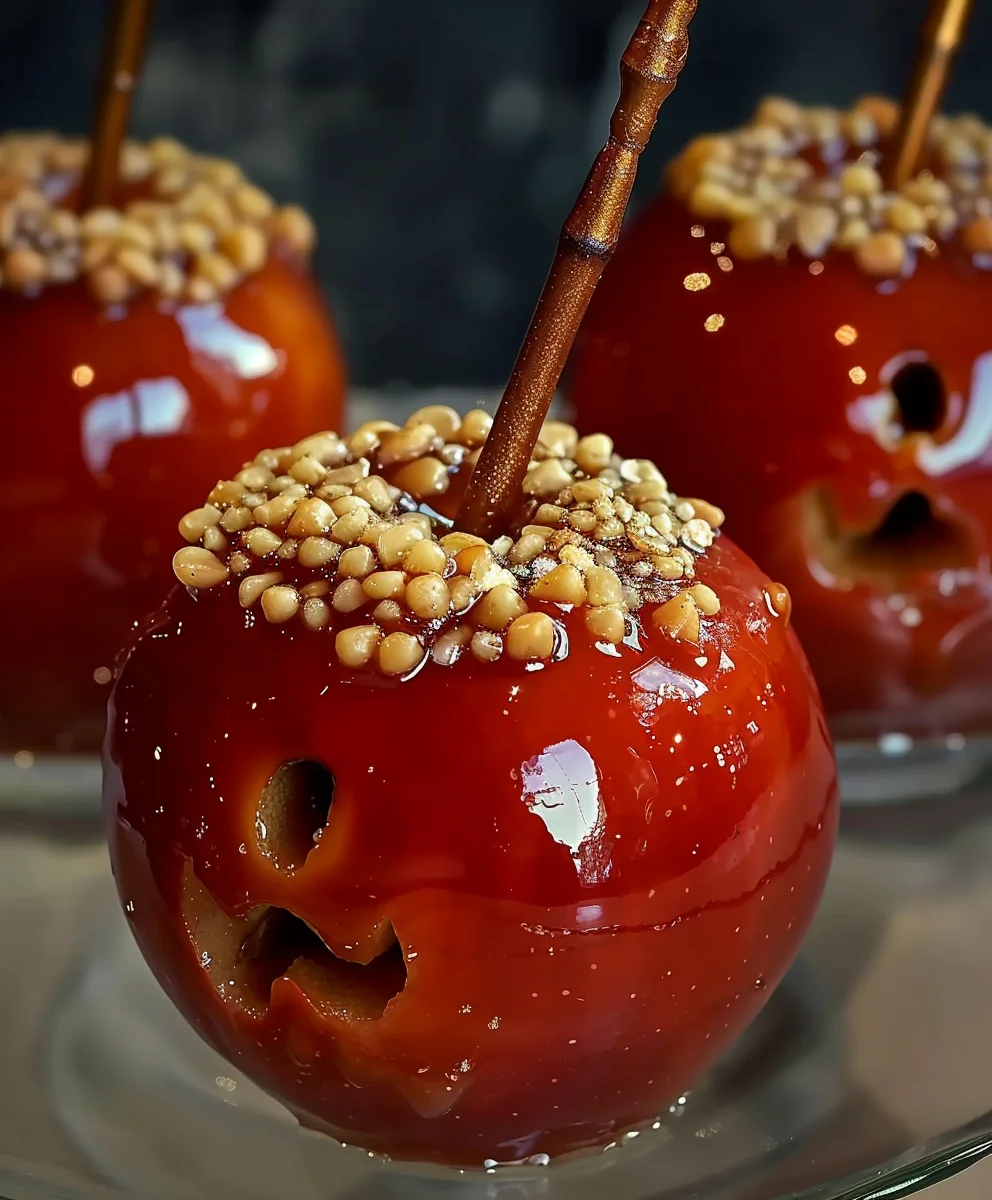
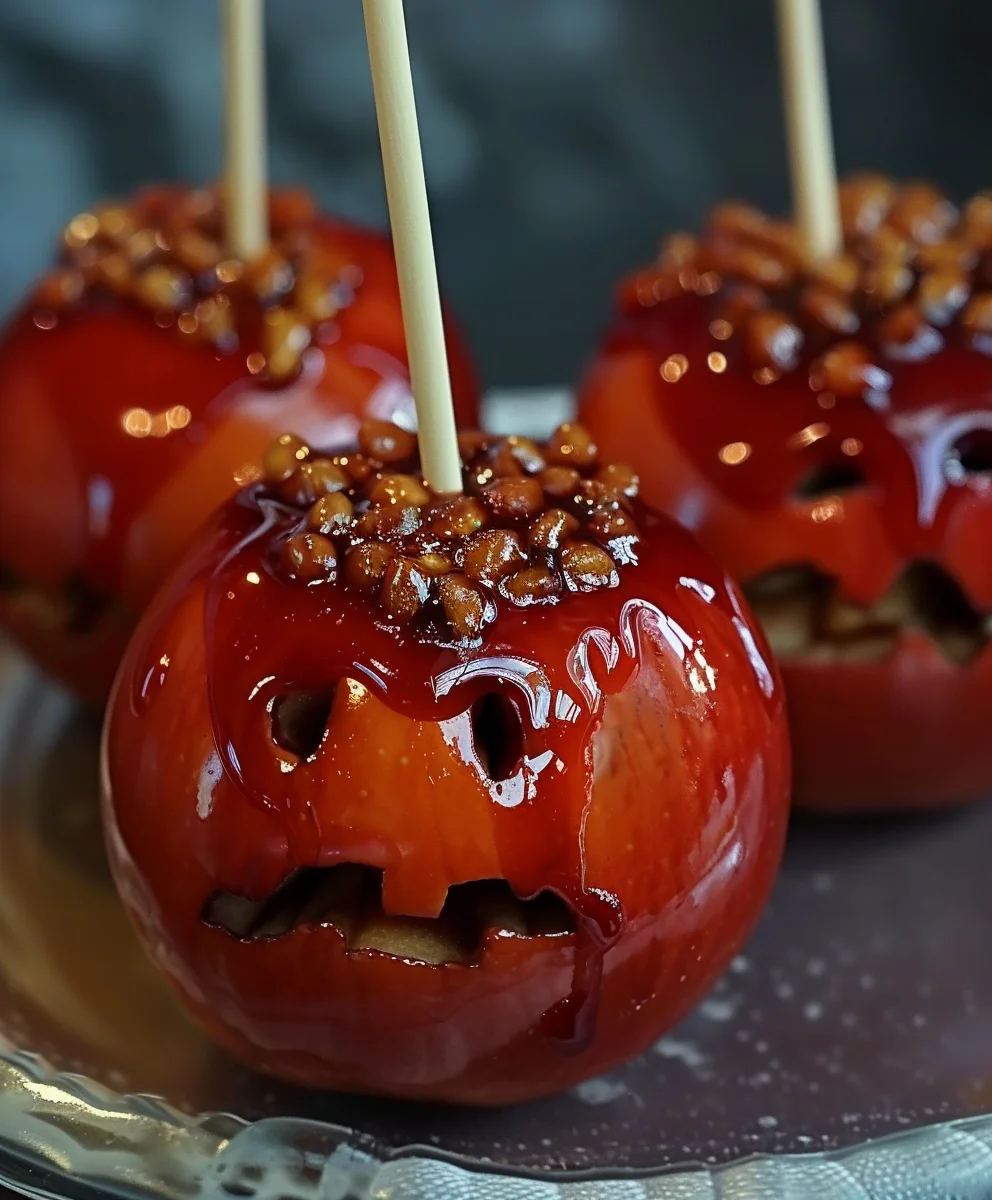
Candied Apples For Halloween
More than just a treat, these iconic confections are a quintessential symbol of autumn festivities, evoking a sense of nostalgic delight with every shiny, red bite. There’s an undeniable magic in preparing these classic delights, transforming simple apples into dazzling, irresistible masterpieces perfect for a chilly October evening. I find myself drawn to their vibrant allure each year, a tradition that truly marks the beginning of the holiday season and adds a touch of old-world charm to modern celebrations.
The history of the candied apple dates back to the early 20th century, reportedly created by a Newark candy maker, William W. Kolb, who dipped apples in a cinnamon-red candy mixture to display in his shop window. Since then, these glossy, sweet and tart delights have become a beloved staple, especially around autumn festivals and, of course, Halloween, intertwining themselves with the very fabric of seasonal joy.
People absolutely adore these treats for their captivating visual appeal, the delightful contrast of the crisp, tart apple encased in a shimmering, hard candy shell, and the sheer joy and tradition they represent. Whether you’re making them for eager trick-or-treaters or as a festive party favor, mastering the art of creating perfect Candied Apples For Halloween is a rewarding experience. Join me as we explore the simple steps to craft these timeless masterpieces, bringing a heartwarming touch to your seasonal gatherings.

Ingredients:
- 6-8 Medium Apples: I usually go for Granny Smith for that perfect tart contrast, but Fuji or Honeycrisp work wonderfully too if you prefer a sweeter apple. Make sure they are firm and blemish-free.
- 3 Cups Granulated Sugar: This is the backbone of our sweet coating!
- 1 Cup Water: Just plain old tap water will do the trick.
- 1 Cup Light Corn Syrup: This magic ingredient is crucial for preventing crystallization and ensuring a smooth, glossy candy coating. Don’t skip it!
- 1 Teaspoon Gel Food Coloring: For classic Halloween vibes, I love using red, but black, orange, or even a spooky green can be fantastic. Gel colors give a much more vibrant result than liquid.
- 1/2 Teaspoon Vanilla Extract (Optional): A little hint of vanilla can add a lovely depth to the sweetness.
- 6-8 Candy Apple Sticks or Wooden Skewers: If using skewers, make sure they are sturdy and long enough to comfortably hold the apple.
- Parchment Paper or Silicone Baking Mats: For cooling your beautiful candied apples without them sticking.
- Candy Thermometer: Absolutely essential for achieving the correct candy consistency. There’s no guessing with this recipe, precision is key!
- Large Heavy-Bottomed Saucepan: A heavy bottom helps distribute heat evenly and prevents scorching.
- Pastry Brush (Optional but Recommended): For brushing down the sides of the pan.
- Baking Soda (Optional): For an extra wax removal step if your apples are particularly waxy.
- Small Bowl of Ice Water (for the thermometer): To quickly clean and calibrate your thermometer if needed, or just cool it down between readings.
Preparing Your Apples & Workstation
Before we dive into making that glorious candy coating, a little preparation goes a long way to ensure our Candied Apples For Halloween turn out perfectly. Trust me, you’ll thank yourself for taking these crucial first steps!
- Wash and Dry the Apples Thoroughly: This might seem obvious, but it’s more important than you think. Many apples come with a protective wax coating applied by growers, and this wax can prevent our candy coating from adhering properly. Wash each apple under hot running water, scrubbing gently with a clean cloth or vegetable brush.
- Optional Wax Removal Step: For particularly waxy apples, you can take an extra measure. Briefly dip the apples in a bowl of very hot water (not boiling, just hot from the tap) for about 10-15 seconds, then quickly scrub them with a clean sponge. Some people even add a tiny pinch of baking soda to the water for extra cleaning power. The goal here is to remove any residue that might create a barrier between the apple skin and our delicious candy. After scrubbing, dry each apple completely. Any moisture on the apple will cause the candy to slide off or create an uneven coating. I usually let them air dry for a bit after towel drying, just to be super sure.
- Insert the Candy Sticks: Once your apples are sparkling clean and bone dry, it’s time to insert the sticks. Carefully push a candy apple stick or a sturdy wooden skewer into the stem end of each apple. Push it in firmly, about halfway through the apple, until it feels secure. You want to make sure it can handle the weight of the apple once it’s coated in candy. This is your handle for dipping, so make it strong!
- Prepare Your Cooling Surface: Lay out a sheet of parchment paper or a silicone baking mat on a flat surface, like a baking sheet or your counter. This is where our beautiful candied apples will cool without sticking. I prefer parchment paper because it’s disposable and cleanup is a breeze. Having this ready before you start cooking the candy is vital, as the coating sets quickly.
- Gather All Your Tools: Make sure your heavy-bottomed saucepan, candy thermometer, measuring cups, ingredients, and even a small bowl of ice water (for thermometer calibration/cleaning, if you’re meticulous like me) are all within arm’s reach. Once the candy starts cooking, things move pretty fast, and you won’t want to be scrambling for equipment.
- Clear Your Workspace: Ensure you have ample space around your stovetop and your cooling station. Working with hot sugar requires focus and a clear, organized environment to prevent accidents.
Crafting the Spooky Candy Coating
This is where the magic happens, turning simple ingredients into that iconic, glossy candy shell for our Candied Apples For Halloween. Precision and attention are key here, so put on your game face!
- Combine Ingredients in the Saucepan: In your large, heavy-bottomed saucepan, combine the granulated sugar, water, and light corn syrup. Give it a gentle stir with a wooden spoon or heat-proof spatula, just enough to moisten all the sugar. Try not to get sugar crystals on the sides of the pan above the liquid line at this point.
- Attach the Candy Thermometer: Clip your candy thermometer to the side of the saucepan, making sure the tip is submerged in the sugar mixture but not touching the bottom of the pan. This is crucial for an accurate temperature reading.
- Begin Heating the Mixture: Place the saucepan over medium-high heat. Allow the mixture to come to a boil without stirring. Resist the urge to stir once it starts boiling! Stirring at this stage can introduce sugar crystals back into the mixture, leading to a grainy candy instead of a smooth, glassy one.
- Brush Down the Sides of the Pan (Optional but Recommended): As the mixture heats and boils, you might notice sugar crystals forming on the sides of the pan. To prevent these from falling back into the liquid and causing crystallization, dip a pastry brush in clean water and gently brush down the sides of the pan, dissolving any rogue sugar crystals. Do this periodically as needed.
- Cook to the Hard Crack Stage: Continue to cook the mixture, monitoring your candy thermometer closely. We’re aiming for the “hard crack” stage, which is typically between 300°F (149°C) and 310°F (154°C). I usually pull mine off the heat right when it hits 300°F-305°F to allow for a slight rise in temperature after removing it from the burner.
Why is Temperature So Important?
If the temperature is too low, your candy coating will be soft, sticky, and might not fully harden. If it’s too high, the sugar can burn, giving your apples a bitter taste, and the candy will become brittle and difficult to work with. Precision is paramount for perfect candied apples for Halloween.
- Add Food Coloring and Vanilla: Once your candy mixture reaches the desired temperature (300-305°F), immediately remove the saucepan from the heat. Carefully stir in your gel food coloring and vanilla extract (if using). Be quick but gentle. The mixture will be extremely hot, so watch out for steam. Stir until the color is evenly distributed and vibrant.
- Work Quickly: At this stage, the candy will start to cool and thicken quickly. You’ll need to move promptly to dip your apples before the coating becomes too firm to work with.
- Safety First! Please remember that you are working with extremely hot sugar, which can cause severe burns. Keep children and pets away from the kitchen, and exercise extreme caution. Have a bowl of cold water nearby in case of accidental splashes.
Dipping and Perfecting Your Candied Apples For Halloween
Now for the most satisfying part – transforming your humble apples into gleaming, spooky Candied Apples For Halloween treats! This is where technique makes all the difference.
- Tilt and Dip: Carefully pick up one prepared apple by its stick. Tilt your saucepan to one side to create a deeper pool of candy coating. Slowly and deliberately dip the apple into the hot candy mixture. Rotate the apple to ensure it’s completely covered, all the way up to just below the stick. Try not to let the apple touch the bottom of the pan, as this can create a thick, uneven layer.
- Allow Excess to Drip: Once the apple is fully coated, lift it out of the candy. Hold it above the saucepan and let the excess candy drip off back into the pan. You can gently rotate the apple and even lightly tap the stick against the edge of the saucepan to encourage dripping and achieve a thinner, more even coating. This step is critical for preventing puddles of candy at the bottom of your finished apple.
- Place on Prepared Surface: Immediately transfer the dipped apple to your prepared parchment paper or silicone baking mat. Make sure to place it stick-side up. Repeat the dipping process with the remaining apples, working as quickly as possible.
Maintaining Candy Temperature:
If your candy starts to thicken too much while you’re dipping, you can briefly return the saucepan to very low heat for a few seconds to gently warm it up and make it more fluid again. Be very careful not to let it re-boil or exceed your desired temperature.
- Optional Decorations: If you want to add sprinkles, edible glitter, or other fun Halloween decorations, do so immediately after placing the apple on the parchment paper, while the candy coating is still wet and sticky. Once it hardens, decorations won’t adhere.
- Cool Completely: Allow your Candied Apples For Halloween to cool undisturbed for at least 30-60 minutes, or until the candy coating is completely hard and set. Resist the temptation to touch them while they are cooling, as this can leave fingerprints or mar the smooth surface. The candy will become firm and brittle once fully cooled.
- Inspect and Enjoy: Once thoroughly cooled, gently peel your beautiful candied apples off the parchment paper. They should come off cleanly. Now, your festive and spooky treats are ready to be admired and enjoyed! The crisp apple inside, paired with the crunchy, sweet candy shell, is an irresistible combination.
Storing Your Delicious Halloween Treats
You’ve put in all that effort to create these magnificent Candied Apples For Halloween, so let’s make sure they stay fresh and delicious for as long as possible!
- Individual Wrapping: Once completely cooled and hardened, I recommend wrapping each candied apple individually. You can use cellophane bags, plastic wrap, or even small treat bags tied with a festive ribbon. This helps protect the candy from moisture in the air, which can make it sticky, and also keeps it clean.
- Room Temperature Storage is Best: Candied apples are best stored at cool room temperature, away from direct sunlight or excessive heat. Placing them in the refrigerator can cause the candy coating to become sticky and cloudy due to condensation, compromising that beautiful hard crunch we worked so hard for.
- Avoid Humid Environments: Humidity is the enemy of crisp candy coatings. If you live in a very humid area, try to enjoy your candied apples within a day or two, or store them in an airtight container at room temperature.
- Optimal Enjoyment Window: While they can last for a few days when stored properly, candied apples are truly at their best within 1-2 days of being made. The apple remains crisp, and the candy coating maintains its perfect crunch. Over time, the moisture from the apple can start to seep into the candy, causing it to soften.
- Serving Suggestion: These are fantastic as standalone treats for parties, trick-or-treaters, or just a fun seasonal snack. You can even create a delightful display with them for your Halloween festivities!
And there you have it! A comprehensive guide to making truly spectacular Candied Apples For Halloween. Happy dipping, and enjoy your sweet, spooky creations!
Conclusion:
And there you have it, my friends! We’ve journeyed through the simple yet magical process of transforming humble apples into a glistening, irresistible treat that promises to delight taste buds and captivate eyes. This isn’t just another recipe; it’s an invitation to create joy, to indulge in a classic, and to bring a burst of vibrant color and delicious sweetness into your kitchen and lives. I genuinely believe that once you try this method, you’ll understand why it’s become my absolute go-to for a truly special dessert.
Why This Recipe is an Absolute Must-Try!
First and foremost, the taste is simply phenomenal. Imagine biting through that perfectly crisp, vibrant candy shell to reach the juicy, tart crunch of a fresh apple. It’s a symphony of textures and flavors that dance on your palate, offering a delightful contrast between the sugary coating and the fruit’s natural zing. Unlike some overly thick or sticky versions, my recipe ensures a candy shell that’s firm but not tooth-shatteringly hard, delivering that satisfying crack without making a mess. We’ve meticulously covered the common pitfalls, ensuring your apples are beautifully coated, evenly set, and utterly delicious from the first bite to the last. This isn’t just about making candy; it’s about crafting an experience, a moment of pure, unadulterated pleasure that transports you back to simpler times, evoking cherished memories of fairs, carnivals, and joyful celebrations. It’s a treat that truly embodies the spirit of fun and indulgence, perfect for any occasion where you want to serve something genuinely special and homemade.
Beyond the incredible flavor, the visual appeal of these treats is undeniable. They are stunning, glossy jewels that instantly elevate any dessert spread. Picture a platter of these shimmering, ruby-red delights catching the light – they are showstoppers, guaranteed to elicit gasps of admiration from your guests. Moreover, the process itself is wonderfully therapeutic and fun, making it a fantastic activity to share with family, especially children who will love dipping and decorating (under supervision, of course!). It’s a chance to get creative in the kitchen, to embrace the joy of making something beautiful and delicious from scratch. You’ll find that the simplicity of the ingredients belies the impressive outcome, proving that some of the best culinary creations don’t require complicated techniques or exotic components. This recipe truly champions the humble apple, showcasing it in its most glamorous form.
Elevate Your Experience: Serving Suggestions & Creative Variations
While these candied apples are utterly perfect on their own, there are so many delightful ways to serve them and even more opportunities to get creative with variations. For a classic presentation, simply arrange them upright on a rustic wooden board or a pristine white platter; their vibrant color will speak volumes. They make an incredible centerpiece for a festive dessert table, especially if you’re hosting a party. Pair them with a warm mug of spiced apple cider or a rich hot chocolate for the ultimate autumnal treat. For a truly indulgent experience, try chopping a candied apple into bite-sized pieces and serving it alongside a scoop of vanilla bean ice cream or a dollop of fresh whipped cream – the crisp candy shell adds an amazing textural contrast to the creamy coolness.
Feeling adventurous? The beauty of this recipe lies in its adaptability. Before the candy shell fully sets, you can roll your apples in various toppings. Think finely chopped nuts like pecans or walnuts for an earthy crunch, colorful sprinkles for a whimsical touch, or even a drizzle of melted white or dark chocolate for an extra layer of decadence. A dusting of cinnamon sugar or a hint of cayenne pepper in the candy mixture can add an exciting twist. For a “grown-up” version, you could experiment with a tiny splash of a complementary liqueur in the candy syrup – just be sure to let it cool slightly before adding to prevent evaporation and to ensure safety. Don’t be afraid to try different apple varieties too; while Granny Smiths offer that classic tartness, a Honeycrisp or Fuji can provide a sweeter, crisper base. If you have any leftovers (which I highly doubt!), store them individually wrapped in parchment paper in a cool, dry place at room temperature for up to two days. They are best enjoyed fresh, but their magic lingers for a short while.
Your Turn: Make Memories and Share the Joy!
Now, it’s your turn! I sincerely hope this recipe inspires you to dive into your kitchen and create these spectacular treats. There’s an incredible sense of accomplishment that comes from making something so visually stunning and incredibly delicious from scratch. These are truly an iconic treat, and with Halloween just around the corner, there’s no better time to master the art of making the perfect Candied Apples For Halloween. Imagine the delight on faces as you present these homemade masterpieces!
I absolutely cannot wait to hear about your experiences. Did you try a fun variation? What was your favorite part of the process? Please, don’t hesitate to share your triumphs, your tips, and even your comical kitchen mishaps (we all have them!). Your feedback and stories inspire me and our entire community of enthusiastic home cooks. So grab your apples, heat up that sugar, and get ready to create some sweet, sticky memories. Happy cooking, and even happier eating!
Spooky Candied Apples: Easy Halloween Recipe Fun!
Craft classic candied apples for Halloween with this easy recipe! These iconic treats, with their crisp, tart apple encased in a shimmering hard candy shell, are a delightful symbol of autumn festivities. Perfect for trick-or-treaters or a festive party favor, learn to make these timeless masterpieces.
Ingredients
-
6 small apples (Granny Smith or any firm variety)
-
6 wooden sticks or skewers
-
2 cups granulated sugar
-
1/2 cup light corn syrup
-
3/4 cup water
-
1/2 teaspoon vanilla extract
-
Orange food coloring (optional)
-
1/2 cup chopped nuts (optional, for topping)
Instructions
-
Step 1
Wash apples thoroughly to remove wax; dry completely. Insert a wooden stick firmly into the stem end of each apple. Line a baking sheet with parchment paper. -
Step 2
In a heavy-bottomed saucepan, combine granulated sugar, water, and light corn syrup. Attach a candy thermometer, ensuring it doesn’t touch the bottom. Heat over medium-high heat to a boil without stirring. Cook until the thermometer reads 300-305°F (hard crack stage). (Optional: brush down sugar crystals from pan sides with wet pastry brush). -
Step 3
Immediately remove the saucepan from heat. Carefully stir in vanilla extract and orange food coloring until evenly distributed. Work quickly as the candy will begin to cool. -
Step 4
Carefully tilt the saucepan to create a deep candy pool. Dip each apple into the hot candy, rotating to coat completely. Lift, letting excess drip back into the pan. If using, immediately sprinkle with chopped nuts or other toppings while candy is wet. -
Step 5
Place dipped apples on the prepared parchment paper to cool completely, about 30-60 minutes, until the candy is hard. Once fully hardened, wrap each apple individually in cellophane or plastic wrap. Store at cool room temperature for 1-2 days for best quality.
Important Information
Nutrition Facts (Per Serving)
It is important to consider this information as approximate and not to use it as definitive health advice.
Allergy Information
Please check ingredients for potential allergens and consult a health professional if in doubt.


Leave a Comment