
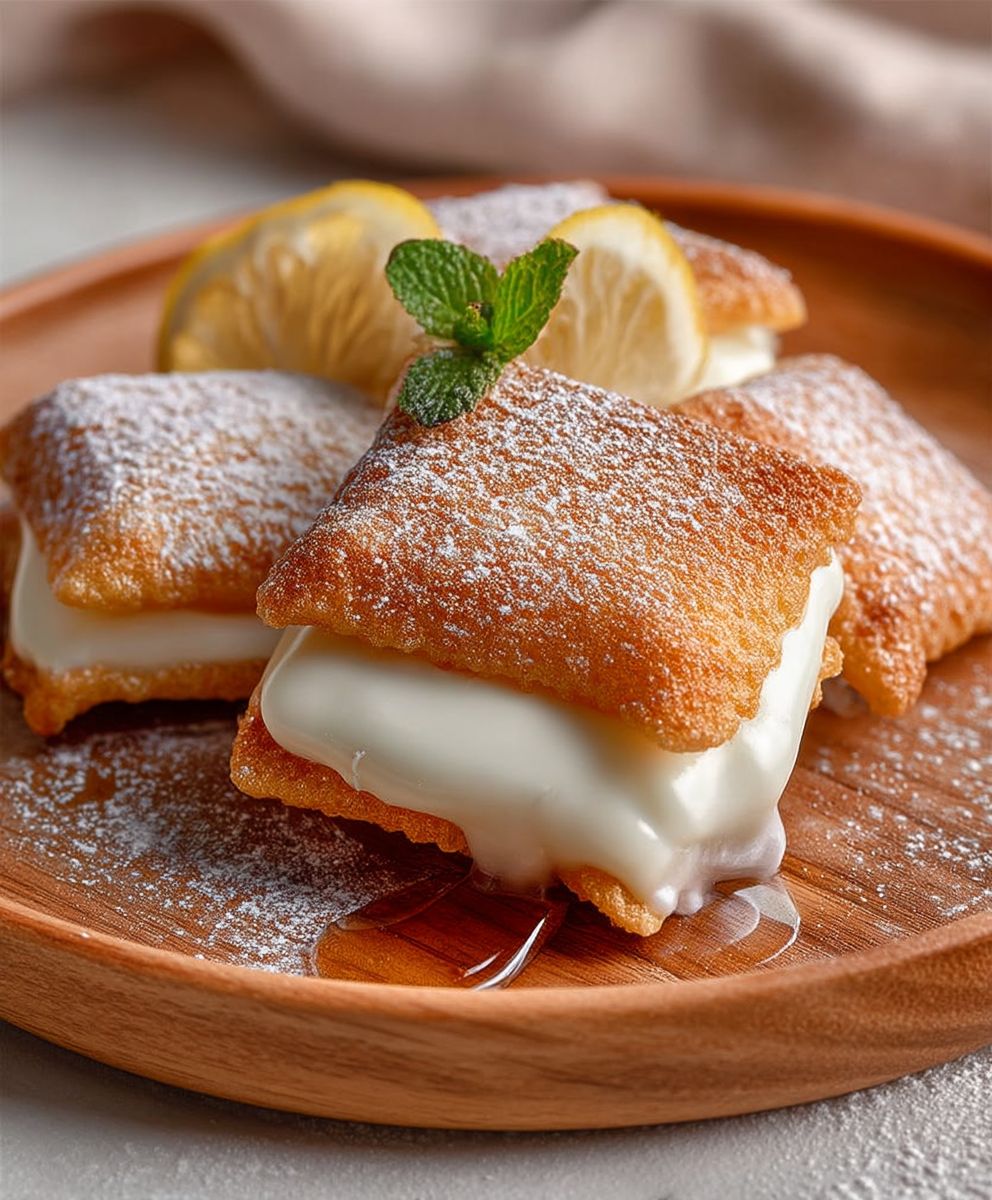
Shiroi Koibito Japanese Snack: Prepare to be transported to the snowy landscapes of Hokkaido with every delicate bite! Imagine two crisp, buttery langue de chat cookies embracing a layer of smooth, melt-in-your-mouth white chocolate. That’s the magic of Shiroi Koibito, a beloved Japanese confection that has captured hearts (and taste buds) worldwide.
This iconic treat, whose name translates to “White Lover,” has a rich history dating back to 1976 when Ishiya Confectionery first introduced it. Legend has it that the founder, while gazing at the snow-covered mountains, was inspired to create a sweet that embodied the purity and beauty of Hokkaido’s winter. The result? A perfect harmony of textures and flavors that has become a symbol of Japanese confectionery excellence.
What makes the Shiroi Koibito Japanese Snack so irresistible? It’s the exquisite balance of the crisp, slightly salty cookies with the sweet, creamy white chocolate. The delicate snap of the cookie gives way to a velvety smoothness that lingers on the palate. Beyond the taste, it’s the elegant packaging and the association with Hokkaido’s pristine beauty that elevates this snack to something truly special. Whether you’re enjoying it with a cup of tea or gifting it to a loved one, Shiroi Koibito is a delightful experience that embodies the art of Japanese confectionery.

Ingredients:
- For the Langues de Chat Cookies:
- 125g (1 cup + 2 tablespoons) unsalted butter, softened
- 80g (2/3 cup) powdered sugar, sifted
- 1 large egg white, at room temperature
- 60g (1/2 cup) all-purpose flour, sifted
- 15g (2 tablespoons) cornstarch, sifted
- 1/4 teaspoon vanilla extract (optional, but recommended)
- Pinch of salt
- For the White Chocolate Filling:
- 200g (7 ounces) high-quality white chocolate, finely chopped
- 50ml (1/4 cup) heavy cream
- 15g (1 tablespoon) unsalted butter
Preparing the Langues de Chat Cookies
Okay, let’s get started with the cookie part! These are delicate and delicious, and the key is to be precise with your measurements and gentle with your mixing.
- Cream the Butter and Sugar: In a large bowl, or the bowl of your stand mixer, cream together the softened butter and sifted powdered sugar until light and fluffy. This usually takes about 3-5 minutes. Make sure to scrape down the sides of the bowl occasionally to ensure everything is evenly incorporated. You want a smooth, pale mixture.
- Incorporate the Egg White: Add the egg white to the butter and sugar mixture. Mix on medium speed until fully combined. Don’t overmix at this stage; just until it’s homogenous. Overmixing can develop gluten and make the cookies tough.
- Add Vanilla Extract (Optional): If you’re using vanilla extract, add it now and mix briefly to combine. The vanilla adds a lovely subtle flavor that complements the white chocolate beautifully.
- Sift in Dry Ingredients: In a separate bowl, whisk together the sifted all-purpose flour, sifted cornstarch, and salt. Sifting is crucial here to prevent lumps and ensure a light and airy cookie. Gradually add the dry ingredients to the wet ingredients, mixing on low speed until just combined. Be careful not to overmix! Overmixing will result in tough cookies. You want a smooth, pipeable batter.
- Prepare the Piping Bag: Transfer the batter to a piping bag fitted with a small round tip (about 1/4 inch or 6mm). If you don’t have a piping bag, you can use a Ziploc bag and snip off a small corner.
- Pipe the Cookies: Line two baking sheets with parchment paper or silicone baking mats. Pipe small, oval-shaped cookies onto the prepared baking sheets, leaving about 1 inch (2.5 cm) of space between each cookie. Aim for cookies that are about 2 inches (5 cm) long and 1 inch (2.5 cm) wide. Consistency in size is important for even baking and a professional look.
- Bake the Cookies: Preheat your oven to 325°F (160°C). Bake the cookies for 8-12 minutes, or until the edges are lightly golden brown. Keep a close eye on them, as they can burn easily. The baking time will depend on your oven, so start checking them at 8 minutes.
- Cool the Cookies: Once baked, remove the baking sheets from the oven and let the cookies cool on the baking sheets for a few minutes before transferring them to a wire rack to cool completely. This prevents them from breaking while they are still soft.
Making the White Chocolate Filling
Now for the delicious white chocolate filling! This is a simple ganache, but using high-quality white chocolate is essential for the best flavor and texture.
- Chop the White Chocolate: Finely chop the white chocolate and place it in a heatproof bowl. The finer you chop it, the easier it will melt.
- Heat the Heavy Cream: In a small saucepan, heat the heavy cream over medium heat until it just begins to simmer. Do not boil the cream.
- Pour Cream over Chocolate: Pour the hot heavy cream over the chopped white chocolate. Let it sit for about 1 minute to allow the heat to melt the chocolate.
- Stir Until Smooth: Gently stir the mixture until the white chocolate is completely melted and the ganache is smooth and glossy. If there are any unmelted pieces, you can microwave the mixture in 10-second intervals, stirring in between, until smooth.
- Add Butter: Add the unsalted butter to the ganache and stir until it is fully incorporated and the ganache is even smoother and shinier. The butter adds richness and helps to stabilize the ganache.
- Cool the Ganache: Let the ganache cool at room temperature for about 30 minutes, or until it has thickened slightly but is still spreadable. You don’t want it to be too firm, or it will be difficult to spread.
Assembling the Shiroi Koibito
Finally, the fun part – putting everything together! This is where the magic happens, and you transform simple cookies and ganache into a beautiful and delicious treat.
- Pair the Cookies: Find cookies that are similar in size and shape. This will make the finished product look more uniform and professional.
- Spread the Filling: Take one cookie and spread a generous amount of the white chocolate ganache on the flat side. Be careful not to spread it too close to the edges, as it will squeeze out when you sandwich the cookies together.
- Sandwich the Cookies: Top the ganache-covered cookie with another cookie, flat side down. Gently press the cookies together to distribute the filling evenly.
- Repeat: Repeat steps 2 and 3 with the remaining cookies and ganache.
- Chill (Optional): For best results, chill the assembled Shiroi Koibito in the refrigerator for about 30 minutes to allow the ganache to set completely. This will make them easier to handle and prevent the filling from squeezing out.
- Serve and Enjoy! Serve the Shiroi Koibito chilled or at room temperature. They are best enjoyed within a few days, as the cookies can soften over time.
Tips for Success
- Use High-Quality Ingredients: The quality of your ingredients will directly impact the flavor of the finished product. Use high-quality butter, white chocolate, and vanilla extract for the best results.
- Don’t Overmix the Cookie Dough: Overmixing develops gluten, which can make the cookies tough. Mix the dough until just combined.
- Bake Evenly: Make sure your oven is properly calibrated and that the cookies are evenly spaced on the baking sheets to ensure even baking.
- Cool Completely: Allow the cookies to cool completely before assembling them. This will prevent the ganache from melting and making the cookies soggy.
- Store Properly: Store the assembled Shiroi Koibito in an airtight container in the refrigerator to keep them fresh.
Variations
- Dark Chocolate Filling: Substitute the white chocolate with dark chocolate for a richer, more intense flavor.
- Matcha Filling: Add matcha powder to the white chocolate ganache for a Japanese-inspired twist.
- Citrus Zest: Add lemon or orange zest to the cookie dough for a bright, citrusy flavor.
Conclusion:
And there you have it! This Shiroi Koibito recipe is more than just a cookie; it’s a little piece of Japan you can create right in your own kitchen. I truly believe you’ll find this recipe a must-try, not only for its unique flavor profile – the delicate sweetness of the white chocolate perfectly complementing the crisp, buttery langue de chat – but also for the sheer joy of recreating a beloved international treat. It’s a delightful project for a weekend afternoon, a fun activity to share with family, or simply a way to treat yourself to something special.
Why is this recipe a must-try? Beyond the authentic taste, it’s about the experience. It’s about the satisfaction of mastering a new technique, the joy of seeing those perfectly golden-brown edges appear, and the anticipation of that first, satisfying crunch. Plus, let’s be honest, who can resist the allure of a beautifully packaged, melt-in-your-mouth cookie? This recipe allows you to bypass the import fees and enjoy this iconic snack whenever the craving strikes.
But the fun doesn’t stop there! Feel free to experiment with different variations to make this recipe your own.
Serving Suggestions and Variations:
* Matcha Magic: Add a teaspoon of high-quality matcha powder to the cookie dough for a subtle earthy flavor and a beautiful green hue. This variation pairs wonderfully with the white chocolate.
* Citrus Zest: A touch of lemon or orange zest in the cookie dough can add a bright, refreshing twist.
* Dark Chocolate Delight: If you’re a dark chocolate lover, substitute the white chocolate with your favorite dark chocolate for a richer, more intense flavor.
* Coffee Infusion: A teaspoon of instant coffee dissolved in a tablespoon of hot water and added to the cookie dough can create a delightful mocha flavor.
* Serving Suggestions: These cookies are perfect on their own with a cup of tea or coffee. They also make a beautiful addition to a dessert platter or a thoughtful homemade gift. Consider packaging them in individual wrappers or a decorative tin for an extra special touch. You can also serve them alongside a scoop of vanilla ice cream or use them to create mini ice cream sandwiches.
I’m so excited for you to try this recipe and experience the magic of Shiroi Koibito for yourself. Don’t be intimidated by the seemingly intricate process; it’s much easier than it looks, and the results are well worth the effort. Remember to take your time, follow the instructions carefully, and most importantly, have fun!
Once you’ve created your own batch of these delectable treats, I’d absolutely love to hear about your experience. Did you try any of the variations? Did you encounter any challenges? What did your friends and family think? Share your photos and stories in the comments below! Your feedback is invaluable and helps me continue to improve and refine my recipes. So go ahead, embark on this culinary adventure and discover the joy of making your own Shiroi Koibito. Happy baking!
Shiroi Koibito Japanese Snack: A Delicious Guide & Review
Delicate butter cookies filled with a smooth white chocolate ganache, inspired by the famous Japanese confection.
Ingredients
Instructions
Recipe Notes
- Use high-quality ingredients for the best flavor.
- Don’t overmix the cookie dough.
- Bake evenly.
- Cool cookies completely before assembling.
- Store assembled cookies in an airtight container in the refrigerator.
- For a dark chocolate filling, substitute the white chocolate with dark chocolate.
- For a matcha filling, add matcha powder to the white chocolate ganache.
- Add lemon or orange zest to the cookie dough for a citrusy flavor.
Leave a Comment