
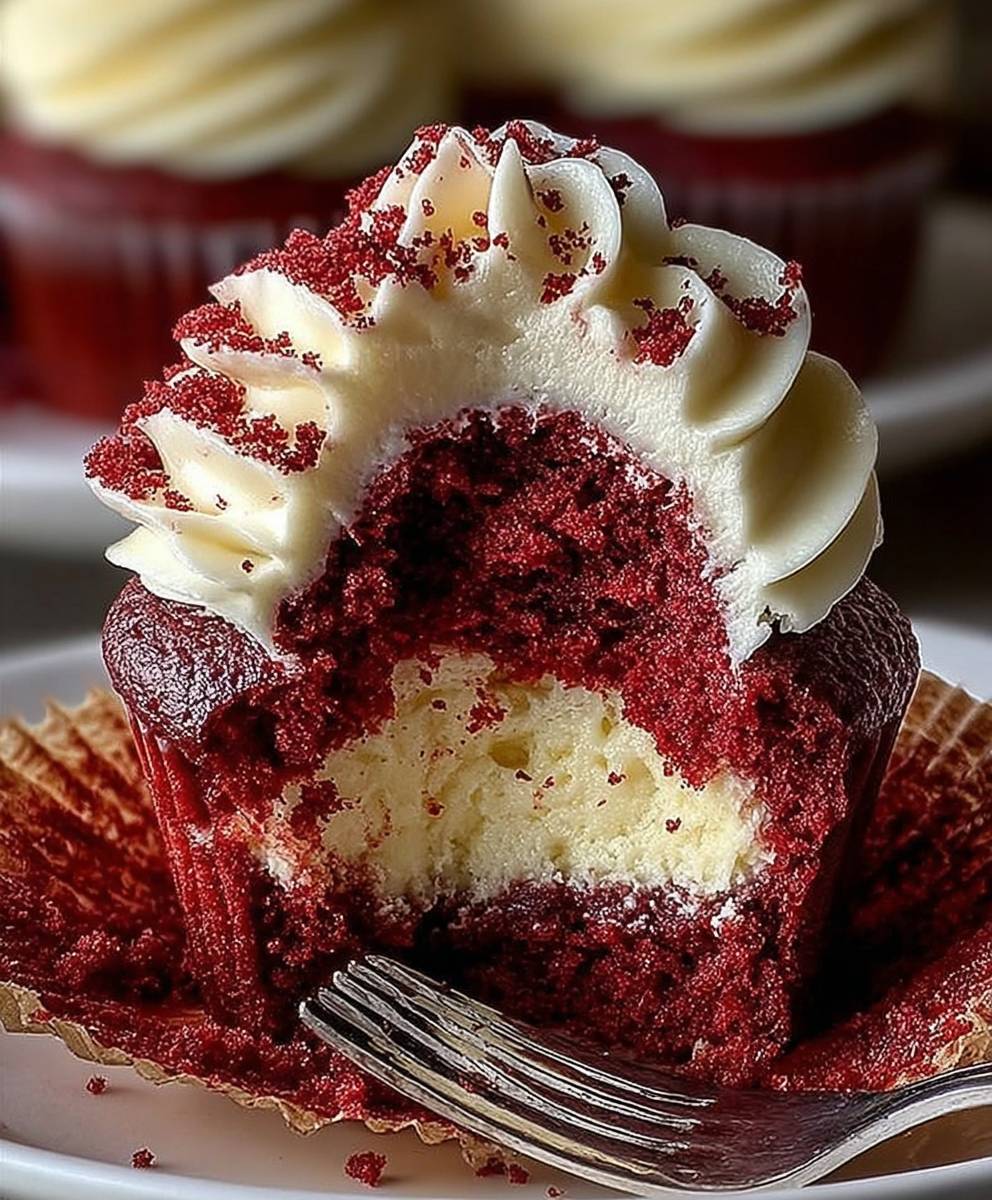
Red Velvet Cheesecake Cupcakes: Prepare to be utterly captivated by these delightful treats! Imagine the moist, tangy crumb of classic red velvet cake swirled together with the creamy, decadent richness of cheesecake, all nestled in a perfectly portioned cupcake. It’s a symphony of flavors and textures that will leave you craving more.
The allure of red velvet extends beyond its captivating color. While its exact origins are debated, many believe it gained popularity during the Great Depression as a way to make cakes more appealing with the addition of beet juice or cocoa. The subtle tang, often achieved with buttermilk or vinegar, creates a unique flavor profile that sets it apart from other chocolate cakes.
But why combine it with cheesecake? Because the combination is pure genius! The slight acidity of the red velvet beautifully complements the creamy sweetness of the cheesecake, creating a balanced and irresistible dessert. These Red Velvet Cheesecake Cupcakes are not only incredibly delicious but also surprisingly easy to make. They are perfect for parties, holidays, or simply as a special treat for yourself. Their individual size makes them convenient to serve and enjoy, ensuring everyone gets the perfect bite. Get ready to impress your friends and family with these stunning and scrumptious cupcakes!

Ingredients:
- For the Red Velvet Cupcakes:
- 1 ½ cups all-purpose flour
- 1 teaspoon baking soda
- 1 tablespoon unsweetened cocoa powder
- ½ teaspoon salt
- ½ cup (1 stick) unsalted butter, softened
- ¾ cup granulated sugar
- 2 large eggs
- 1 teaspoon vanilla extract
- 1 cup buttermilk
- 1 tablespoon red food coloring
- 1 teaspoon white vinegar
- For the Cheesecake Filling:
- 8 ounces cream cheese, softened
- ⅓ cup granulated sugar
- 1 large egg
- 1 teaspoon vanilla extract
- For the Cream Cheese Frosting:
- 8 ounces cream cheese, softened
- ½ cup (1 stick) unsalted butter, softened
- 3 cups powdered sugar
- 1 teaspoon vanilla extract
- Optional: Red velvet cake crumbs for garnish
Preparing the Red Velvet Cupcakes:
- Preheat and Prep: First things first, let’s get that oven ready! Preheat your oven to 350°F (175°C). Line a 12-cup muffin tin with cupcake liners. This will make cleanup a breeze and ensure your cupcakes come out easily.
- Dry Ingredients: In a medium bowl, whisk together the flour, baking soda, cocoa powder, and salt. Whisking is key here to ensure everything is evenly distributed. This prevents pockets of baking soda or cocoa powder in your final cupcakes.
- Cream Butter and Sugar: In a large bowl (or the bowl of a stand mixer), cream together the softened butter and granulated sugar until light and fluffy. This usually takes about 3-5 minutes. The mixture should be noticeably lighter in color and texture. This step is crucial for creating a tender cupcake.
- Add Eggs and Vanilla: Beat in the eggs one at a time, making sure each egg is fully incorporated before adding the next. Then, stir in the vanilla extract. Vanilla extract enhances the flavor of the red velvet and complements the cream cheese filling and frosting.
- Alternate Wet and Dry Ingredients: Gradually add the dry ingredients to the wet ingredients, alternating with the buttermilk, beginning and ending with the dry ingredients. So, add about a third of the dry ingredients, then half of the buttermilk, then another third of the dry ingredients, the remaining buttermilk, and finally the last third of the dry ingredients. Mix until just combined. Be careful not to overmix! Overmixing can lead to tough cupcakes.
- Add Red Food Coloring, Vinegar, and Baking Soda: In a small bowl, combine the red food coloring, vinegar, and baking soda. The mixture will fizz – this is normal! This reaction helps to create the characteristic red velvet color and adds a bit of tang to the cupcakes. Gently fold this mixture into the batter until just combined.
Preparing the Cheesecake Filling:
- Cream Cheese and Sugar: In a medium bowl, beat the softened cream cheese and sugar together until smooth and creamy. Make sure your cream cheese is truly softened, or you’ll end up with lumps in your filling.
- Add Egg and Vanilla: Beat in the egg and vanilla extract until just combined. Again, be careful not to overmix.
Assembling and Baking the Cupcakes:
- Fill the Cupcake Liners: Fill each cupcake liner about ⅔ full with the red velvet batter.
- Add Cheesecake Filling: Spoon about 1 tablespoon of the cheesecake filling onto the center of each cupcake.
- Bake: Bake for 18-20 minutes, or until a toothpick inserted into the red velvet portion comes out clean. The cheesecake filling might still look slightly soft, but it will set as it cools.
- Cool Completely: Let the cupcakes cool in the muffin tin for a few minutes before transferring them to a wire rack to cool completely. This is important to prevent the cupcakes from sticking to the liners.
Preparing the Cream Cheese Frosting:
- Cream Butter and Cream Cheese: In a large bowl (or the bowl of a stand mixer), cream together the softened cream cheese and butter until smooth and creamy. Just like with the cheesecake filling, make sure both are properly softened.
- Add Powdered Sugar: Gradually add the powdered sugar, one cup at a time, beating well after each addition. This prevents a cloud of powdered sugar from exploding in your face!
- Add Vanilla: Stir in the vanilla extract.
- Whip Until Fluffy: Beat the frosting until light and fluffy. This usually takes about 2-3 minutes.
Frosting and Garnishing:
- Frost the Cupcakes: Once the cupcakes are completely cool, frost them with the cream cheese frosting. You can use a piping bag for a fancy look, or simply spread the frosting on with a knife.
- Garnish (Optional): If desired, garnish the cupcakes with red velvet cake crumbs. To make cake crumbs, simply crumble a small piece of leftover red velvet cake (or even a store-bought red velvet cookie) between your fingers.
- Chill (Optional): For best results, chill the frosted cupcakes in the refrigerator for at least 30 minutes before serving. This will help the frosting to set and make the cupcakes even more delicious.
Tips for Success:
- Softened Ingredients are Key: Make sure your butter and cream cheese are properly softened before starting. This will ensure a smooth and creamy texture in both the cheesecake filling and the frosting.
- Don’t Overmix: Overmixing the batter can lead to tough cupcakes. Mix until just combined.
- Cool Completely: Allow the cupcakes to cool completely before frosting. Otherwise, the frosting will melt.
- Adjust Sweetness: If you prefer a less sweet frosting, you can reduce the amount of powdered sugar.
- Food Coloring: The amount of red food coloring can be adjusted to your preference. Gel food coloring is recommended for a more vibrant color.
Storage Instructions:
Store the frosted cupcakes in an airtight container in the refrigerator for up to 3 days. They are best enjoyed within the first 24 hours.
Variations:
- Chocolate Chips: Add chocolate chips to the red velvet batter for an extra chocolatey treat.
- Nuts: Sprinkle chopped nuts on top of the frosting for added texture and flavor.
- Different Frosting: If you’re not a fan of cream cheese frosting, you can use a vanilla buttercream or a chocolate ganache instead.
Conclusion:
And there you have it! These Red Velvet Cheesecake Cupcakes are truly a showstopper, and I genuinely believe they’ll become a new favorite in your baking repertoire. The combination of the tangy cream cheese filling nestled within the moist, slightly cocoa-flavored red velvet cupcake is simply divine. It’s a dessert that’s both comforting and elegant, perfect for any occasion, from a casual weeknight treat to a sophisticated dinner party.
But why is this recipe a must-try? Beyond the incredible flavor profile, it’s surprisingly easy to make. I’ve broken down each step to ensure success, even for novice bakers. Plus, the individual cupcake format makes them incredibly convenient for serving and portion control (though you might find yourself reaching for a second one!). The vibrant red color is undeniably appealing, making these cupcakes a visual delight as well. They are guaranteed to impress your family and friends.
Now, let’s talk about serving suggestions and variations! While these Red Velvet Cheesecake Cupcakes are delicious on their own, a few simple additions can elevate them even further. A dusting of cocoa powder or a sprinkle of red velvet cake crumbs adds a touch of elegance. For a more decadent experience, try drizzling them with melted white chocolate or a tangy cream cheese glaze.
If you’re feeling adventurous, consider these variations:
* Chocolate Chip Surprise: Add a handful of mini chocolate chips to the red velvet batter for a delightful burst of chocolate in every bite.
* Oreo Bottom: Place a whole Oreo cookie at the bottom of each cupcake liner before adding the batter for a fun and unexpected twist.
* Peppermint Perfection: For the holidays, add a few drops of peppermint extract to the cream cheese filling and top with crushed candy canes.
* Lemon Zest Zing: Add lemon zest to the cream cheese filling to brighten the flavor.
The possibilities are endless! Don’t be afraid to experiment and create your own unique version of these delightful cupcakes.
I’m so excited for you to try this recipe! I truly believe you’ll love the results. The moist red velvet cake, the creamy cheesecake filling, and the endless possibilities for customization make these cupcakes a winner every time.
So, go ahead, preheat your oven, gather your ingredients, and get baking! I’m confident that you’ll create a batch of Red Velvet Cheesecake Cupcakes that will impress everyone who tries them.
And most importantly, please share your experience with me! I’d love to hear how your cupcakes turned out, what variations you tried, and any tips or tricks you discovered along the way. You can leave a comment below, tag me on social media, or send me an email. I can’t wait to see your creations! Happy baking!
Red Velvet Cheesecake Cupcakes: The Ultimate Recipe
Decadent red velvet cupcakes with a creamy cheesecake filling and tangy cream cheese frosting. A perfect combination of flavors and textures!
Ingredients
Instructions
Recipe Notes
- Softened Ingredients are Key: Make sure your butter and cream cheese are properly softened before starting.
- Don’t Overmix: Overmixing the batter can lead to tough cupcakes. Mix until just combined.
- Cool Completely: Allow the cupcakes to cool completely before frosting.
- Adjust Sweetness: If you prefer a less sweet frosting, you can reduce the amount of powdered sugar.
- Food Coloring: The amount of red food coloring can be adjusted to your preference. Gel food coloring is recommended for a more vibrant color.

Leave a Comment