
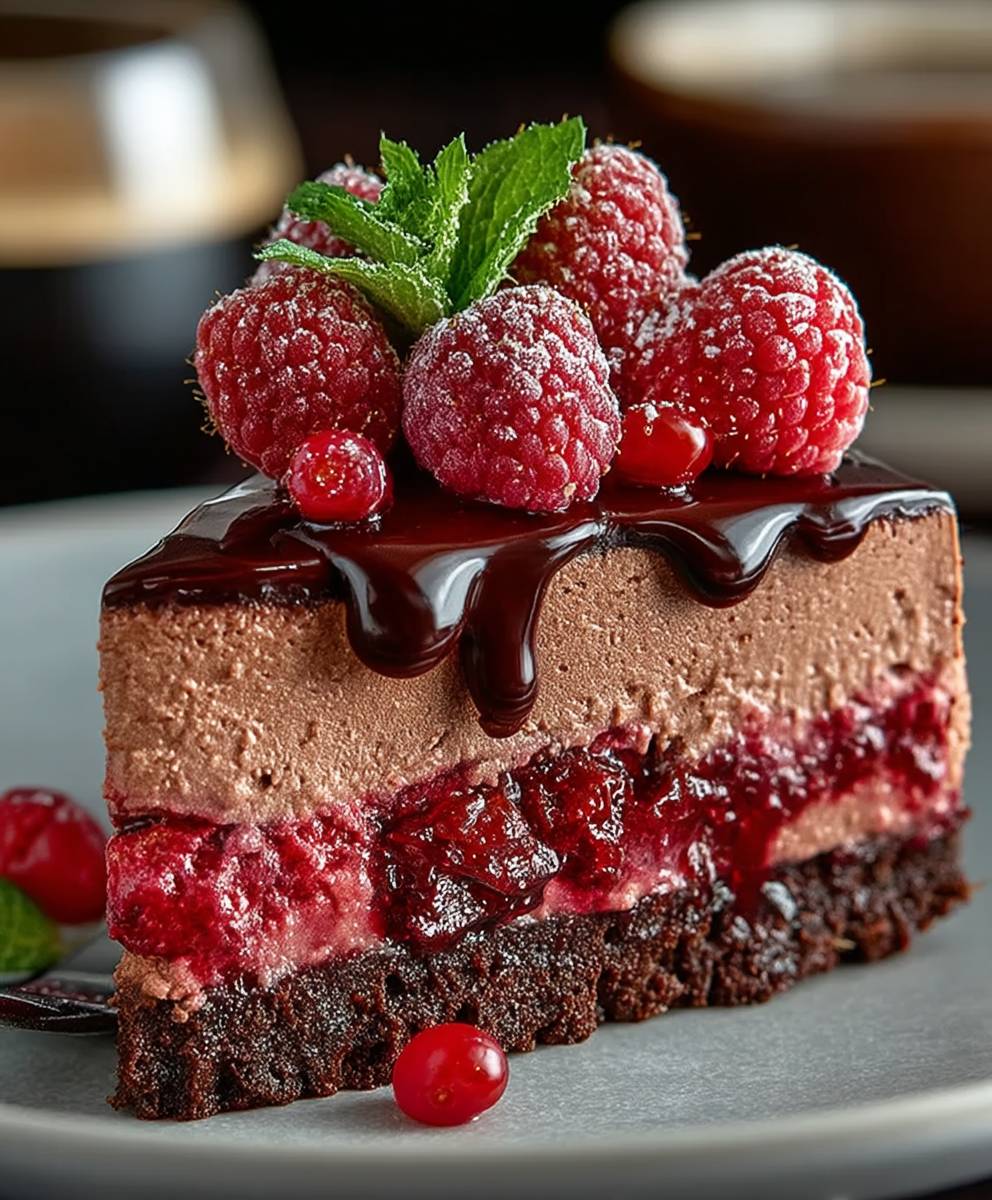
Raspberry chocolate mousse cake: just the name alone conjures images of decadent indulgence, doesn’t it? Imagine sinking your fork into layers of rich, dark chocolate mousse, perfectly complemented by the bright, tangy sweetness of fresh raspberries. This isn’t just a dessert; it’s an experience, a symphony of flavors and textures that will leave you craving more.
While the exact origins of mousse cakes are debated, the concept of mousse itself dates back to 18th-century France. The French, known for their culinary innovation, elevated simple creams into airy, elegant desserts. Combining this classic technique with the universally loved flavors of chocolate and raspberry creates a dessert that transcends time and culture. It’s a modern classic with roots in tradition.
So, why is raspberry chocolate mousse cake so irresistible? It’s the perfect balance. The bitterness of dark chocolate is beautifully offset by the raspberries’ tartness, preventing it from being overly sweet. The mousse texture is light and airy, melting in your mouth, while the cake layers provide a satisfying contrast. Plus, let’s be honest, the vibrant colors of the raspberries against the deep chocolate make it a stunning centerpiece for any occasion. Whether you’re celebrating a birthday, anniversary, or simply treating yourself, this cake is guaranteed to impress. Get ready to create a masterpiece!

Ingredients:
- For the Chocolate Cake:
- 2 cups all-purpose flour
- 2 cups granulated sugar
- ¾ cup unsweetened cocoa powder
- 1 ½ teaspoons baking powder
- 1 ½ teaspoons baking soda
- 1 teaspoon salt
- 1 cup buttermilk
- ½ cup vegetable oil
- 2 large eggs
- 2 teaspoons vanilla extract
- 1 cup boiling water
- For the Raspberry Mousse:
- 12 ounces fresh raspberries
- ½ cup granulated sugar
- 1 tablespoon lemon juice
- 2 teaspoons powdered gelatin
- 2 tablespoons cold water
- 1 ½ cups heavy cream, cold
- For the Chocolate Ganache:
- 8 ounces semi-sweet chocolate, finely chopped
- 1 cup heavy cream
- 2 tablespoons unsalted butter
- For Decoration (Optional):
- Fresh raspberries
- Chocolate shavings
- Powdered sugar
Preparing the Chocolate Cake:
- Preheat and Prepare: Preheat your oven to 350°F (175°C). Grease and flour two 9-inch round cake pans. I like to use parchment paper rounds in the bottom of the pans to ensure the cakes release easily. This step is crucial for a clean release!
- Combine Dry Ingredients: In a large bowl, whisk together the flour, sugar, cocoa powder, baking powder, baking soda, and salt. Make sure everything is evenly distributed. This ensures a consistent rise and flavor throughout the cake.
- Combine Wet Ingredients: In a separate bowl, whisk together the buttermilk, oil, eggs, and vanilla extract. Whisk until well combined. Don’t overmix at this stage, just ensure everything is incorporated.
- Combine Wet and Dry: Gradually add the wet ingredients to the dry ingredients, mixing on low speed until just combined. Be careful not to overmix, as this can lead to a tough cake. A few lumps are okay at this point.
- Add Boiling Water: Carefully pour in the boiling water and mix until the batter is smooth. The batter will be thin, but don’t worry, that’s normal! The hot water helps to bloom the cocoa powder and create a moist cake.
- Divide and Bake: Divide the batter evenly between the prepared cake pans. Bake for 30-35 minutes, or until a wooden skewer inserted into the center comes out clean. Keep a close eye on them, as baking times can vary depending on your oven.
- Cool the Cakes: Let the cakes cool in the pans for 10 minutes before inverting them onto a wire rack to cool completely. Make sure they are completely cool before frosting. This prevents the frosting from melting and makes the cake easier to handle.
Making the Raspberry Mousse:
- Prepare Raspberry Puree: In a saucepan, combine the raspberries, sugar, and lemon juice. Cook over medium heat, stirring occasionally, until the raspberries have broken down and the mixture has thickened slightly, about 10-15 minutes. The lemon juice helps to brighten the raspberry flavor.
- Strain the Puree: Strain the raspberry mixture through a fine-mesh sieve to remove the seeds. This will give you a smooth and silky mousse. Discard the seeds.
- Bloom the Gelatin: In a small bowl, sprinkle the gelatin over the cold water. Let it stand for 5-10 minutes to soften. This process is called blooming and is essential for the gelatin to properly set the mousse.
- Dissolve the Gelatin: Heat the raspberry puree in the saucepan over low heat. Add the bloomed gelatin and stir until it is completely dissolved. Make sure there are no lumps of gelatin remaining.
- Cool the Raspberry Mixture: Remove the raspberry mixture from the heat and let it cool slightly. It should be lukewarm, not hot. This prevents the heat from melting the whipped cream.
- Whip the Cream: In a large bowl, whip the heavy cream until stiff peaks form. Be careful not to overwhip, as this can turn the cream into butter.
- Combine and Fold: Gently fold the cooled raspberry mixture into the whipped cream in two additions. Be careful not to deflate the whipped cream. The mousse should be light and airy.
- Chill the Mousse: Cover the bowl with plastic wrap and refrigerate for at least 2 hours, or until the mousse has set. This allows the mousse to firm up and develop its flavor.
Preparing the Chocolate Ganache:
- Heat the Cream: In a saucepan, heat the heavy cream over medium heat until it just begins to simmer. Do not boil.
- Pour over Chocolate: Place the finely chopped chocolate in a heatproof bowl. Pour the hot cream over the chocolate and let it sit for 1 minute to soften the chocolate.
- Stir Until Smooth: Gently stir the chocolate and cream together until the chocolate is completely melted and the ganache is smooth and glossy.
- Add Butter: Stir in the butter until it is melted and incorporated into the ganache. The butter adds richness and shine to the ganache.
- Cool Slightly: Let the ganache cool slightly before pouring it over the cake. It should be thick enough to spread easily but not too thick that it’s difficult to work with.
Assembling the Raspberry Chocolate Mousse Cake:
- Level the Cakes: If the cakes have domed on top, use a serrated knife to level them. This will ensure that the cake is even and stable.
- Place First Layer: Place one cake layer on a serving plate or cake stand.
- Add Mousse Layer: Spread half of the raspberry mousse evenly over the first cake layer.
- Place Second Layer: Carefully place the second cake layer on top of the mousse.
- Add Remaining Mousse: Spread the remaining raspberry mousse evenly over the second cake layer.
- Chill the Cake: Refrigerate the cake for at least 30 minutes to allow the mousse to set further. This will make it easier to frost with the ganache.
- Pour Ganache: Pour the slightly cooled chocolate ganache over the top of the cake, allowing it to drip down the sides. You can use an offset spatula to spread the ganache evenly.
- Decorate (Optional): Decorate the cake with fresh raspberries, chocolate shavings, and a dusting of powdered sugar, if desired. Get creative and make it your own!
- Chill Again: Refrigerate the cake for at least 1 hour before serving to allow the ganache to set.
Conclusion:
This Raspberry Chocolate Mousse Cake isn’t just a dessert; it’s an experience. The rich, decadent chocolate mousse, perfectly balanced by the tartness of fresh raspberries, creates a symphony of flavors that will leave you and your guests utterly speechless. I truly believe this is a must-try recipe for anyone who appreciates a show-stopping dessert that’s surprisingly achievable at home.
Think of it: the velvety smooth texture of the mousse melting in your mouth, followed by the burst of juicy raspberries and the satisfying crunch of the chocolate cake base. It’s a textural masterpiece as much as it is a flavor explosion. And the best part? You don’t need to be a professional pastry chef to create this magic. The steps are straightforward, and the result is undeniably impressive.
But don’t just take my word for it! Imagine serving this beauty at your next dinner party. Picture the looks of awe and delight as you present this stunning cake. It’s guaranteed to be the highlight of the evening, and you’ll be basking in the glow of compliments for days to come.
Now, let’s talk about serving suggestions and variations. While this Raspberry Chocolate Mousse Cake is divine on its own, a few simple additions can elevate it even further. A dollop of freshly whipped cream, lightly sweetened with vanilla, adds a touch of elegance and complements the richness of the chocolate. A dusting of cocoa powder or a few chocolate shavings on top provides a visual appeal and intensifies the chocolate flavor.
For a more festive touch, consider adding a drizzle of raspberry sauce or a scattering of edible flowers. And if you’re feeling adventurous, you could even incorporate a layer of raspberry jam between the cake base and the mousse for an extra burst of fruity goodness.
Looking for variations? If raspberries aren’t your thing (though I highly recommend giving them a try!), you can easily substitute them with other berries like strawberries, blueberries, or blackberries. Each berry will bring its own unique flavor profile to the cake, creating a delightful twist on the original recipe. You could even experiment with different types of chocolate for the mousse, such as dark chocolate for a more intense flavor or milk chocolate for a sweeter, creamier taste.
Another fun variation is to make individual mousse cups instead of a whole cake. This is a great option for parties or when you want to control portion sizes. Simply layer the cake crumbs and mousse in individual glasses or ramekins, and top with raspberries and whipped cream.
I’m so excited for you to try this recipe and experience the joy of creating this incredible dessert. I know you’ll love it as much as I do. So, gather your ingredients, put on your apron, and get ready to bake!
Once you’ve made your own Raspberry Chocolate Mousse Cake, I’d absolutely love to hear about your experience. Share your photos and stories in the comments below. Let me know what variations you tried, what your guests thought, and any tips or tricks you discovered along the way. Your feedback is invaluable, and it helps me to continue creating recipes that you’ll love. Happy baking!
Raspberry Chocolate Mousse Cake: A Decadent Dessert Recipe
Decadent chocolate cake layered with a light and airy raspberry mousse and topped with a rich chocolate ganache. A perfect dessert for special occasions!
Ingredients
Instructions
Recipe Notes
- For best results, use high-quality chocolate and fresh raspberries.
- Make sure all ingredients are at the correct temperature as indicated in the instructions.
- Don’t overmix the cake batter, as this can result in a tough cake.
- Be gentle when folding the raspberry mixture into the whipped cream to avoid deflating the mousse.
- Chilling the cake at various stages helps to set the layers and makes it easier to frost.


Leave a Comment