
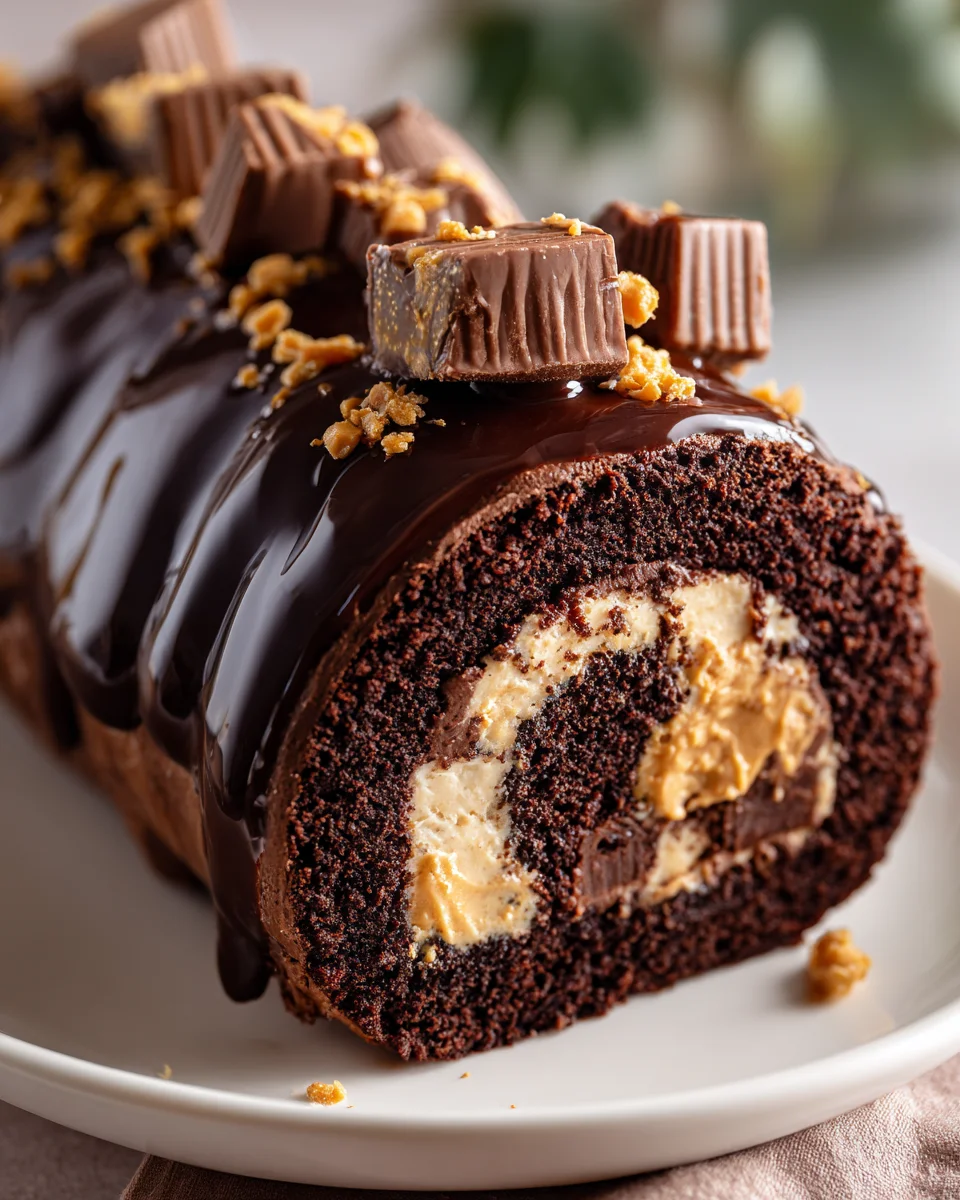
Peanut Butter Cup Chocolate Roll. Oh my goodness, where do I even begin with this absolute showstopper? If you’re anything like me, the mere mention of peanut butter and chocolate together instantly makes your taste buds sing. But this isn’t just any peanut butter and chocolate dessert; it’s a truly special creation that takes those beloved flavors to an elegant new level. I promise, you are going to fall head over heels for this recipe because it delivers on every single decadent promise. Imagine a tender, incredibly moist chocolate cake, lovingly rolled around a generous, creamy peanut butter filling that perfectly captures that iconic peanut butter cup taste. It’s rich, it’s dreamy, and it has that irresistible salty-sweet balance that makes you want just one more slice (or two!). Whether you’re looking to impress guests, celebrate a special occasion, or simply treat yourself to something extraordinary, this Peanut Butter Cup Chocolate Roll is designed to be a crowd-pleaser and a personal indulgence all in one beautiful package. Get ready to bake a masterpiece that tastes as amazing as it looks!

Ingredient Notes
Creating this spectacular Peanut Butter Cup Chocolate Roll truly starts with understanding a few key components. While the list might seem long, each ingredient plays a vital role in building those layers of decadent chocolate and creamy peanut butter goodness that we all love.
For the Chocolate Cake Roll
- All-Purpose Flour: This is the foundation of our flexible chocolate cake. Make sure it’s fresh for the best texture. If you’re looking for a gluten-free alternative, a good quality 1:1 gluten-free baking flour blend can often be substituted, though results may vary slightly in elasticity.
- Unsweetened Cocoa Powder: For a deep, rich chocolate flavor, I always recommend using a good quality Dutch-processed cocoa powder. It has a smoother, less bitter chocolate taste and a darker color. Natural cocoa powder will work too, but the final cake might be slightly lighter in color and have a more robust chocolate tang.
- Granulated Sugar: Essential for sweetness and moisture in the cake.
- Eggs: The eggs are critical here! They provide structure, richness, and, when whipped properly, give the cake its necessary airy texture and flexibility, which is crucial for rolling without cracks. Make sure they are at room temperature for the best volume when whipping.
- Baking Powder & Baking Soda: These leavening agents help the cake rise to be light and tender.
- Vanilla Extract: A good quality vanilla enhances all the chocolate flavors.
For the Peanut Butter Cup Filling
- Creamy Peanut Butter: The star of our filling! I highly recommend a conventional creamy peanut butter (like Jif or Skippy) for this recipe rather than natural, oil-separated brands. The conventional types have a more stable consistency and integrate better into the filling, resulting in a smoother, more spreadable texture. If you prefer a crunch, you could certainly use crunchy peanut butter, but be prepared for a slightly different mouthfeel. For those with nut allergies, sunflower seed butter (like SunButter) can be a fantastic alternative, keeping in mind the flavor will be different but still delicious.
- Unsalted Butter: Make sure it’s softened to room temperature for a smooth, lump-free filling.
- Powdered Sugar (Confectioners’ Sugar): Provides sweetness and structure to the filling without grittiness.
- Heavy Cream or Milk: A touch of liquid helps to achieve the perfect creamy consistency. Heavy cream will give a richer, firmer filling, while milk makes it slightly lighter. You can also use non-dairy milk alternatives like almond or oat milk if you prefer.
- Mini Peanut Butter Cups: Chopped into small pieces, these are folded directly into the filling for bursts of pure peanut butter cup flavor and texture. You can also use regular-sized peanut butter cups, just chop them more finely.
For the Chocolate Ganache
- Good Quality Chocolate: Use semi-sweet or bittersweet chocolate chips or, even better, a chopped chocolate bar. The quality of your chocolate will directly impact the flavor and texture of your ganache, so splurge a little if you can!
- Heavy Cream: The cream combines with the chocolate to create our luscious, shiny ganache. Again, non-dairy cream alternatives can be used.
- Unsalted Butter (Optional): A small knob of butter stirred into the warm ganache at the end adds extra shine and silkiness.
Step-by-Step Instructions
Get ready to create a show-stopping dessert! This Peanut Butter Cup Chocolate Roll takes a little patience, but the results are absolutely worth it. We’ll be making a delicate chocolate cake, a creamy peanut butter filling studded with peanut butter cups, and finishing it with a silky chocolate ganache.
Making the Chocolate Roll Cake
- Prepare Your Pan: First, preheat your oven to 375°F (190°C). Line a 10×15-inch (or 12×17-inch) jelly roll pan with parchment paper, making sure the paper extends slightly over the edges. Lightly grease the parchment paper to prevent sticking. Dust the parchment with a very light coating of cocoa powder or flour, tapping out any excess. This helps prevent sticking.
- Whisk Dry Ingredients: In a medium bowl, whisk together your all-purpose flour, cocoa powder, baking powder, and a pinch of salt. Set aside.
- Whip Eggs and Sugar: In a large mixing bowl, using an electric mixer, beat the eggs and granulated sugar on high speed for 5-7 minutes. You’re looking for a mixture that’s very pale yellow, thick, and almost tripled in volume. It should fall from the whisk in a thick ribbon that holds its shape for a few seconds on the surface of the batter. Beat in the vanilla extract.
- Fold in Dry Ingredients: Gently fold the dry ingredients into the egg mixture in two additions using a rubber spatula. Be very careful not to deflate the eggs. Mix just until no streaks of flour remain. Overmixing will result in a tough cake.
- Bake the Cake: Carefully pour the batter into your prepared jelly roll pan and spread it evenly to the edges. Bake for 10-12 minutes, or until the cake springs back when lightly touched in the center. Don’t overbake, as this can make the cake dry and prone to cracking when rolled.
- Prepare for Rolling: While the cake is baking, lay out a clean kitchen towel (one that doesn’t have a strong fabric pattern that will imprint on your cake) on your counter. Generously dust it with powdered sugar. This is crucial for preventing the cake from sticking.
- Roll the Cake: As soon as the cake comes out of the oven, immediately invert the hot cake onto the prepared powdered sugar-dusted towel. Carefully peel off the parchment paper. While still hot, starting from one short end, tightly roll the cake up with the towel inside it. Place the rolled cake, seam-side down, on a wire rack and let it cool completely to room temperature. This trains the cake to hold its rolled shape and prevents cracking later.
Preparing the Peanut Butter Cup Filling
- Chop Peanut Butter Cups: Finely chop your mini peanut butter cups. You’ll want about 1/2 cup for the filling and extra for garnish.
- Make the Filling: In a medium bowl, beat the softened unsalted butter and creamy peanut butter together with an electric mixer until smooth and creamy.
- Add Powdered Sugar: Gradually add the powdered sugar, beating until fully incorporated. The mixture will be quite thick.
- Add Liquid: Beat in the heavy cream (or milk/non-dairy alternative) one tablespoon at a time until the filling is light, fluffy, and easily spreadable.
- Fold in Peanut Butter Cups: Gently fold in the chopped mini peanut butter cups.
Assembling the Peanut Butter Cup Chocolate Roll
- Unroll and Fill: Once the chocolate cake roll is completely cooled, gently unroll it. If it resists, give it a moment. Carefully spread the peanut butter cup filling evenly over the entire surface of the cake, leaving a small border (about 1/2 inch) around the edges.
- Re-Roll: Starting from the same short end you rolled from initially, carefully and tightly re-roll the cake. Try to make it as snug as possible without squeezing out the filling excessively.
- Chill: Place the re-rolled cake, seam-side down, on a platter or cutting board. Cover loosely with plastic wrap and refrigerate for at least 30 minutes to allow the filling to set, which will make it easier to slice.
Making the Chocolate Ganache
- Prepare Chocolate: Place your good quality chopped chocolate (or chocolate chips) in a heatproof bowl.
- Heat Cream: In a small saucepan, heat the heavy cream over medium heat until it just begins to simmer around the edges (do not boil vigorously).
- Combine: Pour the hot cream directly over the chopped chocolate. Let it sit undisturbed for 5 minutes to allow the chocolate to melt.
- Whisk Smooth: After 5 minutes, gently whisk the mixture starting from the center and working your way out until the ganache is completely smooth and glossy. If using, stir in the optional unsalted butter for extra shine.
- Cool: Let the ganache cool at room temperature for about 15-20 minutes, or until it has thickened to a spreadable consistency. It should be thick enough to coat the back of a spoon, but still pourable. If it gets too thick, you can gently warm it over a double boiler for a few seconds. If too thin, chill briefly.
Decorating the Roll
- Glaze the Roll: Retrieve your chilled chocolate roll. Carefully pour or spread the slightly cooled ganache over the top and sides of the roll, allowing some to drip down the sides for an appealing look.
- Garnish: Immediately sprinkle the remaining chopped mini peanut butter cups over the ganache before it sets.
- Final Chill: Refrigerate the Peanut Butter Cup Chocolate Roll for at least another 30 minutes to allow the ganache to fully set.
Tips & Suggestions
Mastering the art of the chocolate roll can seem intimidating, but with a few pointers, your Peanut Butter Cup Chocolate Roll will be a masterpiece. Here are my favorite tips to ensure success and some ideas for variations:
- Don’t Overbake the Cake! This is the golden rule for any rolled cake. An overbaked cake will be dry and brittle, making it incredibly difficult to roll without cracking. Watch it closely; it’s better to slightly underbake than overbake. The cake should just spring back when lightly touched.
- Roll While Hot: This is the second most crucial tip. The cake needs to be rolled immediately after coming out of the oven. Its elasticity is at its peak when warm, allowing it to conform to the rolled shape without breaking. If you wait too long, it will cool and stiffen, leading to cracks.
- Dust That Towel Generously: Don’t be shy with the powdered sugar on your kitchen towel. It creates a non-stick barrier that prevents the warm cake from adhering to the towel, making the unrolling process much smoother.
- Use the Right Pan: A jelly roll pan (typically 10×15 inches or 12×17 inches) is designed specifically for thin cakes meant for rolling. Using a larger or smaller pan will affect the baking time and the cake’s thickness, potentially impacting its ability to roll.
- Chilling is Key for Neat Slices: Once filled and glazed, chilling your Peanut Butter Cup Chocolate Roll for a good hour or more allows the filling and ganache to firm up. This makes for much cleaner, more precise slices. For extra neatness, use a hot, sharp knife, wiping the blade clean between each cut.
- Customize Your Peanut Butter: While I recommend creamy for consistency, don’t hesitate to experiment with different peanut butter brands or even other nut butters if you’re feeling adventurous. Just be aware that some natural nut butters might separate and affect the filling’s texture.
- Vary the Garnish: Instead of just chopped peanut butter cups, you could drizzle with melted dark and white chocolate, sprinkle with a pinch of sea salt, or add some chocolate shavings for an extra elegant touch.
- Make Ahead: This roll is fantastic for making ahead! It actually tastes better the next day as the flavors meld. Just be sure to store it properly.
Storage
Once you’ve put all that effort into creating your beautiful Peanut Butter Cup Chocolate Roll, you’ll want to make sure it stays fresh and delicious!
- Refrigeration is Essential: Due to the cream-based peanut butter filling and chocolate ganache, this dessert absolutely needs to be stored in the refrigerator. Wrap the entire roll tightly in plastic wrap or place individual slices in an airtight container.
- Shelf Life: Stored properly in the refrigerator, your Peanut Butter Cup Chocolate Roll will stay fresh and delicious for 3-5 days. The flavors actually tend to deepen and meld beautifully over the first day or two.
- Serving Suggestion: While it needs to be refrigerated, I find that letting the roll sit at room temperature for about 15-20 minutes before serving allows the cake to soften slightly and the ganache to lose its chill, enhancing the overall texture and flavor.
- Freezing: Yes, you can freeze this chocolate roll! For best results, I recommend freezing it after it has been fully assembled and chilled. You can freeze the whole roll or individual slices. Wrap it very tightly in several layers of plastic wrap, then an additional layer of aluminum foil to prevent freezer burn. It will keep well in the freezer for up to 1 month.
- Thawing: When you’re ready to enjoy, transfer the frozen roll (or slices) to the refrigerator and let it thaw overnight. You can then let it sit at room temperature for a short while before serving, as mentioned above.
Final Thoughts
And there you have it – your very own Peanut Butter Cup Chocolate Roll! I truly hope you enjoy making this show-stopping dessert as much as I loved sharing the recipe with you. There’s something undeniably magical about the combination of rich, fudgy chocolate cake, swirled with that creamy, irresistible peanut butter cup filling that simply melts in your mouth.
This isn’t just any dessert; it’s an experience. The elegance of the roll, the delightful surprise of the peanut butter cups nestled within, and the sheer indulgence of every bite make the Peanut Butter Cup Chocolate Roll an absolute triumph. It’s the perfect centerpiece for any celebration, a surefire way to impress your guests, or simply a magnificent treat to brighten your day.
So go ahead, grab your ingredients and dive into creating this masterpiece. I promise, the smiles and satisfied sighs you’ll receive make every moment spent crafting your Peanut Butter Cup Chocolate Roll truly worth it. Happy baking!
Peanut Butter Cup Chocolate Roll: Irresistible Dessert!
- Total Time: 42 minutes
- Yield: 8 servings 1x
Description
This Peanut Butter Cup Chocolate Roll is a decadent dessert that beautifully combines the rich flavors of chocolate and creamy peanut butter. Perfect for impressing guests or indulging yourself, this roll is a showstopper that tastes as amazing as it looks.
Ingredients
- 1 cup All-Purpose Flour
- 1/2 cup Unsweetened Cocoa Powder
- 1 cup Granulated Sugar
- 4 Eggs
- 1 tsp Baking Powder
- 1/2 tsp Baking Soda
- 1 tsp Vanilla Extract
- 1 cup Creamy Peanut Butter
- 1/2 cup Unsalted Butter
- 2 cups Powdered Sugar (Confectioners' Sugar)
- 1/4 cup Heavy Cream or Milk
- 1/2 cup Mini Peanut Butter Cups, chopped
- 8 oz Good Quality Chocolate
- 1/2 cup Heavy Cream
- 1 tbsp Unsalted Butter (Optional)
Instructions
- Preheat your oven to 375°F (190°C). Line a 10×15-inch (or 12×17-inch) jelly roll pan with parchment paper, lightly grease it, and dust with cocoa powder or flour.
- In a medium bowl, whisk together the all-purpose flour, cocoa powder, baking powder, and a pinch of salt. Set aside.
- In a large mixing bowl, beat the eggs and granulated sugar on high speed for 5-7 minutes until very pale yellow and thick. Beat in the vanilla extract.
- Gently fold the dry ingredients into the egg mixture in two additions using a rubber spatula until no streaks of flour remain.
- Pour the batter into the prepared jelly roll pan and spread it evenly. Bake for 10-12 minutes until the cake springs back when lightly touched.
- While the cake is baking, lay out a clean kitchen towel and dust it generously with powdered sugar.
- As soon as the cake comes out of the oven, invert it onto the powdered sugar-dusted towel and carefully peel off the parchment paper. Roll the cake up with the towel inside it and let it cool completely.
- Finely chop the mini peanut butter cups.
- In a medium bowl, beat the softened unsalted butter and creamy peanut butter together until smooth.
- Gradually add the powdered sugar, beating until fully incorporated. Then, beat in the heavy cream one tablespoon at a time until the filling is light and fluffy.
- Gently fold in the chopped mini peanut butter cups.
- Once the chocolate cake roll is completely cooled, gently unroll it and spread the peanut butter cup filling evenly over the surface, leaving a small border.
- Carefully re-roll the cake tightly from the same short end and place it seam-side down on a platter. Cover loosely with plastic wrap and refrigerate for at least 30 minutes.
- Place the chopped chocolate in a heatproof bowl. Heat the heavy cream in a saucepan until it simmers, then pour it over the chocolate. Let it sit for 5 minutes.
- Whisk the mixture until smooth and glossy. If using, stir in the optional unsalted butter for extra shine.
- Let the ganache cool until it thickens to a spreadable consistency.
- Retrieve the chilled chocolate roll and pour or spread the ganache over the top and sides, allowing some to drip down.
- Sprinkle the remaining chopped mini peanut butter cups over the ganache before it sets.
- Refrigerate the roll for at least another 30 minutes to allow the ganache to fully set.
- Prep Time: 30 mins
- Cook Time: 12 mins
- Category: Dessert
- Method: Baking
- Cuisine: American
Nutrition
- Serving Size: 1 slice
- Calories: 350
- Sugar: 25 g
- Sodium: 150 mg
- Fat: 20 g
- Saturated Fat: 8 g
- Unsaturated Fat: 10 g
- Trans Fat: 0 g
- Carbohydrates: 35 g
- Fiber: 2 g
- Protein: 6 g
- Cholesterol: 70 mg
Keywords: Ensure not to overbake the cake to prevent it from becoming dry. Roll the cake while it's hot for the best results, and dust the towel generously with powdered sugar to avoid sticking.
Leave a Comment