
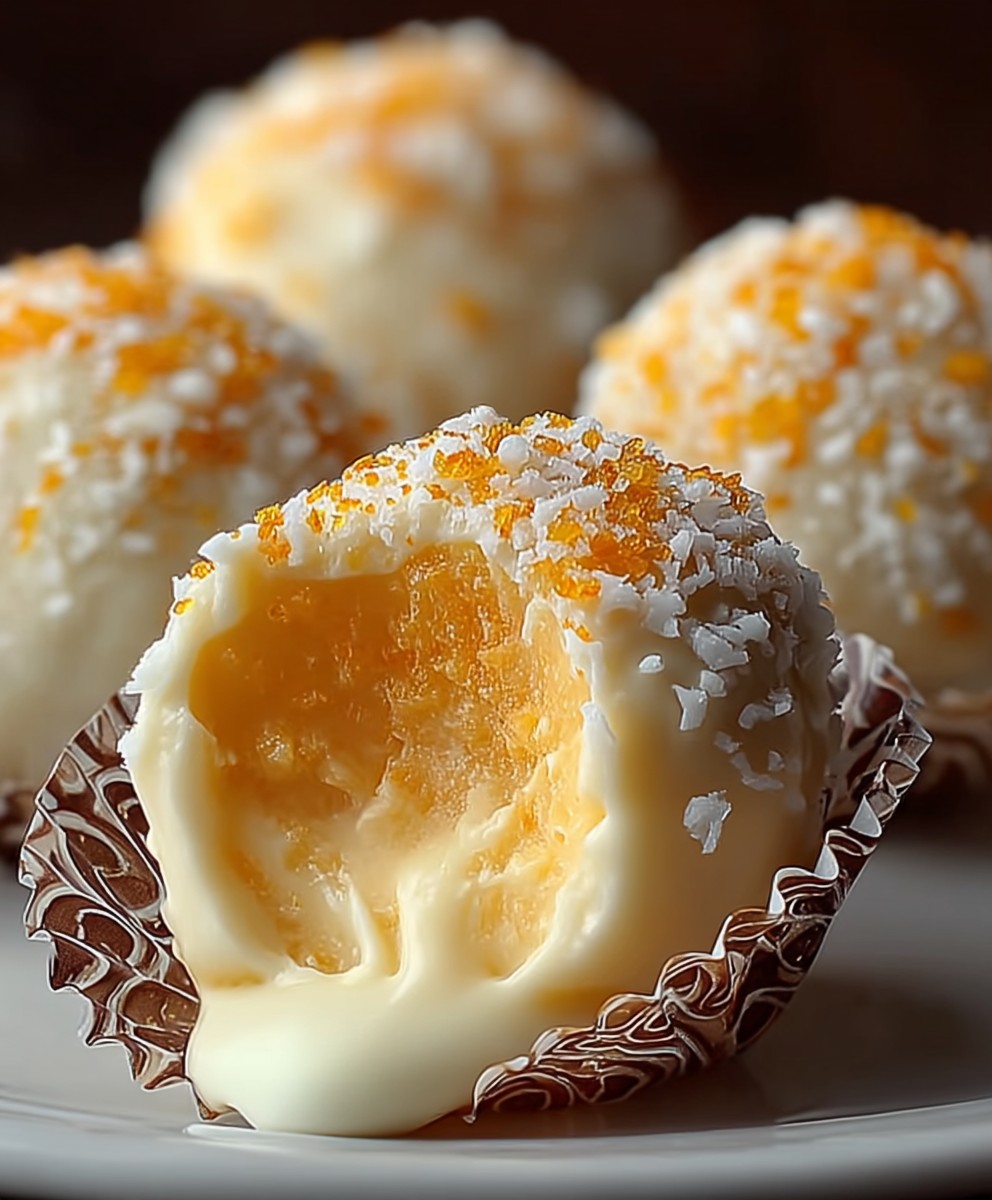
No Bake Orange Truffles: Prepare to be amazed by these little bursts of sunshine! Imagine biting into a decadent, melt-in-your-mouth treat that requires absolutely no baking. Yes, you read that right! These delightful spheres of citrusy goodness are not only incredibly easy to make, but they’re also guaranteed to impress your friends and family.
While the exact origins of truffles are debated, these No Bake Orange Truffles draw inspiration from the classic chocolate truffle, a confection that gained popularity in France in the early 20th century. Our version puts a bright, zesty spin on the traditional recipe, swapping out some of the chocolate intensity for the refreshing tang of orange. Think of them as a sophisticated, grown-up version of your favorite orange creamsicle!
People adore these truffles for several reasons. First, the convenience factor is undeniable. In a world where time is precious, a dessert that comes together in minutes is a true gift. Second, the flavor combination is simply irresistible. The rich, creamy base perfectly complements the vibrant orange notes, creating a harmonious balance that dances on your palate. And finally, let’s be honest, who can resist a perfectly round, bite-sized treat that looks as good as it tastes? Get ready to experience pure bliss with every single bite!

Ingredients:
- 1 (15 ounce) package chocolate sandwich cookies (like Oreos), finely crushed
- 1 (8 ounce) package cream cheese, softened
- 1/4 cup orange juice
- 1 tablespoon orange zest
- 1 teaspoon orange extract
- 1 (12 ounce) package semi-sweet chocolate chips
- 1 tablespoon coconut oil (optional, for smoother melting)
- Optional toppings: Sprinkles, chopped nuts, cocoa powder, powdered sugar, extra orange zest
Preparing the Truffle Mixture:
- First, we need to get those cookies crushed! The easiest way is to use a food processor. Pulse the chocolate sandwich cookies until they are finely ground into a sand-like consistency. If you don’t have a food processor, you can place the cookies in a large zip-top bag, seal it tightly, and crush them with a rolling pin or the bottom of a heavy pan. Make sure there aren’t any large chunks left; we want a smooth truffle base.
- Now, in a large mixing bowl, combine the softened cream cheese and the crushed cookies. It’s crucial that your cream cheese is properly softened. If it’s still cold and firm, you’ll have a hard time getting everything to mix together smoothly, and you might end up with lumps. You can soften cream cheese by leaving it at room temperature for about 30 minutes to an hour, or you can microwave it in 15-second intervals, checking and stirring in between, until it’s soft but not melted.
- Next, add the orange juice, orange zest, and orange extract to the bowl. The orange juice adds moisture and a subtle tang, while the orange zest provides a burst of fresh citrus flavor. The orange extract intensifies the orange flavor, making these truffles truly irresistible.
- Using an electric mixer (either a stand mixer or a hand mixer), beat the mixture until it is well combined and smooth. Start on low speed to prevent the cookie crumbs from flying everywhere, and then gradually increase the speed to medium. Scrape down the sides of the bowl as needed to ensure that everything is evenly incorporated. You should end up with a thick, dough-like mixture.
- Once the mixture is smooth, cover the bowl with plastic wrap and refrigerate it for at least 30 minutes, or even better, for an hour. This chilling time is essential because it allows the mixture to firm up, making it much easier to roll into truffles. If you try to roll them while the mixture is still soft, they will be sticky and difficult to handle.
Rolling and Shaping the Truffles:
- After the truffle mixture has chilled, remove it from the refrigerator. Line a baking sheet with parchment paper or wax paper. This will prevent the truffles from sticking to the sheet as they chill.
- Now comes the fun part: rolling the truffles! Use a small cookie scoop or a spoon to scoop out portions of the truffle mixture. I usually aim for about 1 tablespoon per truffle, but you can adjust the size to your preference.
- Roll each portion of the mixture between your palms to form a smooth, round ball. If the mixture is still a bit sticky, you can lightly dust your hands with powdered sugar or cocoa powder to prevent sticking.
- Place the rolled truffles on the prepared baking sheet, spacing them slightly apart. Once all the truffles have been rolled, return the baking sheet to the refrigerator and chill them for another 30 minutes. This second chilling helps them to firm up even more, making them easier to dip in chocolate.
Melting the Chocolate and Dipping:
- While the truffles are chilling for the second time, prepare the chocolate coating. Place the semi-sweet chocolate chips and coconut oil (if using) in a microwave-safe bowl. The coconut oil is optional, but it helps to create a smoother, glossier chocolate coating.
- Microwave the chocolate in 30-second intervals, stirring well after each interval, until the chocolate is completely melted and smooth. Be careful not to overheat the chocolate, as this can cause it to seize up and become grainy. If you prefer, you can melt the chocolate in a double boiler over simmering water. Just make sure the bottom of the bowl doesn’t touch the water.
- Remove the truffles from the refrigerator. Using a fork or dipping tools, carefully dip each truffle into the melted chocolate, making sure it is completely coated. Gently tap off any excess chocolate.
- Place the dipped truffles back on the parchment-lined baking sheet. While the chocolate is still wet, you can sprinkle them with your desired toppings, such as sprinkles, chopped nuts, cocoa powder, powdered sugar, or extra orange zest. Get creative and have fun with it!
- Once all the truffles have been dipped and decorated, return the baking sheet to the refrigerator and chill them for at least 15 minutes, or until the chocolate has set completely.
Serving and Storage:
- Once the chocolate has set, the truffles are ready to serve! You can arrange them on a platter for a party, package them in a gift box for a special occasion, or simply enjoy them yourself.
- Store the truffles in an airtight container in the refrigerator for up to a week. They can also be frozen for longer storage. To freeze, place the truffles in a single layer on a baking sheet and freeze until solid. Then, transfer them to a freezer-safe bag or container. They can be frozen for up to 2 months. Thaw them in the refrigerator before serving.
Tips and Variations:
- Experiment with different flavors: You can easily customize these truffles by using different types of cookies, such as vanilla wafers or graham crackers. You can also add different extracts, such as almond extract or peppermint extract.
- Use different types of chocolate: Instead of semi-sweet chocolate chips, you can use milk chocolate chips, dark chocolate chips, or even white chocolate chips.
- Add a liqueur: For an extra kick, you can add a tablespoon or two of orange liqueur (such as Grand Marnier or Cointreau) to the truffle mixture.
- Make them vegan: Use vegan chocolate sandwich cookies and vegan cream cheese to make these truffles vegan-friendly.
- Get the kids involved: This is a great recipe to make with kids. They can help with crushing the cookies, rolling the truffles, and decorating them with toppings.
Troubleshooting:
- If the truffle mixture is too soft: Add more crushed cookies to the mixture, a tablespoon at a time, until it reaches the desired consistency.
- If the truffle mixture is too dry: Add a little more orange juice, a teaspoon at a time, until it reaches the desired consistency.
- If the chocolate is seizing up: Try adding a teaspoon of vegetable oil or shortening to the chocolate and stirring well. This can sometimes help to smooth it out. Be careful not to overheat the chocolate.
- If the chocolate is too thick: Add a little more coconut oil or shortening to the chocolate to thin it out.
Conclusion:
So, there you have it! These No Bake Orange Truffles are truly a must-try for anyone who loves a burst of citrusy sweetness. They’re incredibly easy to make, require no baking (perfect for those hot summer days or when you’re short on time!), and are guaranteed to impress. The combination of the creamy white chocolate, the zesty orange, and the satisfying crunch of the optional toppings creates a symphony of flavors and textures that will leave you wanting more.
But why are these truffles so special? It’s the simplicity, really. You don’t need to be a master baker to whip up a batch of these delightful treats. The ingredients are readily available, and the steps are straightforward. Plus, the no-bake aspect makes it a fun activity to do with kids – they’ll love rolling the truffles and decorating them with sprinkles!
Beyond the ease of preparation, these truffles are incredibly versatile. Serve them as a delightful after-dinner treat, bring them to your next potluck, or package them up as a thoughtful homemade gift. They’re perfect for any occasion, big or small.
Looking for serving suggestions? I love to pair these truffles with a cup of hot coffee or tea. The warmth of the beverage complements the cool, creamy texture of the truffles perfectly. You could also serve them alongside a scoop of vanilla ice cream for an extra decadent dessert.
And don’t be afraid to experiment with variations! If you’re not a fan of white chocolate, you can easily substitute it with milk chocolate or dark chocolate. For an extra kick, add a pinch of cayenne pepper to the mixture. You could also try using different citrus fruits, such as lemon or grapefruit, instead of orange. Get creative and make these truffles your own!
Here are a few more ideas to get your creative juices flowing:
* Add a touch of liqueur: A tablespoon or two of orange liqueur, such as Cointreau or Grand Marnier, will enhance the orange flavor and add a sophisticated touch.
* Roll them in different toppings: Instead of just sprinkles, try rolling the truffles in chopped nuts, shredded coconut, cocoa powder, or even crushed pretzels for a salty-sweet combination.
* Make them vegan: Use vegan white chocolate and a plant-based cream cheese alternative to create a delicious vegan version of these truffles.
* Add some spice: A pinch of cinnamon, nutmeg, or ginger will add warmth and depth to the flavor profile.
I truly believe that these No Bake Orange Truffles will become a new favorite in your household. They’re the perfect combination of easy, delicious, and versatile. So, what are you waiting for? Gather your ingredients, put on some music, and get ready to create some magic in the kitchen!
I’m so excited for you to try this recipe! Once you’ve made them, I’d love to hear about your experience. Did you make any variations? What did you think of the flavor? Share your photos and comments in the comments section below. I can’t wait to see what you create! Happy truffle-making!
No Bake Orange Truffles: Easy Recipe & Delicious Dessert
Easy no-bake Oreo truffles with a bright orange flavor. Creamy, chocolatey, and perfect for parties or a sweet treat.
Ingredients
Instructions
Recipe Notes
- Ensure cream cheese is properly softened for a smooth mixture.
- Don’t skip the chilling steps! They are essential for easy rolling and dipping.
- Be careful not to overheat the chocolate, as it can seize up.
- Experiment with different cookie flavors, extracts, chocolate types, and toppings.
- Add a tablespoon or two of orange liqueur (Grand Marnier or Cointreau) to the truffle mixture for an extra kick.
- Use vegan chocolate sandwich cookies and vegan cream cheese for a vegan-friendly version.
- If the truffle mixture is too soft: Add more crushed cookies.
- If the truffle mixture is too dry: Add a little more orange juice.
- If the chocolate is seizing up: Try adding a teaspoon of vegetable oil or shortening.
- If the chocolate is too thick: Add a little more coconut oil or shortening.


Leave a Comment