
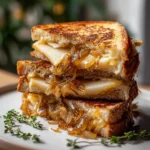
Pear Apple Grilled Cheese With Caramelized Onions
Oh boy, do I have a treat for you today! Forget everything you thought you knew about grilled cheese because we’re about to embark on a flavor journey with my absolute favorite, Pear Apple Grilled Cheese With Caramelized Onions. This isn’t just any grilled cheese; it’s a culinary masterpiece that takes a beloved comfort food and elevates it to something truly extraordinary. What makes it so special, you ask? It’s the incredible dance of flavors – the sweet, crisp tenderness of pear and apple slices perfectly complementing the deep, savory, and slightly tangy notes of slow-cooked caramelized onions, all gooey and warm with melted cheese between two slices of golden, buttery bread.
You are going to absolutely adore this recipe because it hits all the right notes. It’s comforting and familiar, yet sophisticated and utterly delicious. Every bite offers a delightful contrast: the natural sweetness of the fruit cutting through the richness of the cheese, and the earthy, savory depth of the onions tying it all together. It’s surprisingly easy to whip up but tastes like something you’d get at a fancy bistro. Perfect for a cozy lunch, a quick weeknight dinner, or a decadent snack, this Pear Apple Grilled Cheese is guaranteed to become a new favorite in your repertoire. Trust me, once you try this incredible combination, you’ll wonder how you ever lived without it!

Ingredient Notes
Crafting the perfect Pear Apple Grilled Cheese With Caramelized Onions starts with understanding the star ingredients. Each component plays a crucial role in balancing the sweet, savory, and tangy flavors that make this sandwich truly special. Here’s a look at what you’ll need and some thoughtful substitutions.
Pears
- My Pick: I love using firm, sweet-tart varieties like Bosc or Anjou pears. They hold their shape beautifully when sliced thinly and offer a wonderful textural contrast.
- Why they work: Their subtle sweetness and slightly grainy texture melt wonderfully into the sandwich, complementing the other flavors without becoming mushy.
- Substitution: If you can’t find Bosc or Anjou, a firm Bartlett pear would also work. Just ensure they’re not overly ripe, as they might become too soft.
Apples
- My Pick: For a fantastic balance, I often go for a Granny Smith apple for its crisp tartness, or a Honeycrisp for its sweet crunch. Combining them can also be a delightful experience!
- Why they work: The apple’s acidity cuts through the richness of the cheese and onions, providing a bright counterpoint to the sweetness of the pears. Its crispness adds another layer of texture.
- Substitution: Any firm, flavorful apple like Fuji, Gala, or Braeburn would be a good choice. Avoid overly soft or mealy apples.
Cheese
- My Pick: A sharp cheddar is a must for its robust flavor and excellent melting qualities. I often pair it with a nutty Gruyere or a creamy Havarti for complexity and a wonderfully gooey texture. Brie is also an excellent, more decadent option.
- Why it works: The cheese is the backbone, bringing everything together. Its savory, melty goodness is essential.
- Substitution: Provolone, Muenster, or even a good quality Swiss cheese could work in a pinch. The key is to choose a cheese that melts well and has a flavor profile that won’t get lost or overpower the fruit and onions.
Caramelized Onions
- My Pick: Sweet yellow onions or Vidalia onions are my go-to. They develop an incredible depth of sweetness when slowly cooked.
- Why they work: These onions transform from pungent to lusciously sweet and savory, adding a foundational layer of umami and richness that elevates the entire sandwich.
- Substitution: Red onions can be used, but they might yield a slightly different flavor profile. For an extra layer of non-alcoholic depth, I often deglaze the pan with a splash of good quality balsamic vinegar or a touch of apple juice instead of traditional wine or beer.
Bread
- My Pick: A good, sturdy sourdough is my top choice. Its slight tang beautifully complements the sweet and savory fillings, and its crust holds up well to grilling. Brioche or challah also make wonderfully rich and slightly sweet bases.
- Why it works: You need bread that can support the generous fillings without becoming soggy, yet still toasts to a beautiful golden crisp.
- Substitution: Texas toast, a thick-sliced white bread, or even a good whole wheat artisan bread can work. Just make sure it’s substantial enough.
Butter/Mayonnaise
- My Pick: I’m a butter purist for that classic rich, golden crust, but sometimes I’ll use mayonnaise for an incredibly crispy, golden-brown exterior. You can even combine them!
- Why it works: This is what gives your grilled cheese its signature crispy, flavorful crust.
- Substitution: A neutral cooking oil like avocado or grapeseed oil can be used, but you’ll miss some of the flavor that butter or mayo provides.
Step-by-Step Instructions
Making this Pear Apple Grilled Cheese is a delightful culinary journey. Here’s how I bring all those fantastic flavors together into one irresistible sandwich.
- Prepare Your Caramelized Onions (The Foundation of Flavor):
- First, I thinly slice my sweet yellow or Vidalia onions. I aim for consistent slices so they cook evenly.
- In a large skillet, I melt a tablespoon of butter or a swirl of olive oil over medium-low heat.
- I add the sliced onions, a pinch of salt, and a crack of black pepper. The key here is patience – I let them cook slowly, stirring occasionally, for about 20-30 minutes, until they’re deeply golden brown and wonderfully soft. Don’t rush this step; low and slow is the secret to true caramelization.
- If they start to stick, I add a tiny splash of water or, for extra flavor without alcohol, a teaspoon of apple juice or balsamic vinegar to deglaze the pan. Once they’re perfectly caramelized, I set them aside.
- Prep the Fruit:
- Next, I wash and core my pears and apples. I don’t typically peel them, as the skin adds a bit of texture and nutrition, but you can if you prefer.
- I then slice them thinly, about 1/8 to 1/4 inch thick. Thin slices are crucial for ensuring they soften nicely within the sandwich and integrate with the cheese.
- Assemble Your Sandwich:
- I grab two slices of my chosen bread. On one side of each slice, I spread an even layer of softened butter or mayonnaise – this will be the side that hits the pan.
- I place one slice of bread, buttered-side down, in my dry skillet (which I haven’t heated yet).
- On this bread slice, I layer a generous amount of shredded cheese. This first layer acts as a “glue.”
- Next, I add a spoonful or two of my luscious caramelized onions, spreading them evenly.
- Then, I arrange the thin slices of pear and apple over the onions, overlapping them slightly.
- I top the fruit with another good layer of cheese. This second layer helps hold the fruit in place and ensures maximum gooeyness.
- Finally, I place the second slice of bread on top, buttered-side up.
- Grill to Golden Perfection:
- Now, I place my assembled sandwich in a skillet (or a griddle) over medium-low heat. This low heat is essential for allowing the cheese to melt completely and the fruit to soften without burning the bread.
- I cook the sandwich for about 4-6 minutes per side, or until the bread is beautifully golden brown and crispy, and the cheese inside is thoroughly melted and oozing.
- Halfway through cooking the first side, I like to gently press down on the sandwich with a spatula. This helps the ingredients meld together and encourages even browning.
- Carefully flip the sandwich and cook on the other side until it’s equally golden and glorious.
- Serve Immediately:
- Once done, I transfer the grilled cheese to a cutting board, slice it in half (a diagonal cut always feels more satisfying!), and serve it right away while it’s hot and gooey.
Tips & Suggestions
I’ve made countless grilled cheese sandwiches, and I’ve picked up a few tricks along the way, especially for a gourmet version like this one. Here are my top tips to ensure your Pear Apple Grilled Cheese with Caramelized Onions turns out perfectly every time:
- Embrace the Low and Slow Method: This is arguably the most critical tip for any grilled cheese, but especially for one with fruit and multiple layers. Cooking on medium-low heat allows the cheese ample time to melt into a wonderfully gooey pool, and the fruit to gently soften, without the bread burning. Patience here is truly a virtue!
- Thin Slices are Key: For both your pears and apples, I strongly recommend slicing them as thinly as possible. This ensures they cook through and become tender by the time your cheese is melted, and it prevents the sandwich from being too chunky or difficult to eat. A mandoline slicer can be very helpful here, but a sharp knife and a steady hand work just as well.
- Don’t Be Shy with the Cheese: Remember, the cheese isn’t just for flavor; it’s the “glue” that holds everything together. I always use a generous amount, both on the bottom and top layers, to ensure a cohesive and satisfyingly gooey bite. A blend of cheeses (like sharp cheddar for tang and Gruyere for nuttiness) adds incredible depth.
- Consider a Flavor Boost for the Onions: While I mentioned apple juice or balsamic vinegar for deglazing, don’t forget a tiny pinch of sugar during the caramelization process. It can help the onions achieve a deeper, richer sweetness faster. Also, a touch of fresh thyme sprig thrown in with the onions while they caramelize adds a lovely aromatic note.
- The Butter vs. Mayo Debate: If you’ve never tried using mayonnaise on the outside of your grilled cheese instead of butter, I urge you to give it a go! It yields an incredibly even, golden-brown crust that’s wonderfully crisp. For the best of both worlds, I sometimes spread a thin layer of mayo first, then a very thin layer of butter over it.
- Add a Savory Kick: For an extra layer of flavor that beautifully complements the sweetness of the fruit and onions, try spreading a very thin layer of Dijon mustard on the inside of one of your bread slices before assembling. It adds a subtle tang that ties everything together.
- Press Gently: Once you’ve flipped your sandwich, gently pressing down on it with a spatula helps ensure good contact with the pan, promoting even browning and helping the cheese really melt and adhere to the fillings. Just don’t press too hard, or you’ll squeeze out all the deliciousness!
- Serve Immediately: Grilled cheese is one of those dishes that absolutely shines when served fresh off the pan. The cheese is at its peak gooeyness, and the bread is perfectly crispy. Have your plates ready!
Storage
When it comes to grilled cheese, I always say it’s best enjoyed fresh off the griddle. The magic of that hot, gooey cheese, tender fruit, and crispy bread is truly a fleeting moment of perfection. However, I understand that sometimes you might have components prepared ahead or find yourself with a leftover piece.
The Finished Sandwich:
- Leftovers: Honestly, a fully assembled and grilled Pear Apple Grilled Cheese doesn’t store well. The bread tends to get soggy, and the melty cheese can lose its appealing texture. The fruit can also release moisture, further contributing to sogginess. I strongly recommend making only as many sandwiches as you plan to eat immediately.
- Reheating: If you absolutely must reheat a leftover grilled cheese, avoid the microwave at all costs – it will turn your crispy creation into a sad, rubbery mess. Your best bet is to gently re-toast it in a dry skillet over low heat, or in a toaster oven or air fryer until warmed through and the bread crisps up again. However, I must warn you, it simply won’t be the same as fresh.
Preparing Components Ahead:
This is where you can save yourself some time and still enjoy a fresh sandwich!
- Caramelized Onions: These are a fantastic make-ahead component! I often caramelize a big batch. Once they’re cooked and cooled completely, I store them in an airtight container in the refrigerator for up to 3-4 days. They can also be frozen in small portions for up to a month. Just thaw and gently reheat before using.
- Sliced Fruit: Pears and apples are best sliced fresh just before assembling your sandwich to prevent browning and maintain their crispness. If you absolutely need to slice them a little bit ahead, toss them gently in a tiny bit of lemon juice or apple cider vinegar to prevent oxidation, then store them in an airtight container in the fridge for a couple of hours.
- Shredded Cheese: If you’re shredding your own cheese, you can certainly do this a day or two in advance. Store it in an airtight container or bag in the refrigerator.
My advice is to savor this delicious sandwich in its freshest state, but don’t hesitate to prepare those caramelized onions in advance to make future grilled cheese adventures even easier!

Final Thoughts
And there you have it! My absolute favorite take on a classic comfort food, elevated to something truly special. The Pear Apple Grilled Cheese With Caramelized Onions isn’t just another sandwich; it’s an experience of sweet, savory, and tangy all melting together between perfectly crisped slices of bread. The juicy pears and crisp apples provide a wonderful freshness and a touch of sweetness that perfectly balances the rich, gooey cheese. Then, those deeply caramelized onions bring in an incredible depth of flavor that ties everything together into a symphony for your taste buds. This isn’t your average grilled cheese – it’s a gourmet delight that’s surprisingly easy to make. I truly believe you’ll fall in love with the complex yet harmonious flavors of this unique creation. Go on, give the Pear Apple Grilled Cheese With Caramelized Onions a try; your taste buds will thank you!
Mouthwatering Pear Apple Grilled Cheese w/ Caramelized Onions
- Total Time: 45 minutes
- Yield: 2 servings
Description
Indulge in a delightful Pear Apple Grilled Cheese with Caramelized Onions that elevates a classic comfort food to gourmet levels. This sandwich combines the sweetness of fruit with savory cheese and onions for an unforgettable flavor experience.
Ingredients
- Firm, sweet-tart pears (Bosc or Anjou recommended)
- Granny Smith or Honeycrisp apples
- Sharp cheddar cheese
- Gruyere cheese or creamy Havarti
- Sweet yellow onions or Vidalia onions
- Sourdough bread or brioche/challah
- Butter or mayonnaise
Instructions
- Prepare Your Caramelized Onions: Thinly slice sweet yellow or Vidalia onions. In a large skillet, melt a tablespoon of butter or a swirl of olive oil over medium-low heat. Add the sliced onions, a pinch of salt, and a crack of black pepper. Cook slowly for about 20-30 minutes, stirring occasionally, until deeply golden brown and soft. If they start to stick, add a splash of water or a teaspoon of apple juice or balsamic vinegar to deglaze the pan. Set aside once caramelized.
- Prep the Fruit: Wash and core the pears and apples. Slice them thinly, about 1/8 to 1/4 inch thick.
- Assemble Your Sandwich: Spread an even layer of softened butter or mayonnaise on one side of each slice of bread. Place one slice of bread, buttered-side down, in a dry skillet. Layer a generous amount of shredded cheese on this bread slice. Add a spoonful or two of caramelized onions, spreading them evenly. Arrange thin slices of pear and apple over the onions, overlapping slightly. Top with another layer of cheese. Place the second slice of bread on top, buttered-side up.
- Grill to Golden Perfection: Place the assembled sandwich in a skillet over medium-low heat. Cook for about 4-6 minutes per side, until the bread is golden brown and crispy, and the cheese is melted. Gently press down on the sandwich with a spatula halfway through cooking the first side. Flip and cook on the other side until golden.
- Serve Immediately: Transfer the grilled cheese to a cutting board, slice in half, and serve while hot and gooey.
- Prep Time: 15 mins
- Cook Time: 30 mins
- Category: Lunch
- Method: Grilling
- Cuisine: American
Nutrition
- Serving Size: 1 sandwich
- Calories: 600
- Sugar: 10 g
- Sodium: 800 mg
- Fat: 30 g
- Saturated Fat: 15 g
- Unsaturated Fat: 10 g
- Trans Fat: 0 g
- Carbohydrates: 60 g
- Fiber: 4 g
- Protein: 20 g
- Cholesterol: 60 mg
Keywords: Embrace the low and slow method for caramelizing onions. Thin slices of fruit ensure they cook through. Don't skimp on cheese; it holds everything together. Consider adding a touch of Dijon mustard for extra flavor. Serve fresh for the best experience.

Leave a Comment