
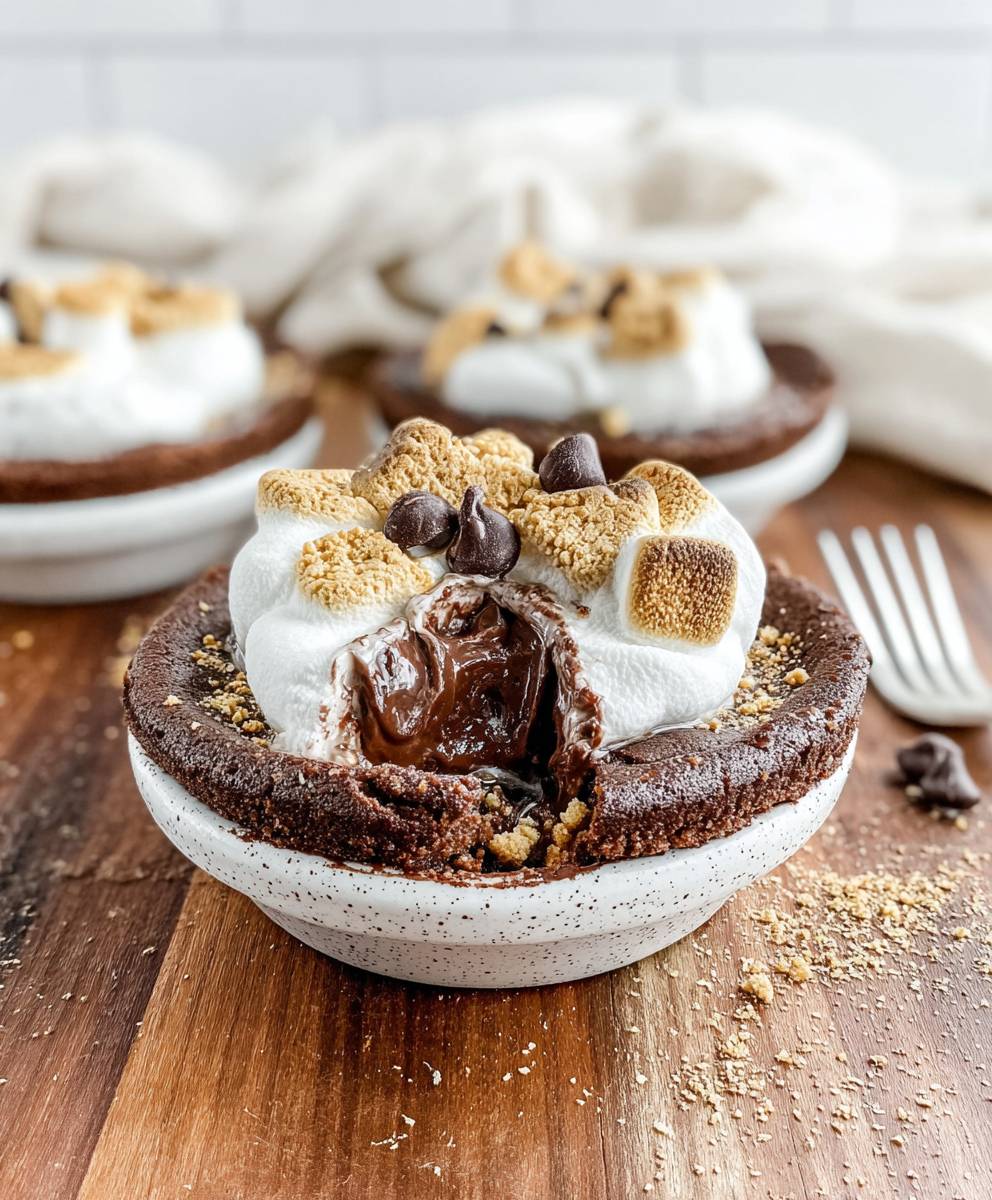
Mini Smores Pies: Prepare to be transported back to campfire nights with a sophisticated twist! Imagine the gooey, chocolatey, marshmallowy goodness of a classic s’more, but now perfectly portioned and baked into a buttery, crumbly pie crust. Are you ready to experience this delightful handheld dessert?
The humble s’more, a beloved treat born from Girl Scout campfires in the early 20th century, has always held a special place in our hearts. Its simple combination of graham crackers, chocolate, and toasted marshmallows is pure nostalgic bliss. But what if we could elevate this iconic flavor profile into something a little more… elegant? That’s where these Mini Smores Pies come in!
People adore s’mores for their irresistible combination of textures and tastes. The crunch of the graham cracker, the smooth melt of the chocolate, and the soft, pillowy marshmallow create a symphony of sensations in every bite. These mini pies capture all of that magic, but with the added bonus of a tender, homemade pie crust. They’re incredibly easy to make, perfect for parties, and guaranteed to be a crowd-pleaser. Plus, who can resist a miniature version of their favorite dessert? Get ready to bake up a batch of these irresistible treats!

Ingredients:
- For the Graham Cracker Crust:
- 1 ½ cups graham cracker crumbs (about 12 full graham crackers)
- 5 tablespoons (2 ½ ounces) unsalted butter, melted
- ¼ cup granulated sugar
- ⅛ teaspoon salt
- For the Chocolate Filling:
- 1 cup (6 ounces) semi-sweet chocolate chips
- ½ cup heavy cream
- 1 tablespoon unsalted butter
- ⅛ teaspoon salt
- 1 teaspoon vanilla extract
- For the Marshmallow Topping:
- 4 large egg whites
- ¾ cup granulated sugar
- ¼ cup water
- ⅛ teaspoon cream of tartar
- 1 teaspoon vanilla extract
- For Garnish (optional):
- Mini marshmallows
- Chocolate shavings
- Graham cracker crumbs
Preparing the Graham Cracker Crust:
- Crush the Graham Crackers: First, we need to turn those graham crackers into fine crumbs. You can do this in a food processor, pulsing until you have a consistent crumb texture. Alternatively, place the graham crackers in a large zip-top bag, seal it tightly, and use a rolling pin to crush them. Make sure there aren’t any large chunks remaining for the best crust consistency.
- Combine Dry Ingredients: In a medium bowl, whisk together the graham cracker crumbs, granulated sugar, and salt. This ensures that the sugar and salt are evenly distributed throughout the crust, preventing any pockets of sweetness or saltiness.
- Add Melted Butter: Pour the melted butter into the dry ingredients. Use a fork or your fingers to mix everything together until the crumbs are evenly moistened and resemble wet sand. The mixture should hold its shape when you squeeze a handful. If it’s too dry, add a tiny bit more melted butter, a teaspoon at a time.
- Press into Mini Pie Tins: Now, it’s time to press the crust into your mini pie tins. I like to use a tablespoon to scoop the crumb mixture into each tin, then use the bottom of a measuring cup or my fingers to firmly press the crumbs evenly across the bottom and up the sides of each tin. Make sure the crust is compact and uniform in thickness for even baking. You should have enough crust for about 12 mini pies.
- Pre-bake the Crusts: Place the mini pie tins on a baking sheet. This makes it easier to transfer them in and out of the oven. Bake in a preheated oven at 350°F (175°C) for 8-10 minutes, or until the crusts are lightly golden brown and fragrant. This pre-baking step helps the crust set and prevents it from becoming soggy when we add the filling.
- Cool Completely: Remove the baking sheet from the oven and let the mini pie crusts cool completely on a wire rack before adding the chocolate filling. This is important because if the crusts are still warm, the chocolate filling might melt and become runny.
Making the Chocolate Filling:
- Combine Chocolate and Cream: In a heatproof bowl (like glass or stainless steel), combine the semi-sweet chocolate chips and heavy cream. Make sure the bowl is large enough to prevent the cream from boiling over.
- Melt the Chocolate: There are two ways to melt the chocolate. You can either microwave it in 30-second intervals, stirring in between each interval, until the chocolate is completely melted and smooth. Or, you can create a double boiler by placing the heatproof bowl over a saucepan of simmering water, making sure the bottom of the bowl doesn’t touch the water. Stir constantly until the chocolate is melted and smooth.
- Add Butter, Salt, and Vanilla: Once the chocolate is melted and smooth, remove it from the heat (or microwave) and stir in the butter, salt, and vanilla extract. The butter will add richness and shine to the filling, while the salt will enhance the chocolate flavor. The vanilla extract adds a touch of warmth and complexity.
- Pour into Crusts: Carefully pour the melted chocolate filling into the cooled graham cracker crusts, dividing it evenly among them.
- Chill to Set: Place the mini pies in the refrigerator for at least 2 hours, or until the chocolate filling is firm and set. This chilling time is crucial for the filling to solidify properly.
Preparing the Marshmallow Topping:
- Combine Sugar and Water: In a small saucepan, combine the granulated sugar and water. Stir to dissolve the sugar.
- Cook to Soft-Ball Stage: Place the saucepan over medium heat and cook, without stirring, until the sugar syrup reaches the soft-ball stage (235-240°F or 113-116°C on a candy thermometer). If you don’t have a candy thermometer, you can test the syrup by dropping a small amount into a bowl of cold water. If it forms a soft, pliable ball, it’s ready.
- Whip Egg Whites: While the sugar syrup is cooking, place the egg whites and cream of tartar in the bowl of a stand mixer fitted with the whisk attachment. Beat on medium speed until soft peaks form. The cream of tartar helps to stabilize the egg whites and create a firmer meringue.
- Slowly Pour in Sugar Syrup: Once the sugar syrup reaches the soft-ball stage, slowly and steadily pour it into the egg whites while the mixer is running on medium speed. Be careful not to pour the syrup onto the whisk, as it can splatter.
- Continue Whipping: Continue whipping the egg whites on high speed until the meringue is glossy, stiff peaks form, and the bowl is cool to the touch. This usually takes about 5-7 minutes. The meringue should be thick and hold its shape well.
- Add Vanilla Extract: Stir in the vanilla extract.
Assembling the Mini S’mores Pies:
- Top with Marshmallow Meringue: Spoon or pipe the marshmallow meringue onto the chilled chocolate-filled mini pies. You can create swirls or peaks for a visually appealing presentation.
- Toast the Marshmallow: Using a kitchen torch, carefully toast the marshmallow meringue until it’s golden brown and slightly charred. Be careful not to burn it. Alternatively, you can broil the mini pies in the oven for a few seconds, watching them closely to prevent burning.
- Garnish (Optional): If desired, garnish the mini s’mores pies with mini marshmallows, chocolate shavings, or graham cracker crumbs.
- Serve Immediately: These mini s’mores pies are best served immediately after toasting the marshmallow meringue. The contrast between the warm, toasted marshmallow and the cold, chocolate filling is simply divine!
Conclusion:
These Mini Smores Pies are truly irresistible, and I wholeheartedly believe you need to add them to your baking repertoire immediately! They perfectly capture the essence of a campfire treat in a convenient, adorable, and utterly delicious package. The combination of the buttery, crumbly graham cracker crust, the gooey, melted chocolate, and the perfectly toasted marshmallow fluff creates a symphony of textures and flavors that will transport you back to those cherished summer nights around the fire. But the best part? You can enjoy this nostalgic experience any time of year, right from the comfort of your own kitchen!
Why are these a must-try? Because they are incredibly easy to make, require minimal ingredients, and deliver maximum flavor. Forget about complicated baking techniques; this recipe is straightforward and foolproof, making it perfect for bakers of all skill levels. Plus, they are individually portioned, making them ideal for parties, potlucks, or simply a delightful personal treat. Imagine the smiles on your friends’ and family’s faces when you present them with these charming little pies!
But the fun doesn’t stop there! These Mini Smores Pies are also incredibly versatile. Looking for serving suggestions? Serve them warm with a scoop of vanilla ice cream for an extra decadent dessert. Or, drizzle them with a bit of salted caramel sauce for a sweet and salty twist. For a more sophisticated presentation, garnish them with a few fresh raspberries or a sprinkle of cocoa powder.
And if you’re feeling adventurous, why not experiment with some variations? Try using different types of chocolate, such as dark chocolate or white chocolate, to create unique flavor profiles. Add a layer of peanut butter between the graham cracker crust and the chocolate for a Reese’s-inspired treat. Or, incorporate some chopped nuts, such as pecans or walnuts, into the graham cracker crust for added texture and flavor. You could even try using different flavored marshmallows, like strawberry or vanilla bean, to add a subtle twist to the classic smores flavor.
Another fun variation is to make these into Mini Smores Pies bars! Simply press the graham cracker mixture into a square baking pan, top with the chocolate and marshmallows, and bake as directed. Once cooled, cut into bars for an easy grab-and-go treat. This is a great option if you’re looking for a less individual serving option.
I am confident that you will absolutely love these Mini Smores Pies. They are the perfect combination of simplicity, deliciousness, and nostalgia. So, gather your ingredients, preheat your oven, and get ready to embark on a baking adventure that will delight your taste buds and warm your heart.
I can’t wait to hear about your experience making these! Please, try this recipe and share your creations with me. Let me know what variations you tried, what your family and friends thought, and any tips or tricks you discovered along the way. Tag me in your photos on social media – I’d love to see your beautiful Mini Smores Pies! Happy baking!
Mini Smores Pies: The Perfect Bite-Sized Dessert
Individual s'mores pies with graham cracker crust, rich chocolate filling, and toasted marshmallow meringue topping.
Ingredients
Instructions
Recipe Notes
- Make sure the graham cracker crust is compact and uniform in thickness for even baking.
- Cool the crusts completely before adding the chocolate filling to prevent it from melting.
- Chilling the chocolate filling is crucial for it to solidify properly.
- Be careful when pouring the hot sugar syrup into the egg whites to avoid splattering.
- Watch the marshmallow meringue closely when toasting to prevent burning.

Leave a Comment