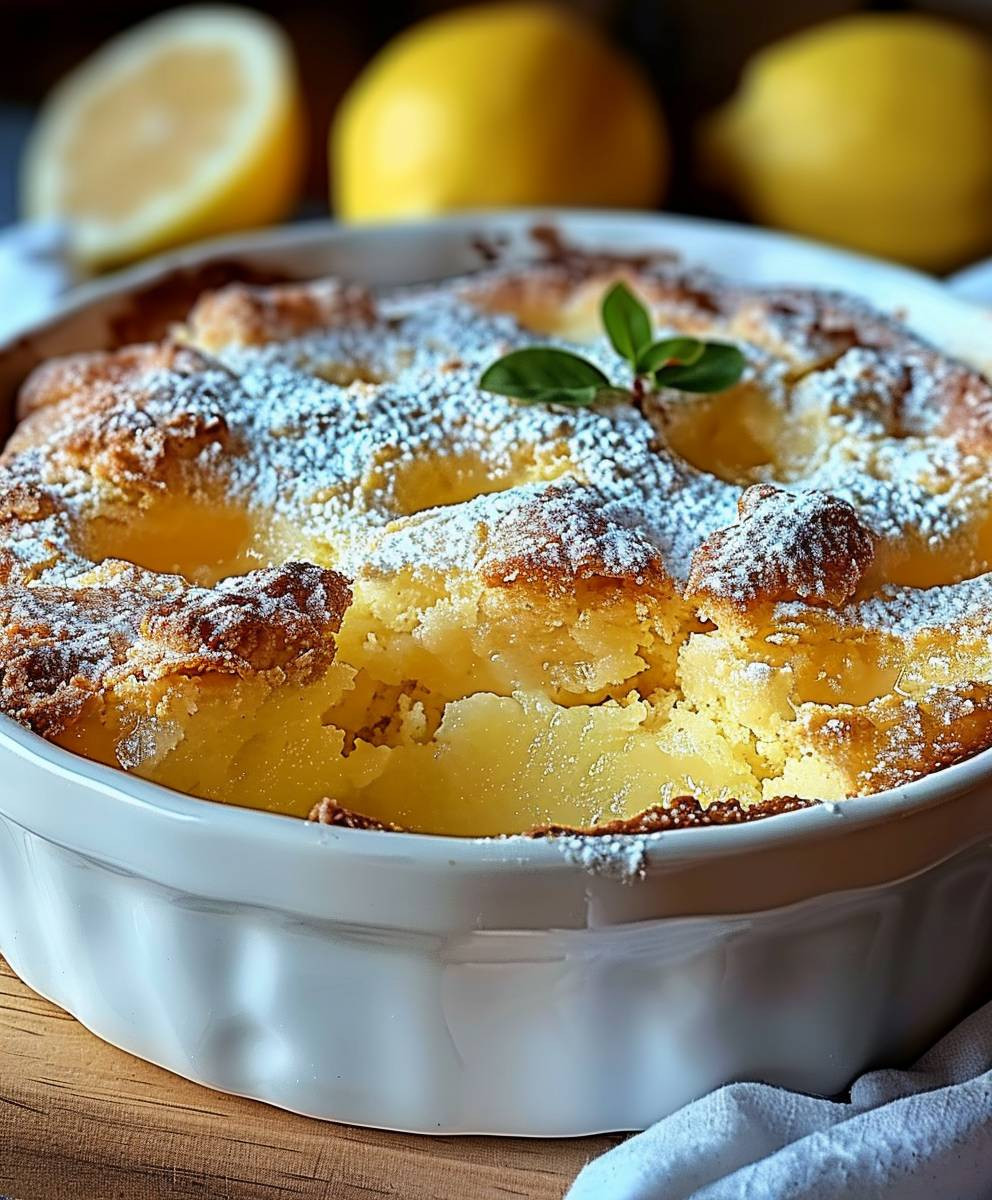
Lemon Cobbler, a dessert that sings of sunshine and simpler times, is about to become your new favorite comfort food. Imagine this: a warm, bubbling, golden crust giving way to a tangy, sweet, and utterly irresistible lemon filling. Are you drooling yet? I know I am just thinking about it!
While the exact origins of cobblers are debated, they are widely believed to have emerged from early American kitchens, born out of necessity and ingenuity. Colonists, missing their traditional pies but lacking the familiar ingredients, cleverly adapted by topping fruit with a biscuit-like dough. This resourceful spirit gave rise to the humble yet delightful cobbler, a dessert that has stood the test of time.
What makes Lemon Cobbler so universally loved? It’s the perfect balance of flavors and textures. The bright, zesty lemon filling cuts through the richness of the buttery crust, creating a symphony of sweet and tart that dances on your palate. It’s also incredibly easy to make, requiring minimal effort for maximum reward. Whether you’re a seasoned baker or a kitchen novice, this recipe is practically foolproof. Plus, the comforting aroma that fills your home as it bakes is an added bonus, promising warmth and happiness with every bite. So, let’s get baking and create a little sunshine in our kitchens!
Ingredients:
- For the Cobbler Topping:
- 1 ½ cups all-purpose flour
- 1 ½ teaspoons baking powder
- ¼ teaspoon salt
- ¾ cup granulated sugar
- 6 tablespoons (3 ounces) cold unsalted butter, cut into cubes
- ¾ cup whole milk
- 2 tablespoons granulated sugar, for sprinkling
- For the Lemon Filling:
- 1 ½ cups granulated sugar
- ¼ cup all-purpose flour
- ¼ teaspoon salt
- 3 cups water
- 6 tablespoons (3 ounces) unsalted butter, cut into pieces
- ½ cup fresh lemon juice (from about 3-4 lemons)
- 1 tablespoon lemon zest
Preparing the Lemon Filling:
Okay, let’s start with the star of the show – the lemon filling! This is where all that tangy, sweet goodness comes from. Don’t be intimidated; it’s surprisingly simple.
- In a medium saucepan, whisk together the 1 ½ cups of granulated sugar, ¼ cup of all-purpose flour, and ¼ teaspoon of salt. Make sure everything is nicely combined. This prevents lumps from forming later on.
- Gradually whisk in the 3 cups of water. It’s important to add the water slowly while whisking continuously to ensure a smooth mixture. We don’t want any flour clumps hanging around!
- Add the 6 tablespoons (3 ounces) of unsalted butter, cut into pieces, to the saucepan. The butter will add richness and a lovely sheen to the filling.
- Place the saucepan over medium heat and bring the mixture to a simmer, stirring constantly. Keep stirring! This is crucial to prevent the sugar from burning on the bottom of the pan.
- Once the mixture is simmering, reduce the heat to low and continue to simmer for about 5-7 minutes, or until the filling has thickened slightly. It should be thick enough to coat the back of a spoon. Don’t worry if it seems a little thin at first; it will thicken more as it cools.
- Remove the saucepan from the heat and stir in the ½ cup of fresh lemon juice and 1 tablespoon of lemon zest. The lemon juice will add that signature tartness, and the zest will amplify the lemon flavor. Give it a good stir to incorporate everything evenly.
- Set the lemon filling aside while you prepare the cobbler topping. It’s okay if it cools down a bit; it will all come together beautifully in the oven.
Making the Cobbler Topping:
Now for the cobbler topping! This is what gives the cobbler its delightful texture and golden-brown crust. We’re going for a slightly biscuit-like topping that’s tender and slightly sweet.
- Preheat your oven to 375°F (190°C). This is important! You want the oven nice and hot so the cobbler topping bakes up perfectly.
- In a large bowl, whisk together the 1 ½ cups of all-purpose flour, 1 ½ teaspoons of baking powder, and ¼ teaspoon of salt. The baking powder is what will give the topping its lift, so don’t skip it!
- Add the ¾ cup of granulated sugar to the dry ingredients and whisk to combine.
- Cut in the 6 tablespoons (3 ounces) of cold unsalted butter, cut into cubes. You can use a pastry blender, a fork, or even your fingers to do this. The goal is to work the butter into the flour mixture until it resembles coarse crumbs. The colder the butter, the better! This will create those flaky layers we’re looking for.
- Gradually add the ¾ cup of whole milk, stirring until just combined. Be careful not to overmix! Overmixing will develop the gluten in the flour, resulting in a tough topping. You want a soft, slightly shaggy dough.
Assembling and Baking the Cobbler:
Alright, we’re in the home stretch! Time to put everything together and get this cobbler in the oven.
- Pour the lemon filling into a 9×13 inch baking dish. Make sure the filling is evenly distributed in the dish.
- Drop spoonfuls of the cobbler topping evenly over the lemon filling. You can use a spoon or a cookie scoop to do this. Don’t worry about covering the entire surface of the filling; you want some of the lemon filling to peek through.
- Sprinkle the 2 tablespoons of granulated sugar over the cobbler topping. This will add a touch of sweetness and help the topping brown beautifully in the oven.
- Bake in the preheated oven for 30-35 minutes, or until the cobbler topping is golden brown and the lemon filling is bubbly. Keep an eye on it! Ovens can vary, so you may need to adjust the baking time slightly.
- Remove the cobbler from the oven and let it cool for at least 15-20 minutes before serving. This will allow the filling to thicken up a bit and prevent it from being too runny.
Serving Suggestions:
Now for the best part – enjoying your homemade Lemon Cobbler! Here are a few serving suggestions to take it to the next level:
- Serve warm with a scoop of vanilla ice cream. The cold ice cream and warm cobbler are a match made in heaven!
- Top with a dollop of whipped cream. A light and airy whipped cream adds a touch of elegance.
- Dust with powdered sugar. A simple dusting of powdered sugar adds a touch of sweetness and visual appeal.
- Garnish with fresh berries. Fresh raspberries or blueberries add a pop of color and flavor.
Storage: Leftover Lemon Cobbler can be stored in the refrigerator for up to 3 days. Reheat gently in the oven or microwave before serving.
Tips and Tricks:
- Use fresh lemon juice for the best flavor. Bottled lemon juice just doesn’t compare!
- Don’t overmix the cobbler topping. Overmixing will result in a tough topping.
- If the cobbler topping starts to brown too quickly, tent it with foil. This will prevent it from burning.
- For a richer flavor, use brown butter in the lemon filling. Simply melt the butter in the saucepan and cook until it turns a nutty brown color before adding the other ingredients.
- Add a pinch of nutmeg to the cobbler topping for a warm, comforting flavor.
- Experiment with different citrus fruits. You can use a combination of lemon, orange, and grapefruit for a unique flavor profile.
Enjoy your delicious Lemon Cobbler! I hope you love it as much as I do. It’s the perfect dessert for any occasion, from a casual weeknight dinner to a special celebration.

Conclusion:
Well, there you have it! This Lemon Cobbler recipe is more than just a dessert; it’s a slice of sunshine on a plate, a warm hug on a chilly evening, and a guaranteed crowd-pleaser at any gathering. I truly believe this is a must-try recipe for anyone who appreciates simple, comforting flavors done exceptionally well. The bright, tangy lemon filling, perfectly balanced with the sweet, buttery biscuit topping, creates a symphony of textures and tastes that will leave you wanting more.
What makes this Lemon Cobbler so special, in my humble opinion, is its versatility. It’s elegant enough to serve at a dinner party, yet casual enough to enjoy on a weeknight with your family. The ease of preparation is another huge selling point. You don’t need to be a seasoned baker to whip this up; the straightforward instructions and readily available ingredients make it accessible to everyone, regardless of their culinary skills.
But don’t just take my word for it! The real magic happens when you bake it yourself and experience the aroma filling your kitchen, the golden-brown crust bubbling with lemony goodness. I’ve made this Lemon Cobbler countless times, and each time, it brings a smile to my face.
Now, let’s talk about serving suggestions and variations. While it’s absolutely divine on its own, a scoop of vanilla ice cream or a dollop of freshly whipped cream takes it to the next level. The cold creaminess perfectly complements the warm, tangy cobbler, creating a delightful contrast. For a richer flavor, try using brown butter in the biscuit topping. The nutty notes will add a wonderful depth of flavor.
If you’re feeling adventurous, you can experiment with different citrus fruits. Orange or grapefruit would be delicious alternatives, or you could even create a mixed citrus cobbler for a truly unique flavor profile. A sprinkle of toasted coconut flakes on top adds a lovely textural element and a hint of tropical flavor. Another variation I love is adding a handful of fresh blueberries or raspberries to the lemon filling. The berries burst with juicy sweetness, creating a beautiful color contrast and an extra layer of flavor.
For a more sophisticated presentation, you can bake the cobbler in individual ramekins. This is perfect for dinner parties or special occasions. Just be sure to adjust the baking time accordingly. And if you’re short on time, you can use store-bought biscuit dough for the topping. While it won’t be quite as good as homemade, it’s a great shortcut that still delivers a delicious result.
Ultimately, the best way to enjoy this Lemon Cobbler is to make it your own. Feel free to experiment with different ingredients and techniques to create a version that perfectly suits your taste. The most important thing is to have fun and enjoy the process.
So, what are you waiting for? Grab your ingredients, preheat your oven, and get ready to bake a Lemon Cobbler that will knock your socks off. I’m confident that you’ll love it as much as I do. And when you do, please share your experience with me! I’d love to hear your thoughts, see your photos, and learn about any variations you’ve tried. You can leave a comment below or tag me on social media. Happy baking! I can’t wait to hear about your Lemon Cobbler success!
Lemon Cobbler: The Ultimate Guide to Baking This Classic Dessert
Tangy and sweet Lemon Cobbler with a golden, biscuit-like topping. A comforting and easy dessert perfect for any occasion.
Ingredients
Instructions
Recipe Notes
- Use fresh lemon juice for the best flavor.
- Don’t overmix the cobbler topping.
- If the cobbler topping starts to brown too quickly, tent it with foil.
- For a richer flavor, use brown butter in the lemon filling.
- Add a pinch of nutmeg to the cobbler topping for a warm, comforting flavor.
- Experiment with different citrus fruits.
- Serve warm with vanilla ice cream, whipped cream, powdered sugar, or fresh berries.
- Leftover Lemon Cobbler can be stored in the refrigerator for up to 3 days. Reheat gently in the oven or microwave before serving.


Leave a Comment