
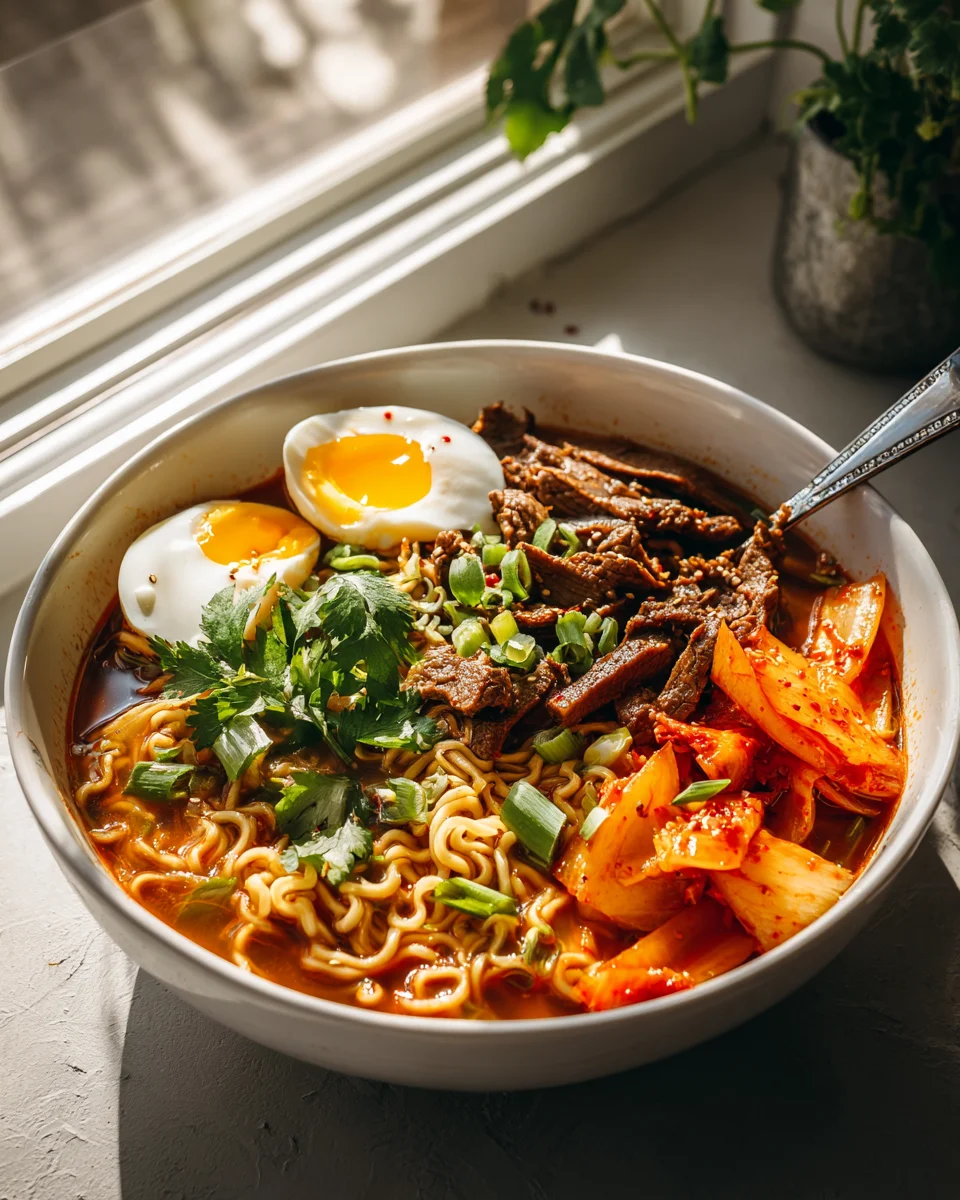
Kimchi Bulgogi Ramen Noodle Bowl
I’m so excited to share my latest obsession with you: the Kimchi Bulgogi Ramen Noodle Bowl! Seriously, this isn’t just another dinner; it’s a flavor explosion that I know you’re going to absolutely adore. We’re talking about taking all the best parts of Korean comfort food – the savory, sweet, and oh-so-tender marinated bulgogi beef and the irresistible tang of kimchi – and swirling it all together with perfectly slurpable ramen noodles in a deeply satisfying broth. It’s a culinary journey right in your own kitchen!
What makes this dish so incredibly special, you ask? Well, it’s the ingenious marriage of sweet and savory Korean BBQ beef, marinated to perfection, meeting the vibrant, spicy, and tangy kick of kimchi, all nestled into a warm, comforting ramen bowl. This isn’t your average ramen; it’s an elevated experience where every spoonful delivers a symphony of bold flavors. You get that umami-rich broth, the melt-in-your-mouth beef, the refreshing crunch and spice from the kimchi, and those wonderfully chewy noodles. It’s a complete meal that hits every single one of your taste buds.
You’ll love this Kimchi Bulgogi Ramen Noodle Bowl because it’s the ultimate comfort food with an exciting twist. It’s hearty, incredibly satisfying, and packed with layers of flavor that will keep you coming back for more. Whether you’re looking for a cozy weeknight dinner or something truly impressive to share, this bowl delivers. Get ready to dive into a bowl that’s wonderfully rich, a little spicy, perfectly balanced, and utterly delicious. Trust me, once you try this, it’ll become a new favorite in your recipe rotation!

Ingredient Notes
Crafting the perfect Kimchi Bulgogi Ramen Noodle Bowl is all about balancing those wonderfully rich and spicy Korean flavors. Let’s talk about the stars of our show and some handy substitutions I often use!
- Bulgogi Beef: For that authentic bulgogi experience, you really want thinly sliced beef. Ribeye or sirloin are my top picks because they have enough fat to stay tender and absorb all that delicious marinade. If you can’t find pre-sliced bulgogi beef, ask your butcher to slice it thin for you, or partially freeze a cut of beef for about 30 minutes, which makes it much easier to slice yourself.
- Bulgogi Marinade: This is where the magic happens for our beef! My go-to marinade includes soy sauce, a touch of brown sugar for sweetness, rich sesame oil, plenty of minced garlic and ginger, and freshly ground black pepper. For a non-alcoholic alternative to traditional mirin or rice wine, I absolutely swear by pear juice (or even apple juice in a pinch). It adds a lovely natural sweetness and helps tenderize the beef, just like those traditional ingredients would. A spoonful of gochujang (Korean chili paste) can also be added here for a subtle, complex kick if you like.
- Kimchi: The more aged and fermented your kimchi is, the better! Sour, well-fermented kimchi provides a deeper, more complex flavor and a fantastic tang that really stands up to the rich bulgogi and ramen broth. While fresh kimchi is still delicious, it won’t give you that same depth. I always make sure to grab some of that flavorful kimchi juice from the jar too – it’s liquid gold for our broth!
- Ramen Noodles: For convenience, you can use instant ramen noodles (discarding the seasoning packet, or saving it for another use). However, if you want to elevate your bowl, fresh or dried high-quality ramen noodles from an Asian grocery store make a noticeable difference in texture and chewiness.
- Broth Base: I usually start with a good quality low-sodium chicken or beef broth. This forms the foundation, and then we build on it with our star flavors: kimchi juice, gochujang (for heat and savory depth), gochugaru (Korean chili flakes for extra spice and color), and a dash more soy sauce for seasoning.
- Toppings: Don’t skip these! Freshly sliced green onions (scallions) add a crisp bite and freshness, while roasted sesame seeds provide a nutty aroma. A soft-boiled or fried egg with a runny yolk is non-negotiable for me – it adds richness and creaminess. A final drizzle of sesame oil just before serving ties everything together beautifully.
Step-by-Step Instructions
Let’s get cooking! This bowl comes together quicker than you might think, especially if you get your ingredients prepped.
- Marinate the Bulgogi Beef: In a medium bowl, combine all your bulgogi marinade ingredients: soy sauce, brown sugar, sesame oil, minced garlic, minced ginger, black pepper, and that wonderful pear juice. Whisk everything together until the sugar dissolves. Add your thinly sliced beef to the marinade, ensuring every piece is coated. Give it a good mix with your hands. Cover the bowl and refrigerate for at least 30 minutes, or ideally, for 2-4 hours to let those flavors truly sink in.
- Cook the Bulgogi: Heat a large non-stick skillet or wok over medium-high heat. Add a tiny bit of cooking oil if your pan isn’t perfectly non-stick. Once hot, add a single layer of marinated beef, making sure not to overcrowd the pan. Cook for 2-3 minutes per side, until beautifully caramelized and cooked through. You want a nice sear! Remove the cooked beef to a plate and repeat with the remaining batches. Don’t worry if there’s a little sauce left in the pan – that’s flavor!
- Prepare the Kimchi Ramen Broth: While your bulgogi is cooking, grab a medium saucepan. Pour in your chicken or beef broth. Stir in the kimchi juice, gochujang, gochugaru, and soy sauce. Add about half a cup of your prepared kimchi directly into the broth. Bring the mixture to a gentle simmer over medium heat, allowing the flavors to meld for about 5-7 minutes. Taste and adjust seasoning as needed – you might want more spice, a bit more tang, or a touch more soy sauce.
- Cook the Ramen Noodles: In a separate pot of boiling water, cook your ramen noodles according to the package directions. Be careful not to overcook them; we want them al dente, with a nice chew. Once cooked, drain the noodles thoroughly and, if using instant ramen, you can briefly rinse them under cold water to remove excess starch and prevent sticking, then drain again.
- Assemble Your Kimchi Bulgogi Ramen Noodle Bowl: Now for the best part – building your masterpiece! Divide the cooked ramen noodles evenly among your serving bowls. Ladle the hot kimchi ramen broth generously over the noodles, making sure to include some of that delicious cooked kimchi. Arrange a hearty portion of your freshly cooked bulgogi beef on top of the noodles and broth. Finish with your desired toppings: a scattering of fresh green onions, a sprinkle of roasted sesame seeds, and, of course, your perfectly cooked soft-boiled or fried egg. Serve immediately and enjoy every flavorful slurp!
Tips & Suggestions
To truly elevate your Kimchi Bulgogi Ramen Noodle Bowl experience, I’ve got a few extra tricks up my sleeve:
- Embrace Sour Kimchi: Seriously, the older and sourer your kimchi, the better for this dish! That deep, fermented tang is what makes the broth truly sing and contrasts beautifully with the savory bulgogi. If your kimchi is on the fresher side, you might want to add a tiny splash of rice vinegar to the broth for an extra kick.
- Don’t Overcrowd the Pan: When cooking the bulgogi, resist the urge to pile all the beef in at once. Cooking in batches ensures each piece gets a good sear and caramelization, instead of steaming, which can make the beef less flavorful and tender.
- Mind Your Noodles: Nothing’s worse than mushy ramen! Keep a close eye on your noodles and cook them just until they’re al dente. They’ll continue to cook slightly in the hot broth, so undercooking them by about 30 seconds can be a good strategy.
- Adjust the Spice: This bowl is easily customizable to your heat preference. If you love a fiery kick, add more gochugaru to the broth. For a milder version, reduce the gochugaru or skip it entirely, letting the gochujang provide just enough warmth.
- Extra Depth for Broth: For an even richer, more umami-packed broth, you can simmer a small piece of dried kelp (dashima) in your initial broth base for 10-15 minutes before adding the kimchi and other seasonings. Just remember to remove it before serving!
- Topping Adventures: While the basic toppings are amazing, feel free to get creative! I sometimes add a few sheets of roasted seaweed (nori), some sautéed mushrooms, or blanched bean sprouts for extra texture and nutrition.
Storage
If you happen to have any leftovers of this delicious Kimchi Bulgogi Ramen Noodle Bowl (which is rare in my house!), here’s how I recommend storing them to keep everything tasting its best:
- Separate Components are Key: The best way to store this dish is to keep the cooked components separate. This prevents the noodles from getting soggy and the flavors from mingling too much, which can alter the texture. Store the cooked bulgogi beef, the prepared kimchi ramen broth, and the cooked ramen noodles in individual airtight containers.
- Refrigeration: Place all containers in the refrigerator within two hours of cooking. They will stay fresh for about 2-3 days.
- Reheating: When you’re ready to enjoy your leftovers, reheat the broth gently in a saucepan on the stovetop until simmering. Add the cooked bulgogi beef to the hot broth to warm through. For the noodles, you can either briefly drop them into the hot broth for about 30-60 seconds to warm up (be careful not to overcook them!), or you can quickly microwave them in a separate bowl.
- Assembly: Once everything is hot, assemble your bowl just as you did the first time: noodles first, then broth and bulgogi, and finally, any fresh toppings you might want to add again, like green onions or a fresh egg.
- Freezing: While the cooked bulgogi beef freezes quite well in an airtight container for up to 2-3 months, I generally don’t recommend freezing the assembled ramen bowl or the noodles/broth separately, as the texture can change significantly upon thawing. This bowl is best enjoyed fresh or reheated from the fridge!
Final Thoughts
And there you have it! I truly hope you’re as excited as I am about diving into your very own Kimchi Bulgogi Ramen Noodle Bowl. This isn’t just another meal; it’s an incredible journey for your taste buds, combining the fiery tang and probiotic goodness of kimchi with the irresistible sweetness and savory depth of tender bulgogi beef. The rich, umami broth of the ramen, made perfect with non-alcohol alternatives, perfectly ties everything together, creating a symphony of flavors and textures in every spoonful.
I believe you’ll find that making this Kimchi Bulgogi Ramen Noodle Bowl is a wonderfully rewarding experience, yielding a dish that’s both comforting and exciting. It’s a testament to how simple ingredients, carefully combined, can create something truly extraordinary – a hearty, flavorful, and incredibly satisfying bowl that will warm you from the inside out. Go on, give it a try; I promise you won’t regret bringing this sensational dish to your table!
Kimchi Beef Bulgogi Ramen Bowl: Spicy, Savory & Easy
- Total Time: 50 minutes
- Yield: 4 servings
Description
Dive into a flavor explosion with this Kimchi Beef Bulgogi Ramen Bowl, where tender marinated bulgogi beef meets the vibrant tang of kimchi in a comforting broth. Perfect for a cozy dinner or an impressive meal to share, this dish is a delightful journey for your taste buds.
Ingredients
- Thinly sliced bulgogi beef (ribeye or sirloin)
- Soy sauce
- Brown sugar
- Sesame oil
- Minced garlic
- Minced ginger
- Freshly ground black pepper
- Pear juice (or apple juice)
- Gochujang (Korean chili paste)
- Aged kimchi
- Kimchi juice
- Instant ramen noodles (or fresh/dried high-quality ramen noodles)
- Low-sodium chicken or beef broth
- Gochugaru (Korean chili flakes)
- Freshly sliced green onions (scallions)
- Roasted sesame seeds
- Soft-boiled or fried egg
- Additional sesame oil for drizzling
Instructions
- In a medium bowl, combine all your bulgogi marinade ingredients: soy sauce, brown sugar, sesame oil, minced garlic, minced ginger, black pepper, and pear juice. Whisk everything together until the sugar dissolves. Add your thinly sliced beef to the marinade, ensuring every piece is coated. Cover the bowl and refrigerate for at least 30 minutes, or ideally, for 2-4 hours.
- Heat a large non-stick skillet or wok over medium-high heat. Add a tiny bit of cooking oil if necessary. Once hot, add a single layer of marinated beef and cook for 2-3 minutes per side until caramelized and cooked through. Remove the cooked beef to a plate and repeat with the remaining batches.
- In a medium saucepan, pour in your chicken or beef broth. Stir in the kimchi juice, gochujang, gochugaru, and soy sauce. Add about half a cup of prepared kimchi directly into the broth. Bring to a gentle simmer over medium heat for about 5-7 minutes.
- In a separate pot of boiling water, cook your ramen noodles according to the package directions. Drain thoroughly and rinse under cold water if using instant ramen.
- Divide the cooked ramen noodles among serving bowls. Ladle the hot kimchi ramen broth over the noodles, including some cooked kimchi. Top with bulgogi beef and desired toppings: green onions, roasted sesame seeds, and a soft-boiled or fried egg. Serve immediately.
- Prep Time: 30 mins (or up to 4 hours for marinating)
- Cook Time: 20 mins
- Category: Dinner
- Method: Stovetop
- Cuisine: Korean
Nutrition
- Serving Size: 1 bowl
- Calories: 600
- Sugar: 8 g
- Sodium: 1200 mg
- Fat: 25 g
- Saturated Fat: 5 g
- Unsaturated Fat: 15 g
- Trans Fat: 0 g
- Carbohydrates: 70 g
- Fiber: 3 g
- Protein: 30 g
- Cholesterol: 150 mg
Keywords: For a richer broth, use aged kimchi and consider adding a splash of rice vinegar for extra tang. Be careful not to overcrowd the pan when cooking the bulgogi for optimal caramelization.


Leave a Comment