
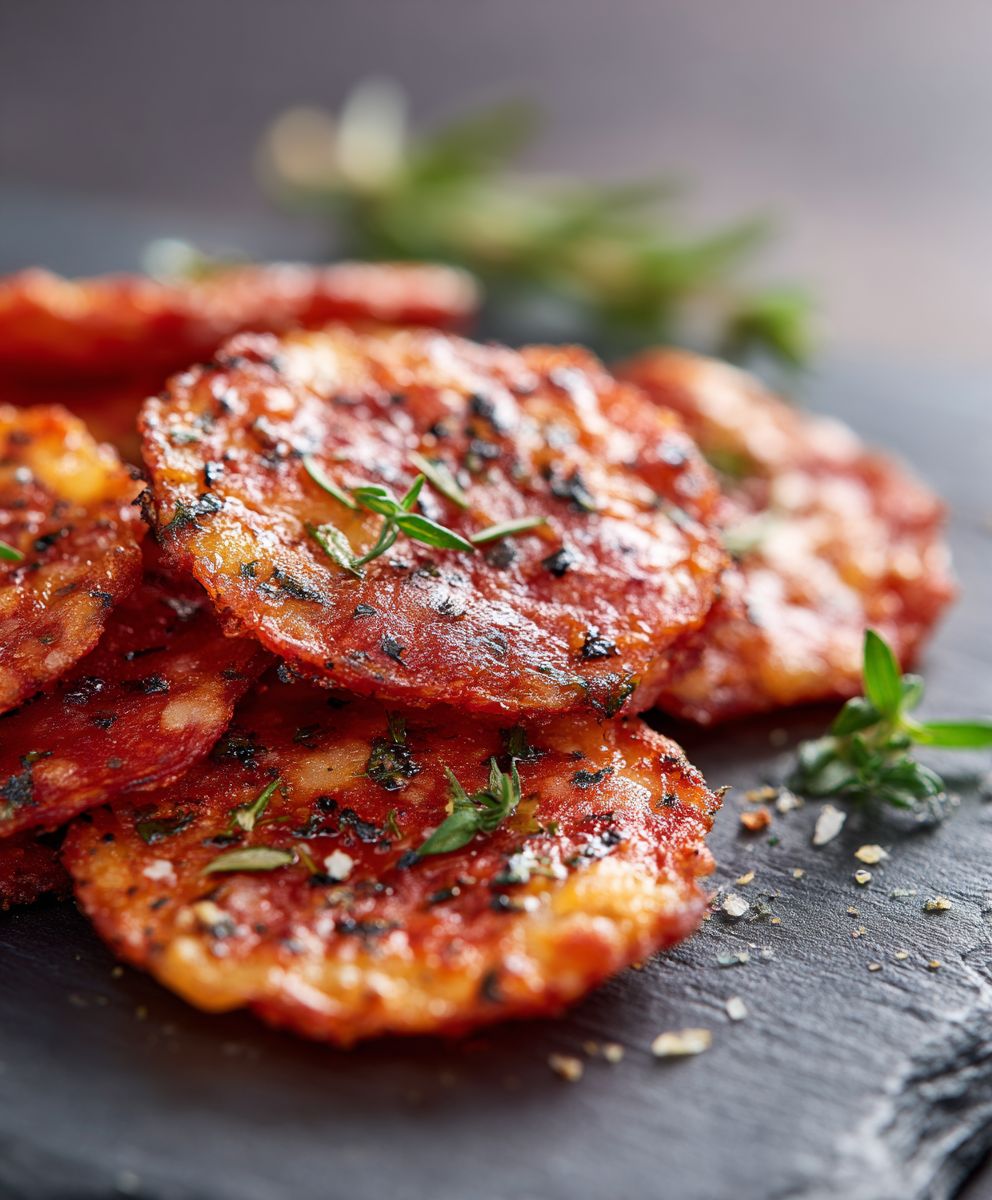
Keto Pepperoni Cheese Crisps: Prepare to have your low-carb world rocked! Imagine a snack that’s unbelievably crispy, bursting with savory pepperoni flavor, and requires practically zero effort to make. Sounds too good to be true? It’s not! These delightful crisps are the answer to your crunchy cravings, and they’re perfectly keto-friendly.
While not steeped in ancient history, the concept of cheese crisps has been around for ages, a testament to our love of baked cheese. But the addition of pepperoni? That’s where the magic happens! It elevates a simple snack to a flavor explosion. Think of it as a personal pizza, deconstructed and made incredibly convenient.
People adore these Keto Pepperoni Cheese Crisps for so many reasons. First, the taste is undeniably addictive – the salty pepperoni perfectly complements the rich, nutty cheese. Second, the texture is pure bliss: a satisfying crunch that will keep you coming back for more. And finally, the convenience factor is off the charts. With just a few ingredients and minimal prep time, you can whip up a batch of these crisps in minutes. Whether you’re looking for a quick afternoon snack, a party appetizer, or a way to satisfy your pizza cravings without the carbs, these crisps are the perfect solution. Get ready to discover your new favorite keto snack!

Ingredients:
- 1 cup shredded mozzarella cheese (low-moisture, part-skim works best)
- 1/2 cup shredded cheddar cheese
- 1/4 cup grated Parmesan cheese
- 1/4 teaspoon garlic powder
- 1/4 teaspoon Italian seasoning
- 1/4 teaspoon red pepper flakes (optional, for a little kick!)
- Approximately 30-40 slices of pepperoni (depending on size)
Preparing the Cheese Mixture:
Okay, let’s get started! The key to these crisps is a good cheese blend that melts beautifully and holds its shape. I’ve found this combination works perfectly, but feel free to experiment with other cheeses you love – just make sure they melt well.
- Combine the cheeses: In a medium-sized bowl, add the shredded mozzarella, cheddar, and Parmesan cheeses. Make sure to break up any clumps of cheese so they are evenly distributed. This will ensure a consistent melt and prevent any burnt spots.
- Add the seasonings: Now, sprinkle in the garlic powder, Italian seasoning, and red pepper flakes (if using). I love the little bit of heat the red pepper flakes add, but you can definitely leave them out if you prefer a milder flavor.
- Mix well: Use a spoon or your hands to thoroughly mix all the ingredients together. Make sure the seasonings are evenly distributed throughout the cheese mixture. This step is important because you want every crisp to have that delicious flavor!
Assembling the Pepperoni Crisps:
This is where the magic happens! We’re going to create little pepperoni and cheese masterpieces that will bake into crispy, cheesy goodness. The arrangement of the pepperoni is key to achieving the perfect crisp, so pay attention to the details.
- Preheat your oven: Preheat your oven to 375°F (190°C). This temperature is ideal for melting the cheese and crisping the pepperoni without burning them.
- Prepare your baking sheet: Line a large baking sheet with parchment paper. Parchment paper is essential because it prevents the crisps from sticking to the pan and makes cleanup a breeze. Don’t skip this step!
- Arrange the pepperoni: Place the pepperoni slices in a single layer on the prepared baking sheet. You can arrange them in circles or rows, but make sure they are slightly overlapping. This overlapping is crucial because as the pepperoni cooks, the fat will render out and help create a crispy base. Aim for about 6-8 pepperoni slices per crisp, depending on their size.
- Top with cheese mixture: Now, take a small spoonful of the cheese mixture and place it on top of each pepperoni arrangement. Gently spread the cheese mixture evenly over the pepperoni, making sure to cover most of the surface. Don’t use too much cheese, or the crisps will be too thick and won’t get as crispy. A thin layer is all you need!
Baking the Crisps:
Time to bake these beauties! Keep a close eye on them while they’re in the oven, as they can go from perfectly golden brown to burnt very quickly. The baking time will vary slightly depending on your oven, so trust your instincts.
- Bake in the preheated oven: Carefully place the baking sheet in the preheated oven and bake for 10-12 minutes, or until the cheese is melted, bubbly, and golden brown, and the pepperoni is crispy around the edges. The pepperoni should be slightly curled and have a nice, deep red color.
- Watch carefully: Keep a close eye on the crisps during the last few minutes of baking to prevent them from burning. If the cheese starts to brown too quickly, you can lower the oven temperature slightly or cover the baking sheet loosely with aluminum foil.
- Remove from the oven: Once the crisps are golden brown and crispy, carefully remove the baking sheet from the oven.
Cooling and Serving:
Patience is key here! Let the crisps cool slightly before removing them from the parchment paper. This will allow them to firm up and prevent them from breaking. Trust me, it’s worth the wait!
- Let them cool: Let the crisps cool on the baking sheet for a few minutes, or until they are firm enough to handle. This will prevent them from falling apart when you try to remove them.
- Remove from parchment paper: Use a spatula to carefully remove the crisps from the parchment paper. If any of the crisps are stuck, gently loosen them with the spatula.
- Serve immediately: Serve the pepperoni cheese crisps immediately while they are still warm and crispy. They are best enjoyed fresh out of the oven!
Tips and Variations:
Want to customize your crisps? Here are a few ideas to get you started:
- Cheese variations: Experiment with different types of cheese, such as provolone, Monterey Jack, or pepper jack. Just make sure they melt well.
- Spice it up: Add a pinch of cayenne pepper or a dash of hot sauce to the cheese mixture for extra heat.
- Add veggies: Sprinkle some finely chopped green onions, bell peppers, or mushrooms on top of the cheese before baking.
- Different meats: Try using salami, prosciutto, or chorizo instead of pepperoni.
- Herb it up: Add fresh herbs like basil, oregano, or thyme to the cheese mixture for a more aromatic flavor.
- Dipping sauces: Serve the crisps with your favorite dipping sauces, such as marinara sauce, ranch dressing, or blue cheese dressing.
Storage Instructions:
While these crisps are best enjoyed fresh, you can store any leftovers in an airtight container at room temperature for up to 2 days. However, keep in mind that they will lose some of their crispness over time. To reheat, you can bake them in a preheated oven at 350°F (175°C) for a few minutes, or until they are warmed through and slightly crispy again. You can also microwave them, but they will become softer and less crispy.
Nutritional Information (Approximate):
Please note that the nutritional information is an estimate and may vary depending on the specific ingredients you use.
- Serving Size: Approximately 3-4 crisps
- Calories: 150-200
- Fat: 12-15g
- Protein: 10-12g
- Carbohydrates: 2-3g
Enjoy your delicious and easy Keto Pepperoni Cheese Crisps! They’re the perfect snack for satisfying your cravings without derailing your diet.
Conclusion:
So, there you have it! These Keto Pepperoni Cheese Crisps are truly a game-changer for anyone following a ketogenic lifestyle, or frankly, anyone who just loves a satisfyingly crunchy and flavorful snack. I know I do! They’re quick, easy, and require minimal ingredients, making them the perfect solution for those moments when cravings strike and you need something delicious fast. But beyond the convenience, it’s the incredible taste and texture that really make these crisps a must-try. The combination of salty pepperoni and sharp cheddar, baked to crispy perfection, is simply irresistible.
Why are these Keto Pepperoni Cheese Crisps a must-try? Because they offer a guilt-free indulgence that perfectly satisfies your cravings without derailing your dietary goals. They’re a fantastic source of healthy fats and protein, keeping you feeling full and energized. Plus, they’re incredibly versatile! Think of them as a blank canvas for your culinary creativity.
Serving Suggestions and Variations:
While these crisps are amazing on their own, there are countless ways to enjoy them. Here are a few of my favorite serving suggestions and variations to get you started:
- Dipping Delights: Serve them with a side of sugar-free marinara sauce, ranch dressing, or even a dollop of guacamole for an extra layer of flavor.
- Crumbled Toppings: Crumble the crisps over salads or soups for a crunchy, savory topping. They add a fantastic texture and flavor boost to any dish.
- Cheese Board Addition: Include them on your next cheese board for a keto-friendly alternative to crackers. They pair perfectly with a variety of cheeses, olives, and nuts.
- Spice It Up: Add a pinch of red pepper flakes or a dash of hot sauce to the cheese before baking for a spicy kick.
- Herb Infusion: Sprinkle some dried Italian herbs or fresh rosemary over the cheese before baking for an aromatic twist.
- Different Cheeses: Experiment with different types of cheese, such as mozzarella, provolone, or even a blend of cheeses, to create your own unique flavor combinations.
- Add Veggies: Finely dice some bell peppers, onions, or jalapenos and sprinkle them over the cheese before baking for added nutrients and flavor.
I’ve even tried adding a thin layer of cream cheese under the cheddar for an extra creamy and decadent treat. The possibilities are truly endless! Don’t be afraid to get creative and experiment with different flavors and ingredients to find your perfect combination.
I truly believe that these Keto Pepperoni Cheese Crisps will become a staple in your keto kitchen. They’re a simple, satisfying, and incredibly versatile snack that you can enjoy anytime, anywhere. They are also a great way to get your kids to eat cheese and pepperoni, and they will love the crispy texture.
So, what are you waiting for? Grab your ingredients, preheat your oven, and get ready to experience the deliciousness of these Keto Pepperoni Cheese Crisps. I’m confident that you’ll love them as much as I do!
And most importantly, I want to hear about your experience! Did you try the recipe? Did you make any variations? What did you think? Share your photos and comments in the comments section below. I can’t wait to see what you create!
Happy snacking!
Keto Pepperoni Cheese Crisps: The Ultimate Low-Carb Snack Recipe
Crispy, cheesy, keto-friendly pepperoni crisps! Easy to make, perfect for satisfying cravings without the carbs.
Ingredients
- 1 cup shredded mozzarella cheese (low-moisture, part-skim works best)
- 1/2 cup shredded cheddar cheese
- 1/4 cup grated Parmesan cheese
- 1/4 teaspoon garlic powder
- 1/4 teaspoon Italian seasoning
- 1/4 teaspoon red pepper flakes (optional, for a little kick!)
- Approximately 30-40 slices of pepperoni (depending on size)
Instructions
- Prepare the Cheese Mixture: In a medium bowl, combine mozzarella, cheddar, and Parmesan cheeses. Break up any clumps. Sprinkle in garlic powder, Italian seasoning, and red pepper flakes (if using). Mix well.
- Assemble the Pepperoni Crisps: Preheat oven to 375°F (190°C). Line a large baking sheet with parchment paper.
- Place pepperoni slices in a single layer on the baking sheet, slightly overlapping. Aim for 6-8 slices per crisp.
- Top each pepperoni arrangement with a small spoonful of the cheese mixture, spreading it evenly. Use a thin layer of cheese.
- Bake the Crisps: Bake in the preheated oven for 10-12 minutes, or until the cheese is melted, bubbly, and golden brown, and the pepperoni is crispy around the edges. Watch carefully to prevent burning.
- Cool and Serve: Remove from the oven and let the crisps cool on the baking sheet for a few minutes, or until they are firm enough to handle.
- Use a spatula to carefully remove the crisps from the parchment paper.
- Serve immediately while warm and crispy.
Notes
- Experiment with different cheeses like provolone, Monterey Jack, or pepper jack.
- Add a pinch of cayenne pepper or hot sauce for extra heat.
- Sprinkle finely chopped green onions, bell peppers, or mushrooms on top before baking.
- Try using salami, prosciutto, or chorizo instead of pepperoni.
- Add fresh herbs like basil, oregano, or thyme to the cheese mixture.
- Serve with marinara sauce, ranch dressing, or blue cheese dressing.
- Store leftovers in an airtight container at room temperature for up to 2 days. Reheat in a 350°F (175°C) oven or microwave.


Leave a Comment