
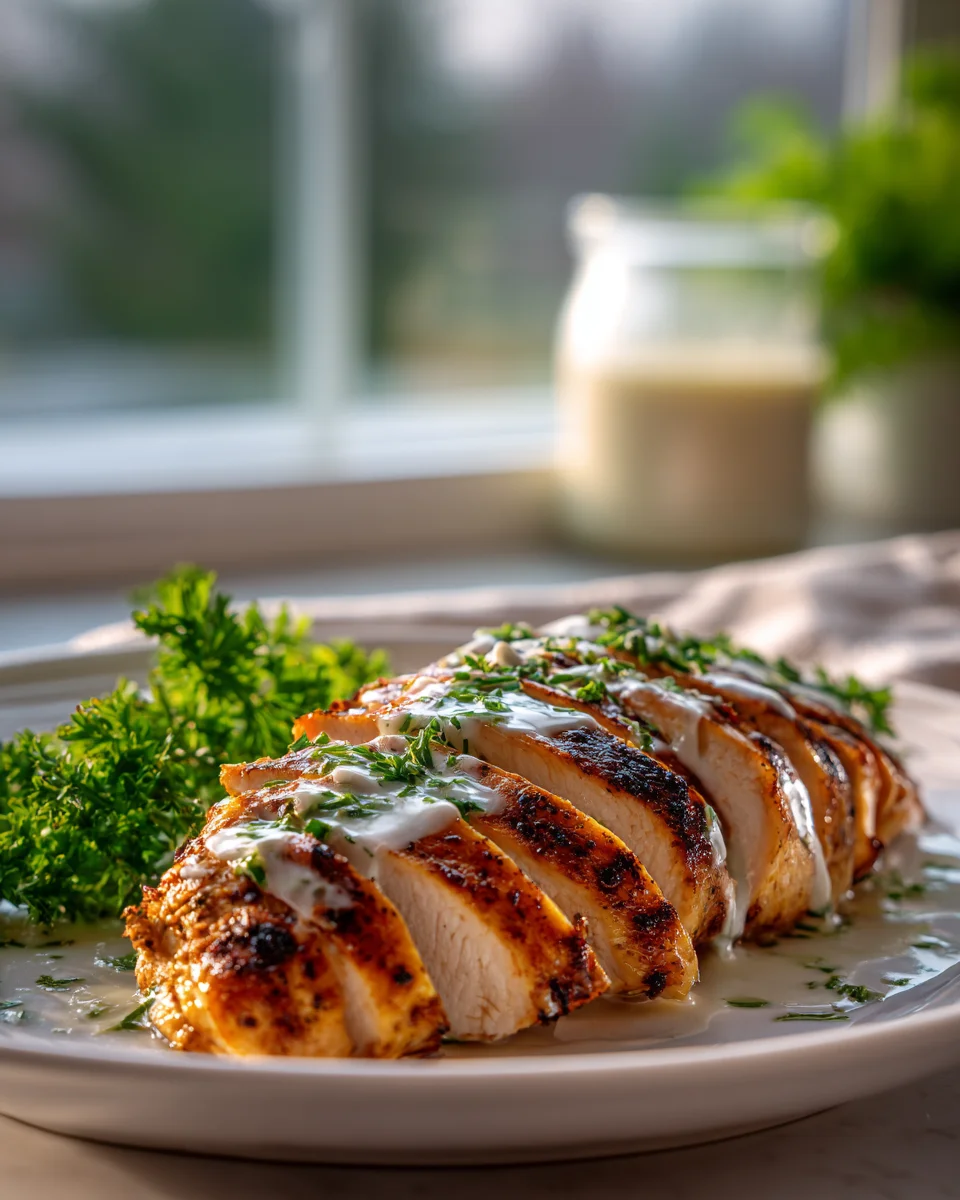
Chicken Breast Recipes That Stay Juicy (3 Simple Tricks) (quick + Easy)
I know, I know. We’ve all been there. You’re excited to cook up some chicken breast, envisioning a tender, juicy main course, only to end up with something that could double as a hockey puck. Dry, bland, disappointing – it’s the most common culinary crime committed against this versatile protein! But what if I told you that achieving perfectly juicy, flavorful chicken breast every single time is not just possible, but also quick and easy, thanks to just three simple tricks? That’s exactly what my Chicken Breast Recipes That Stay Juicy (3 Simple Tricks) (quick + Easy) is all about, and I promise, it’s a game-changer you’re going to absolutely adore.
You’re going to love this because it solves that age-old problem once and for all. This isn’t just one recipe; it’s a foolproof method that you can apply to almost any chicken breast dish, transforming your meals from dry disasters into moist, tender triumphs. I’m going to walk you through my secret trio of techniques that guarantee a succulent result without adding any extra time or fuss to your cooking process. Get ready to enjoy perfectly cooked chicken breast that’s ideal for meal prep, weeknight dinners, or any time you crave a delicious, lean protein that truly tastes amazing. Say goodbye to dry chicken forever!

Ingredient Notes
Creating truly juicy chicken breasts starts with selecting the right ingredients and understanding their role. While the core of this recipe is simple, a few key components make all the difference in achieving that tender, moist result every time. Here’s what I typically reach for:
Fresh Chicken Breasts
- Boneless, Skinless Chicken Breasts: This is our star! I always look for fresh chicken breasts, avoiding any that look discolored or have an off smell. The size can vary, but I often choose medium to large ones, as they allow for easier pounding to even thickness.
For the Brine (Trick #1: Moisture Retention)
- Water: Cold water is essential for creating our simple brine.
- Salt: Kosher salt or sea salt works best for brining. It helps the chicken retain moisture and seasons it from the inside out. Don’t worry, it won’t taste overly salty if done correctly.
- Sugar (Optional but Recommended): A small amount of sugar in the brine aids in browning and can subtly enhance the flavor and tenderness.
For the Marinade/Seasoning (Flavor & Tenderness)
- Olive Oil: A good quality olive oil helps carry flavors into the chicken and contributes to a nice sear.
- Acid (Lemon Juice or Vinegar): A splash of lemon juice, lime juice, or apple cider vinegar not only adds brightness but also helps to tenderize the chicken slightly without “cooking” it like a ceviche.
- Aromatics: Minced garlic and chopped fresh herbs (like thyme, rosemary, or parsley) are my go-to’s for infusing flavor.
- Spices: A blend of your favorite spices – think paprika, onion powder, black pepper, and a pinch of chili powder – can transform the chicken. Keep it simple or get creative!
- Non-Alcoholic Alternatives: If a recipe calls for wine or other alcoholic additions, I easily substitute with chicken broth, vegetable broth, or even a splash of white grape juice for a touch of sweetness.
Substitutions & Variations:
- Chicken Thighs: While this recipe focuses on breasts, these tricks work wonderfully for boneless, skinless chicken thighs too, which are naturally more forgiving.
- Other Proteins: The brining and even-cooking principles can be applied to other lean proteins like fish fillets or even thin-cut beef steaks to help them stay juicy.
- Herb & Spice Blends: Feel free to experiment! Try a smoky BBQ rub, a zesty Italian blend, or an aromatic Indian-inspired mix. The goal is to season well.
Step-by-Step Instructions
Alright, let’s get into how I prepare these incredibly juicy chicken breasts. The beauty of these three tricks is how simple they are to incorporate into your cooking routine, ensuring perfectly tender chicken every time.
Step 1: Prepare the Chicken (The First Two Tricks)
- Trick #1: The Quick Brine (20-30 minutes):
- In a bowl or shallow dish, dissolve 1 tablespoon of salt (and optionally 1 teaspoon of sugar) in 4 cups of cold water.
- Place your chicken breasts into the brine, ensuring they are fully submerged.
- Let them sit at room temperature for 20-30 minutes. This quick brine significantly boosts their moisture content and seasons them internally.
- After brining, remove the chicken from the solution and pat them thoroughly dry with paper towels. This is crucial for a good sear!
- Trick #2: Pound to Even Thickness:
- Place one chicken breast at a time between two pieces of plastic wrap or in a large zip-top bag.
- Using a meat mallet, rolling pin, or even the bottom of a heavy skillet, gently pound the chicken until it’s about ½ to ¾ inch thick and of uniform thickness throughout. This prevents thinner parts from drying out while thicker parts finish cooking.
- Season Your Chicken:
- In a small bowl, whisk together 1-2 tablespoons of olive oil, 1 tablespoon of lemon juice or apple cider vinegar, minced garlic, and your chosen spices (e.g., 1 tsp paprika, ½ tsp onion powder, salt, and pepper).
- Rub this mixture generously over both sides of the pounded chicken breasts. You can cook immediately or let them marinate for another 15-30 minutes for deeper flavor.
Step 2: Cook the Chicken (The Third Trick)
- Trick #3: Cook Hot and Fast, Then Rest:
- Heat a large, heavy-bottomed skillet (cast iron works wonderfully) over medium-high heat. Add a tablespoon of olive oil. You want the pan hot enough so the chicken sizzles immediately when it touches the surface.
- Carefully place the seasoned chicken breasts in the hot skillet, ensuring not to overcrowd the pan (cook in batches if necessary).
- Sear for 3-5 minutes per side, depending on thickness, until deeply golden brown and cooked through. The internal temperature should reach 165°F (74°C). Use an instant-read thermometer to check for accuracy – this is key to avoiding overcooking!
- Alternatively, you can bake them in a preheated oven at 400°F (200°C) for 15-20 minutes, or grill them over medium-high heat for 4-6 minutes per side. No matter the method, monitoring the internal temperature is paramount.
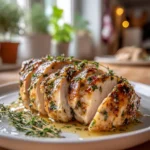
Step 3: Rest Your Chicken
- Once cooked, immediately remove the chicken from the pan and transfer it to a cutting board.
- Tent loosely with foil and let it rest for at least 5-10 minutes before slicing or serving. This allows the juices, which have migrated to the center during cooking, to redistribute throughout the meat, resulting in incredibly juicy chicken.
Tips & Suggestions
Mastering juicy chicken breasts is all about understanding the “why” behind these simple tricks. Here are my top tips and suggestions to ensure your chicken is always tender, flavorful, and never dry:
Embrace the Brine (Trick #1 Deep Dive)
- Why it Works: Brining works through osmosis. The salty water penetrates the chicken meat, causing it to absorb extra moisture. More importantly, the salt denatures the proteins, allowing them to hold onto that moisture better during cooking. Even a quick 20-30 minute brine makes a remarkable difference.
- Don’t Over-Brine: While a quick brine is great, brining for too long (e.g., more than 1-2 hours for thin breasts) can make the chicken too salty or give it a somewhat rubbery texture. Stick to the suggested times for quick brines.
- Flavor Boost: You can add other aromatics like garlic cloves, peppercorns, or bay leaves to your brine for an extra layer of subtle flavor.
Pounding for Perfection (Trick #2 Deep Dive)
- Why it Works: Chicken breasts are naturally thicker at one end and thinner at the other. When you cook them, the thinner parts will always cook faster and dry out by the time the thicker parts are done. Pounding them to an even thickness ensures uniform cooking, so every bite is equally juicy.
- Beyond Juiciness: Pounding also tenderizes the meat by breaking down some of the muscle fibers, making the chicken feel more delicate. It also helps the marinade penetrate more effectively.
- Protective Layer: Always use plastic wrap or a zip-top bag to prevent splattering and for easier cleanup.
The Art of Cooking & Resting (Trick #3 Deep Dive)
- Temperature is Everything: The absolute biggest mistake people make with chicken breasts is overcooking them. Chicken is done when it reaches an internal temperature of 165°F (74°C). I highly recommend investing in an instant-read meat thermometer. Pull the chicken off the heat when it hits 160-162°F, as it will continue to cook a bit while it rests (carryover cooking).
- High Heat, Quick Cook: For pan-searing or grilling, higher heat cooks the exterior quickly, creating a delicious crust, while the interior cooks fast enough to stay juicy. Don’t linger on lower heat, as this can dry out the chicken.
- The Magic of Resting: This step is non-negotiable for juicy results! When meat cooks, the muscle fibers contract, pushing juices to the center. Resting allows these juices to redistribute throughout the meat. If you cut into it immediately, all those precious juices will simply run out onto your cutting board.
- Marinade Variations: Get creative with your marinades! Try Asian-inspired with soy sauce (or tamari), ginger, and sesame oil; Mediterranean with oregano, lemon, and olive oil; or a spicy kick with chili powder and cumin.
- Versatility: These juicy chicken breasts are perfect for meal prep, sliced over salads, tucked into sandwiches, or served as the main protein with your favorite sides like roasted vegetables or rice.
Storage
Once you’ve gone through the effort to make truly juicy chicken breasts, you’ll want to ensure they stay that way, even after storing and reheating. Proper storage and thoughtful reheating are key to maintaining their delicious texture.
Refrigeration
- Cool Completely: Before storing, always allow your cooked chicken breasts to cool down to room temperature. This usually takes about 20-30 minutes. Do not leave them out for more than two hours.
- Airtight Container: Transfer the cooled chicken breasts to an airtight container. This prevents them from drying out and absorbing other odors from your refrigerator.
- Shelf Life: Stored properly, cooked chicken breasts will last in the refrigerator for 3-4 days.
Freezing
- For Longer Storage: If you’ve made a larger batch or want to save some for later, cooked chicken breasts freeze beautifully.
- Individual Portions: I recommend slicing or dicing the chicken before freezing, or freezing individual breasts flat on a baking sheet before transferring them to a freezer-safe bag or container. This makes it easier to grab just what you need.
- Prevent Freezer Burn: Wrap individual pieces tightly in plastic wrap or foil before placing them in a freezer-safe bag or container. This extra layer of protection helps prevent freezer burn, which can dry out and affect the texture of the chicken.
- Shelf Life: Frozen cooked chicken can be stored for 2-3 months. Beyond that, it’s still safe to eat but might start to lose some quality.
Reheating Tips for Maximum Juiciness
Reheating can be a death sentence for chicken breast if not done carefully. The goal is to warm it through without cooking it further and drying it out.
- Low and Slow in the Oven: This is my preferred method for whole or larger pieces. Preheat your oven to 300-325°F (150-160°C). Place the chicken in an oven-safe dish with a splash of chicken broth or water to create some steam. Cover tightly with foil and heat for 15-20 minutes, or until warmed through.
- Stovetop with Moisture: For sliced or diced chicken, heat a skillet over medium-low heat. Add a tiny bit of olive oil or chicken broth. Add the chicken and cover the pan, stirring occasionally, until just warmed through. Be gentle and avoid high heat.
- Microwave (Use with Caution): If you must use a microwave, do so in short bursts (30 seconds at a time) on a lower power setting. Cover the chicken with a damp paper towel to help retain moisture. Overheating in the microwave is the quickest way to dry out your chicken.
- Avoid Overheating: Remember, the chicken is already cooked! You just want to warm it up to a safe eating temperature, not cook it again.
Final Thoughts
Well, there you have it! I’m genuinely thrilled for you to discover the magic behind truly succulent chicken. No more settling for dry, uninspired meals – with Chicken Breast Recipes That Stay Juicy (3 Simple Tricks) (quick + Easy), you’re armed with the secrets to consistently tender, flavorful results. These three simple tricks are an absolute game-changer, making this recipe a must-try for anyone who believes chicken breast can and should be delicious, every single time. I promise you’ll be amazed at how quick and easy it is to achieve such incredible juiciness. Get ready to enjoy chicken breast like never before!
Juicy Chicken Breast Recipes: Quick & Easy Tricks
- Total Time: 13 minute
- Yield: 4 servings
Description
Discover the secrets to perfectly juicy chicken breasts with these three simple tricks. Transform your meals from dry disasters into moist, tender triumphs effortlessly!
Ingredients
- Boneless, Skinless Chicken Breasts
- Water
- Salt
- Sugar (Optional but Recommended)
- Olive Oil
- Acid (Lemon Juice or Vinegar)
- Minced Garlic
- Chopped Fresh Herbs (like thyme, rosemary, or parsley)
- Spices (e.g., paprika, onion powder, black pepper, chili powder)
- Non-Alcoholic Alternatives (chicken broth, vegetable broth, or white grape juice)
Instructions
- Step 1: Prepare the Chicken (The First Two Tricks)
- Trick #1: The Quick Brine (20-30 minutes):
- In a bowl or shallow dish, dissolve 1 tablespoon of salt (and optionally 1 teaspoon of sugar) in 4 cups of cold water.
- Place your chicken breasts into the brine, ensuring they are fully submerged.
- Let them sit at room temperature for 20-30 minutes.
- After brining, remove the chicken from the solution and pat them thoroughly dry with paper towels.
- Trick #2: Pound to Even Thickness:
- Place one chicken breast at a time between two pieces of plastic wrap or in a large zip-top bag.
- Using a meat mallet, rolling pin, or the bottom of a heavy skillet, gently pound the chicken until it’s about ½ to ¾ inch thick.
- Season Your Chicken:
- In a small bowl, whisk together 1-2 tablespoons of olive oil, 1 tablespoon of lemon juice or apple cider vinegar, minced garlic, and your chosen spices.
- Rub this mixture generously over both sides of the pounded chicken breasts.
- Step 2: Cook the Chicken (The Third Trick)
- Trick #3: Cook Hot and Fast, Then Rest:
- Heat a large, heavy-bottomed skillet over medium-high heat. Add a tablespoon of olive oil.
- Carefully place the seasoned chicken breasts in the hot skillet, ensuring not to overcrowd the pan.
- Sear for 3-5 minutes per side until deeply golden brown and cooked through.
- Alternatively, bake them in a preheated oven at 400°F (200°C) for 15-20 minutes, or grill them over medium-high heat for 4-6 minutes per side.
- Step 3: Rest Your Chicken:
- Once cooked, immediately remove the chicken from the pan and transfer it to a cutting board.
- Tent loosely with foil and let it rest for at least 5-10 minutes before slicing or serving.
- Prep Time: 30 mins
- Cook Time: 15-20 mins
- Category: Dinner
- Method: Pan-searing or Baking
- Cuisine: American
Nutrition
- Serving Size: 1 chicken breast
- Calories: 200
- Sugar: 1 g
- Sodium: 600 mg
- Fat: 8 g
- Saturated Fat: 1 g
- Unsaturated Fat: 7 g
- Trans Fat: 0 g
- Carbohydrates: 1 g
- Fiber: 0 g
- Protein: 30 g
- Cholesterol: 80 mg
Keywords: Feel free to experiment with marinades and spices. Always use an instant-read thermometer to ensure chicken reaches an internal temperature of 165°F (74°C) for perfect juiciness.

Leave a Comment